Such a busy week
I have been so busy this past week, I haven’t had a chance to pop in and show you anything. Myself, Sarah and Shirley are going to Caboolture markets this Sunday (15th November). We have all been busy making lots of stocking fillers, teacher gifts and fun treats to sell on the day. We would love you to pop in and have a look. We start early at 6am and finish at 11.30am. I hope to catch up with you there.
Also I need to remind everyone that the Spring Mini finishes at the end of this month. So if you love anything in that catalogue you need to get in and purchase it before the 30th.
Just before I dash off, don’t forget the great special on until the 14th December. Purchase $85.00 worth of product from the gift giving guide and receive either a Scallop Square Punch or a Boho Blossoms Punch (regularly $30.95) absolutely FREE. So just contact me if you need anything at all.
I promise to be back with photos of what I have been making and also, hopefully, a “sneak peak” at some of the fantastic new product in the Summer Mini which commences on the 1st December.
Christmas is coming
I can’t believe it’s almost Christmas already. Something like six weeks to go. I hope you are a bit more organised than me. I still have a few presents to buy, lots of cards unfinished and decorations to make.

So to help us out with the gift giving, Stampin’ Up! has released a fantastic promotion. From 1st November through to 14th December, purchase $85.00 worth of product from their gift giving guide and you will not only have a fantastic gift for a lucky family member or friend, but you will also receive a Scallop Square Punch which normally costs $30.95 absolutely FREE. To find out more please visit my Stampin’ Up! website and visit the promotions page. You can download a copy of the flyer and take your time to make your selections. Please contact me k.mcintosh1@optusnet.com.au to place your order.
Happy Birthday Jae
My youngest granddaughter turned one yesterday. We had a lovely morning at the park. The children all had a great time eating cake, playing on the equipment and digging in the sand
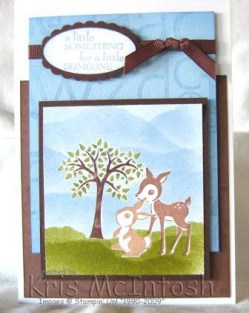
I made this card for Jae using the Forest Friends stampset from the spring mini and Best Yet stampset which is a Level 1 Hostess set. I also used the Nursery Letters Jumbo wheel.
I rolled the Close to Cocoa card with the Nursery Letters wheel using Close to Coco Ink and sponged the edges using the same ink. The Bashful Blue card was rolled with the same wheel using Bashful Blue ink and sponged with the same ink.
For the image panel, firstly I inked the tree image using my Chocolate Chip and Old Olive Markers and stamped it onto the Whisper White cardstock. Then I stamped onto a post-it note and cut it out and masked the tree. I stamped the bunny in Creamy Caramel ink also on the Whisper White cardstock and then again on a post-it note, cut it out and masked the bunny. I stamped “bambi” in Close to Cocoa ink partially over the bunny. I also stamped it on a post-it note, cut it out and then masked the image. To create the sky and the ground I tore a post-it note so that it had a wavy edge. I layed the torn post-it note onto the card and sponged along the edge using Bashful Blue ink for the sky and Old Olive ink for the ground. By moving the post-it note around I was able to cover both areas and create a lovely background. When the sponging was done I removed the masks from the images.
To assemble I adhered the image piece to Chocolate Chip cardstock. The Close to Cocoa piece was attached to the Whisper White base card, the Bashful Blue piece was wrapped with Chocolate Chip 1/4″ grosgrain ribbon and then attached over the Close to Cocoa cardstock using dimensionals. The greeting was stamped using Bashful Blue ink on Whisper White Cardstock and punched out using the Large Oval Punch and this was attached to a Chocolate Chip Scallop Oval and attached over the ribbon using dimensionals. The image piece was also attached using dimensionals. I love the way this card turned out.
The Spring Mini Catalogue ends on the 30th November and there is no guarantee that we will see anything from this catalogue again so if you love the Scallop Oval Punch and also this beautiful Forest Friends stampset (which by the way is fantastic value at only $24.95 for 4 stamps), you need to hurry and order.
If you would like to learn this technique why not contact me(k.mcintosh1@optusnet.com.au).
Stampin’ Up! Web Page
Well something very exciting has happened. Stampin’ Up! is hosting a site for Demonstrators to promote their business. This site will always be updated with current information about specials and upcoming events in the world of Stampin’ Up!. I will also be able to send newsletters and e-cards keeping you informed in a much more timely manner. Pop on over and have a look.
 I will have some projects loaded on the new site but if you want to keep up to date with what I am doing then you will still need to visit this site. This will be where most of my projects will be on show and although my classes are listed on the new site, if you want more details you will need to come back here and have a look.
A new fold
Last week the newsletter from Splitcoast Stampers posted a link to make an easel card. So I thought that I would try it out and because I still need to make about 20 Christmas cards, this is what I came up with.

I love the look of monochromatic cards and I don’t think you can beat our Real Red for Christmas. I used the snowflake images from the Snow Swirled stampset and randomly stamped over the Whisper White Cardstock using Real Red ink. I added one Rhinestone brad and two silver brads to the centres of the large snowflakes and wrapped the piece with Real Red Grosgrain Ribbon. This was then sponged around the edges with Real Red ink and attached to a piece of Real Red Cardstock and lastly added to a piece of Whisper White Cardstock.
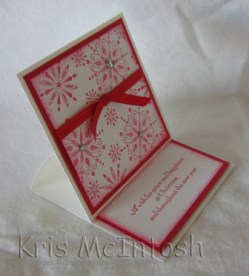
The greeting is from the stampset A Wish for Peace and was stamped in Real Red ink onto Whisper White card. The edges were sponged using the same colour and then it was attached to a piece of Real Red Card. This whole piece was then attached using dimensionals, so that the image piece would catch behind it to create the easel.
I love the way this card turned out and although I followed the instructions and made it 4″ x 4″, it will be easy to convert to other sizes. It also folds flat to fit into a standard size envelope, so no extra postage. If you would like to make one of these cards the template was shared by Penny Wessenauer here. I hope this inspires you to try this fun fold card.
Happy Birthday Shirley
My fellow Stampin’ Up! demonstrator Shirley, who also happens to be a member of my team, celebrated her birthday yesterday.

I wanted to give her a small gift to celebrate and this is what I decided on. I made her a bag-a-lope with covers. These are so simple to make as the bag is actually an envelope, so you can make any size bag depending on what size envelope you start with. I used A Rose is a Rose stampset because I know it is a favourite of Shirley’s. The colours were taken from the Bella Bleu Designer Series Paper – Very Vanilla, Kraft and Night of Navy. I also made her a punch pal so that she and her customers can see exactly what size the shape is that is punched out by each of the Stampin’ Up! punches. Of course, no gift would be complete without a little chocolate.

The matching card is a double slider and a tutorial for this card can be found on Makeesha Byl’s website. The instructions were easy to follow and I just love how it turned out. I will be making more of these in the future I am sure. I used the same designer series paper and colours as the little bag. The greeting is from On Your Birthday. The two sections at the top just slide back inside and so the message is slightly “secret” (something my grandchildren will love).
Well I must close now but before I do please note that I have a link to my daughter Sarah’s brand new blog. She is amazingly talented so please have a look at her site.
Workshop Fun
Yesterday I had five lovely ladies come to my home to make a Carousel Notes Purse. I found the tutorial for this on Jan Tink’s website. Jan’s site is fantastic, not only does she share some wonderful tutorials and some absolutely GOJUS (her words) cards. She is also funny and an absolute Chocoholic. Anyway I wanted to post a couple of photos and by the time I got my camera out Shirley had gone home and by the time I photographed the actual purses everyone made, Trisha had also gone home.
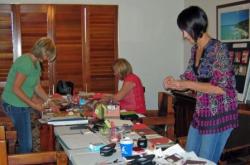
This first shot shows the girls in full swing. Concentrating on how they will decorate their purses. I pushed my dining room table up against the window and added a trestle table to give the girls some extra room.
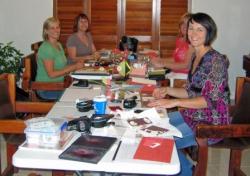
Not a great shot thanks to my poor photography (you can almost see Trisha) but these are four of my lovely ladies – Michelle, Karen, Trisha and Angela. Unfortunately Shirley had already gone home to prepare for an evening out to celebrate her birthday.

And here are Michelle’s, Karen’s and Angela’s finished puses. They were all done with a Christmas theme. The purse opens to reveal three sections for photos and journalling and two pockets with a pull out for extra photos and journalling. Now all they have to do is add the photos and this year’s Christmas scrapping is all taken care of.
If you think this looks like fun, then come along and join us for one of our workshops – just check out the Classes and Workshops page to see what’s coming up. Or contact me to arrange to have one of these workshops in your own home.
Baby Shower
Last weekend Sarah and I attended a baby shower for her friend Sandy. I wasn’t quite sure what to get her so decided to make a few scrapbook pages. You know what new Mum’s are like, they get lots and lots of photos of their gorgeous new baby and then find they don’t have any time to actually scrap them. She hasn’t indicated the sex of the baby so I went with something a bit neutral, So Saffron, Certainly Celery and a little Chocolate Chip.
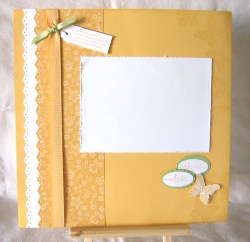
This one is a case of the one on page 4 of the Spring Mini. I just changed the colours and designer paper.
I am happy with the way it turned out.

This page is a layout I have used before. It is a page map from Becky Fleck.
Sandy can put her photos down the So Saffron Strip – as many as will fit.

This page has room for a title on the top left So Saffron Section. The Certainly Celery section on the right will hold a few photos and the Chocolate Chip Section above the White will also take a 4 x 6″ photo.
The Whisper White piece is attached with Dotto and can be removed to run through the printer to add some journalling.

This last page is a case of the one on page 30 of the current Idea Book and Catalogue.
I thought with Christmas being so close that a page for the baby’s first Christmas would be appropriate. Sandy can always add her jounalling in strips on the bottom right hand side.
Now I am not a great scrapbooker but by using the current catalogues and scrap maps from other sources, it is not too hard to create beautiful pages to preserve your memories.
October Specials
Yes specials. This month we have two specials. The first one is for the month of October only.

Order either Flower Power Card Elements or Rock Star Card Elements for $30.95 and you can purchase either of the co-ordinating stamp sets for a 20% discount. So Wow Flowers or Starring You can be purchased for $19.96 instead of the usual $24.95. This is a fantastic saving but remember this offer ends on the 31st October.
 The second offer runs from 1 October through until 31st December. For every new recruit that signs up during this period Stampin’ Up! will donate $5.00 to the National Breast Cancer Foundation (Australia) or The New Zealand Breast Cancer Foundation. When you sign up Stampin’ Up! will also include a pack of Raspberry Tart Designer Series Paper and a Pretty in Pink Ink Pad at no extra cost. This is $28.95 worth of FREE product if you sign up during this time.
I love being a Stampin’ Up! demonstrator. I love the discount first of all but I love all the people that you meet and Stampin’ Up! Demonstrators are the nicest, most sharing crafters. Stampin’ Up! is a fantastic company to work for and they are always offering us incentives to do well in our business. So if you have been thinking about getting the best “job” in the world, then now would be a good time to take the plunge and join.
Please contact me at k.mcintosh1@optusnet.com.au so that we can discuss this excellent promotion in more detail.
Another Thank You

Recently we had a visit from my Mum and Dad and my Dad’s cousin Joan and her husband Gordon. Joan is a crafty lady and when she went home she sent me this lovely card. The colours are Amethyst and Celery and she has used the Merci stampset which was a Sale-A-Bration set a couple of years ago. I love this card.