Christmas Stamp-A-Stack
On Friday night we held our first Christmas Stamp-A-Stack with 8 lovely ladies. We had a great time and everyone seemed to just whiz though the cards so we all had time to sit and have a cuppa and a chat (which I love).

This is one of the cards we made with a layout I found on Marelle Taylors website. She even included the cutting dimensions which made my job so much easier – isn’t she a treasure.
Anyway I have used Bordering Blue card for my base and stamped the swirl image from Spotlight on Christmas using Bordering Blue ink. I stamped “Peace, Love, Joy” from the Occasional Greetings set using Night of Navy ink. The star image is also from Spotlight on Christmas and I have stamped it in Night of Navy ink also. The edges of this piece and the Night of Navy card it is layered onto were distressed using the distresser from the Cutter Kit. The joy image is also from Spotlight on Christmas and I have stamped it in Night of Navy ink onto Whisper White card and punched it out with the 1 1/4″ punch. I also punched out a 1 3/8″ circle in Night of Navy card and attached them together. They are mounted using dimensionals. The fabulous thing about the Spotlight on Christmas stampset is that all the images can be punched out using Stampin’ Up! punches which makes it so easy to get lots of dimension onto your cards.
 I love using Bordering Blue and Night of Navy card together for Christmas and we used them on another card on Friday night.
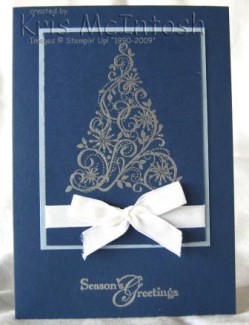
This card is so simple. The image and greeting are from the Snow Swirled stampset and have been stamped in Versamark and embossed with silver embossing powder. The bow is tied with White Taffeta ribbon.
In real life it is just beautiful.
If you would like me to show you and your friends how to make these cards just email me k.mcintosh1@optusnet.com.au and we can work out the details.
Happy New Home
My daughter Sarah has just moved into a brand new home and I wanted to make a card for her and her family.
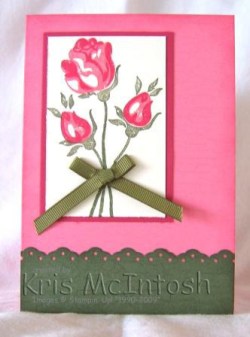
This is what I came up with. I stamped the Regal Rose Card with the Weathered Background using Versamark Ink and sponged the edges with Regal Rose ink. I also stamped the Always Artichoke Card with the Weathered Background and used the Eyelet Edge Punch on the top edge. I stamped the Roses from A Rose is a Rose using Regal Rose, Rose Red and Always Artichoke Ink. I extended the stems and tied a piece of Always Artichoke grosgrain ribbon in a bow and attached using a mini glue dot. The image piece was mounted onto a piece of Rose Red Card and adhered to the left hand side of the card. This a fairly simple card but I am rather pleased with the way it turned out.
A Christmas Card
I was watching the news last week and they said it was only 100 days to go till Christmas. I found the thought of Christmas being that close a little scary. So perhaps its just as well that I have started making a few Christmas cards. Before I came to live in sunny Queensland I lived in Pottsville, NSW, and my Mum and Dad still do (hi), so occasionally when I get back there I get together with my customers and we make a few cards.
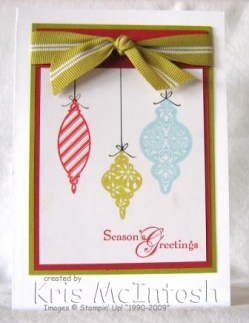
This is one of the cards we made a few weeks ago.
The baubles from Tree Trimmings were stamped in Riding Hood Red, Kiwi Kiss and Baja Breeze Ink onto Glossy cardstock. The greeting is from the Snow Swirled stampset and was stamped in Riding Hood Red ink. The strings were stamped in basic black. The glossy card slips inside the Riding Hood Red Card which is folded over the top. This piece was then attached to Kiwi Kiss Card and the Kiwi Kiss striped grosgrain ribbon tied around it. The whole thing is then attached to a Whisper White card. This is a very simple card but I think it is quite elegant.
A Sad Time
Last week I had to send a card to my niece as her grandfather had passed away. As you know these are not my favourite cards to make and I never seem to have anything suitable on hand. So for inspiration I went looking at the examples on the Demonstrator Page of the Stampin’ Up Website and as usual I was able to find something to inspire me.

I used the colours that were suggested but changed the stampset and the greeting.
I inked the image from Thoughts and Prayers using my Bordering Blue and Old Olive Markers. I stamped this onto Whisper White card. Next I layered the image onto a piece of Bordering Blue Cardstock. The next layer is Kraft card and this is torn down the left hand side and then a row of paper piercing is added. Lastly I punched an Old Olive photo corner using the Photo Corner Punch. The whole piece was then attached to the Very Vanilla card. The words (also from Thoughts and Prayers) were stamped using Old Olive ink.
If you would like to be able to access the Demonstrator Website – contact me (k.mcintosh1@optusnet.com.au) and we can discuss how you can get all the benefits of being a Stampin’ Up! Demonstrator.
Faux Silk Class
Today Sarah and I are hosting a class teaching a technique called Faux Silk. We have some lovely ladies coming and I hope they enjoy themselves.

This is one of the cards we will be making today. This is a technique that Stephanie taught us at retreat and this card is a case of the sample we made there. Check out Steph’s website to see some other fabulous ideas.
This card uses the Great Friend stampset from the Stampin’ Up! current mini catalogue. My base card is Basic Gray and I have stamped the butterfly from this set randomly on the right hand side in Basic Gray ink. The Cameo Coral piece has been punched down the right hand side with the Eyelet Edge punch. To make the main piece, firstly I have stamped the leaf image in Cameo Coral Ink and Basic Gray ink onto some tissue paper. I have crumpled this tissue and then adhered it to a piece of Whisper White card. I then trimmed the extra tissue paper away. I attached this piece to the Cameo Coral card and wrapped it with Basic Gray Taffeta Ribbon. Once this piece was adhered to the left hand side of the card, I stamped the butterfly in Cameo Coral Ink onto some scrap Whisper White card and cut it out. I then attached it with dimensionals over the stamped butterflies. Thanks Stephanie for the inspiration for this card and for teaching us this great technique.
If you would like to learn this fantastic technique please do not hesitate to contact me on k.mcintosh1@optusnet.com.au.
There’s more than one way to use a punch
When I was surfing the net recently I found a card made by someone, somewhere (can’t find it again) with a link to a You Tube video to make this fabulous punch art owl.
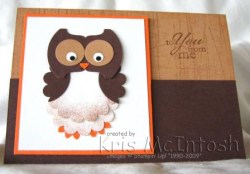
As soon as I saw it I knew I would have to make a card using it. My husband and I recently took our grandson Ethan away for a few days and he was such a good boy I wanted to make him a card telling him so.
He loved it and so do I. If you would like to make one then please visit the video or visit her website.
I have used Creamy Caramel, Chocolate Chip and Pumpkin Pie Cardstock to make the card. I have stamped the Creamy Caramel with the Sanded Background using Creamy Caramel ink. The greeting is from the Hostess Set “Best Yet”, one of my favourite greeting sets.
Updated For Sale Page
Just a quick post to let you know that I have updated my For Sale page. My downline held a very successful “open house” last weekend and sold a large number of sets for me. I have discounted the prices again – so if you are after a bargain, please have a look and contact me if you would like to purchase any of these sets. My cupboard space (and my husband) will thank you.
Christmas Tri-Shutter
I had a lovely class last weekend where we made four cards using different folds. This is the tri-shutter card which we made.
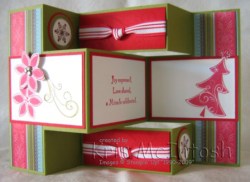
We used Ski-Slope Designer Series Paper from the current mini catalogue. The base card was Old Olive and the main panels Whisper White mounted onto Real Red. The ribbon is Real Red 5/8″ grosgrain. The stampset is Season of Joy and the words are from Many Merry Messages. Inks used are Real Red, Old Olive and Chocolate Chip. We had a great time putting all the pieces together and everyone loved the way the card turned out. If you haven’t made one of these yet – you really should try. There is an excellent tutorial on Splitcoast Stampers here by Bonnie Szwalkiewicz. Get crafting and make one of these beautiful cards.
A beautiful thankyou
I was lucky enough to have a catchup morning with a group of other Stampin’ Up! demonstrators who all live in the same area where I live. We met at our local coffee shop and had lots of fun getting to know each other. While there my lovely downline Shirley gave me a beautiful card to thank me for loaning her a stampset and some cardstock for her workshop.
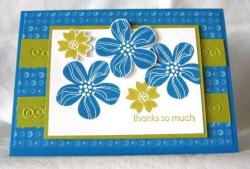
Shirley does lovely work and this card is no exception. She has used the Good Morning Sunshine Designer Series Paper, Kiwi Kiss and Pacific Point Cardstock and the beautiful stampset Eastern Blooms. She has just started her own blog so please check out her other work here.
I also want to share with you some beautiful work done by my lovely granddaughter Abigail. Abi is 4 1/2 and loves to stamp. Last week while she was spending some time with me she decided to make a card and decided that it should be just like one I had just made.
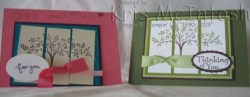
She picked the colours around a piece of ribbon from my offcut stash. The tree from Thoughts and Prayers was stamped and then I cut it into pieces for her. She glued everything down using snail and then found the wide oval cutout also in my offcut stash and stamped the for you. After she had finished stamping she decided to do some writing to give the card to her Mum. I think I just may have another budding Stampin’ Up! demonstrator on my hands. I wonder how old you have to be?
OBE
One of the members of a group that my husband and I belong to is turning eighty and I volunteered to make the card to be presented with his OBE (over b…. eighty) award. I have drawn inspiration from this card which I found on Splitcoast Stampers. I love the colours – Very Vanilla and Night of Navy.

I first stamped the Sanded Background onto Very Vanilla card using Night of Navy Ink. Then over that I stamped the “cog” image from the Sense of Time stampset which is a new set in the Spring Mini catalogue. Then over that I stamped the large “clock” image from the same set firstly stamping off twice onto scrap paper. I then sponged the edges with the same ink. The ship image is from the Seaworthy stampset and this has been stamped in Night of Navy ink onto Very Vanilla Card. The edges were sponged with the same ink and then it was attached to Night of Navy card. This was then attached to the larger stamped piece and wraped with twine. The whole thing was then attached to the Night of Navy base cardstock.
I am quite pleased with this card and hope that John likes it too.