Spring Mini Out Now
Well the Spring Mini catalogue is released today and what a fantastic catalogue it is. Beautiful new stampsets with co-ordinating papers and rub-ons. A great new scallop oval punch. Now you can nest the small oval and large oval into the new scallop oval and they have even released a stampset Oval All which fits the new punch.
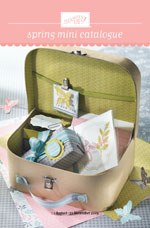
You can view the new catalogue online here.
If you would like one of these catalogues or if you would like to order any product from this catalogue please contact me k.mcintosh1@optusnet.com.
Just to whet your appetite I made this card at retreat using the new Forest Friends and Oval All stampsets.
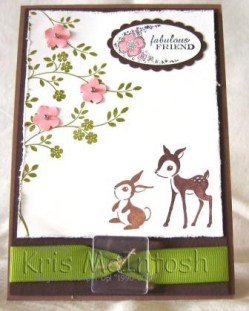
I have stamped the branch image from Thoughts and Prayers on the left hand side of the Whisper White card with Old Olive ink three times. I punched out three flowers in Pretty in Pink using the Trio Punch. I used crystal effects to adhere the seed beeds from the Pretties Kit and attached them over the branches. I stamped the “Bambi” image using Chocolate Chip ink in the bottom right hand corner and the “Thumper” image in Close to Cocoa. Both these images are from the Forest Friends stampset. I stamped “fabulous friend” from the new Oval All stampset in Basic Black ink and coloured the flowers with a Pretty in Pink marker. I punched this image out using the large oval and mounted it onto Chocolate Chip card punched out using the new scallop oval punch and attached it to the top right hand corner. I distressed the edges of the Whisper White card and attached it to a piece of Chocolate Chip card using dimensionals. I wrapped the bottom of the Chocolate Chip card with wide Old Olive grosgrain ribbon and tied a square clear button on using linen thread. This whole piece was then attached to a Close to Cocoa base card. Don’t you just love these gorgeous little animals. This card is a case of one that I saw on Splitcoast stampers here.
My granddaughter Abi just loves this card and she just might receive it next time she helps out her Nana.
Retreat Challenges
When we arrived at retreat we were each given a gift bag filled with goodies. There were also three challenges which you could participate in if you wished.
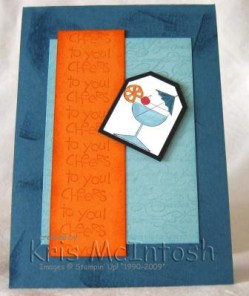
The first challenge was a sketch challenge. The cardstock was provided. I decided to randomly swipe the Night of Navy base cardstock with a Night of Navy ink pad. The Baja Breeze piece I stamped with En Francais using Baja Breeze ink and then sponging the edges with the same ink. The Pumpkin Pie piece I stamped with the greeting from Cheers to You in Pumpkin Pie ink and then sponged the edges with the same ink. I stamped the Martini glass from the Cheers to You set and coloured in using Baja Breeze, Night of Navy, Pumpkin Pie and a Ruby Red Cherry. I punched this piece out with the small tag and then mounted it onto a piece of Basic Black which I had punched out using the Tag punch. I used dimensionals to attach the tag to the card.

The next challenge was a “mystery” challenge. Everyone’s pack contained something different and we had to come up with whatever we wished. You had to use all the pieces in some way, a punch and you could add ribbon if you wished. I used a favourite layout of mine and stamped the branch from Thoughts and Prayers using Regal Rose and Always Artichoke markers. I used a greeting from Short and Sweet, punching out with the small oval and mounting on a Regal Rose large oval. I punched the So Saffron strip with the Eyelet Edge and added the Always Artichoke Ribbon. The Brocade Blue base cardstock has been stamped with the Weathered Background using Brocade Blue ink. All in all not too bad.
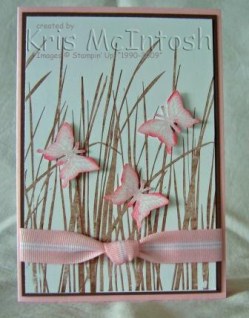
The next challenge was all about pink. We were given a piece of Pink Pirouette cardstock to use as our base and a piece of Pink Pirouette stripped grosgrain ribbon. I decided to use the grass from Inspired by Nature which I stamped in Close to Cocoa on Whisper White card. I mounted this to a piece of Close to Cocoa card, wrapped it with the ribbon and attached it the Pink Pirouette card. I stamped the butterfly image from Dreams Du Jour three times onto Whisper White card using Pink Pirouette ink and then cut them out. I sponged the edges of the butterflies with Regal Rose ink and attached them to the card using dimensionals under the wings and snail down the body of the butterfly. For this one I got an “honourable mention” and I was thrilled to bits.
Back Home
Well I am home after an absolutely FABULOUS weekend. We were spoiled and looked after from the moment we arrived. Stephanie, Nicki and Vicki along with a few extra helpers do an amazing job. We were provided with a “little” bag of goodies when we arrived, which contained lots to nibble on while we are creating, a bottle of water and also 3 different challenges and 3 3D items to make.
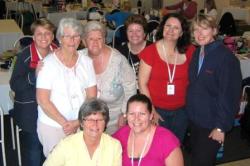
This is a photo of the group from our table.
Back Row – Ann, Myra, Nan, Judy, Helen and Robyn.
Front Row – Myself and Sarah.
A big thank you to these lovely ladies who made the weekend such fun.

This is my dining room table loaded with all the things I made over the weekend. Some of these were made at classes I attended, some were challenges and others inspired by all the talent that surrounded me.
I will endeavour to post some of these things individually in coming posts.
Hi Ho, Hi Ho, it’s off to retreat I go
I am so excited, today I am travelling to Coolangatta to stay at the Greenmount Resort. I am attending a stamping retreat organised by my lovely upline Stephanie Pike, along with Nicki Tidbold and Vicki Dean. I attended this retreat last year and had a fantastic time. These ladies do an awesome job. Classes are always fantastic. Food is great. Accommodation terrific. This year I am going with my Mum (who came last year) and my daughter Sarah (also a Stampin’ Up! demonstrator). Retreat starts at 4pm today and ends 5pm Sunday. WooHoo. When I come back I will show you what I managed to get done.
Anyway before I go I thought I would share a card a demonstrated recently at a workshop for the lovely Jo-Anne and her family and friends.
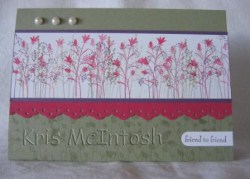
I have used Mellow Moss for my base card and stamped along the bottom edge with one of the images from Pocket Silhouettes also in Mellow Moss Ink. I stamped on a piece of Whisper White card firstly with another image from Pocket Silhouettes in Mellow Moss ink, then another image in Elegant Eggplant ink and then another image in Rose Red ink. This stamped piece was layered onto a piece of Elegant Eggplant card. The Rose Red card is puched using the new Eyelet Punch (Did I mention I looove it?) and then the stamped piece is layered on the top. The whole piece was then layered on to the Mellow Moss Card. Three half pearls from the Pretties Kit were added to the top left hand corner using Mini Glue Dots. The “friend to friend” stamp is also part of the Pocket Silhouettes stampset and was stamped in Elegant Eggplant ink onto Whisper White card. I punched it out with the word window punch, attached it to the bottom right hand corner and trimmed off the overhang so that I got a straight edge.
This is a very simple card but a very pretty one and such an easy technique to use. The ladies loved it and so do I.
If you would like to know more about having me come to your home to demonstrate a card such as this to you and your friends then please contact me k.mcintosh1@optusnet.com.
A Special Blessing
My youngest granddaughter Jae was christened recently and this is the card I made her.

I stamped the beautiful floral cross from the Special Blessing stampset in versamark ink on Pink Pirouette cardstock and heat set with white embossing powder. I then cut the image out. I used Whisper White Card as my base but trimmed the front and used the new Eyelet Border punch. I added a piece of Pretty in Pink Cardstock also with the Eyelet Border and wrapped with White Tafetta Ribbon. I used a piece of Pink Pirouette Card to cover the back of the whole front section. The cross was mounted to the left hand side using dimensionals. May God bless you on your Baptism day was stamped using Pretty in Pink ink.
I love the simple elegance of this card.
Recent Workshop
I held a workshop earlier this month for a lovely lady who was my very first hostess (Hi Lynda). I demonstrated a card using the Upsy Daisy stampset and thought I would share it with you.

The base cardstock is Basic Gray to which I have added a piece of Kiwi Kiss Patterns Designer Series Paper. The “ric rac” was created using a piece of Riding Hood Red cardstock and the Scallop Edge punch. I inked the flowers firstly with Pink Pirouette and then swiped the bottom with Riding Hood Red ink and stamped them onto Whisper White Cardstock and mounted it onto a piece of Kiwi Kiss cardstock. I stamped the words using Riding Hood Red ink onto Whisper White card and punched out with the large oval punch, swiped the edges with Riding Hood Red ink and mounted onto a piece of Kiwi Kiss card punched out using the wide oval punch. I attached this to the daisy image and mounted the whole thing to the card using dimensionals.
To make the “ric rac” with your scallop edge punch you need a fairly thin piece of cardstock. I used a piece 3/4″ wide. You punch one side making sure that you start with a full scallop and then you flip the piece of cardstock and start with a half scallop – voila “ric rac”.
Let me know what you think.
Flip Album
A few weeks ago, Sarah and I hosted a class where everyone made a “Flip Album”. The instructions for this amazing little album were posted here by Amy Celona. She has some fantastic ideas and it is worth taking a look around her website.
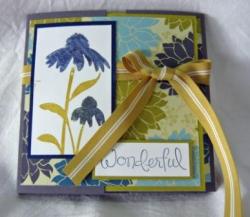
We used Basic Gray, Night of Navy and Kiwi Kiss cardstock to construct the basic album. Then we used the beautiful Urban Garden Designer Series Paper to decorate our albums. The fabulous thing about the album is that it just keeps on opening. I used mine to showcase the construction of our new home.

This shows the album with the left and right covers open.
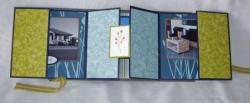
This shows the next two pages flipped open.
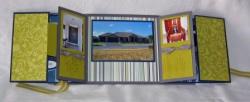
This shows the centre of the album.
The great thing about a class like this is seeing all the different ways that everyone put their album together. We all started with the same basic pieces but the individual creativity of all of the ladies is reflected in their finished albums.
Happy 55th Wedding Anniversary
It was my Mum and Dad’s 55th Wedding Anniversary last Friday and I thought I would share the card I made for them. I was inspired by this card on Splitcoast Stampers.
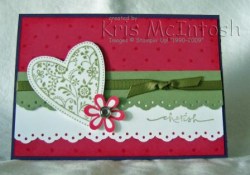 I used Perfect Plum as my base Cardstock. I stamped the Rose Red Cardstock with the Polka Dot Background stamp using Versamark and then clear embossed it and layered it onto the Perfect Plum card. I stamped the heart from the Always stampset in Mellow Moss ink on Whisper White card and cut it out. I stamped the flower, also from the Always stampset in Rose Red ink on Whisper White card and cut it out. I inserted a Clear Rhinestone brad in the cente of the flower. I used the eyelet edge punch on the Whisper White Card and also on the Mellow Moss Card. I layered the Mellow Moss card onto the Whisper White card and wrapped it with Mellow Moss ribbon and then layered the whole piece onto the Rose Red Card. The flower was attached to the heart and then this piece was mounted to the card using dimensionals. I stamped the word “Cherish” from the Warm Words stampset on the white card using Mellow Moss ink.
I love the way it turned out. I hope they like it. What do you think?
Happy Birthday Emma
Today is my youngest daughter’s birthday and I wanted to share the card that I made her with you. I had decided to make her card using A Rose is a Rose Stampset and I wanted the roses to be yellow. I stamped the roses with Barely Banana and Summer Sun Ink and the leaves with Always Artichoke ink and cut them all out. I spent three days playing around with the roses and cardstock but was not very happy with the result. Then while visiting Nicole Stalker’s website I found this card which she had made by CASING this year’s catalogue. I loved it immediately and CASED it for the birthday card.
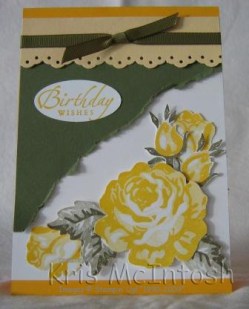
I used Summer Sun cardstock as my base cardstock and layered it with a piece of Whisper White arranging my roses in the bottom right hand corner. The Always Artichoke cardstock is torn and distressed. I used the eyelet punch (looove this) on the bottom of some Barely Banana cardstock and layered it on the top of the Always Artichoke and wrapped it with Always Artichoke ribbon. This piece was then layered onto the Whisper White Card. I stamped Birthday Wishes from the Sincere Salutations Stampset in Summer Sun on Whisper White cardstock and punched it out with the large oval. It was then attached on the top left hand side of the Always Artichoke Cardstock.
Thanks Nicole for providing the inspiration for me to complete this card. My daughter loved it and so do I. What do you think?
Can you tell me how to get to Sesame Street
I have been wanting to make a card using punches to create the Sesame Street characters for a very long time. I have seen numerous examples on the net over time but couldn’t find any instructions anywhere when I wanted to make one. I was surfing the net (again) and came across a beautiful card made by Carol Dunstan. So I was able to create my own version.
 I made this card for my Grandson who is turning 3 this week. I used Real Red as my base card and used a piece of Summer Sun to layer on top. The black card has had the edges punched using the spiral punch and the sentiment is from the Occasional Greetings stampset – the only stampset used. I only used three characters on the front of the card and used the Cookie Monster inside. The characters were made using the following punches – Scallop Circle Punch, 1/2″ circle punch, Crop-A-Dile (for pupils), small oval punch, 1 1/4″ circle punch, 3/4″ punch, Boho Blossoms punch (for the cookie bite), Chocolate Chip marker (for the chocolate chips). The list of punches was provided by Carol very generously in her instructions – thanks so much.
I love the way the card turned out.