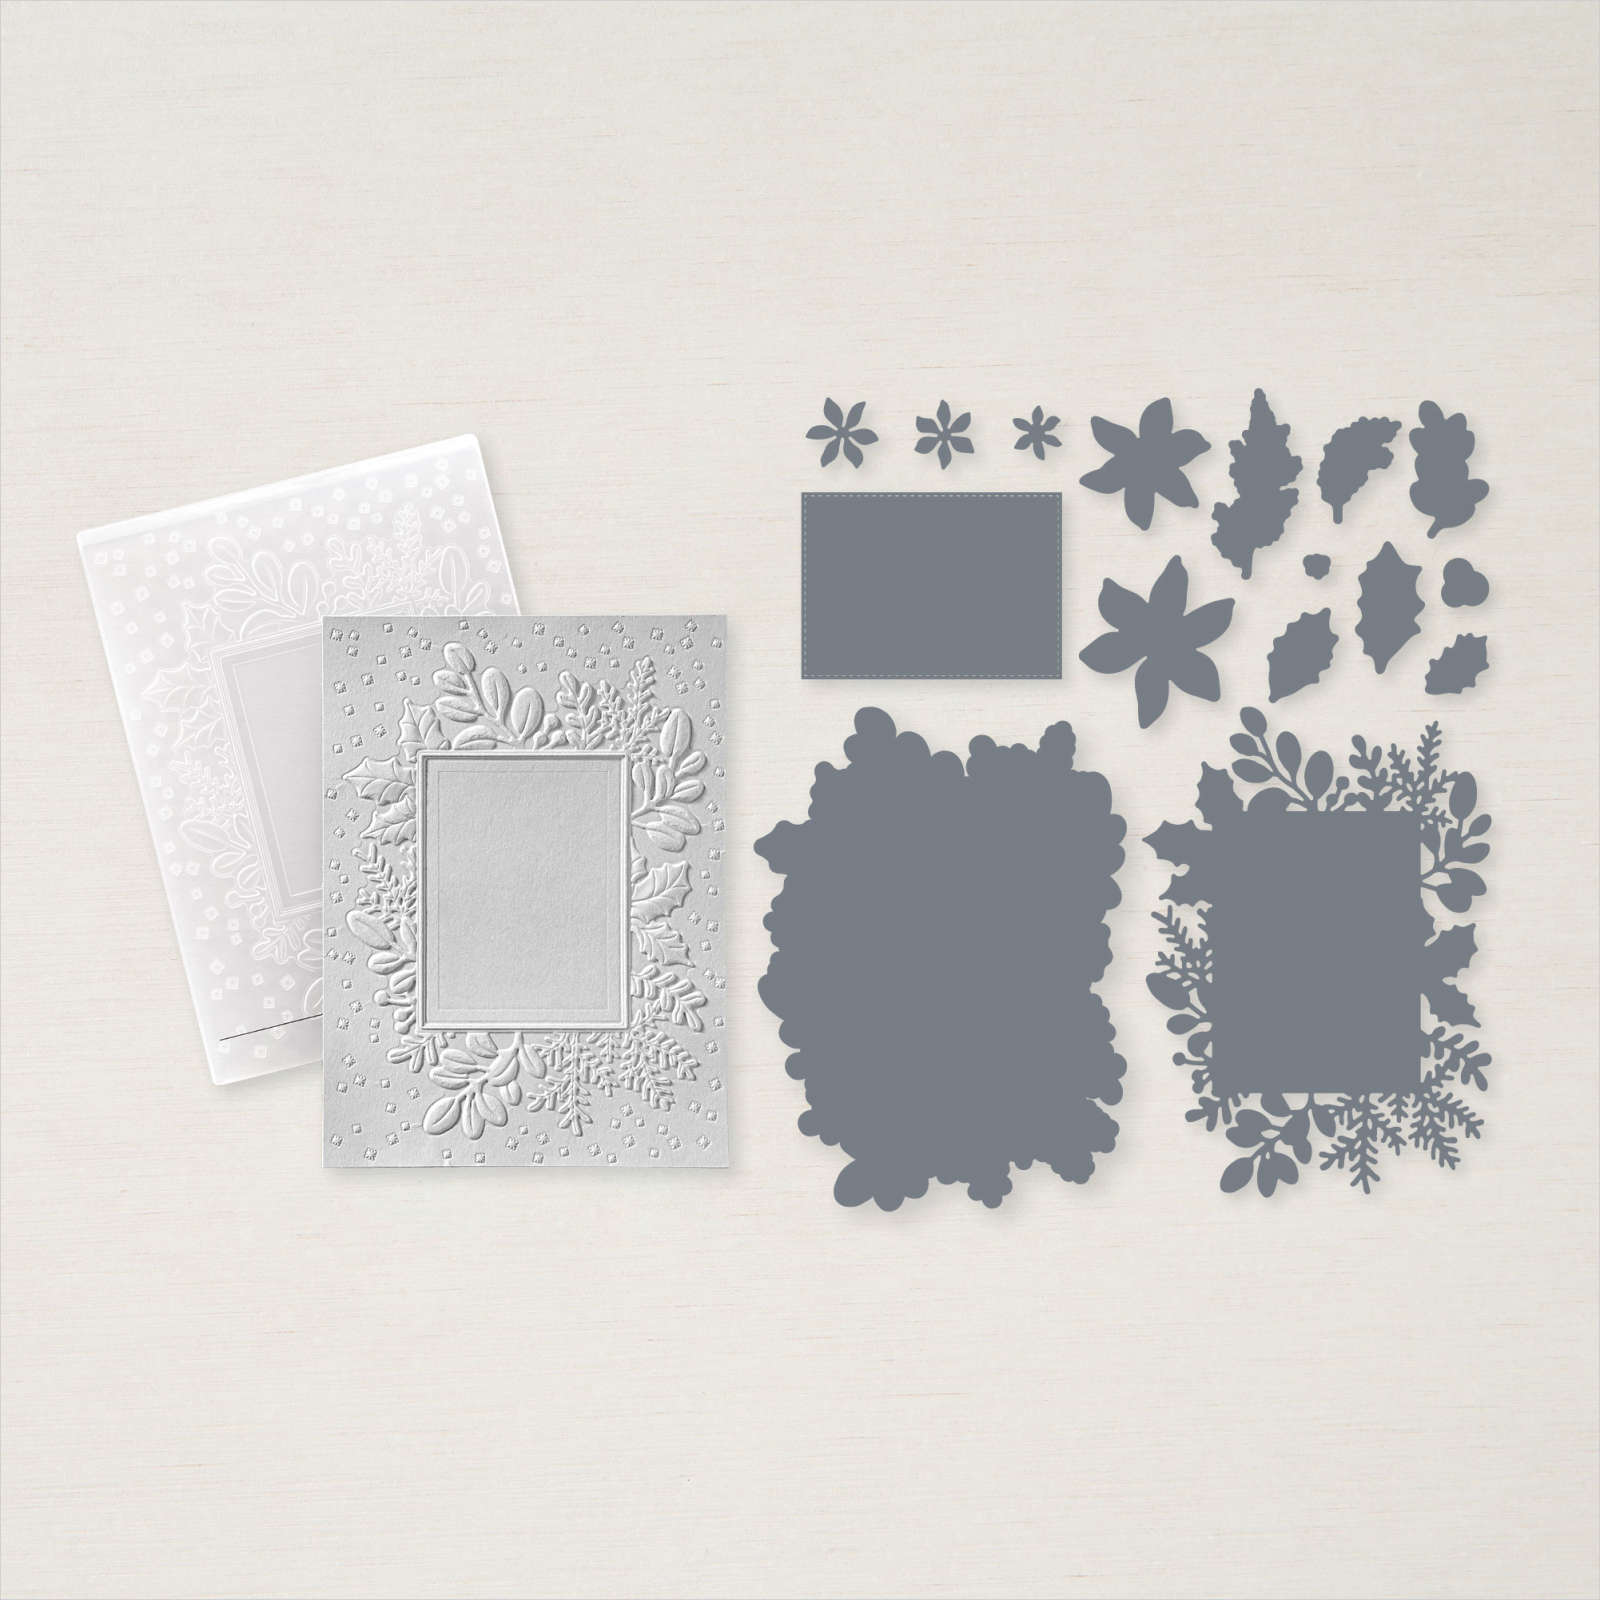
Amazing Silhouettes

Last week on my Facebook Live, I shared some ideas using the Amazing Silhouettes stamp set which you can find on page 40 of the January to June Mini Catalogue. This stamp set was in my swag bag when I attended Onstage at Home in November. At first I wasn’t too sure how to use this stamp set but now that I have used it I think I am going to love it.

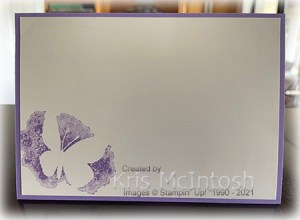
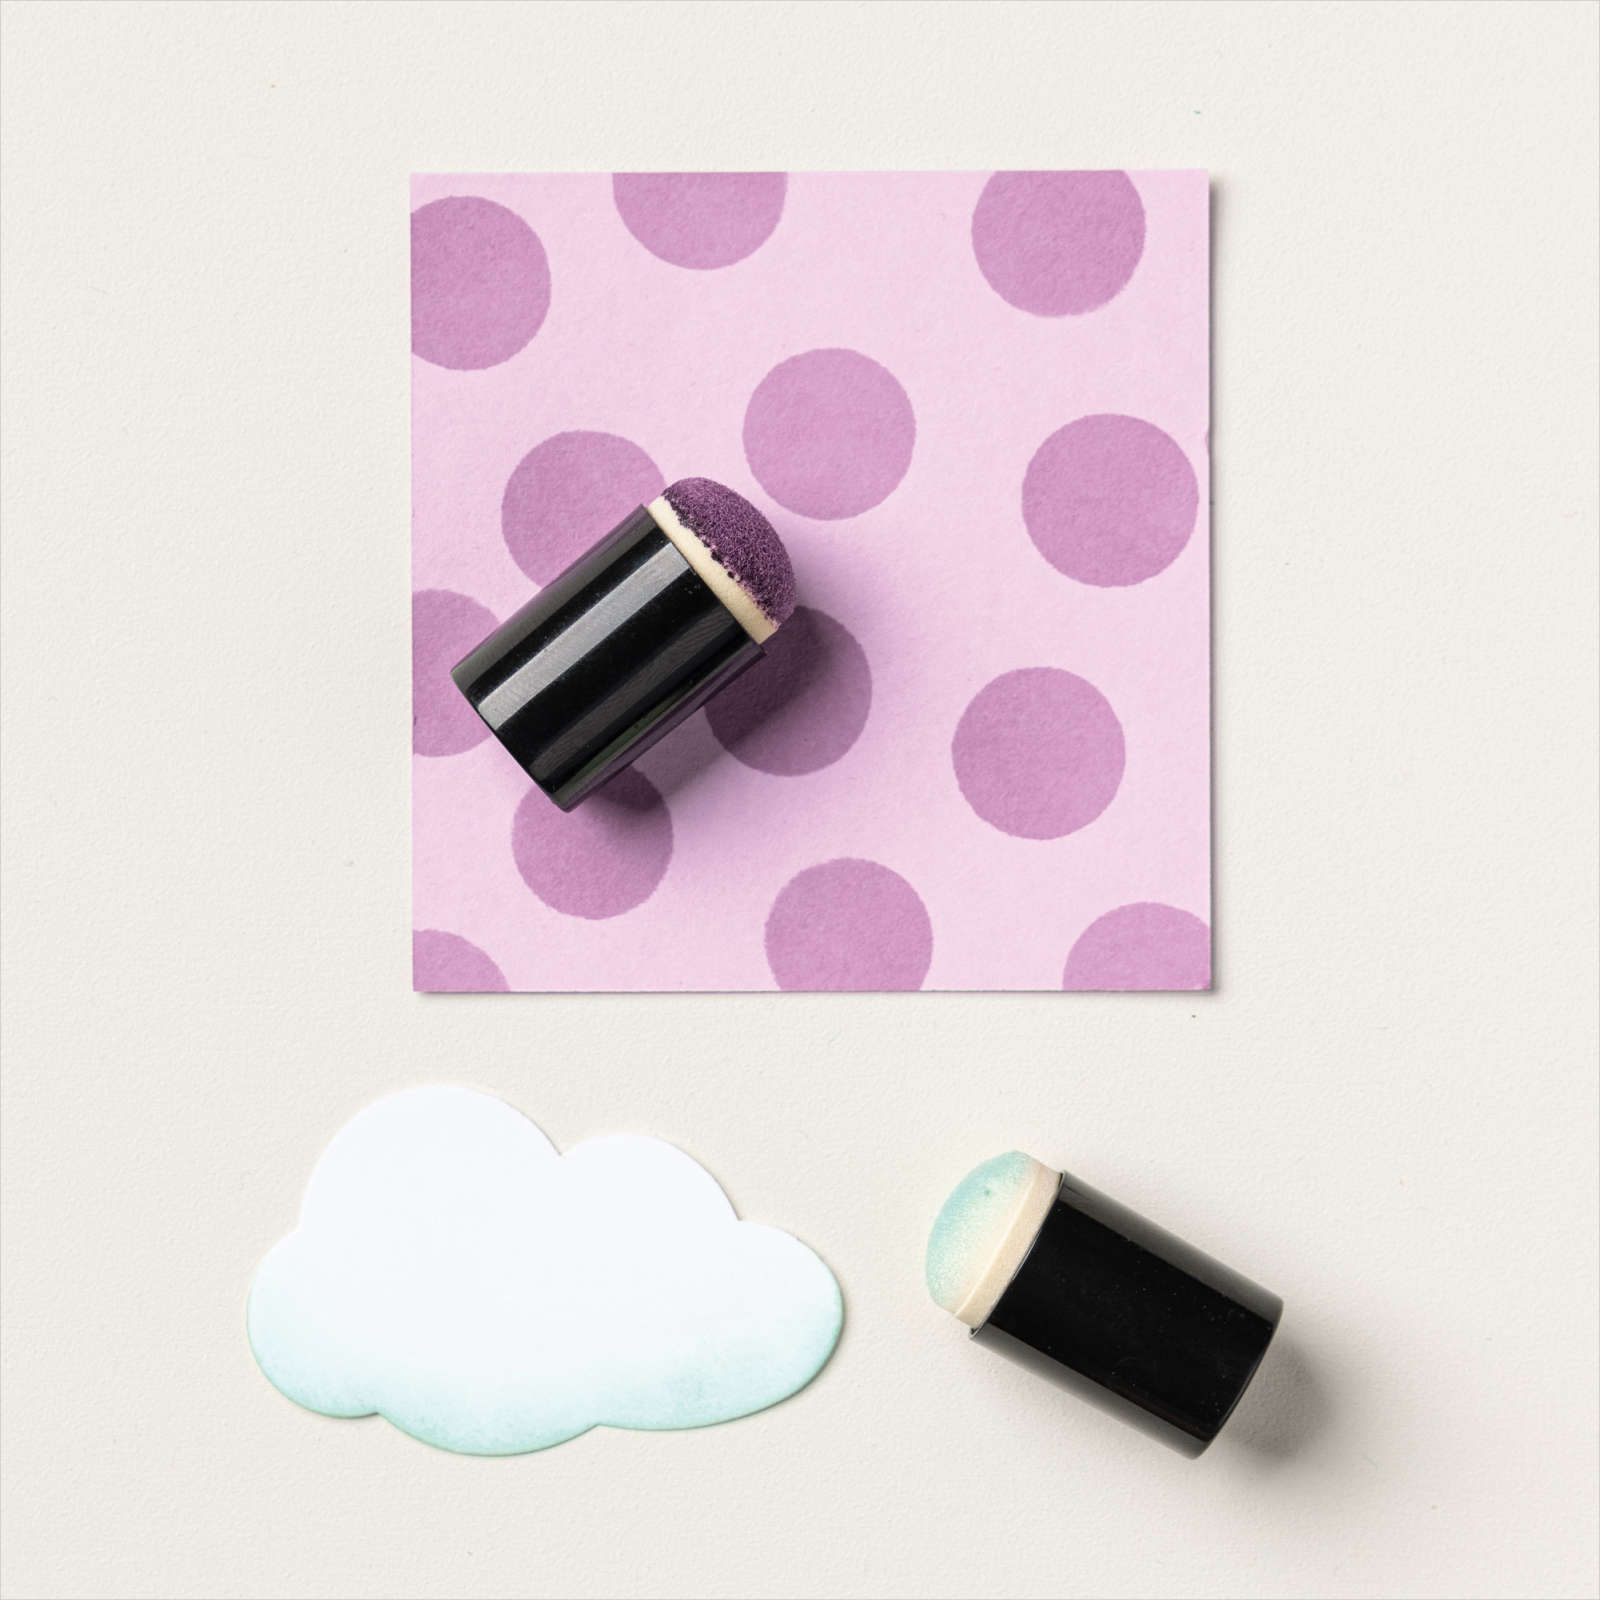
The stamp set has co-ordinating dies which I purchased in my pre-order (a demonstrator perk). For the first card I am sharing today, I stamped the butterfly image from the Amazing Silhouettes stamp set onto the left hand side of Very Vanilla card using Highland Heather ink.
I cut “you are amazing” from Gorgeous Grape card using the solid word images and from Highland Heather card for the more detailed word images using the Amazing Thanks Dies. I attached the Highland Heather image to the Gorgeous Grape images and then the card front. I attached the Very Vanilla card to Gorgeous Grape card and then scored and folded Highland Heather card.

To decorate the inside of the card, I stamped the butterfly image from the Amazing Silhouettes stamp set onto the lower left hand corner of Very Vanilla card using Highland Heather ink. For the second card, I stamped the butterfly image from the Amazing Silhouettes stamp set three times onto Very Vanilla card using Highland Heather ink. I cut “thanks” from Gorgeous Grape and Highland Heather card using the Amazing Thanks Dies. I attached the Highland Heather die cuts to the Gorgeous Grape Dies cuts and then stamped Very Vanilla card. The image panel is attached to Gorgeous Grape card and then scored and folded Highland Heather card. To decorate the inside of the card, I once more stamped the butterfly image onto the lower left hand corner of Very Vanilla card using Highland Heather ink.

I really love the way this stamp set and dies work together, don’t you? Only a few days until you too can order this Amazing stamp set!
Bye for now,
Kris
Product Used:


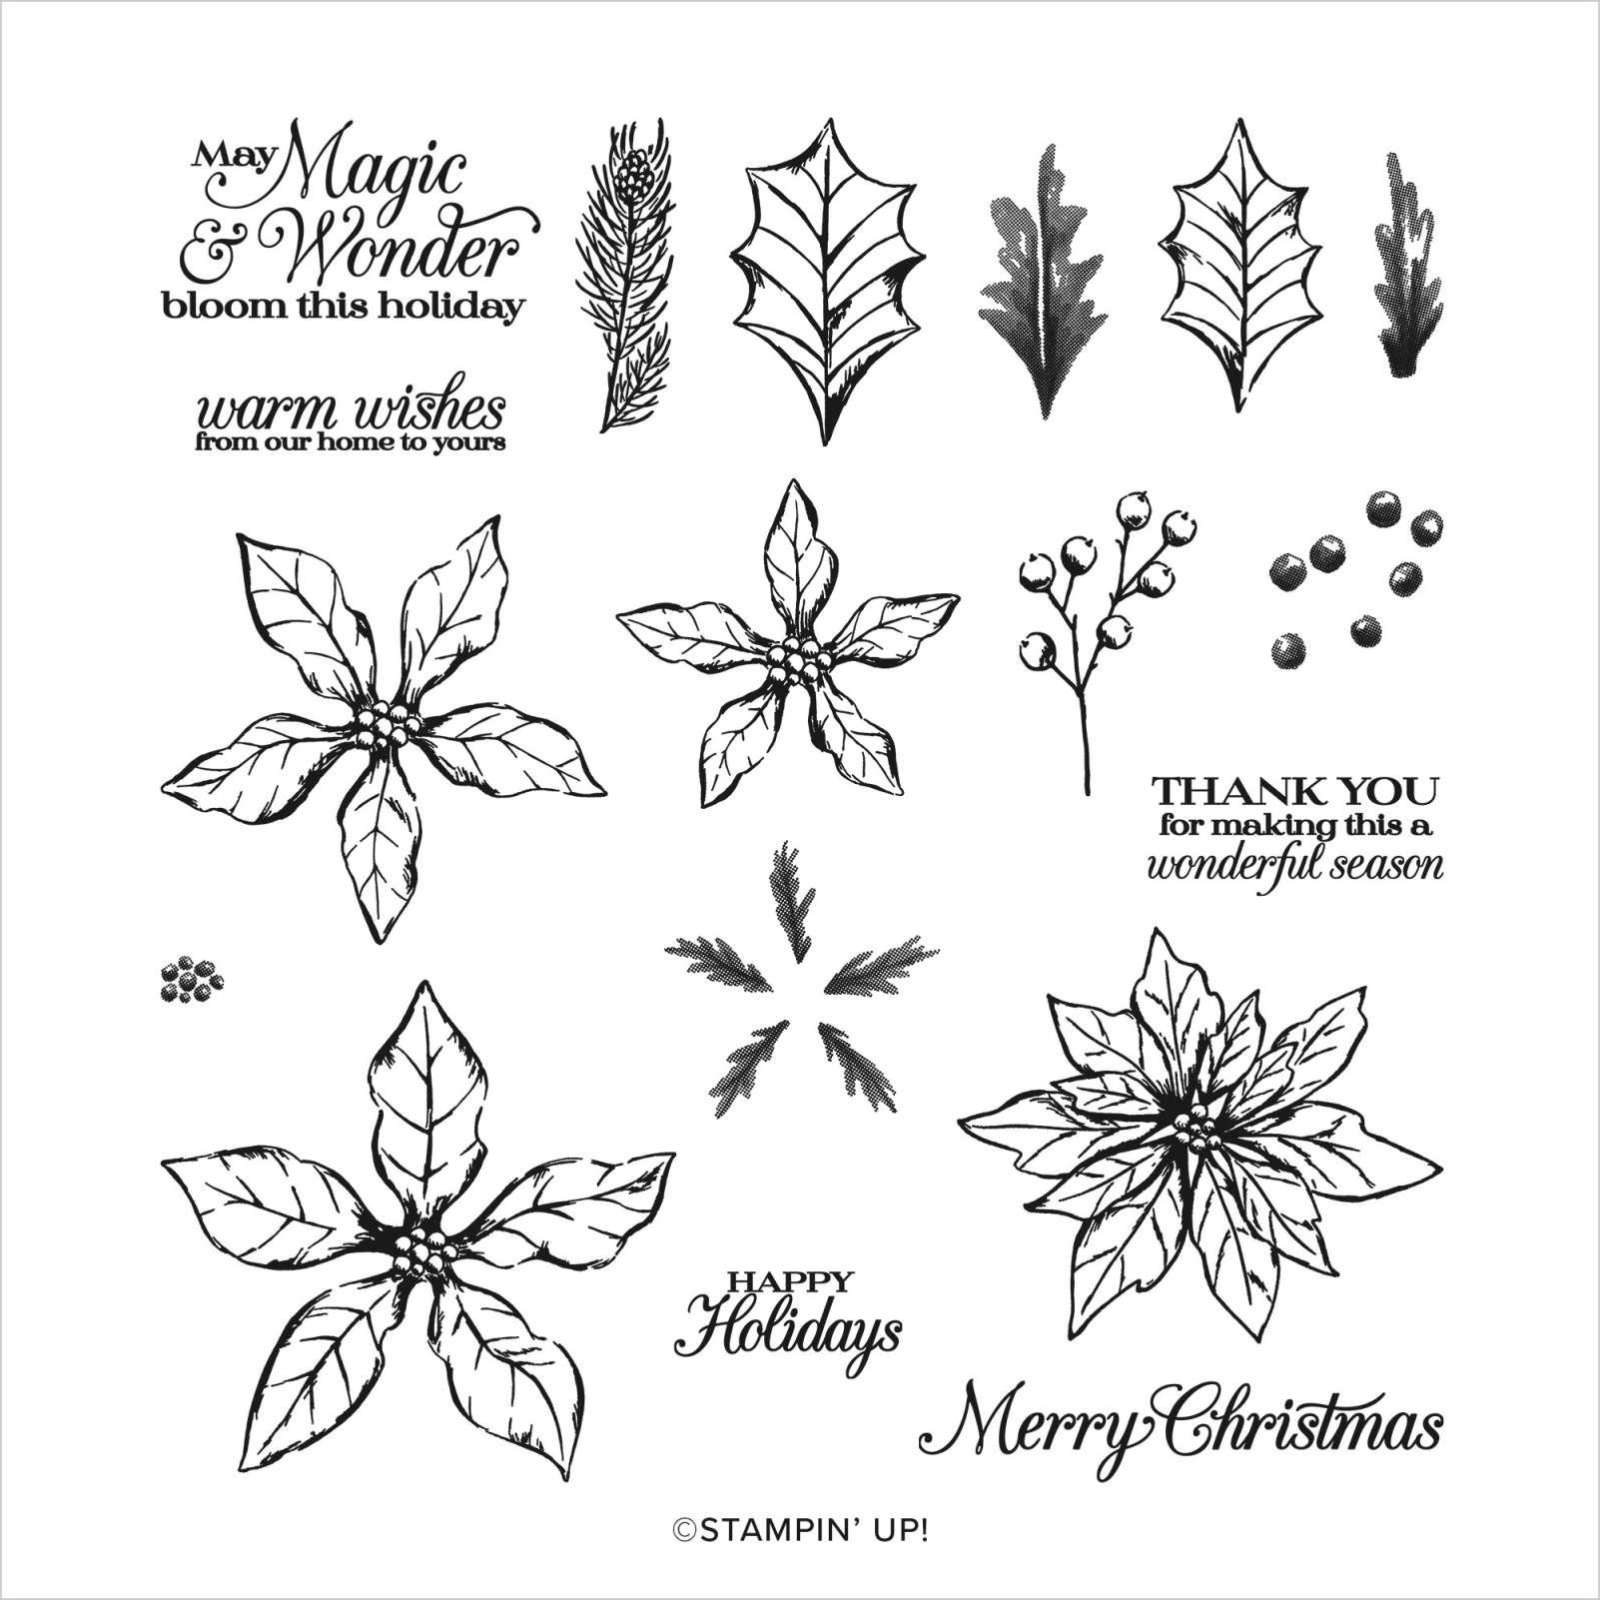
Magic & Wonder

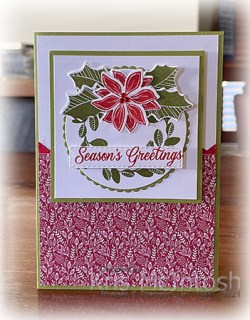
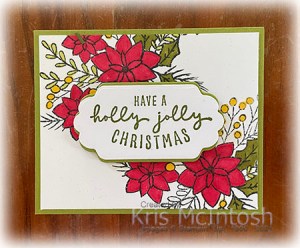
Can you believe it? Today is Christmas Day, the most wonderful day of the year. I wish each and every one of you a very Merry Christmas and a wonderful New Year. A little different for us this year as my two girls are spending Christmas elsewhere, so it will just be Mum & Dad, my sister, neice, great nephew and Ron & I. I hope that all of you have a wonderful day celebrating with those you love. Instead of a scrap page, today I am sharing with you the cards I made for each of my four granddaughters for Christmas this year. The vintage style was inspired by a card from a tutorial that I purchased from Create with Connie & Mary but the layout was inspired by this card I found on Pinterest by Julianne Richards. I created the first card using the colours that were used in Connie & Mary’s tutorial. I sponged the edges of Very Vanilla card using a sponge dauber and Soft Suede ink and stamped the greeting from the Poinsettia Petals stamp set onto the top right hand corner using the same ink.
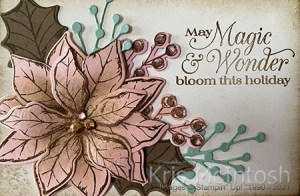
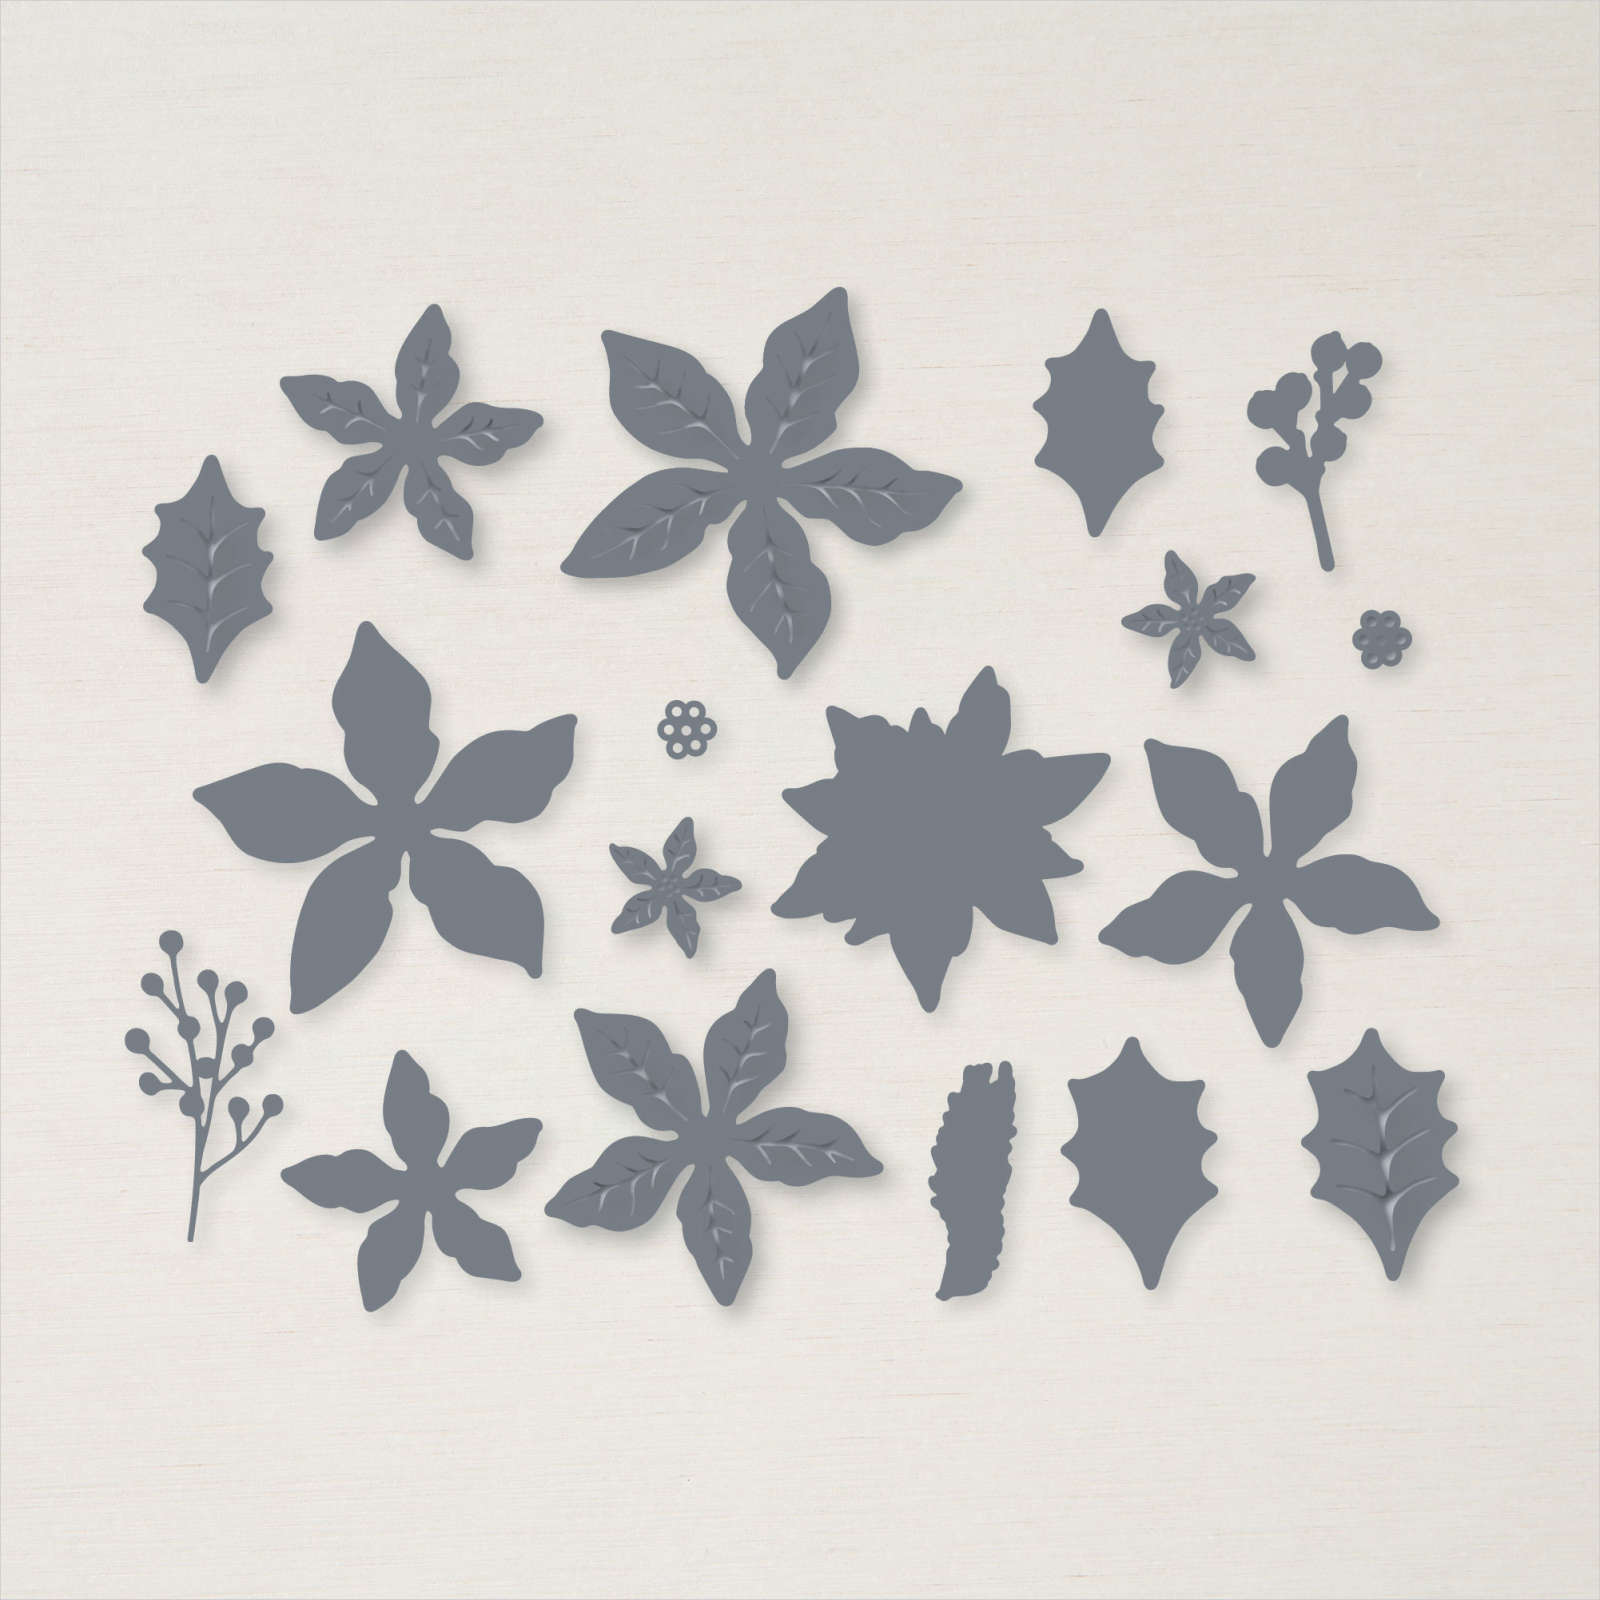
I attached the panel to Soft Suede card and then Blushing Bride scored and folded card. I stamped two large and one medium flowers from the Poinsettia Petals stamp set onto Blushing Bride card using Soft Suede ink. I cut out the flowers using the co-ordinating Poinsettia Die. I sponged a little Soft Suede ink into the centre of each of the flowers before using my bone folder to add curl the leaves. I used a Glue Dot to attach the layers together and then added mini dimensionals underneath each of the curled petals. I stamped two large leaves onto Soft Suede card using Soft Suede ink. I cut them out using the co-ordinating Poinsettia Die and sponged a little Soft Suede ink onto the lower part of the leaf.

I stamped the berry image from the Poinsettia Petals stamp set twice onto Blushing Bride card using Soft Suede ink. I stamped the berry fill image onto the stems using Soft Suede ink as well. I cut out the berry images using the co-ordinating Poinsettia Die. I also cut two sets of berries/leaves from Mint Macaron card using the Poinsettia Die. I layered the flowers and leaves onto the lower left hand corner of the sponged Very Vanilla card. Lastly I added three Champagne Rhinestones to the centre of the flower.
To decorate the inside of the card I sponged Soft Suede ink around the edges of Very Vanilla card before attaching the panel to Soft Suede card. I stamped and die cut, one medium and one small flower, two small leaves, one berry image and one mint macaraon berry/leaf image. The flowers and leaves are layered onto the lower left hand corner of the sponged Very Vanilla card.
When I am creating a card, like these, I only adhere the flowers in the very centre, so that I can layer the leaves underneath the outer edges of the flowers. Once I have everything in the right place, I carefully remove the backing from the mini dimensionals and adhere them to the card. For the inside of the card, I just add a little liquid glue underneath the petals to secure them to the card base.

I created three more cards using Petal Pink, Highland Heather and Fresh Freesia for the flowers and card bases. I love them all and hope that my granddaughters do too.
Bye for now,
Kris
Product Used:


Panel 5 Card
Today I am sharing the card I made using the last panel from my Framed Art Piece. You can find the instructions for this decorative piece and all five cards here on my Free Tutorials Page. I cut a piece of Real Red card in half using one of the Basic Border Dies. I attached one half of the Real Red die cut behind the top edge of a peace of Peaceful Prints Designer Series Paper (Sale-a-bration Freebie).
The Designer Series Paper panel is attached across the bottom of Basic White card before being attached to scored and folded Old Olive card. I created the image panel following the instructions and attached the panel to the card front using dimensionals.
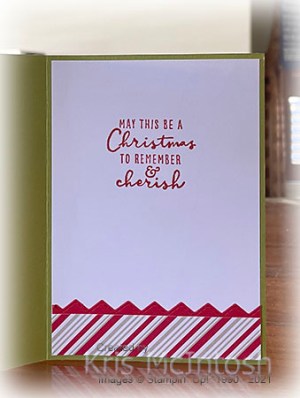
To decorate the inside of the card, I stamped the greeting from the Christmas to Remember stamp set onto Basic White card using Real Red ink. I attached the second half of the Real Red die cut behind one long edge of a strip of Peaceful Prints Designer Series Paper. The Designer Series Paper panel is attached across the bottom of the stamped Basic White card. I have had so much fun using up my left over kits to create cards using the panels from the Framed Art piece. So, since this is the last card, I created using the panels from the Framed Art Piece, I thought you might like to see them all together.

I hope that you find the tutorial for these cards and the Framed Art Piece useful now and in the future.
Bye for now,
Kris
Product Used:


Panel 4 Card

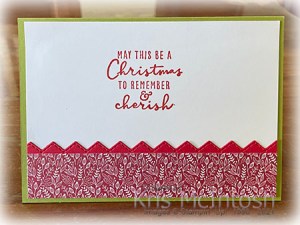
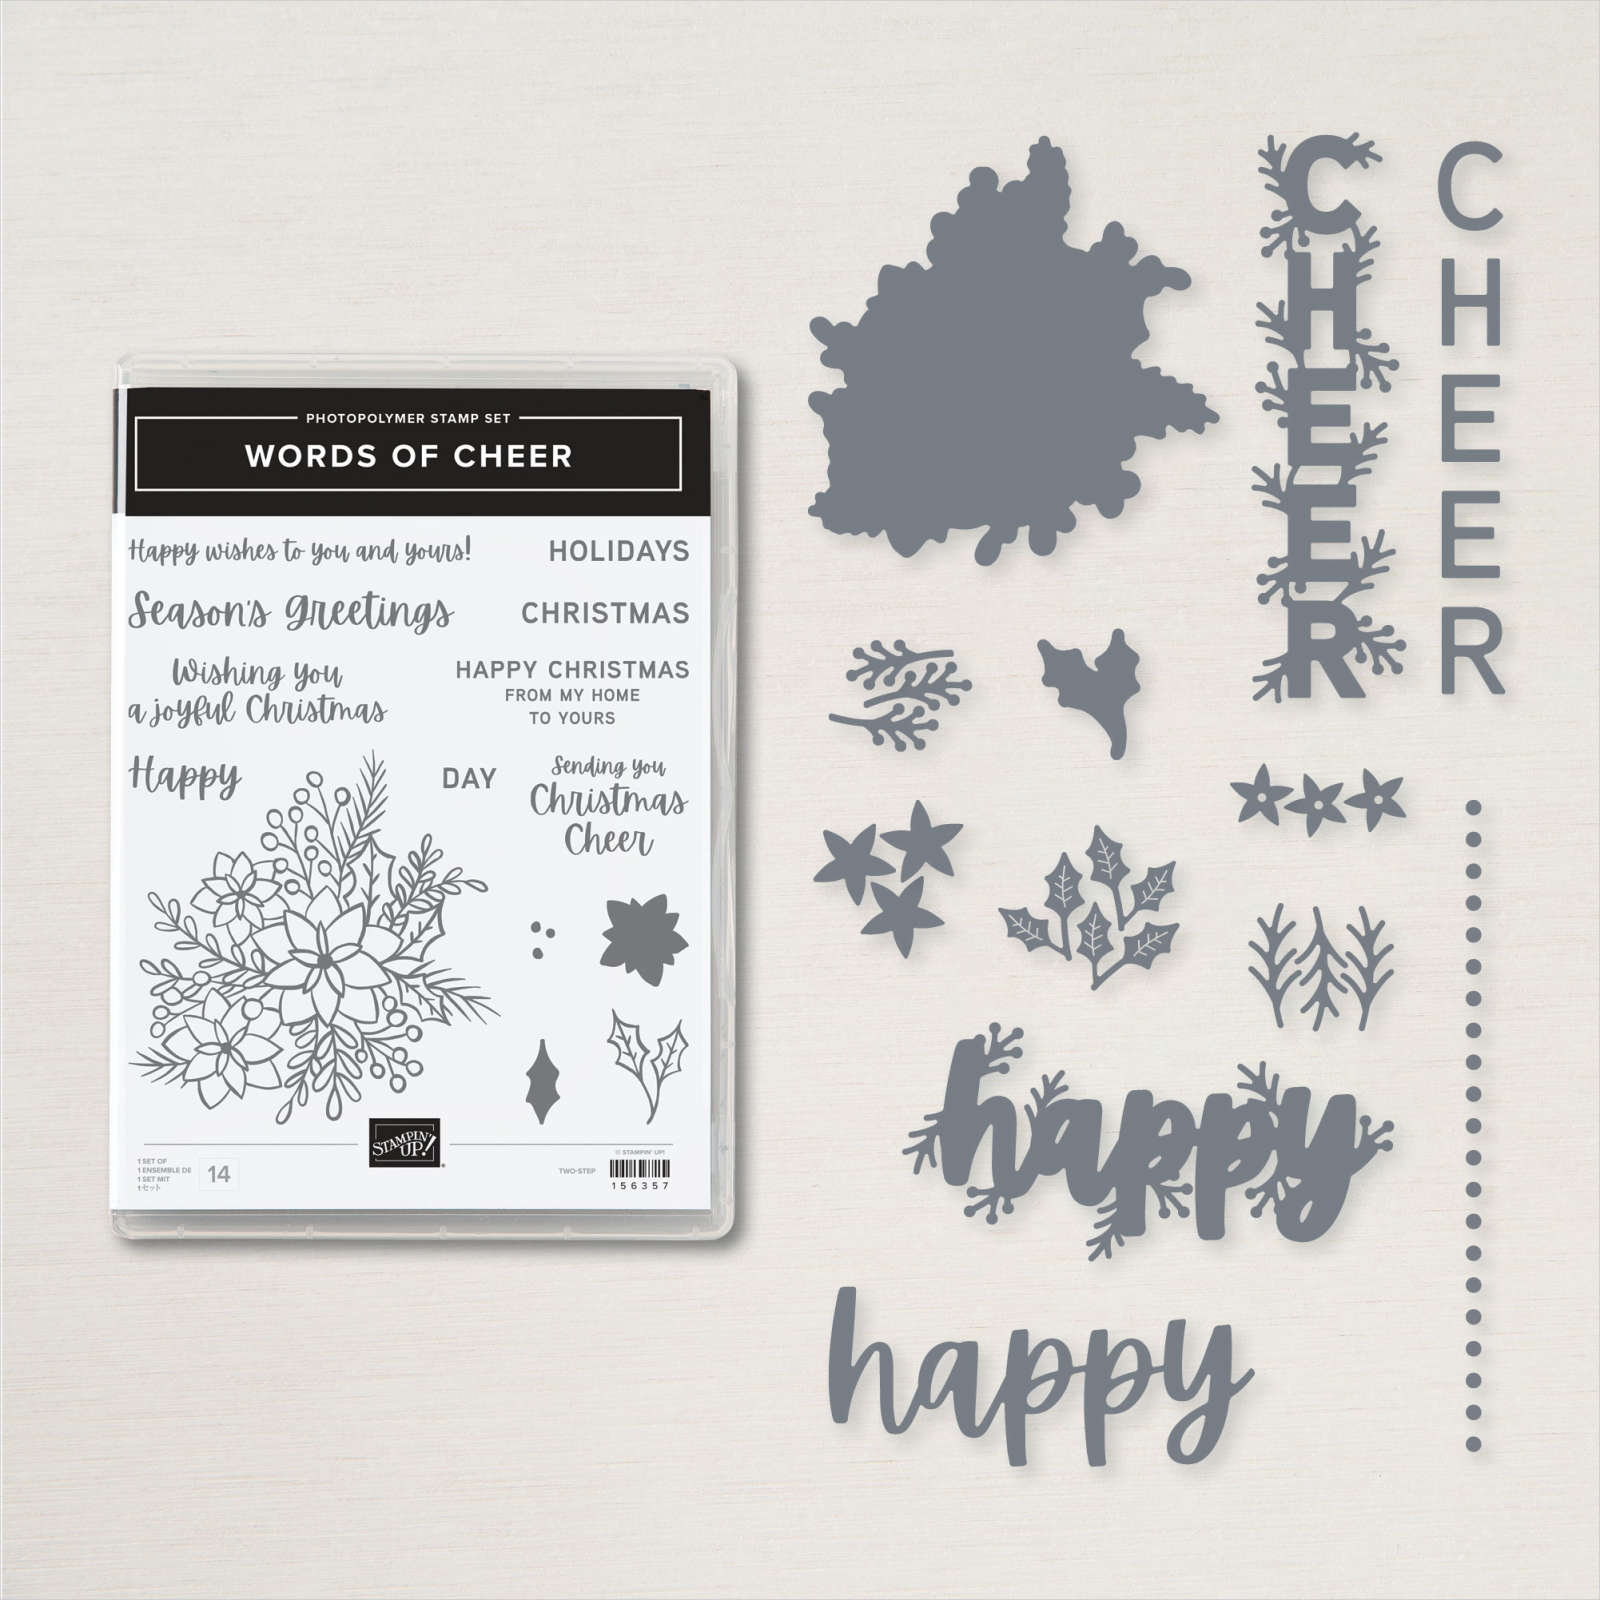
Today’s card uses the fourth panel that I created for my Framed Art piece this year. You can download the PDF instructions here. I did change this panel slightly, instead of stamping the image from the Words of Cheer stamp set twice onto Basic White card, I only stamped it once onto the top left hand corner. The image is coloured using the Real Red, Old Olive and Dark Daffodil Delight Stampin’ Blends. I cut a piece of Real Red card in half using one of the Basic Border Dies.

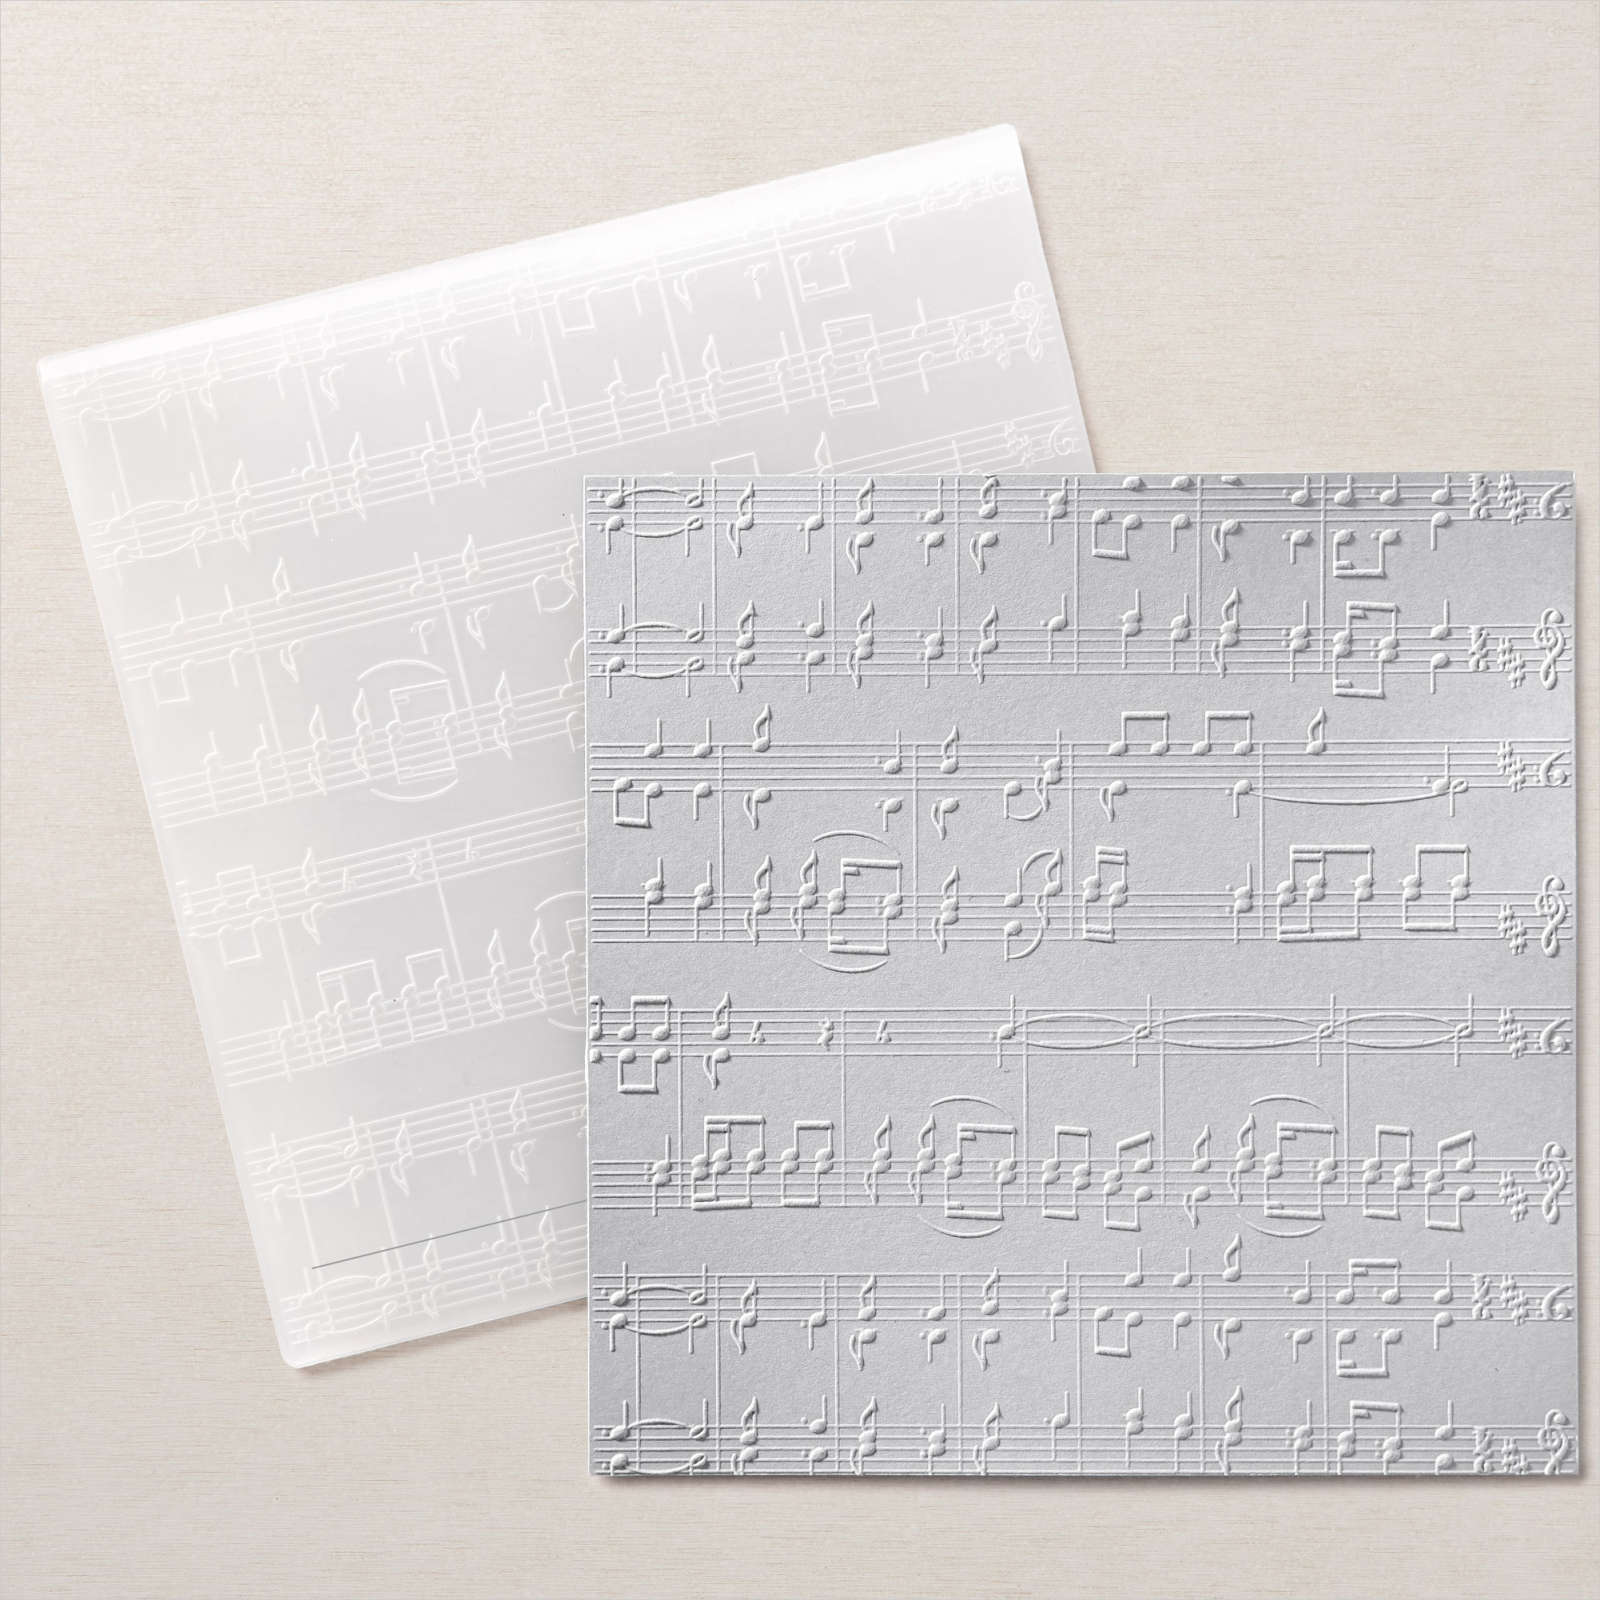
I embossed Old Olive card using the Painted Texture 3D Embossing Folder and attached one half of the Real Red die cut behind the long edge. The embossed panel is attached to Basic White card and then scored and folded Old Olive card. I attached the stamped panel to Old Olive card and then the card front using dimensionals. I stamped the greeting from the Christmas to Remember stamp set onto Basic White card using Old Olive ink. and cut out using the Seasonal Labels Die. I cut Old Olive card using the same die and then cut it in half, I attached one half behind the back of the top of the greeting label and the other half behind the bottom half of the greeting label.
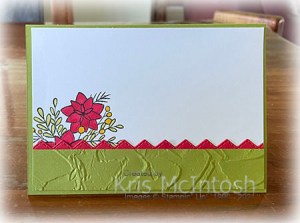
The greeting is attached to the card using dimensionals. I added a Basic Rhinestone to the centre of the two flowers and one to the greeting label. To decorate the inside of the card, I stamped the image from the Words of Cheer stamp set onto the lower left hand corner of Basic White card using Memento Tuxedo Black ink. I coloured the image once more using Real Red, Old Olive and Dark Daffodil Delight Stampin’ Blends. I embossed a narrow strip of Old Olive card using the Painted Texture 3D Embossing Folder. I attached the second half of the Real Red die cut behind one long edge of the embossed card before attaching the panel across the bottom of the stamped Basic White card.
I really love this finished card and love that I am using up my left over kits.
Bye for now,
Kris
Product Used:


Panel 3 Card

Today’s card uses the third panel that I created for my Framed Art piece this year. I will update the instructions for the Framed Art Piece as soon as I have shared all five cards. I didn’t really add much to this panel except a Crumb Cake card base since it was a perfect card front as it was.

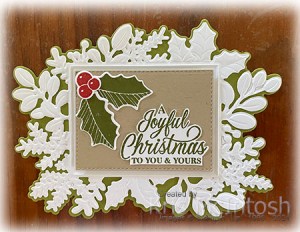
To decorate the inside of the card, I stamped two leaves from the Merriest Moments stamp set onto Basic White card using Old Olive ink and cut them out using the co-ordinating Merriest Frames Die. I stamped the holly berries from the Merriest Moments stamp set onto Basic White card using Real Red ink and cut them out using the co-ordinating Merriest Frames Die. I attached the leaves and berries onto the upper left hand corner of Basic White card before attaching the panel to the inside of the Crumb Cake card base.
Simple!
Bye for now,
Kris
Product Used:


Happy 17th
My eldest granddaughter celebrated her 17th birthday recently and today I thought I would share the card I made for her with you. I embossed Misty Moonlight card using the Painted Texture 3d Embossing Folder before attaching a piece of the Heart & Home Designer Series Paper across the panel. The whole piece is attached to scored and folded Thick Basic White card. I cut Fresh Freesia card using one of the Scalloped Contour Dies. I attached a narrow strip of another piece of Heart & Home designer Series Paper down the left hand side before attaching the panel to the card front.
I stamped the image from the Blessings of Home Stamp set onto Basic White card using Memento Tuxedo Black ink. I used sponge daubers to add Misty Moonlight, Fresh Freesia, Pale Papaya and Soft Succulent ink to the image before cutting it out using another of the Scalloped Contour Dies.

The image panel is attached to the card front using dimensionals. For the inside of the card I created a pop up using the same instructions as I shared on a recent Facebook Live using Basic White card. I embossed a piece of Misty Moonlight card using the Painted Texture 3D Embossing Folder and attached it to the left hand side of the pop up. I stamped the same image from the Blessings of Home onto the lower right hand corner of the pop up and coloured it using sponge daubers and the same inks as on the front of the card.
I cut Basic White card using one of the Scalloped Contour Dies and stamped “happy” and “birthday” using the greeting from the Artistically Inked stamp set using Misty Moonlight ink. I cut the “17” from Misty Moonlight card using the Playful Alphabet Dies and stamped the “th” by inking only those letters from the Artistically Inked stamp set. I attached the stamped die cut to a piece of Fresh Freesia card and then the pop up. I loved the finished result and decided to create a little tag to go with the present. I used the Tailor Made Tags to cut out the stamped and coloured image from the Blessings of Home stamp set. I cut Misty Moonlight using a slightly large die and attached the two tags together using a length of Denim Ribbon.
I just know that you are going to love the Heart and Home Product Suite in the next Mini Catalogue when it is released on the 3rd January.
Bye for now,
Kris
Product Used:


On The Road
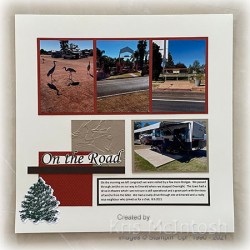
Today’s page shows off some photos from our drive from Longreach to Emerald. Our day started with a visit by four friendly Brolgas while we were packing up. On the drive we passed through Jericho, a lovely little town with it’s own Drive-in movie theatre (not sure it still operates). We arrived mid afternoon at Emerald and had a lovely drive-through site. Our neighbour was a lovely man who joined us for a chat while we had a couple of drinks before dinner. I printed my photos to 3″ x 4″ size and attached three of them to Cajun Craze card before attaching them to a Very Vanilla 12″ x 12″ page. The last photo is attached to Crumb Cake card and then the page.

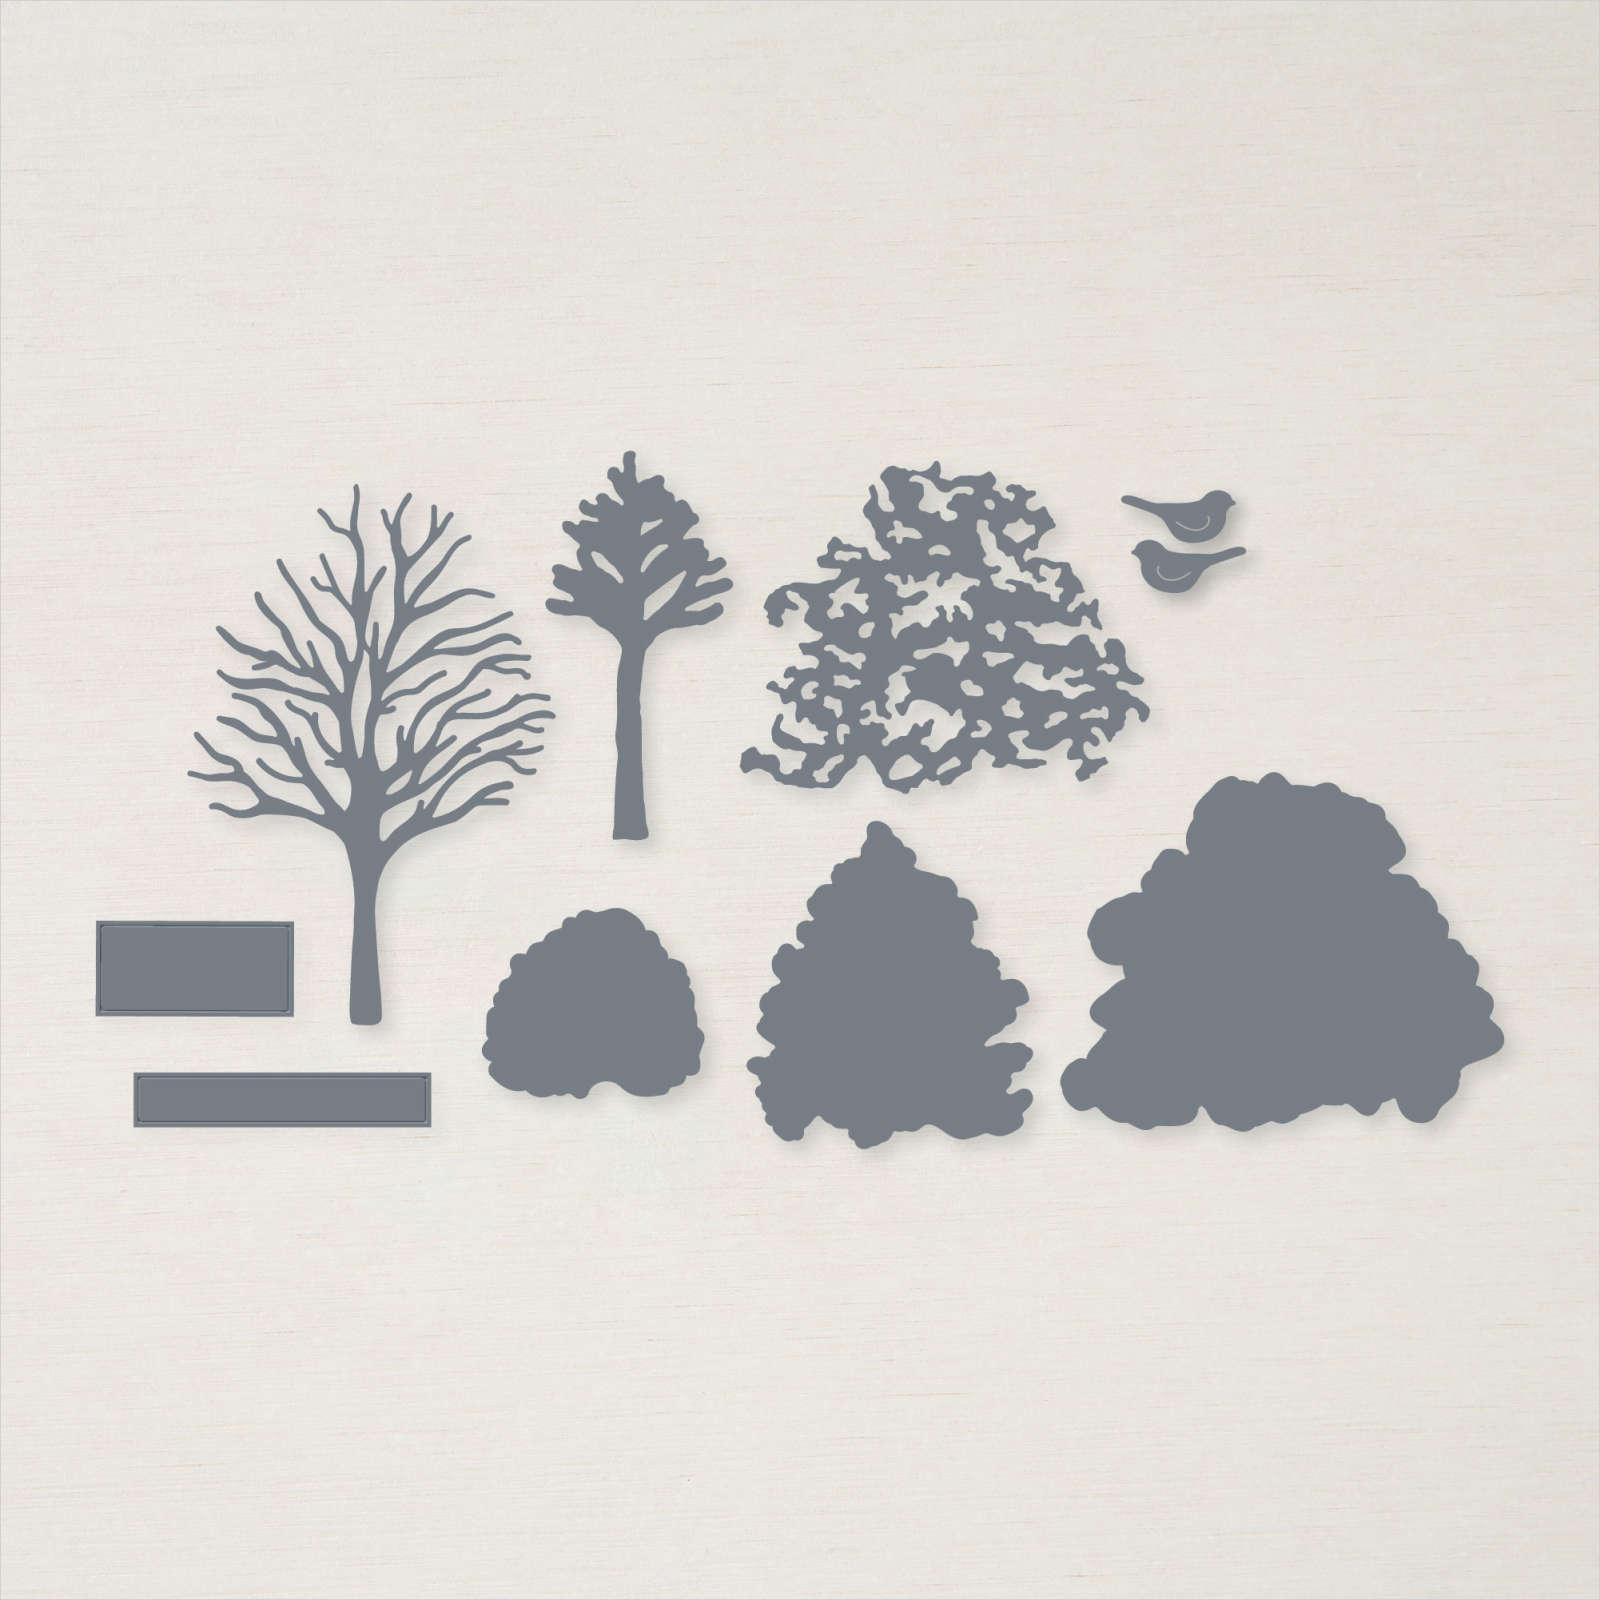
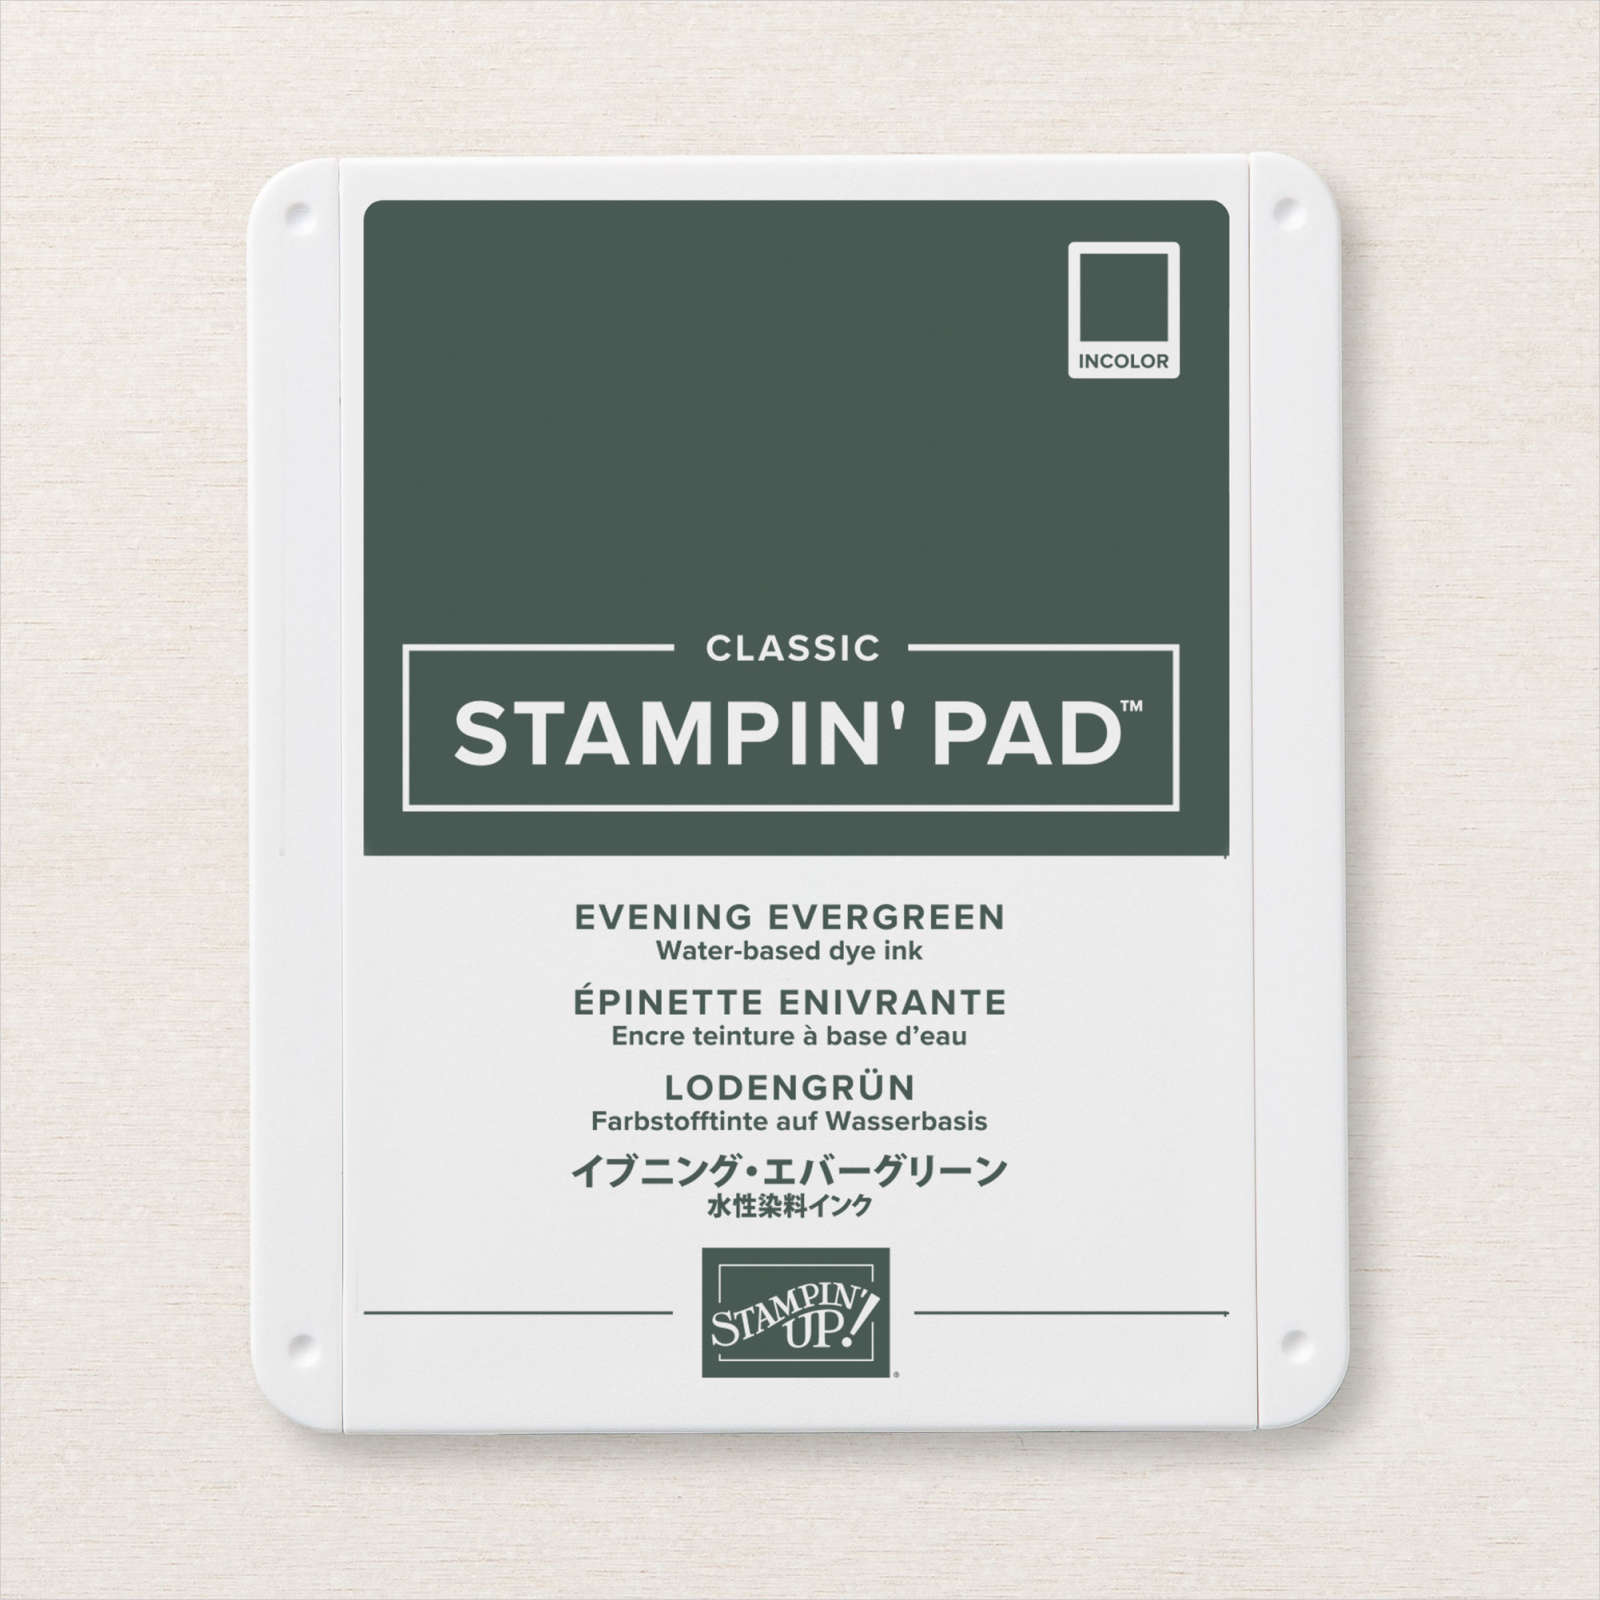
I embossed a Crumb Cake square of card using the Painted Texture 3D Embossing Folder and attached it to the left of the last photo. I embossed a Cajun Craze square of card using the Tasteful Textile 3D Embossing Folder and attached it to the page partially covering the Crumb Cake square. I added strip of Early Espresso card across the two embossed squares. I printed my title onto Very Vanilla card and cut it out before attaching it just above the Early Espresso strip of card. I stamped the large tree from the Beauty of Friendship stamp set onto Very Vanilla card using Soft Succulent ink and added the detailed tree image over the top using Evening Evergreen ink. The image is cut out using the co-ordinating Beautiful Trees Die and attached to the lower left hand corner of the page. I printed my journaling onto Very Vanilla card and attached it to Early Espresso card before attaching it to the page. Another simple page but one that makes me smile.
Bye for now,
Kris
Product Used:


Panel 2 Card

Today’s card uses the second panel that I created for my Framed Art piece this year. I will update the PDF instructions for the Framed Art Piece to include instructions for these cards once you have seen all five. To begin this card I embossed Basic White card using the Merry Melody 3D Embossing Folder. I cut a piece of Real Red card in half using the Basic Border Dies.
I attached one half behind a piece of Christmas Trimmings Designer Series Paper before attaching the panel across the bottom of the embossed Basic White card. The whole piece is attached to scored and folded Real Red card.
I created the image panel according to the instructions in my Framed Art PDF instructions. The image panel is attached to the card front using dimensionals. To decorate the inside of the card, I stamped the greeting from the Christmas to Remember stamp set onto Basic White card using Real Red ink. I attached the second half of the Real Red die cut behind one long edge of a piece of Christmas Trimmings Designer Series Paper. The Designer Series Paper panel is attached across the bottom of the Basic White card.
I love how much texture is on this card don’t you?
Bye for now,
Kris
Product Used:


Panel 1 Card
I wanted to show you how to use the panels from the Framed Art Piece to create cards. Today’s card uses the first panel and since I had a few kits left over, this was quick and easy to create. You can find the instructions for the Framed Art Piece here and once I have shared all five cards with you, I will update the PDF instructions for the Framed Art Piece so that it includes instructions for each of the cards. To begin this card I cut a piece of Real Red card in half using the Basic Border Dies and attached one half behind the edge of a piece of Tidings of Christmas Designer Series Paper. The panel is attached to Basic White card and then scored and folded Old Olive card.

I created the image panel according to the instructions in my Framed Art PDF instructions. The panel is attached to the card front using dimensionals. To decorate the inside of the card, I stamped the greeting from the Merriest Moments stamp set onto Basic White card using Real Red ink.
I attached the second half of the Real Red border piece behind one long edge of a narrow strip of Tidings of Christmas Designer Series Paper. The Designer Series Paper panel is attached across the bottom of the stamped Basic White card. Since I had a couple of kits for this project already cut it was easy to create this card with all the pieces ready to go.
Let me know what you think.
Bye for now,
Kris
Product Used:

Framed Art 2021

Every year, I hold a class where I create a Christmas Panel which can be framed and used for decoration. Today I am going to share this year’s piece with you. I am not going to go into a lot of detail, but if you need the instructions you can download the tutorial here. The colours in the panel are Old Olive and Real Red with the addition of Crumb Cake and Early Espresso for the last panel. I used a piece of Crumb Cake A4 to go in the A4 document frame as background.
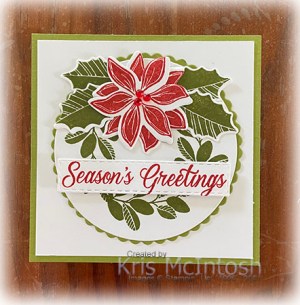
The first panel uses the stamparatus to create a small wreath using a leaf image from the Merriest Moments stamp set as a background. The other images and greetings also come from this stamp set. I also added three Real Red Rhinestones to the flower centre.

The second panel uses the Merry Melody 3D Embossing Folder as background. I have also used the Christmas Cheer Dies, Stitched Rectangle Dies and the Words of Cheer stamp set.
The middle panel uses the Merriest Frames Dies and Merriest Frames Hybrid Embossing Folder along with the Merriest Moments stamp set.
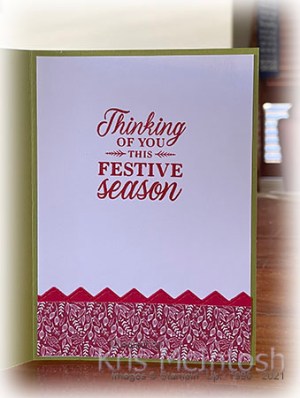
The lower left hand panel uses the Words of Cheer stamp set and the Christmas to Remember stamp set also with the Seasonal Labels Dies. The image is coloured using the Dark & Light Real Red, Dark & Light Old Olive and Dark Daffodil Delight Stampin’ Blends.

The last panel uses the Christmas Season stamp set, Christmas to Remember stamp set and the Seasonal Labels Dies. I love creating these frames for Christmas, it gives me a chance to use lots of Christmas stamp sets and dies all in the one creation.
I have recreated each of these panels as cards which I will share with you soon.
Bye for now,
Kris
Product Used:


