Poppies Forever

The Peaceful Poppies Designer Series Paper will soon retire so I thought I would share a card I made recently using this Designer Series Paper. I attached a piece of the paper which has the look of a field of poppies to Blackberry Bliss card. I punched a narrow strip of Old Olive card using the Decorative Ribbon Border Punch and attached it behind one edge of another piece of the Peaceful Poppies Designer Series Paper. This panel is attached to the bottom section of the Blackberry Bliss card. The whole panel is attached to scored and folded Thick Whisper White card.  I printed the greeting from the Share Sunshine PDF download and cut out the image using the Layering Circle Dies. I coloured the hearts using the Dark Poppy Parade Stampin’ Blend and the leaves using the Dark Old Olive Stampin’ Blend.
 I coloured around the outside of the heart using the Light Blackberry Bliss Stampin’ Blend. The image is attached to a Whisper White scalloped circle cut using the Layering Circle Dies and then the card front using dimensionals.
To decorate the inside of the card I attached a piece of co-ordinating Designer Series Paper to the bottom of Whisper White card. You still have time to purchase the fantastic Share Sunshine PDF if you haven’t already. You can purchase the download here. It only costs $12.00 (USD).
Bye for now,
Kris
Product Used:


It’s your time
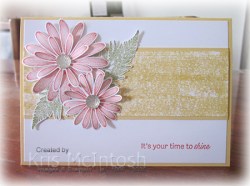
to Shine. Today’s card is one I created for a recent Facebook Live. I showcased using masking tape and ink to create backgrounds for your cards. This card uses Masking Tape and So Saffron ink to create the central panel on the card front. You simply take a piece of tape and lay it over the ink pad sticky side down and then attach the tape to Whisper White card. When you remove the tape you are left with a unique pattern of ink. I covered the Whisper White card by attaching the tape several times. I attached the coloured panel to So Saffron card and then Whisper White card.  I stamped the greeting from the Daisy Lane stamp set using Calypso Coral ink before attaching the panel to scored and folded So Saffron card. I stamped two large flowers and three small flowers onto Whisper White card using Calypso Coral ink and the images from the Daisy Lane stamp set. I used the Daisy Punch and the Medium Daisy Punch to cut out the flowers. I also stamped the leaf image from the Daisy Lane stamp set onto scrap Whisper White card twice using Pear Pizzazz ink and cut them out. I curled the petals on the flowers and stacked the two large flowers and one small flower together. I stacked the last two small flowers together before arranging the leaves and flowers onto the left hand side of the card front.
  I also added some Clear Faceted Gems to the centre of the flowers.
To decorate the inside of the card, I stamped the leaf image twice using Pear Pizzazz ink onto the lower left hand corner of Whisper White card. I stamped the small daisy onto scrap Whisper White card twice using Calypso Coral ink. I punched out the flowers using the Medium Daisy Punch, stacked them together and attached them over the leaf stems.
I really love the end result, don’t you. This masking tape technique is lots of fun and I am sure I will be using it again to create one of a kind cards.
Bye for now,
Kris
Product Used:


Celebrate

Today’s page shows some photos taken in 1990 at my husband’s grandmother’s 80th birthday. We travelled from Port Macquarie to Forbes in New South Wales for this event. The top photo shows Grandma with her grandchildren and the bottom photo is of myself with my husband and beautiful girls. I embossed strips of Whisper White card using the Ornate Floral 3D Embossing Folder. I cut Cherry Cobbler card using the Ornate Border Dies which I attached behind the embossed panels. I also wrapped the embossed card using the (retired) Cherry Cobbler 1cm Diagonal Stripe Ribbon.  I attached one embossed panel to the top of a Whisper White 12″ x 12″ page and one to the bottom of the page. I created my journaling on the computer and printed onto Whisper White card. The journaling panel and the photos are attached to Basic Gray card before being attached to the page. I cut “celebrate” from Cherry Cobbler card using the (retired) Celebrate You Dies.
A simple page but one I truly love because it brings back so many happy memories.
Bye for now,
Kris
Product Used:


Goodbye Beautiful You
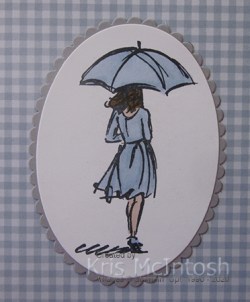
Today I am sharing a set of cards I created using the retiring stamp set Beautiful You. I also used the retiring 6″ x6″ 2019-2021 In-Colour Designer Series Paper (the colours are not retiring just the paper) and the retiring Delicate Lace Dies. I created three cards using the female images from the Beautiful You stamp set. The first card, has a piece of the Seaside Spray Designer Series Paper attached to Smoky Slate card and then scored and folded Thick Whisper White card.  I stamped the image from the Beautiful You stamp set onto Whisper White card using Memento Tuxedo Black ink and coloured the image using the Seaside Spray, Ivory and Bronze Stampin’ Blends. I cut out the image using the Layering Ovals Dies, attached it to a Smoky Slate scalloped oval and then the card front using dimensionals. To decorate the inside of the card I attached a strip of Smoky Slate behind one long edge of the same Seaside Spray Designer Series Paper before attaching it to Whisper White card.
 For the second card I embossed Whisper White card using the Coastal Weave 3D Embossing Folder (retiring). The embossed card is attached to scored and folded Smoky Slate card. I cut one edge of a piece of Seaside Spray card using the Delicate Lace Dies. I attached a piece of the Seaside Spray Designer Series Paper before attaching the panel to the card front. Once more I stamped the image from the Beautiful You stamp set onto Whisper White card using Memento Tuxedo Black ink.
  The image is coloured using the Soft Seaside, Ivory and Bronze Stampin’ Blends. The image is cut out using the Layering Ovals Dies, attached to a Smoky Slate scalloped oval and then the card front using dimensionals. To decorate the inside of the card I cut Soft Seaside card using the Delicate Lace Dies before attaching a piece of the Soft Seaside Designer Series Paper. The whole panel is attached to the bottom of Whisper White card.
 For the third card, I embossed Whisper White card using the Coastal Weave 3D Embossing Folder and attached it to scored and folded Smoky Slate card. I cut Soft Seaside card twice using the Delicate Lace Die and attached one die to each side of a strip of the Soft Seaside Designer Series Paper. The Designer Series Paper panel is attached to the card front.
  I stamped the image from the Beautiful You stamp set onto Whisper White card using Memento Tuxedo Black ink and coloured the image using Soft Seaside, Ivory and Bronze Stampin’ Blends. The image is cut out using one of the Layering Squares Dies, attached to a Smoky Slate scalloped square and then the card front using dimensionals. To decorate the inside of the card, I cut Soft Seaside card using the Delicate Lace Die, attached it behind a piece of Soft Seaside Designer Series Paper before attaching the panel to Whisper White card.
They look so pretty together don’t they.

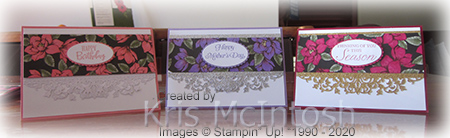
Because the first three cards were so lovely, I decided to create some more. This set uses the Subtle 3D Embossing Folder, Purple Posy Designer Series Paper and Purple Posy Stampin’ Blends.

This set uses Tufted 3D Embossing Folder, Rococo Rose Designer Series Paper and Rococ Rose Stampin’ Blends.

This set uses the Ornate Floral 3D Embossing Folder, Pretty Peacock Designer Series Paper and Pretty Peacock Stampin’ Blends.

I think I have just about used up all of this retiring Designer Series Paper. While I am sad to see the Beautiful You stamp set and the Delicate Lace Dies retire, I can’t wait to see what gorgeous new product will be available in the next Annual Catalogue.
Bye for now,
Kris
Product Used:
Unfortunately a lot of product I used on this page including the Designer Series Paper has already sold out.


Happy Birthday Noah

Today I am sharing the card I made for my Grandson Noah on the occasion of his 13th birthday. I haven’t been able to see him since early March and hate the idea of not seeing him for his birthday. However, hopefully we can catch up in person soon. I began by cutting Whisper White card using the large gear die from the Garage Gears Dies. I cut the die in half and attached it into the top right and left hand corners of Whisper White card. I attached a strip of the Come Sail Away Designer Series Paper across the bottom of the Whisper White card. I stamped the car image from the Geared Up Garage stamp set onto Whisper White card using Night of Navy ink. I stamped the “smoke” image from the Geared Up Garage stamp set below the card using Smoky Slate ink.  I cut out the image using one of the Layering Ovals Dies. I used an Aqua Painter to move the Night of Navy ink around inside the stamped car image to add some colour. I attached the car image to a Night of Navy scalloped oval which I cut using the same dies. The image panel is attached to the Whisper White panel using dimensionals. I cut my card base from Night of Navy card and added an extra score line across the centre of the front of the card. I attached my image panel to the lower scored section of the card front.
 To decorate the inside of the card, I attached a strip of the same pattern Come Sail Away Designer Series Paper across the bottom of Whisper White card. I stamped “happy birthday” from the Itty Bitty Birthday stamp set onto Whisper White card using Night of Navy ink. I cut the greeting into two separate words. I cut the numbers from Night of Navy card using an old Sizzix die and the “th” was cut using “birthday” from the Well Written Dies. I attached the words and the numbers onto a Whisper White panel before attaching it to the centre of the Designer Series Paper using dimensionals.
Happy Birthday Noah, I hop you had an amazing 13th birthday.
Bye for now,
Kris
Product Used:


Birthday Bonanza

Well I have achieved my ultimate aim in these cards, the only thing I had to stamp was the greeting! I cut the Birthday Bonanza Designer Series Paper to card front size and attached it to scored and folded Grapefruit Grove card. I cut Whisper White card using the 2nd largest rectangle from the Stitched So Sweetly Dies. I cut Grapefruit Grove card using the largest rectangle from the same Dies. I stamped the greeting from the Bonanza Buddies stamp set onto the bottom of the card using Memento Tuxedo Black ink. I attached the Whisper White rectangle to the Grapefruit Grove rectangle then the card front.  The Birthday Bonanza Designer Series Paper has some designs which are either the Koala, the Toucan or the Lion and for this card I cut out one of the Toucan’s holding balloons and attached it to the Whisper White rectangle.
To decorate the inside of the card, I cut out another Toucan, this time one with the party hat and attached it to the left hand side of Whisper White card.  I also stamped another of the greetings from the Bonanza Buddies stamp set using Memento Tuxedo Black ink.
So cute, so I had to make another one, using a different pattern from the Birthday Bonanza Designer Series Paper for the large panel on the card front. I used the same colours and of course, I used the Toucan images from the Designer Series Paper once more.
I had only one piece of the balloon patterned paper from the Birthday Bonanza Designer Series paper and used it for the last card. This time, I used the Layering Ovals for the image panel and I die cut the koala images to decorate the front panel. I didn’t add a Koala to the inside of the card, just a greeting.
 I just love these cards and just image how many you could make from one packet of the Birthday Bonanza Designer Series Paper just by cutting out the images and using them as the focal point of your card. I hope you enjoy this idea and take another look at your designer series paper stash to see what you can create using the images on the papers.
Bye for now,
Kris
Product Used:


Happy Mother’s Day

I thought I would share with you the card that I made for my Mum for Mother’s Day. As you are aware the Annual Catalogue is nearing it’s end. Because of Social Isolation I haven’t been able to run my classes and so I have a lot of Designer Series Paper that I haven’t used. So I am on a mission to use up as much as I can this month before they are all retired. So today’s card uses more of the Magnolia Lane Designer Series Paper. I must admit that I love this paper, especially because you can colour it! For this card, I cut a 5cm strip of the paper and coloured the flowers using the Dark Highland Heather Stampin’ Blend. I die cut some Silver Glimmer Paper (also retiring) using the Delicate Lace Dies (another product retiring).  I attached the coloured Magnolia Lane Designer Series Paper onto the die cut before attaching it to Whisper White card. The whole panel is attached to scored and folded Highland Heather card. I used the “Happy Mother’s Day” stamp from the Strong and Beautiful stamp set to create the greeting. This stamp has the greeting all on one line, so I inked the “happy” with Highland Heather ink and stamped onto Whisper White card. I stamped onto scrap paper until there was no ink left on the “happy” and then I inked the “Mother’s Day” and stamped it below the “Happy” using Highland Heather ink. I cut out the greeting using one of the Layering Ovals Dies.
 I attached the greeting to a Highland Heather scalloped oval and then the card front using dimensionals.
To decorate the inside of the card, I coloured a narrow strip of the Magnolia Lane Designer Series Paper using the Dark Highland Heather Stampin’ Blend and attached it to the bottom of Whisper White card. I cut a narrow strip of Silver Glimmer Paper and attached it so that it abutted the top of the Designer Series Paper.
I just love the way this looks and of course couldn’t resist creating more cards using different Stampin’ Blends, card and Glimmer Paper. I created some using Cherry Cobbler and Gold Glimmer Paper and more cards using Flirty Flamingo and Sparkle Glimmer Paper.
I think they all look lovely. I hope Mum loves her card as much as I do.


Bye for now,
Kris
Product Used:
Remembering

A couple of weeks ago I shared a page I created using a photo of my Grandfather in his uniform during WWII. I wanted to record what he did and where he served for my Grandchildren, so this page has no photos. I began by stamping one of the images from the Gallery Grunge stamp set onto a Mossy Meadow A4 sheet of card using Mossy Meadow ink. I also sponged the edges of the card using the same ink.  I used an old distressing tool to rough up the edges of the paper before attaching it to a 12″ x 12″ Whisper White page. I created the journaling on my computer and printed it onto Whisper White card before attaching it to Basic Black card. I attached the panel to the left hand side of the page. I cut the solid poppy from Poppy Parade card twice using the Poppy Moments Dies. I cut the detailed poppy overlays from Real Red card using the same dies. I cut the flower centres from Basic Black card and the leaves from Old Olive card using the Poppy Moments Dies. I attached the detailed flower to the solid flower before attaching the flower centres. I attached the leaves to the back of the flowers before attaching them to the upper right hand side of the page.
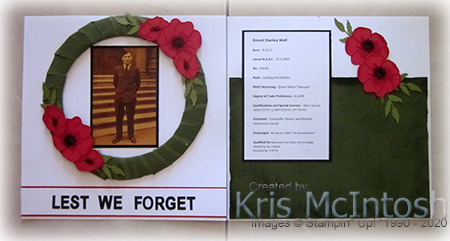 It’s a very simple page but I think they look great together.
Bye for now,
Kris
Product Used:


Beautiful Day

Today’s card shows off one of the designs I created for my Facebook Live this week. We followed a tutorial by Lisa Curcio which you can find here. She used a rectangle of designer series paper to create a different kind of focal point for your card. I loved the idea and share it with my followers on Facebook. Of course, I wanted to make it very user friendly for my customers, so I created a 6″ x 6″ template that they could use. This creates two card fronts with enough pieces to decorate the inside panel. To begin my card, I cut my designer series paper pieces from the beautiful Perennial Essence Designer Series Paper and used them as a guide as to where I would put my greeting. I stamped the greeting from the Floral Essence stamp set onto Whisper White card using Blackberry Bliss ink.  After stamping the greeting, I embossed the card using the Subtle 3D Embossing Folder. Once I embossed the Whisper White card, I attached the designer series paper pieces before attaching the whole panel to scored and folded Blackberry Bliss card. I stamped one large and two small flowers from the Floral Essence stamp set onto scrap Whisper White card using Blackberry Bliss ink and cut them out. I also stamped the leaf image from the Floral Essence stamp set three times onto scrap Whisper White card using Old Olive ink and punched them out using the Leaf Punch.
 I attached one small flower to the centre of the large flower using dimensionals. I attached the leaves to the back of the flowers before attaching them to the card front. I used dimensionals to attach the single small flower. Lastly I added Clear Faceted Gems (unfortunately no longer available) to the centres of the flowers.
To decorate the inside of the card, I attached a narrow strip of Blackberry Bliss card behind one long edge of a strip of the Perennial Essence Designer Series Paper before attaching it to the bottom of Whisper White card. I stamped the large flower from the Floral Essence stamp set onto scrap Whisper White card using Blackberry Bliss ink and stamped the flower centre using Crushed Curry ink. I cut out the flower and attached it just above the Designer Series Paper.
This card is really gorgeous when you see it in person, I’m not sure if it looks so pretty in the photos. I really would love to hear what you think.
Bye for now,
Kris
Product Used:


Magnolia Fancy Fold
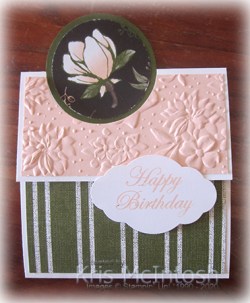
I don’t really know what you call this kind of fancy fold card but I thought it was fun and wanted to create one. I have been getting very inventive with the cards I create for the card kits I am mailing out to my ladies. It has made me look closer at some of our Designer Series Paper and today I am sharing my creation using the Magnolia Lane Designer Series Paper. I cut my card base from Whisper White card and attached Petal Pink card which I embossed using the Country Floral 3D Embossing Folder (so sad this one is retiring) to the top panel of the card front. I punched the panel using the 2-1/4″ Circle Punch. I attached another piece of Magnolia Lane Designer Series Paper to the bottom front panel. I cut the small flower from the Magnolia Lane Designer Series Paper and attached it to Whisper White card which I attached to the inside panel of the card base. I punched a 2-1/4″ Circle from Mossy Meadow card and attached it into the punched section of the card base. I punched the large flower from the Magnolia Lane Designer Series Paper using the 2″ Circle Punch and attached it to the Mossy Meadow 2-1/4″ Circle. To hold the card closed I stamped “happy birthday” from the Magnolia Blooms stamp set using Petal Pink ink and punched it out using the Pretty Label Punch. The greeting is attached to the lower panel using dimensionals so that the upper panel will be held in place.
I love the way this card turned out and I love the opportunity to use up some of this gorgeous Designer Series Paper. Let me know what you think.
Bye for now,
Kris
Product Used:


