Leaves and Greetings

Here is another card using the Forever Fernery Product Suite which I showed on my Facebook Live last week. This one features the second embossing folder in the Greenery Embossing Folders. This one embosses a leaf image at the top and bottom of the panel. These panels are narrower than standard folders and are designed for the Mini Stamp and Emboss Machine which will hopefully be released soon. The folders are only 8.3cm or 3-1/4″ wide but standard length. I like to cut my card so that it fits perfectly inside the embossing folder and these measurements work perfectly. So I embossed Just Jade card (a new in-colour) using this Greenery Embossing Folder. I attached the embossed panel to Whisper White card and then scored and folded Just Jade card.  Since I can’t order the in-colour inks until tomorrow, I stamped the small leaf from the Forever Fern stamp set onto Whisper White card using Shaded Spruce ink. The second leaf is stamped onto Whisper White card using Soft Sea Foam ink. I cut out the images with the co-ordinating Forever Flourishing Dies.
  I also cut Shaded Spruce card using one of the other leaf dies and cut it in half. I stamped the greeting from the Forever Fern stamp set onto Whisper White card using Shaded Spruce ink and punched it out using the 2″ Circle Punch. I attached the greeting to a 2-1/4″ circle punched from Gold Foil card. I attached the leaves to the card front and then the greeting using dimensionals.
To decorate the inside of the card, I embossed the lower right hand corner using the same folder from the Greenery Embossing Folders. I like the way this finishes the card and you could still write over the embossing if you need to. Beginning tomorrow the new Annual Catalogue goes live, so you will be able to begin purchasing these fabulous new products.
I’d love to hear what you think.
Bye for now,
Kris
Product Used:


To A Friend
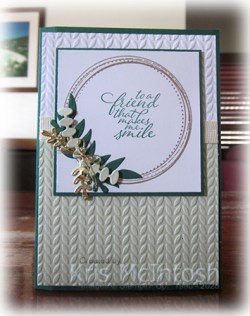
Today’s card is another that I made using the Forever Fernery Product Suite. I began by attaching a piece of Soft Sea Foam card to the bottom of Whisper White card. I embossed the whole piece using one of the Greenery Embossing Folders. I wrapped the top of the Soft Sea Foam card with a piece of the Open Weave Ribbon from the Forever Greenery Trim Combo Pack. I attached the embossed card to scored and folded Shaded Spruce card. I stamped the circle image from the Swirly Frames stamp set onto Whisper White card using Crumb Cake ink. I stamped the greeting from the Forever Fern stamp set inside the circle image using Shaded Spruce ink.  I cut two small leaf images from Shaded Spruce card and two from Gold Foil Card. I cut one long semi-circle leaf image from Shaded Spruce card and a second smaller semi-circle image from Soft Sea Foam card. I layered the images onto the lower left hand corner of the stamped circle image. I tied a bow in the Gold Metallic Trim from the Forever Greenery Trim Combo Pack and attached it to the centre of the layered die cut images.
  I attached the Whisper White card to Shaded Spruce card and then the card front using dimensionals.
To decorate the inside of the card, I embossed Soft Sea Foam card with the same Greenery Embossing Folder and attached it to the bottom of Whisper White card, I stamped two small leaf images from the Forever Fern stamp set using Shaded Spruce ink. I wrapped the top of the embossed card using the Vanilla Open Weave Ribbon from the Forever Greenery Trim Combo Pack before attaching the panel to the inside of the card.
I love the way this card has turned out, it is just so pretty.
Bye for now,
Kris
Product Used:


A Night Out
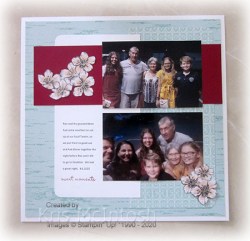
The page I am sharing with you today shows off a couple of photos taken when we went out to dinner with our eldest daughter and her family. I cut down a 12″ x 12″ piece of Pool Party card and stamped it with the Birch Background stamp using Pool Party ink. I love this background because it is forgiving when you want to cover a whole piece of card like this one. I attached the stamped card to a 12″ x 12″ Whisper White page.  I punched the two right hand corners of a piece of Parisian Blossoms Specialty Designer Series Paper before attaching it to the right hand side of the stamped Pool Party card. I printed my journaling onto Whisper White card, punched the two left hand corners and attached it to the page, partially over the left hand edge of the Designer Series Paper.
  I stamped “sweet moments” from the long retired Remember This stamp set using Cherry Cobbler ink. I attached a strip of Cherry Cobbler card across the top of the page before attaching my photos. I fussy cut flowers from the Parisian Blossoms Specialty Designer Series Paper and attached some to the Cherry Cobbler card and three to the corner of the bottom photo. I attached the larger of these flowers using dimensionals. I didn’t add a title to this page because I didn’t think it was necessary.
Another simple page but one that brings a smile to my face when I remember this night out. I do hope that I am inspiring you to get your photos printed and onto a page to be shared with your family and friends.
Bye for now,
Kris
Product Used:


Essential Sunshine
Today’s card uses some of the soon to be retired Perennial Essence Designer Series Paper. I attached the Designer Series Paper to Blackberry Bliss card and then scored and folded Thick Whisper White card. I printed the image from the Share Sunshine PDF download onto Whisper White card. I cut out the image using one of the Layering Circle Dies. I coloured the image using Dark Petal Pink, Dark Old Olive and Dark Real Red Stampin’ Blends. I cut a scalloped circle from Blackberry Bliss card using the Layering Circle Dies. I attached the image to the scalloped circle and then the card front using dimensionals.
 To decorate the inside of the card, I attached a piece of co-ordinating Perennial Essence Designer Series Paper across the bottom of Whisper White card. I cut the greeting from the Share Sunshine PDF Download using the Stitched Rectangle Dies. I attached the greeting to a Blackberry Bliss rectangle, cut using the same dies, and then the Whisper White card.
I really love this image from the Share Sunshine PDF download. If you haven’t purchased your download yet, you have until the 3rd June to do so. The cost is $12.00 (USD) and the total amount is donated to charities helping to deal with the CORVID-19 pandemic. The great thing is that once you have the download, you can print it as many times as you wish. Such fun!
Bye for now,
Kris
Product Used:


Forever Fernery

Yesterday I shared the Forever Fernery Product Suite on my Facebook Live. This product suite can be found on pages 108 – 110 of the 2020-2021 Annual Catalogue. Today I thought I would share the cards I made for my blog viewers. I like the idea of sharing ideas to cater for all kinds of crafters. The first card is quite simple and uses a Whisper White Note Card as the card base. I stamped the leaf image from the Forever Fern stamp set onto the Note Card using Shaded Spruce ink.  I also stamped the greeting from the Forever Fern stamp set using Basic Gray ink. I also stamped the leaf image onto the front of the envelope.
For the second card I stamped the same leaf image from the Forever Fern stamp set using Shaded Spruce ink. I stamped the same image onto scrap Whisper White card and cut it out using the Forever Flourishing Dies.  I attached the die cut leaf over the stamped leaf before stamping the greeting from the Forever Fern stamp set using Basic Gray ink. I attached the stamped panel to Shaded Spruce card and then scored and folded Thick Whisper White card. I tied a bow in the gold thread which is part of the Forever Greenery Trim Combo Pack and attached it over the stems of the leaf images. To decorate the inside of the card I stamped the leaf image onto the lower left hand corner.
 For the third card I embossed Whisper White card using one of the Greenery Embossing Folders. I attached a piece of the Forever Greenery Designer Series Paper across the bottom of the embossed card. I attached a piece of the ribbon which is part of the Forever Greenery Trim Combo Pack across the top of the Designer Series Paper before attaching the panel to scored and folded Shaded Spruce card. I stamped the floral image onto Whisper White card twice using Shaded Spruce ink.
  I stamped the floral image onto scrap Whisper White card using Shaded Spruce ink and cut it out using the co-ordinating Forever Flourishing Dies. I attached the die cut leaf over the stamped images before stamping the greeting using Basic Gray ink. The stamped panel is attached to Shaded Spruce card before attaching to the card front using dimensionals. To decorate the inside of the card, I stamped another of the leaf images onto the lower left hand corner of Whisper White card using Shaded Spruce ink. I embossed Whisper White card using the Greenery Embossing Folder and attached it across the bottom of the stamped Whisper White card. I attached a length of the ribbon from the Forever Greenery Trim Combo Pack before attaching the whole panel to the inside of the card.

I think the cards look lovely together don’t you? I really love this Product Suite, the images in the Forever Fern stamp set are distinctive, which, as you know, makes the images look so much more lifelike. Unfortunately, the photos don’t do it justice, they are so much better in person. I did share another card using this Product Suite in my Facebook Live and I will share that with you on another day.
Bye for now,
Kris
Product Used:


Some retiring
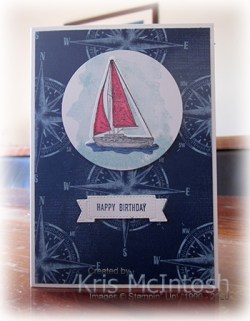
……some not. Today’s card again features Designer Series Paper, this time the Come Sail Away Designer Series Paper. I cut the paper into card front sized pieces and attached them to scored and folded Thick Whisper White card. I cut a large circle from Whisper White card using the Layering Circles Dies. I stamped the circle using the background stamp from the Love What You Do stamp set using Balmy Blue ink which I stamped onto scrap paper first. I didn’t mind how uneven it stamped because I wanted it to have a “watercolour” look. I attached the stamped circle to the card front using dimensionals. I stamped the large boat image from the Sailing Home stamp set onto Whisper White card using Memento Tuxedo Black ink. I coloured the image using Light Real Red, Light Smoky Slate and Light Night of Navy Stampin’ Blends. I cut out the image using the co-ordinating Come Sail Away Die and attached the boat to the stamped Whisper White circle.
  I stamped “happy birthday” from the Itty Bitty Greetings stamp set onto Whisper White card using Night of Navy ink and cut it out using the banner die from the Come Sail Away Dies. The greeting is attached to the card front using dimensionals.
To decorate the inside of the card, I attached a strip of the same Come Sail Away Designer Series Paper to the bottom of Whisper White card. I stamped the small boat image above the Designer Series Paper using Memento Tuxedo Black ink. I coloured the image using the same blends as for the boat on the front of the card.
Such a simple card, but I think it is a great guy card.
Bye for now,
Kris
Product Used:


Free As A Bird

Today I am sharing some cards I made using the Free As a Bird stamp set and the Bird Ballard Designer Series Paper. The first card uses Bird Ballard Designer Series Paper attached to scored and folded Basic Gray card. I cut ovals from Whisper White card using the Layering Ovals Dies and stamped the image from Free As a Bird using Tuxedo Black ink. The image is coloured using Light Poppy Parade, Light Night of Navy. Light Balmy Blue, Light Old Olive and Light Soft Suede Stampin’ Blends.  I attached the image panel to a Basic Gray scalloped oval before attaching it to the card front using dimensionals.
The second card has Bird Ballard Designer Series Paper attached to scored and folded Basic Gray card. I die cut, stamped and coloured the image in the same manner as the first card. This time I layered some Calypso Coral 3/8″ Satin Ribbon to the back of the panel before attaching to the card front using dimensionals.
 The third card follows the same principals as the first two but this time I punched the image panel using the 2″ Circle Punch and attached it to a 2-1/4″ circle punched from Basic Gray card. The image panel is attached to the centre of a Pearlised Doily before being attached to the card front.
For the next card, I embossed Whisper White card using the Subtle 3D Embossing Folder. I attached a piece of Designer Series Paper across the bottom of the embossed panel and wrapped the top of the Designer Series Paper with Petal Pink Metallic Edge Ribbon. I cut a Pearlized Doily in half and attached half to the Designer Series Paper before attaching the panel to scored and folded Basic Gray card. The image panel is stamped and coloured as before and punched out using the 2″ Circle Punch. I attached the image to a 2-1/4″ Basic Gray circle before attaching the image panel to the card front using dimensionals.
 For the last card, I embossed Whisper White card using the Subtle 3D Embossing Folder before attached a piece of the Bird Ballard Designer Series Paper to the left hand side. I wrapped the edge of the Designer Series Paper with Petal Pink Metallic Edge Ribbon before attaching the whole panel to scored and folded Basic Gray card. The image from the Free As A Bird stamp set is stamped, coloured and punched out using the 2″ Circle Punch. I attached the image to a 2-1/4″ Basic Gray circle and a Pearlised Doily before attaching to the card front.
Each of the cards is decorated on the inside using a strip of matching Bird Ballard Designer Series Paper across one edge of Whisper White card.

I love how these cards turned out, don’t you?
Bye for now,
Kris
Product Used:


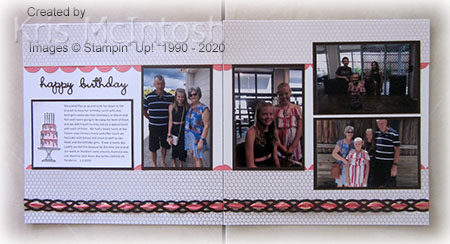
March Birthdays

Today’s pages document a lunch we had with two of our Granddaughters who celebrate their birthdays during the month of March. Ron and I were going to be away for both birthdays, so we took them out to lunch before we went. Such a lovely day! I cut Flirty Flamingo with the retiring die from the Seasonal Layers Dies and attached the border behind the edges of some of the Golden Honey Specialty Designer Series Paper, a Sale-A-Bration item. I added Early Espresso mats to my photos and journaling before attaching them to the pages. I punched Early Espresso card using the retiring Braided Border Punch.
  I coloured Whisper White 3/8″ Gold Metallic Edge Ribbon using the Dark Flirty Flamingo Stampin’ Blend. The ribbon is threaded through the bunched border before attaching them across the bottom of the pages. I created the journaling on my computer and printed onto Whisper White card. I stamped the cake images from the Piece of Cake stamp set onto Whisper White card using Memento Tuxedo Black ink. The images are coloured using Light and Dark Flirty Flamingo, Light Smoky Slate and Dark Daffodil Delight Stampin’ Blends. I punched out the cake stand and the cake images using the Cake Builder Punch. I trimmed the smaller cake from one image and attached it to the page on top of the cake stand with the double image on top. I fussy cut the candles and attached them to the top of the cake images. I cut Early Espresso card using the Well Written Dies to create the title.
I love how these pages turned out. I have to tell you that threading the ribbon through the punched border was a little trickier than I anticipated but totally worth the effort.
Bye for now,
Kris
Product Used:


Two For

the price of one. Today I am sharing two cards I made from one card front sized piece of Designer Series Paper. It came about because I knew that you can use the Stitched Rectangle Dies to cut pieces of Designer Series Paper or card to fit on top of several of the Ornate Layers Dies. So I cut a rectangle from the card front sized piece of Peaceful Poppies Designer Series Paper. I put the rectangle piece to one side and attached the outside piece of the Designer Series Paper to scored and folded Thick Whisper White card. I cut a smaller rectangle from Blackberry Bliss card and attached it inside the rectangle cut out using dimensionals.  I stamped the image from the Painted Poppies stamp set onto Whisper White card using Memento Tuxedo Black ink. I coloured the image using Blackberry Bliss and Old Olive Stampin’ Blends.
  I cut out the flower image using another of the Stitched Rectangle Dies and attached it to the centre of the Blackberry Bliss rectangle. I stamped “Happy Birthday” from the Itty Bitty Birthday stamp set onto Whisper White card using Blackberry Bliss ink. I cut out the image using one of the Stitched Rectangle Dies. I attached the greeting to the card front using dimensionals.
 To decorate the inside of the card I stamped the greeting from the Peaceful Moments stamp set onto Whisper White card and attached a piece of the co-ordinating Peaceful Poppies Designer Series Paper across the bottom of the card.
To create the second card, I embossed Blackberry Bliss card using the Subtle 3D Embossing Folder before attaching it to scored and folded Thick Whisper White card. I cut Whisper White card using the Ornate Layers Die.  I attached the rectangle piece of the Peaceful Poppies Designer Series Paper I cut when creating the first card to the centre of the Die cut. The whole piece is attached to the centre of the card front.
 I stamped the greeting from the Peaceful Moments stamp set onto Whisper White card using Blackberry Bliss ink and cut it out using one of the Stitched Rectangle Dies. The greeting is attached to the card front using dimensionals.
To decorate the inside of the card, I stamped the flower from the Painted Poppies stamp set onto Whisper White card using Memento Tuxedo Black ink. I stamped the greeting from the Peaceful Moments stamp set beside the flower using Blackberry Bliss ink. I coloured the flower using Blackberry Bliss and Old Olive Stampin’ Blends.
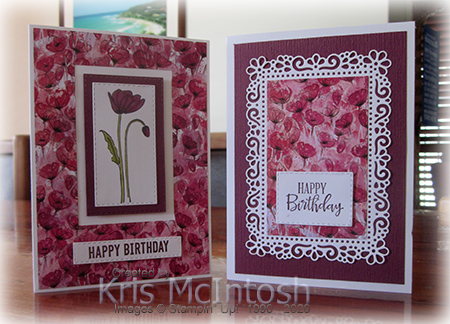
I love the fact, that I got two cards from one piece of Designer Series Paper 10cm x 14.3cm. Woohoo! It makes your Designer Series Paper go further and I think both cards are really lovely don’t you.
Bye for now,
Kris
Product Used:


Something New

During my last Facebook Live, I shared the In Good Taste Product Suite from the soon to be released 2020-2021 Annual Catalogue – so exciting! I also created three cards to cater for Beginner, Casual and Avid stampers. I thought you might like to see them with a little more detail. Beginner cards cannot get any easier than using our Note Cards and Envelopes. These are great value and you get 20 cards with envelopes in the package. I stamped the feather image from the Tasteful Touches stamp set twice onto the Note Card using Gray Granite ink.  I also stamped the greeting from the Tasteful Touches stamp set using Early Espresso ink. The envelope is also stamped twice using the feather image and Gray Granite ink. Simple but so effective, don’t you think?
For the Casual Stamper, I added a few layers but kept the design to ink and paper. I stamped the flower from the Tasteful Touches stamp set onto Whisper White card using Petal Pink. I stamped the same image onto a Post-it-Note, cut it out and attached it over the stamped image. With the Post-It-note mask in place, I stamped the feather image twice using Gray Granite ink. I removed the mask and stamped the greeting from the Tasteful Touches stamp set using Early Espresso ink. I attached the Whisper White stamped panel to Gray Granite card and then scored and folded Thick Whisper White card.
 To decorate the inside of the card, I stamped the feather image twice onto the lower left hand corner of the inside of the card.
To create the card for the Avid Stamper, I changed the format up – just a bit! I embossed Petal Pink card using the Tasteful Textures 3D Embossing Folder. I attached a strip of the In Good Taste Designer Series Paper to the left hand side of the embossed card before attaching the panel to scored and folded Early Espresso card.  I used the Tasteful Labels Dies to cut Whisper White card. I stamped the feather image from the Tasteful Touches stamp set three times onto the die cut using Smoky Slate ink without re-inking. I stamped the greeting from the Tasteful Touches stamp set onto the die cut using Early Espresso ink before attaching the image panel to the card front using dimensionals. To decorate the inside of the card, I stamped the feather from the Tasteful Touches stamp set three times onto the lower left hand corner of Whisper White card using Smoky Slate ink without re-inking. I attached a narrow strip of Early Espresso card behind one long edge of a strip of Petal Pink card embossed using the Tasteful Textures 3D Embossing Folder. The embossed panel is attached to the stamped Whisper White card, cover the ends of the stamped feathers.

I am extremely happy with my first use of this Product Suite. The cards look lovely don’t you think? I am sure you will see me using this set a lot more.
Bye for now,
Kris
Product Used:


