Elemental Easel Card
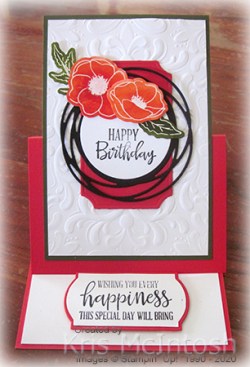
Well I am on a roll using the beautiful Peaceful Poppy Elements, so today’s easel card is created using more of these gorgeous die cuts. For this card, I used two of the flowers which are already embossed onto Watercolour paper and coloured them using an Aqua Painter and Poppy Parade re-inker. I also coloured two of the leaves which again are already embossed onto Watercolour paper using an Aqua Painter and Mossy Meadow re-inker. To do this I placed a drop of the re-inker in each colour onto a clear block, so that I could use my Aqua Painter to mix the re-inker with water and add to the flowers and leaves. Anyway, I set the flowers and leaves aside to dry while I created the rest of the card. I embossed a piece of Whisper White card using the Parisian Flourish 3D Embossing Folder and attached it to a piece of Mossy Meadow card. I cut Poppy Parade card using on the dies from the Painted Labels Dies and attached it to the card front. I cut Basic Black card using another of the Painted Labels Dies and attached it over the Poppy Parade die cut.  I stamped “Happy Birthday” from the Peaceful Moments stamp set onto Whisper White card using Memento Tuxedo Black ink and cut it out using one of the circles from the Layering Circles Dies. The greeting is attached to the centre of the Basic Black die cut. I attached the flowers and leaves to the card front using dimensionals under the smallest flower. I cut Poppy Parade card (10.5cm x length of the A4 sheet, scored along the longest side at 7.4 and 14.8cm).
  I used my bone folder on the score lines to give nice folds and attached the image panel to the centre of the section below the 7.4cm score line. (Gosh I hope that makes sense.)
To decorate the inside of the card, I attached a piece of Whisper White card which gives me somewhere to write a message. I stamped the greeting from the Peaceful Moments stamp set onto Whisper White card and cut it out using the label die from the Painted Labels Dies. There is a score line on this die and I cut along the score line to reduce the size of the label. I cut Poppy Parade using the same die and attached the greeting. As you can see by trimming the Whisper White label, the greeting now has a Poppy Parade border. The greeting is attached to the Whisper White card using dimensionals so that my easel will sit up nicely. However, if folds flat to go into a standard sized envelope. Yay!
I really am loving using these dies and I hope that you are enjoying my creations using them.
Bye for now,
Kris
Product Used:


Case This Sketch #359
I created today’s card using the current challenge at Case This Sketch this week. Since I had my Peaceful Poppies Elements out on the desk, I decided to use them once more for this sketch. I embossed Whisper White card using the Parisian Flourish 3D Embossing Folder and attached it to Poppy Parade card. I cut Whisper White and Basic Black card using the Stitched Rectangle Dies. I stamped the greeting from the Itty Bitty Greetings stamp set onto the bottom of the Whisper White rectangle using Memento Tuxedo Black ink. I cut Poppy Parade using the border die from the Painted Labels Dies.  The Poppy Parade die cut is attached to the back of the Basic Black rectangle before being attached to the card front. I attached the die cut from the Peaceful Poppies Elements to the stamped Whisper White rectangle before attaching it to the card front. I cut two borders from Basic Black card using the Painted Labels Dies.
  I trimmed the length of the borders and attached them below the image panel on the card front.
To decorate the inside of the card, I stamped the greeting from the Peaceful Moments stamp set onto Whisper White card using Memento Tuxedo Black ink. I also attached another of the die cuts from the Peaceful Poppies Elements to the left of the greeting.
Oh My Goodness, I am loving how easy it is to create a card using these fabulous Peaceful Poppies Elements. Thank you Stampin’ Up! and thank you Case This Sketch for another great challenge.
Bye for now,
Kris
Product Used:


Just Add Ink #492
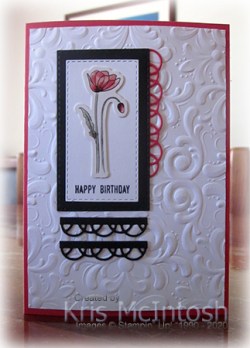
 I saw the sketch challenge at Just Add Ink this week and decided to play along. I have had the Peaceful Poppies Elements for quite a while and decided that it was about time, I brought them out and used them! I stamped the greeting from the Peaceful Moments stamp set onto Whisper White card using Memento Tuxedo Black ink. I embossed the top two-thirds of the stamped Whisper White card using the Parisian Flourish 3D Embossing Folder. I attached the border die from the Peaceful Poppies Elements across the card using dimensionals on the ends only to cover where the embossing ended. I cut an oval from Whisper White card using the Stitched Shapes Dies and attached it to a scalloped Basic Black oval cut using the Layering Ovals Dies.
 I attached the Peaceful Poppies Elements die cut to the Whisper White oval. The whole panel is attached to the card front under the border element.
  I added another die cut from the Peaceful Poppies Elements to the card front using mini dimensionals where necessary.
To decorate the inside of the card I stamped a greeting from the Peaceful Moments stamp set using Memento Tuxedo Black ink. To compliment the greeting, I attached another die cut from the Peaceful Poppies Elements just to the left.
This card was made really easy to assemble by using these gorgeous Peaceful Poppies Elements. I actually made four cards the same so that I have a few in my stash. Thank you so much Just Add Ink for a fabulous challenge.
Bye for now,
Kris
Product Used:


More First Day

Last week I shared a page I made for the first day of school this year. I wanted to do a double page layout with photos of all of my grandchildren. However, I only had Sarah’s childrens photos printed and when I went to print Emma’s first day photos, my Cannon Picturemate failed me! Apparently it’s not fixable so I am going to have to buy a new photo printer. Anyway, I got the photos and today’s page shows Emma’s three on the girls first day of school and Noah’s second day. I used the same patterned piece of paper from the Tropical Oasis Designer Series Paper but this time I attached it down the right hand side of the page. I punched a strip of Early Espresso card using the Decorative Ribbon Border punch which I attached to the left hand side of the paper first. I cut Early Espresso card to mat my photos and journaling. I hand wrote the journaling onto a journal card I had on hand (not Stampin’ Up! but I could have written on Whisper White card) using the 0.5 Journaling Pen. I also attached one of the stickers from the Tropical Oasis Memories and More card pack to the journaling card.

I didn’t add a title to this page as the one from last week said it all. Again this page is my style, simple, but when you put them together they do look lovely, don’t they?
Kris
Product Used


Healing Vibes
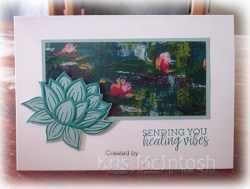
I made today’s card for a friend who recently had an operation. I stamped the greeting from the Healing Hugs stamp set onto the lower right hand corner of scored and folded Thick Whisper White card using Bermuda Bay ink. I attached a piece of the Lily Impressions Designer Series Paper to Pool Party card and then the card front. I stamped the large water lily from the Lovely Lily Pad stamp set onto Pool Party card using Bermuda Bay ink. I cut out the image using the Lily Pad Dies.  I also cut out the open large lily from Bermuda Bay card using the Lily Pad Dies. I attached the die cut to the stamped lily and then the card front using dimensionals.
To decorate the inside of the card I stamped the greeting from the Healing Hugs stamp set using Bermuda Bay ink. I stamped the small water lily from the Lovely Lily Pad stamps set onto Pool Party card using Bermuda Bay ink. I cut out the flower using the Lily Pad Dies. I stamped the double leaf image from the Lovely Lily Pad stamp set onto Pretty Peacock card using Pretty Peacock ink.  I cut out the image using the Lily Pad Die. I attached the leaves to the back of the small lily and then to the inside of the card to the left of the greeting.
You know the best thing about this card? The Lovely Lily Pad stamp set, the Lily Pad Dies and the Lily Impressions Designer Series Paper are all FREE with a qualifying order during Sale-A-Bration. So knock yourself out shopping and earn some lovely product for FREE!
Did you also notice that this card is exactly the same layout as this card I shared with you previously.
Bye for now,
Kris
Product Used:


Hello Fabulous

Today’s Fancy Fold is a “W” card. Sounds interesting doesn’t it? I think I might have shared one of these with you previously but this one uses the Dressed to Impress stamp set from the 2020 Handmade For You Mini Catalogue. I began by embossing Whisper White card using the Tufted 3D Embossing Folder. I attached the embossed card to scored and folded Smoky Slate card. To decorate the front of the card I borrowed an idea I saw somewhere, on Pinterest, I believe. Unfortunately, I can’t find it now. To do this you need to cut two scalloped circles from Smoky Slate card, one circle from Whisper White and one circle from Silver Foil. The last piece you need is cut from Whisper White card, which is folded in half and when you cut it with the circle you leave them attached at the folded edge.  All of the circles and scalloped circles are cut using the Layering Circle Dies. I attached the Silver Foil circle to the inside of the folded circles before attaching them to a Smoky Slate scalloped circle. You might need to trim the Silver Foil circle so that it sits below the score line. I attached the second Smoky Slate scalloped circle to the top of the folded Whisper White circle before attaching the panel to the card front. I stamped the greeting using Poppy Parade and the lipstick image using Memento Tuxedo Black ink onto the last Whisper White circle. The greeting and the lipstick image are from the Dressed to Impress stamp set. I coloured the lipstick image using Dark Poppy Parade and Smoky Slate Stampin’ Blends.
  The stamped circle is attached to the top of the Smoky Slate scalloped circle. When you lift the top circle you get a mirror like effect from the Silver Foil, creating a kind of makeup mirror – someone(?), was very clever! To decorate the inside of the card, I embossed two pieces of Whisper White card using the Tufted 3D Embossing Folder.
  I scored a strip strip of Smoky Slate card to create the “W” mechanism. This mechanism is attached to the outside of each of the panels before they are attached to the inside of the card. I created four panels to fit onto the “W” mechanism from Whisper White, Poppy Parade and Smoky Slate card. For the first panel I stamped the greeting from the Dressed to Impress stamp set using Poppy Parade ink.
 For the second panel I stamped the perfume image and coloured it using Light So Saffron, Light Smoky Slate and Light Poppy Parade Stampin’ Blends. The third panel I didn’t stamp so I would have somewhere to write a greeting. For the last panel I stamped the shoe image from the Dressed to Impress stamp set using Memento Tuxedo Black ink. I covered the image with a post-it-note mask and stamped the shoe a second time. I removed the mask and coloured the image using Poppy Parade and Light Smoky Slate Stampin’ Blends.
Isn’t this a fun fold? When you fold the card closed, the “W” mechanism stays hidden inside the card and pops up when you open it. The front of the card lifts as well, so it’s a kind of double fun fold! I’d love to hear what you think.
Bye for now,
Kris
Product Used:


Thank You
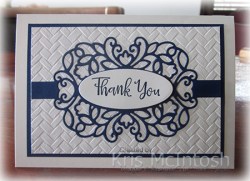
I recently needed to make a Thank You card and the recipients were going to be a mixture of men and women, so I couldn’t go with my usual flowers! So this is what I created. I embossed Very Vanilla card using the Coastal Weave 3D Embossing Folder and attached it to Night of Navy card. The whole panel is attached to scored and folded Thick Very Vanilla card.  I cut Night of Navy card using one of the dies from the Detailed Bands Dies. I attached the band across the embossed Very Vanilla card. I stamped “Thank You” from the Peaceful Moments stamp set onto Very Vanilla card using Night of Navy ink. I cut out the greeting using the oval die from the Detailed Bands Dies.
 I attached the greeting to the centre of the Night of Navy die cut using dimensionals.
To decorate the inside of the card, I embossed a narrow strip of Very Vanilla card using the Coastal Weave 3D Embossing Folder. I attached a narrow strip of Night of Navy behind one long edge before attaching the panel to the inside of the card.
Simple, but I think, really lovely. We have so many beautiful dies and embossing folders to work with and sometimes they are all you need.
Bye for now,
Kris
Product Used:


Koala Birthday

I just love the cute little Koala image in the Bonanza Buddies stamp set. So I couldn’t resist using him on this card. I attached a piece of Birthday Bonanza Designer Series Paper to the left hand side of Whisper White card. I stamped “happy birthday” from the Bonanza Buddies stamp set onto the lower right hand corner using Memento Tuxedo Black ink. I attached the panel to scored and folded Bermuda Bay card. I cut Bermuda Bay card using the Stitched So Sweetly Dies and attached it to the card front. I used a smaller die from the Stitched So Sweetly Dies to cut Whisper White card. I stamped the balloon string image from the Bonanza Buddies stamp set onto the Whisper White card using Memento Tuxedo Black ink.  I stamped one balloon using Bermuda Bay ink onto the top of the balloon strings before attaching the panel to the card front. I cut Daffodil Delight and also Coastal Cabana card using the balloon die from the Bonanza Dies and attached them to the top of the other balloon strings. I stamped the Koala from the Bonanza Buddies stamp set onto scrap Whisper White card using Smoky Slate ink and stamped the nose and eye image over the top using Memento Tuxedo Black ink. I used the co-ordinating Bonanza Die to cut out the Koala before attaching him to the stamped Whisper White panel. I stamped the birthday hat from the Bonanza Buddies stamp set onto scrap Whisper White card using Bermuda Bay ink and cut it out using the co-ordinating Bonanza Die.
  I also stamped the pom-pom image onto scrap Whisper White card using Coastal Cabana ink and cut it out using the co-ordinating Bonanza Die. I attached the pom-pom to the birthday hat and then to to the Whisper White panel using Mini Glue Dots.
To decorate the inside of the card, I stamped another greeting from the Bonanza Buddies stamp set using Memento Tuxedo Black ink. I also stamped one of the “present” images using Bermuda Bay ink. The co-ordinating ribbon image is stamped over the top using Memento Tuxedo Black ink.
These images are such fun and I know I am going to have fun playing with this stamp set.
Bye for now,
Kris
Product Used:


First Day 2020
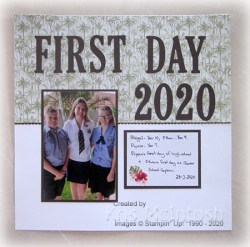
Today’s page is my signature style – simple! I wanted to create a layout using the photo of my grandchildren starting their first day of school for the year. I punched a length of Early Espresso card using the Decorative Ribbon Border Punch and attached it behind one long edge of a piece of the Tropical Oasis Designer Series Paper. The paper is attached across the top of a Whisper White 12″ x 12″ page. I attached my photo to Early Espresso card before attaching it to the page.  I wrote my journaling by hand onto some 4″ x 3″ journaling cards I had on hand and added one of the stickers from the Tropical Oasis Memories and More Card Pack to the journaling panel. The panel is attached to Early Espresso card before being attached to the page. I cut the letters for the title from Early Espresso card using the now retired Large Letters and Large Numbers Dies. It’s such a simple page but I love how the Designer Series Paper compliments the photo.
Bye for now,
Kris
Product Used:
More Birthday Dies

After my first success with the Happy Birthday To You stamp set and the Birthday Dies, I decided to have another play. One of the dies in the Birthday Dies cuts out only the flowers from the birthday cake image. Such fun. So, I decided to play with some images that I had already coloured. I stamped the birthday cake from the Happy Birthday To You stamp set twice onto Whisper White card using Memento Tuxedo Black ink.  I coloured the image using Flirty Flamingo, Dark Soft Sea Foam, Dark Daffodil Delight and Dark Petal Pink Stampin’ Blends. I used the Birthday Die to cut out the flowers. I embossed Flirty Flamingo card using the Country Floral 3D Embossing Folder and attached it to scored and folded Thick Whisper White card.
  I cut Whisper White card using the largest stitched scalloped rectangle from the Stitched So Sweetly Dies. I stamped “happy birthday” from the Perennial Birthday stamp set onto the top right hand corner using Flirty Flamingo ink. I attached one of the die cut flowers to the lower left hand corner of the stitched scalloped rectangle before attaching the panel to the card front.
To decorate the inside of the card, I stamped the greeting from the Perennial Birthday stamp set using Flirty Flamingo ink. I attached the second set of die cut flowers to the right of the greeting. Let me say that wasn’t my original plan but I had a smudge I needed to cover and it seemed to work.
I loved this card and decided to make two more using different colours. The first one uses Poppy Parade card and ink as well as Poppy Parade, Light Old Olive and Dark Daffodil Delight Stampin’ Blends. The second one uses Highland Heather card and ink as well as Highland Heather, Dark Granny Apple Green and Dark Daffodil Delight Stampin’ Blends.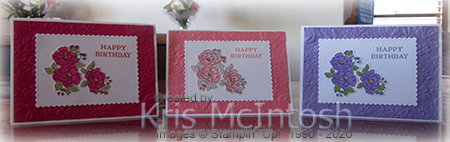
Don’t they look cute? Now I have a few more cards in my stash for upcoming birthdays. Let me know what you think!
Bye for now,
Kris
Product Used:


