More Happy Birthday To You
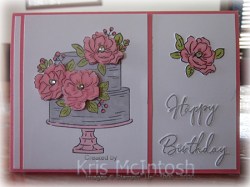
Today’s card uses the Happy Birthday To You stamp set which you can earn for free during Sale-a-Bration. I attached Whisper White card to scored and folded Flirty Flamingo card. I stamped the birthday cake image onto Whisper White card using Memento Tuxedo Black ink. I coloured the image using Light Smoky Slate, Flirty Flamingo and Light Old Olive Stampin’ Blends.  I attached the image to Flirty Flamingo card and then to the left hand side of the card front. I stamped “happy birthday” from the Happy Birthday to You stamp set onto Whisper White card using Smoky Slate ink. I fussy cut the greeting and attached it to the right hand side of the card front.
  I stamped the flower section of the birthday cake onto scrap Whisper White card using Memento Tuxedo Black ink. I coloured the flowers only using Flirty Flamingo Stampin’ Blends and cut them out. I attached each of the flowers over the co-ordinating one on the card front using dimensionals. I stamped the flower section of the birthday cake image onto scrap Whisper White card and coloured the flowers using Flirty Flamingo and the leaves using the light Old Olive Stampin’ blends.
  I fussy hand cut the flowers and I attached the single flower to the top right hand corner of the card front.
I attached the double flower with leaves to Whisper White card and stamped the greeting from the Perennial Birthday stamp set to the right of the flowers using Smoky Slate ink. The whole panel is attached to the inside of the card.
Bye for now,
Kris
Product Used:


Celebrate
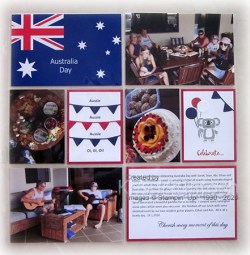
Today I am sharing with a pocket page I created with photos from our Australia Day this year. I found a photo of our flag on the internet and added the title before I printed it. I added various photos of the day including some of our somewhat traditional Aussie Australia Day foods. I couldn’t help adding that now famous chant – Aussie, Aussie, Aussie, Oi, Oi, Oi! The flags are cut using the Bonanza Dies. I thought that the cute little Koala from the Bonanza Buddies made a great embellishment for the page.  The balloon strings are stamped using Memento Tuxedo Black ink. I also stamped the Real Red Balloon. I die cut the Night of Navy and Whisper White balloons using the Bonanza Dies.
  The Koala is stamped in Smoky Slate ink with his nose, eyes and mouth stamped using Memento Tuxedo Black ink. I stamped “Celebrate” from the Beautiful You stamp set using Real Red ink. The journaling is created on my computer and printed on Whisper White card. The greeting from the Forever Blossoms stamp set is stamped using Night of Navy ink across the bottom of the journaling panel. All of the mats on the pocket page are cut using Real Red ink.
I don’t usually add so much stamping to a pocket page but I must say I love how this turned out. Let me know what you think.
Bye for now,
Kris
Product Used:


Happy Birthday To You

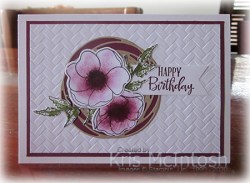
The Happy Birthday To You stamp set is available FREE during Sale-A-Bration with a qualifying order. This is such a pretty stamp set and I am sure that you will all want to earn it. For today’s card I cut Flirty Flamingo card using the largest Stitched Rectangle Die and attached it to Thick Whisper White card. I cut Whisper White card using the second largest Stitched Rectangle Die and stamped the cake image from the Happy Birthday To You stamp set using Memento Tuxedo Black ink. I also stamped “happy birthday” from the same stamp set onto the bottom of the Whisper White Stitched Rectangle using Smoky Slate image.  I coloured the cake image using Flirty Flamingo, Smoky Slate, Dark Daffodil Delight and Light Old Olive Stampin’ Blends. I coloured a length of Whisper White 1/4″ Crinkled SEam Binding Ribbon using the Dark Flirty Flamingo Stampin’ Blend. I tied a knot in the Seam Binding and attached it between the cake and the greeting.
  The whole panel is attached to the card front. Lastly I added medium Basic Rhinestones to the centres of the flowers.
To decorate the inside of the card, I stamped the double flower image on the cake onto scrap Whisper White card using Memento Tuxedo Black ink. I once more coloured the image using the Flirty Flamingo, Dark Daffodil Delight and Old Olive Stampin’ Blends before fussy cutting the flowers. I attached the flowers to the inside of the card. I stamped the greeting from the Perennial Birthday stamp set beside the flowers using Smoky Slate ink.
I think this card is quite pretty, don’t you? Bet you can’t wait to be able to get this stamp set for free!
Bye for now,
Kris
Product Used:


Ladybug Waterfall

Today’s card uses another one of my favourite fancy folds – the waterfall. I know my grandchildren love getting this kind of card. If you don’t know how to create one of these, you can follow the instructions on Splitcoast Stampers. I embossed a piece of Whisper White card using the Coastal Weave 3D Embossing Folder. The embossed card is attached to Old Olive card and then scored and folded Thick Whisper White card. I cut the mechanism for the card and the cross piece from Old Olive card. I stamped the four ladybug images from the Little Ladybug stamp set onto scrap Whisper White card using Memento Tuxedo Black ink. I coloured the images using Dark Real Red, Dark Old Olive, Dark Daffodil Delight, and Ivory Stampin’ Blends.  Once coloured I cut the images out using the co-ordinating Ladybugs Dies. I cut squares of Whisper White card and attached three of the lady bug images before attaching them to Old Olive card. I stamped another small square of Whisper White card using the lady bug border image and Memento Tuxedo ink. You will notice that I only inked up three of the images so that they fit evenly across the card.
 I coloured the images using Dark Real Red, Dark Daffodil Delight and Ivory Stampin’ Blends. I also stamped “happy birthday” from the Beautiful Bouquet stamp set onto the same Whisper White square using Real Red ink before attaching to a square of Old Olive card. I punched one end of the long mechanism piece using the Scalloped Tag Topper Punch. The bottom of the mechanism is attached to the back of the cross piece using Tear and Tape.
  Then the squares are attached to the mechanism using a piece of Tear and Tape across the back of the top edge of each square. I tied a length of Whisper White Solid Baker’s Twine through the scalloped end of the mechanism.
To decorate the inside of the card, I stamped the flower image from the Little Ladybug stamp set onto scrap Whisper White card using Memento Tuxedo Black ink. I coloured the image using Old Olive, Rich Razzleberry and Dark Daffodil Delight Stampin’ Blends. I cut out the flower using the co-ordinating Ladybug Dies and attached it to the lower left hand corner of Whisper White card. I attached the last ladybug image to the top of the flower and stamped the greeting from the Little Ladybug stamp set to the right of the flower using Real Red ink. The panel is attached to the inside of the card.
This is such a cute card. I am in love with this stamp set and the best thing is this is a Hostess set. This means you can earn this stamp set FREE during Sale-A-Bration with a qualifying order. The dies will be available for purchase from the 4th February until the end of Sale-A-Bration (or while stocks last). Bet you can’t wait to earn this cute little stamp set!
Bye for now,
Kris
Product Used:


Razzleberry Birthday
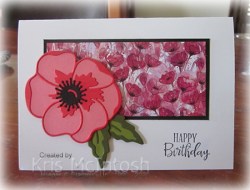
Today’s card once more features poppies. Just love these gorgeous flowers! Anyway today I embossed Whisper White card using the Coastal Weave 3D Embossing Folder which I attached to Rich Razzleberry card and then scored and folded Thick Whisper White card. I cut the swirl from Crumb Cake card using the Painted Labels Dies. I attached the swirl to Rich Razzleberry card and then cut around the Crumb Cake piece, trimming away the excess Rich Razzleberry card. I stamped the large and the small poppy from the Painted Poppies stamp set onto Whisper White card using Memento Tuxedo Black ink. I used a sponge to add Rich Razzleberry ink to each of the flowers.  I stamped the leaf image from the Painted Poppies stamp set onto Whisper White card using Memento Tuxedo Black ink. To colour the leaves, I used the small dotted spray to add Old Olive ink and then cut out the leaves. I love the way the variation in colour gives added depth to the leaves. I stamped “happy birthday” from the Peaceful Moments stamp set onto Whisper White card using Rich Razzleberry ink. I punched one short end using the Triple Banner Punch. I attached the leaves, flowers and greeting to the swirly circle before attaching the whole piece to the card front.
 To decorate the inside of the card, I stamped the large poppy from the Painted Poppies stamp set onto the lower left hand corner using Memento Tuxedo Black ink. I masked the image using a post-it-note mask and stamped the single leaf image from the Painted Poppies stamp set four times around the flower. I left the mask in place and used the small dotted spray from the same stamp set to add Old Olive ink to the leaves. I removed the post-it-note mask and used a sponge to add Rich Razzleberry ink to the flower. I also stamped the greeting from the Peaceful Moments stamp set using Memento Tuxedo Black ink.
I hope the lady receiving this card, loves it as much as I do.
Bye for now,
Kris
Product Used:


More Poppies

For today’s card I stamped the poppy image from the Painted Poppies stamp set across the bottom of Whisper White card using Memento Tuxedo Black ink. I used the small dotted background stamp from the same stamp set to add Blueberry Bushell ink over the flowers and Old Olive ink over the flower stems. I stamped multiple times without re-inking to get some variation in colour. I attached the stamped panel to Blueberry Bushel card.  I cut the border image twice from Blueberry Bushel card using the Painted Labels Dies and attached it to the bottom of the stamped panel before attaching the whole piece to scored and folded Thick Whisper White card. I stamped the greeting from the Peaceful Moments stamp set onto Whisper White card using Blueberry Bushel ink and cut it out using the label die from the Painted Labels Dies. When you use this die cut you get a line impression just inside the outside edge and I used this as a guide to trim down the label.
 I cut Blueberry Bushel card using the same die and attached the greeting which gives me a narrow border all around. The greeting is attached to the card front.
To decorate the inside of the card, I stamped “happy birthday” from the Peaceful Moments stamp set using Blueberry Bushel ink. I also stamped the poppy image onto the lower left hand corner using Memento Tuxedo Black ink. I once more used the small dotted background image to add Blueberry Bushel and Old Olive ink to the stamped image.
I really liked this card and decided to make it in a couple more colour variations. One used Poppy Parade, cardstock and ink and the second one used Highland Heather cardstock and ink. I think they look so pretty together, what about you?
Bye for now,
Kris
Product Used:


Birthday Celebration

Today’s page shows off a few photos from a celebration lunch we had for Sarah for her 40th birthday. I decided to use the Golden Honey Specialty Paper which is FREE during Sale-a-Bration with a qualifying order. This paper has a gold embossed pattern on one side and the other is basically black and white in various patterns. I cut a sheet of this paper in half and attached it to the top of each page 12″ x 12″ Whisper White page. I cut a 2″ strip of the gold/black stripe pattern and attached it below the 6″ piece. The last strip of Designer Series Paper is also 2″ wide – I used the same paper as the 6″ strip but swapped over the pages, so each page has three different designs.  The photos for both pages are attached to Basic Black card before being attached to the pages. On the first page I cut Basic Black card using the retired Happy Birthday Dies and used this as my title. I stamped the greeting from the Strong and Beautiful stamp set onto Whisper White card and cut it out using one of the Stitched So Sweetly Dies. I also cut Basic Black card using the largest rectangle from the Stitched So Sweetly Dies. The greeting is attached to the Basic Black rectangle and then the page. For the second page I cut “celebrate” and “you” from Basic Black card using the retired Celebrate You Dies. After I attached the words to the second page I used a jounaling pen to add the date.
These are simple pages but I know they will always bring back happy memories of a happy day.
You might have noticed that I often use retired product on my Memory Keeping Pages. Well. That’s because I don’t give up any stamp set or die which I know has a potential use in Memory Keeping. These pages are for me and not really to promote my business but rather to promote Memory Keeping as such. It is so easy to forget what your photos relate to and now that we are all using digital photos we have so many photos to choose from, its easy to be overwhelmed. For me the most important thing is to try and create memories of the events that happen in our daily life and for this you don’t have to use very photo you have, just ones that you know will bring the event to life. I’d love to hear your thoughts on this.
Bye for now,
Kris
Product Used:


Another Poppy Birthday
Today’s card is another using the beautiful products in the Peaceful Poppies Product Suite which can be found on pages 24-27 of the 2020 Handmade For You Mini Catalogue. This is truly an amazing product suite. It contains Designer Series Paper, two stamp sets with co-ordinating dies, sequins, ribbon and some pre-stamped elements. Everything you could possibly want to create gorgeous cards and scrapbook pages. Anyway, today’s card grew from a design I saw somewhere using a different panel of designer series paper. I attached a piece of the Peaceful Poppies Designer Series Paper to Basic Black card and then scored and folded Thick Whisper White card. I stamped “happy birthday” from the Peaceful Moments stamp set onto the lower right hand corner of the card front using Memento Tuxedo Black ink. I cut the large solid poppy from Flirty Flamingo card using he Poppy Moments Dies. I cut the large detailed poppy from Poppy Parade card using the same dies. Using the Poppy Moments Dies I cut two solid leaves from Old Olive card and two detailed leaves from Mossy Meadow card as well as one flower centre from Basic Black card. I attached the flower pieces and the leaf pieces together. I attached the leaves to the back of the flower before attaching to the card front using dimensionals.
 Lastly adding the Basic Black flower centre.
To decorate the inside of the card, I stamped another greeting from the Peaceful Moments stamp set using Memento Tuxedo Black ink. Using the Poppy Moments Dies, I cut the small solid flower from Flirty Flamingo card, the small detailed flower from Poppy Parade card and the flower centre from Basic Black card. I attached the die cuts together and attached them to the inside of the card to the left of the sentiment.
I love this card, it is so pretty. If you haven’t purchase these products yet, don’t wait, I think this one will be very popular.
Bye for now,
Kris
Product Used:


Joyful Poppies

Today’s card is a favourite fancy fold of mine – a Joy Fold card. I’ve combined the fancy fold with the Painted Poppies Product Suite to create the card. I cut my card base 21cm x 10.5cm from Basic Black card, scored along the 21cm length at 14.8cm. The small flap is on the left hand side of the card. I attached a piece of the Peaceful Poppies Designer Series Paper (14.3cm x 10cm) onto the right hand inside of the card. I attached another piece of Peaceful Poppies Designer Series Paper (5.5cm x 10cm)onto the front of the small flap on the left hand side. The smaller folding card 20cm x 8cm is cut from Basic Black card and scored along the 20cm length at 10cm. To decorate the front panel of this smaller folding card, I stamped the image from the Painted Poppies stamp set onto Whisper White card 9.5cm x 7.5cm using Memento Tuxedo Black ink.  I stamped the image 4 times, the first image on the left with the bottom of the image sitting flush with the bottom of the Whisper White card. The second image is stamped slightly lower so that it fits close to the first image and so on for the other two images. I coloured the images using Poppy Parade and Old Olive Stampin’ Blends. I wrapped the bottom of the stamped panel with Whisper White 1/4″ Crinkled Seam Binding Ribbon and attached it to the front of the smaller card, making sure that the fold is on the right hand side. I attached the panel on top of the right hand Designer Series Paper panel with the fold on the right hand side. I tied a bow in a length of Whisper White 1/4″ Crinkled Seam Binding Ribbon and attached it to the panel using MIni Glue Dots.
 To decorate the inside of the card, I stamped the greeting from the Peaceful Moments stamp set onto Whisper White card 9.5cm x 7.5cm using Memento Tuxedo Black ink. This panel is attached inside the smaller folding card.
I stamped the large flower from the Painted Poppies stamp set onto Whisper White card using Memento Tuxedo Black ink. The image is coloured using Poppy Parade and Dark Daffodil Delight Stampin’ Blends. I cut out the image using the co-ordinating Painted Labels Die. The large poppy is attached to the small panel on the left hand side using dimensionals so that the image panel can slide underneath and keep the card closed.
There is a tutorial with video on the Splitcoast Stampers website here. You will notice that the dimensions of the card pieces I used at different but that is to accommodate the size of a standard Australian card.
I hope you like this card as much as I do.
Bye for now,
Kris
Product Used:
Poppy Birthday
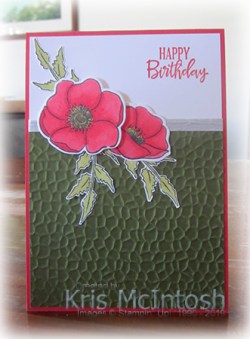
Today’s card uses some of the product from the Peaceful Poppies Product Suite which can be found on pages 24-27 of the 2020 Handmade For You Mini Catalogue. I stamped the greeting from the Peaceful Moments stamp set onto the upper right hand corner of Whisper White card using Poppy Parade ink. I embossed Mossy Meadow card using the Hammered Metal 3D Embossing Folder and attached it to the bottom of the stamped Whisper White card. I wrapped the top of the embossing with the Whisper White 1/4″ Crinkled Seam Binding Ribbon and attached the whole panel to scored and folded Poppy Parade card.  I stamped the large flower and the small flower from the Painted Poppies stamp set onto Whisper White card using Memento Tuxedo Black ink. I coloured the flowers using the Poppy Parade and Dark Daffodil Delight Stampin’ Blends. I cut out the flowers using the co-ordinating Painted Labels Dies. I stamped the leaf image from the Painted Poppies stamp set onto Whisper White card three times using Memento Tuxedo Black ink.
  I coloured the leaves using the Light Old Olive Stampin’ Blend and cut them out. I laid the flowers and leaves onto the card front to get the placement right before attaching them. The small flower is attached flat to the card front and the large one is attached using dimensionals.
To decorate the inside of the card, I stamped a greeting from the Peaceful Moments stamp set using Poppy Parade ink. I embossed a narrow strip of Mossy Meadow card using the Hammered Metal 3D Embossing Folder and attached it to the bottom of the stamped card. I wrapped the top of of the embossed card using the Whisper White 1/4″ Crinkled Seam Binding Ribbon before attaching the panel to the inside of the card.
I just love how the Mossy Meadow card makes the Poppy Parade flowers just “pop” off the card front. What do you think?
Bye for now,
Kris
Product Used:


