Avid Thoughtful Blooms

Today’s card doesn’t share the same layout as the Simple and Casual stamper cards I shared with you last week but it does use the Thoughtful Blooms stamp set which you can earn for free during Sale-A-Bration. For this card I embossed Flirty Flamingo card using the Parisian Flourish 3D Embossing Folder which is part of the Parisian Blossoms Product Suite in the 2020 Handmade for You Mini Catalogue. I attached the embossed card to Whisper White card before wrapping the top of the embossed card using Silver 3/8″ Metallic Edge Ribbon. The whole panel is attached to scored and folded Granny Apple Green card.  I stamped the leaf image from the Thoughtful Blooms stamp set onto Whisper White card using Granny Apple Green ink. I stamped the large solid flower into the centre of the leaf image using Petal Pink ink. I stamped the detailed flower over the top using Flirty Flamingo ink. I also stamped the small flower using Flirty Flamingo ink. The image is cut out using one of the circles from the Layering Circles Dies and attached to a Flirty Flamingo scalloped circle cut using the same dies.
 I attached the image panel to the card front using dimensionals. I stamped the greeting from the Thoughtful Blooms stamp set onto Whisper White card using Flirty Flamingo ink. The greeting is cut out using one of the Ornate Frames Dies and attached to the embossed card. I am so happy that these Ornate Frames Dies are going to be around for a while, I just love them.
To decorate the inside of the card, I embossed a piece of Flirty Flamingo card using the Parisian Flourish 3D Embossing Folder and attached it to the bottom of Whisper White card and wrapped the top of the embossed card using the Silver 3/8″ Metallic Edge Ribbon. I stamped the border image from the Thoughtful Blooms stamp set across the top of the Whisper White card using Granny Apple green ink. As you can see, this card requires quite a lot of product, something the Avid Stamper certainly has.
Which one is your style? I’d love to know.
Bye for now,
Kris
Product Used:


Lily Pad Birthday

The card I am sharing with you today, I made for my Mum to celebrate her recent birthday. I used the Lovely Lily Pad stamp set which is FREE with a qualifying order during Sale-A-Bration. I punched one end of a strip of Gorgeous Grape card using the Triple Banner Punch and attached it to Whisper White card. I embossed the panel using the Coastal Weave 3D Embossing Folder which can be found in the 2020 Handmade for You Mini Catalogue. I attached the embossed card to scored and folded Gorgeous Grape card. I stamped the lily image from the Lovely Lily Pad stamp set onto Whisper White card using Memento Tuxedo Black ink. I coloured the image using Highland Heather Stampin’ Blends and cut it out using the co-ordinating Lily Pad Dies (which is also FREE during Sale-A-Bration with a qualifying order).  I stamped the single leaf from the Lovely Lily Pad stamp set onto Whisper White card using Memento Tuxedo Black ink and coloured them using the Granny Apple Green Stampin’ Blends. The leaves also have a co-ordinating die in the Lily Pad Dies. I cut a circle from Whisper White card using the Layering Circle Dies and attached it to a Gorgeous Grape scalloped circle cut using the same Dies.
  I attached the leaves to the back of the lily image before attaching the whole piece to the Whisper White circle. The image panel is attached to the card front using dimensionals. I stamped “happy birthday” from the Itty Bitty Greetings stamp set onto Whisper White card using Gorgeous Grape ink. I cut out the image using a die from the Stitched Labels Dies. I attached the greeting to Gorgeous Grape card which has been cut with another of the Stitched Labels Dies. The greeting is attached to the card front using dimensionals where necessary.
To decorate the inside of the card I stamped the lily image from the Lovely Lily Pad stamp set onto the lower left hand corner of Whisper White card. I coloured the image using the Highland Heather Stampin’ Blends before attaching the panel to the inside of the card.
I am really pleased with this card, what about you? What do you think?
Bye for now,
Kris
Product Used:


This Christmas
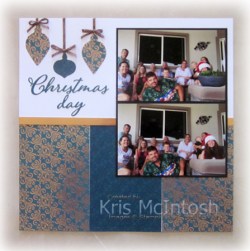
Today’s pages showcase some photos from our family Christmas Day celebration at Sarah & Sean’s home. We had such a lovely day. Lucky for us we got some rain and our temperature didn’t hit the 30’s so a very pleasant day. I have used some of the Brightly Gleaming Specialty Designer Series Paper and the Christmas Gleaming stamp set. Unfortunately, both of these items are no longer available for purchase. The first page has three pieces of Designer Series Paper attached across the bottom of a Whisper White 12″ x 12″ page.  I attached a narrow strip of Copper Foil across the top of the Designer Series Paper. I attached the two photos to Basic Black card and then the right hand side of the page. I cut Christmas and Holidays from Shaded Spruce card using the Merry Christmas Dies. I trimmed the Holiday to just “day” and attached the title to the left hand side of the page.
  I punched two large and one small Christmas Bauble from the same pattern of Brightly Gleaming Specialty Designer Series Paper using the Gleaming Ornaments Punch Pack and attached them to the top of the page with a length of 1/4″ Copper Trim behind each one. I glued the ends of the copper trim to the back of the page and attached a bow tied using the 1/4″ Copper Trim to the top of each bauble using Mini Glue Dots.
For the co-ordinating page, I attached a piece of Basic Black card which I trimmed to 9-3/8″ x 11-1/2″. I attached the photos to the top section of the page and two pieces of Designer Series Paper to the outside of the bottom of the Basic Black card. I printed my journaling onto Whisper White card and attached it between the Designer Series Paper. I printed my journaling so that I could add a bauble which I punched from the Brightly Gleaming Specialty Designer Series Paper. I used the 1/4″ Copper Trim to hang my bauble and added a bow tied with the same 1/4″ Copper Trim.

I love these pages. Every time I look at them they will help me remember what a fun day we had.
Bye for now,
Kris
Product Used:


Thoughtful Blooms

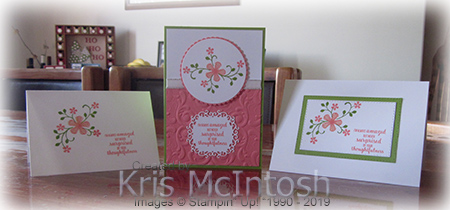
The cards I am sharing with you today use the Thoughtful Blooms stamp set which is one of the stamp sets that you can earn for FREE during Sale-A-Bration. When I first looked through the Sale-A-Bration catalogue, this stamp set was not one that took my eye right away, however, now that I have started to play with it, I find I really like it. The stamp set has a co-ordinating Small Bloom Punch which you can also earn for FREE during Sale-A-Bration. I began by creating a note card for the beginner stamper. I stamped the leafy image onto the Whisper White Note Card using Granny Apple Green ink. I stamped the large solid flower into the centre of the leaves using Petal Pink ink. I stamped the large detailed flower over the top of the solid flower using Flirty Flamingo ink. I stamped the small flowers around the leafy image also using Flirty Flamingo ink. I stamped the greeting which also comes from the Thoughtful Blooms onto the card front using Flirty Flamingo ink.
  To decorate the inside of the Note Card, I stamped the border image from the Thoughtful Blooms stamp set using Granny Apple Green ink.
After I stamped this card, I thought I would create a version for the Casual Stamper. Someone who has a little more product to play with. I stamped the images and the greeting from the Thoughtful Blooms stamp set onto Whisper White card using Granny Apple Green and Flirty Flamingo ink as before.  However, this time I cut out the images using one of the Stitched Rectangle Dies. I attached the stamped panel to a Granny Apple Green rectangle cut using the same dies and then scored and folded Thick Whisper White card. To decorate the inside of the card, I stamped the border image from the Thoughtful Blooms stamp set using Granny Apple Green ink. This is still a simple card but it does need a little more product than the Note Card to create.
I am working on a card for the Avid Stamper using this stamp set which I will share with you soon.
Bye for now,
Kris
Product Used:


Fab Friday Sketch Challenge #179

I used the sketch challenge at Fab Friday to create a card for my Dad’s birthday which is today. I used product from the Country Club Product Suite which is in the 2020 Handmade for You Mini Catalogue to create this card. It suits my Dad perfectly because he loves golf and although he just turned 89 he still plays at least twice per week. I cut a large rectangle from a piece of Whisper White card using the Stitched Rectangle Dies and attached it to scored and folded Night of Navy card. The Country Club Designer Series Paper has a couple of sheets of images which are perfect to use with the Watercolour Pencils.  So I trimmed the paper to 4″ strips and used a slightly smaller Stitched Rectangle Die to cut out the image. I coloured the image using the Watercolour Pencils Assortment 2. I use my finger to smooth out the colour once I have applied it to the paper, very technical! I attached the coloured image panel to the centre of the card front using dimensionals. I stamped the greeting from the Clubhouse stamp set onto Night of Navy card using Versamark ink. I sprinkled the greeting with White Embossing Powder and heat set it.
  I cut out the image using one of the co-ordinating Golf Club Dies and attached it to the left hand side of the image panel.
To decorate the inside of the card, I stamped the golf ball image from the Clubhouse stamp set onto the lower left hand corner of Whisper White card using Memento Tuxedo Black ink. I used a couple of colours from the Watercolour Pencils Assortment 2 to colour the image as well as the Gray colour from the Watercolour Pencils. Again I used my finger to smooth out the colour on the image.
I love the finished result and my Dad does too.
Bye for now,
Kris
Product Used:


Hello Tulips
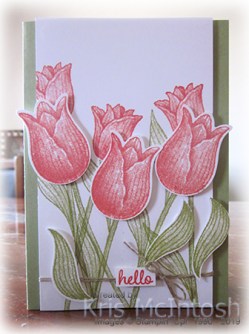
Today’s card is another that we created at Onstage Local. The stem image from the Timeless Tulip stamp set was stamped onto Whisper White card several times using Pear Pizzazz ink. The medium tulip image was stamped onto the stem images using Calypso Coral ink. The large tulip image was stamped onto scrap Whisper White card three times using Calypso Coral ink and punched out using the co-ordinating Tulip Builder Punch. The leaf image was stamped onto Whisper White card using Pear Pizzazz ink and punched out using the co-ordinating Tulip Builder Punch. The leaves and large tulips were attached to the card front using dimensionals.  The panel is wrapped with Linen Thread and the greeting from the Timeless Tulip stamp set was stamped onto Whisper White card, trimmed and attached using dimensionals. You will note that some of the leaves have been attached over the linen thread.
The whole Whisper White panel is attached to scored and folded Pear Pizzazz card.
We didn’t decorate the inside of the card at Onstage and I must admit I haven’t done anything since I got home, but I did want to share this amazing stamp set with you.
Bye for now,
Kris
Product Used:


Timeless Birthday
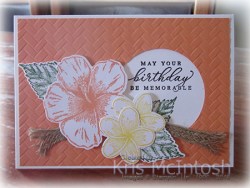
Today I am sharing a card with you that I made using the Timeless Tropical stamp set which will be released very soon now, in the Handmade for You Mini Catalogue. I cased one of the examples from the Mini Catalogue to create my card. I cut a circle from Grapefruit Grove card before embossing it using the Coastal Weave 3D Embossing Folder. The embossed card is attached to scored and folded Thick Whisper White card. I stamped the greeting from the Timeless Tropical stamp set into the circle cut out using Memento Tuxedo Black ink. I also stamped the large single leaf from the Timeless Tropical stamp set into the circle cut out using Garden Green ink.  I attached a length of the 5/16″ Braided Burlap Trim across the card front. I stamped the large flower from the Timeless Tropical stamp set onto Whisper White card using Graprefruit Grove ink and cut it out using the co-ordinating In The Tropics Die. I stamped the frangipani flower from the same stamp set onto Whisper White card using Daffodil Delight ink and cut them out using the co-ordinating In The Tropics Die.
  I stamped the large single leaf onto Whisper White card using Garden Green ink and cut them out using the same dies. I attached the flowers and the leaves together before attaching them to the card front using dimensionals.
To decorate the inside of the card, I stamped the large hibiscus flower onto the lower left hand corner using Grapefruit Grove ink. I stamped the image onto a post-it-note and cut it out before attaching it over the stamped flower. I stamped the large single leaf from the Timeless Tropical stamp set twice around the flower using Garden Green ink and removed the post-it-note mask.
This is such a fun product suite, I think I am going to have to play with it a little more.
Bye for now,
Kris
Product Used:


December 1964
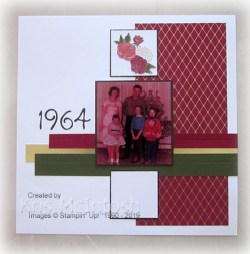
Today’s page showcases a photo taken in our apartment in Waukegan, Michegan, USA in December 1964. My Dad was stationed there for nearly 12 months by the Navy. The photo is probably not the best, but you have to take what you can get when it comes to older family photos. It shows my Mum and Dad, myself and my two sisters and a neighbours little girl, whose Dad I think was also in the Navy and visiting from another country – can’t remember which one! Anyway I decided to use the gorgeous Christmastime is Here Designer Series Paper which I think is still available for purchase.  I attached the Designer Series Paper to the right hand side of a 12″ x 12″ Whisper White page. I used the Stitched Labels Dies to add stitching to a piece of Mossy Meadow card and also a piece of Cherry Cobbler card. I attached the Mossy Meadow and Cherry Cobbler card to a piece of Gold Foil and then the page.
  I cut out the flowers from the Christmastime is Here Designer Series Paper and attached them to Whisper White card and then Early Espresso card. The photo and what will be my journaling are also attached to Early Espresso card. I cut the title from Early Espresso card using some old Sizzix Dies in my stash. (Sorry they are not Stampin’ Up!).
I need to ask my Mum and Dad about the other little girl before I print my journaling onto the Whisper White card. So here you have another really simple page but one that I love. I am so happy that my sister shared this photo with me and now I can share it with my children and grandchildren.
Bye for now,
Kris
Product Used:


Always and Forever
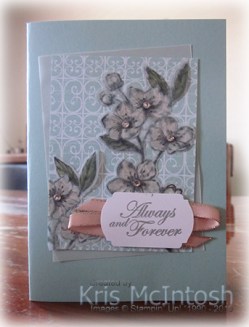
The card I am sharing with you today is one that we received as a Make and Take at Onstage Live in November – another peak at what’s to come with the release of the new Mini Catalogue in January. I decided to change the design a little but not too much. I stamped the floral image from the Forever Blossoms stamp set twice onto Vellum card stock using Memento Tuxedo Black ink. I coloured the images on the reverse side using Mossy Meadow and Petal Pink Stampin’ Blends. I cut out the images using the co-ordinating Cherry Blossoms Die.  The images are layered onto a piece of the Parisian Blossoms Specialty Designer Series Paper as well as a piece of Vellum card stock before being attached to scored and folded Pool Party card. I stamped the greeting from the Forever Blossoms stamp set onto Whisper White card using Smoky Slate ink and punched it out using the Label Me Fancy Punch. I attached a length of the Petal Pink 1/4″ Metallic Edge Ribbon to the back before attaching the greeting to the card front using dimensionals.
 Lastly I added Basic Rhinestones to the centres of the flowers.
To decorate the inside of the card, I stamped the small flower onto the top left and lower right hand corners of Whisper White card using Memento Tuxedo Black ink. I stamped the same flower onto a post-it-note and cut it out. I masked the flowers and stamped the double leaf image from the Forever Blossoms stamp set using Memento Tuxedo Black ink. I coloured the flowers using Petal Pink Stampin’ Blends and the leaves using Mossy Meadow Stampin’ Blends.
I really love the soft effect you get when you colour on the reverse side of the Vellum card stock. What do you think?
Bye for now,
Kris
Product Used:


Just Add Ink Sketch Challenge #487
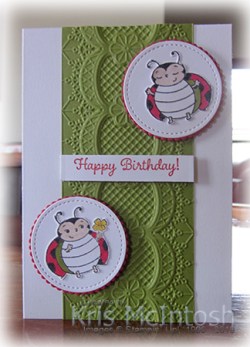
Today’s card was inspired by the sketch challenge at Just Add Ink. I had been stamping and colouring the images in the Little Ladybug stamp set with the idea of CASing the 2020 Sale-A-Bration catalogue, but this sketch just screamed to use these cute little images. I embossed Old Olive card using the Lace 3D Embossing Folder and attached it to scored and folded Thick Whisper White card. I cut two circles from Whisper White card using the Stitched Shapes Dies and attached each one to a Real Red scalloped circle cut using the Layering Circles Dies. I attached one circle to the top right hand side of the embossed card and the other to the lower left hand side of the embossed card using dimensionals. The ladybug images from the Little Ladybug stamp set were stamped onto Whisper White card using Memento Tuxedo Black ink and coloured using Dark Real Red, Dark Old Olive, Dark Daffodil Delight and Ivory Stampin’ Blends. I hand cut each image and attached one to each circle. I stamped the greeting from the Little Ladybug stamp set onto Whisper White card and trimmed it to fit across the embossed Old Olive card. The greeting is attached using dimensionals.
To decorate the inside of the card, I stamped the flower image from the Little Ladybug stamp set onto Whisper White card using Memento Tuxedo Black ink, I coloured the leaves using the Dark Old Olive Stampin’ Blend. I cut out the flower and attached it to the inside of the Thick Whisper White card. I stamped the ladybug image onto Whisper White card using Memento Tuxedo Black ink and coloured it using the Dark Real Red and Ivory Stampin’ Blends. I hand cut the ladybug image and attached it to the centre of the flower. I stamped the greeting from the Perennial Birthday stamp set to the right of the flower using Real Red ink.
How cute is that? This really gorgeous little stamp set is an additional bonus for anyone who holds a qualifying workshop or places a qualifying order during Sale-a-bration. You cannot buy it, you have to earn it. It’s a great incentive to hold a workshop or place a qualifying order during the Sale-a-bration period.
If you do not have a demonstrator and you would like a catalogue, please contact me so that we can organise to get one to you.
Bye for now,
Kris
Product Used:


