Christmas Framed Art

Today I am sharing with you a project which I created for my November classes. For quite a few years now during my November classes my customers have been creating a framed art piece. This year we had a “blue” theme. I used lots of different stamp sets to create the panels. Check out the icons below to see just which ones I have used. Of course you could substitue the images with other stamps sets you may own. Instead of going into great detail about how I made this piece, you can download the PDF for free. The piece is designed to fit into a standard A4 document frame.
I will also be adding this to my Free Tutorials page.
I’d love to see your creations.
Bye for now,
Kris
Product Used:


Free Shipping

For today only, if you place an order of $45.00 or more you will be eligible for free shipping! Woohoo! What a great time to save on the cost of shipping your order. Stock up on all those things you have been wanting to add to your stash. Better still take advantage of the Year End Closeout. View the PDF and check out which items are discounted, some of them will be on your wish list for sure. You can even check out the list of items that will be carrying over to future catalogues to see if they are on the discounted list.
Don’t forget if you have any discount coupons to use, they will expire on the 13th December, so today would be the perfect day to use them. Oh the goodies you can buy!
In any case have a wonderful day and if you do want to make some huge savings today would be the day to place your order.
Bye for now,
Kris
Deck the Halls

I saw a lovely card on Pinterest by Susan La Croix and couldn’t resist CASING it, but of course I have changed it ever so slightly to suit my purpose. I attached a piece of the absolutely stunning Brightly Gleaming Specialty Paper to the left hand side of Whisper White card. I wrapped the right hand edge of the Designer Series Paper with the 1/4″ Copper Trim before stamping the greeting from the Christmas Gleaming stamp set onto the right hand corner using the Delicata Celestial Copper ink. I also stamped the border image twice onto the right hand side of the Whisper White card using the same ink.  The panel is attached to scored and folded Pretty Peacock card. I stamped the large Christmas bauble from the Christmas Gleaming stamp set onto Night of Navy card using the Delicata Celestial Copper ink and punched it out using the co-ordinating Gleaming Ornament Punch. I stamped the small Christmas bauble onto Pretty Peacock card using the Delicata Celestial Copper ink and punched it out using the co-ordinating Gleaming Ornament Punch.
 I attached the Christmas baubles to the ends of the border images and attached a bow tied using the 1/4″ Copper Trim to the top of each one. To decorate the inside of the card, I stamped the border image onto the left hand side of Whisper White card using Delicata Celestial Copper ink. I stamped the large Christmas bauble once more onto Night of Navy ink using the Delicata Celestial Copper ink and punched it out using the co-ordinating Gleaming Ornament Punch. The Christmas bauble is attached to the end of the border image.
I love how this card turned out. Thanks so much Susan for the inspiration.
Bye for now,
Kris
Product Used:


Mercury and Stars
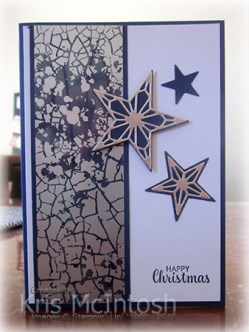
I haven’t used my Mercury Glass Designer Acetate much, well, hardly at all, except for cutting one star for one of my Christmas projects. So I decided to give it a whirl on this card. I attached a piece of the Mercury Acetate to Night of Navy card which is attached to the left hand side of Whisper White card. I stamped the greeting from the Itty Bitty Christmas stamp set onto the lower right hand corner using Night of Navy ink. The panel is attached to scored and folded Night of Navy card.  I die cut three stars from Night of Navy card using the Stitched Stars Dies. I also cut two Silver Foil card using two of the detailed stars dies from the Stitched Stars Dies. I attached the detailed stars to the co-ordinating Night of Navy stars before attaching all three to the card front.
  The largest star is attached using dimensionals.
To decorate the inside of the card, I stamped the greeting from the So Many Stars stamp set using Night of Navy ink. I attached a narrow strip of Mercury Glass Designer Acetate to a slightly larger piece of Night of Navy card and attached it to the bottom of the stamped Whisper White card.
I don’t know why I waited so long to use this gorgeous Mercury Acetate but I am sure going to be using it a lot more.
Bye for now,
Kris
Product Used:


Mataranka
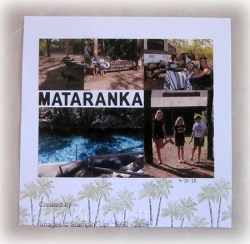
This page shares a few photos from our stop at Mataranka on the way home from Darwin last year. We wanted to stay at Mataranka to visit the homestead used in the making of the film We Of The Never Never. We also wanted to have a swim in the natural spring. I attached the photos to a Whisper White 12″ x 12″ page leaving room to add my title which is cut from Early Espresso card using the retired Little Letters Thinlits Dies. To decorate the bottom of the page, I used a stamp set called Timeless Tropical which will be available when the Handmade for You catalogue is released in January.  I inked the palm tree image using Early Espresso and Old Olive Stampin’ Write Markers and stamped it many times across the bottom of the page. I didn’t add any journaling because I know when I look at them I will recall the experiences we shared during our stay. I did hand write the date.
You know me by now, this is just my style – simple. I hope you are enjoying the pages I have been sharing and more importantly I hope that you are getting your photos onto pages to be enjoyed by you and your family.
Bye for now,
Kris
Product Used:


Gleaming Christmas
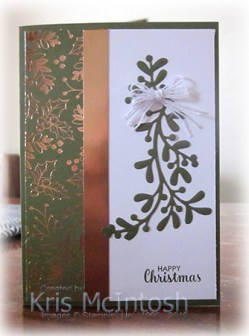
Today’s card is a case of one I saw on Pinterest here. I began by stamping the greeting from the Itty Bitty Christmas stamp set onto the lower right hand corner of Whisper White card using Mossy Meadow ink. I attached a piece of the Brightly Gleaming Specialty Designer Series Paper to the left hand side of the stamped card. This paper is truly gorgeous with one side of each of the paper designs having gorgeous copper foil highlights. The whole panel is attached to scored and folded Mossy Meadow card.  I attached a piece of Copper Foil card next to the Designer Series Paper to really make the foil highlights in the Designer Series Paper shine. I cut Mossy Meadow card using one of the Christmas Layers Dies and attached it to the card front above the greeting.
  I cut four of the strands from a length of Whisper White 5/8″ Flax Ribbon and tied a bow. This ribbon, literally fell apart after I tied the bow to give this really gorgeous effect.
To decorate the inside of the card, I stamped the greeting from the So Many Stars stamp set using Mossy Meadow ink.
I love the way this card turned out. What about you. You might like to CASE this one too.
Bye for now,
Kris
Product Used:


Parisian Anniversary

My eldest daughter and son-in-law recently celebrated their Wedding Anniversary. As I had new product on my desk from my pre-pre-order, I decided to use the Parisian Blossoms Suite to create my card. I decided to create an Open Book card using the instructions which I purchased from Elizabeth Shannon. I stamped “happy Anniversary” from the Beautiful Bouquet stamp set onto the lower right hand corner of Whisper White card using Mossy Meadow ink. I stamped the Eiffel Tower image from the Parisian Beauty stamp set onto the same card using Crumb Cake ink which I had stamped onto scrap card first. I stamped the word background image from the same stamp set around the Eiffel Tower image using Petal Pink ink. Some of the images have been stamped onto scrap paper first to give variation in the colour. I attached a piece of the Parisian Blossoms Specialty Designer Series Paper across the stamped card. I stamped the floral image from the Forever Blossoms stamp set onto scrap Whisper White card using Memento Tuxedo Black ink and coloured the image using Cherry Cobbler and Light Mossy Meadow Stampin’ Blends. I cut out the flower image using the co-ordinating Cherry Blossoms Die. I attached the floral image to the card front, partially over the Designer Series Paper. I tied a knot in a length of Petal Pink 1/4″ Metallic Edge Ribbon and attached it over the end of the floral image. The panel is attached to scored and folded Petal Pink card.
 I created my book insert from Whisper White card following Elizabeth’s instructions. I stamped the greetings from the Beautiful Bouquet stamp set onto Whisper White card using Mossy Meadow ink. I masked the greetings using two post-it-notes and then stamped the floral image from the Forever Blossoms stamp set onto the centre of the stamped card. The image is again coloured using Cherry Cobbler and Light Mossy Meadow Stampin’ Blends. The stamped panel is attached to Petal Pink card and then the left hand page of the “book”. The right hand panel is where I will write my message.
You are going to fall in love with all the beautiful product in the Handmade For You Mini Catalogue to be released in January next year. Today’s card is just a taste of what’s to come.
Bye for now,
Kris
Product Used:


Love and Sympathy

Today’s card is for a lovely friend of mine who recently lost her daughter-in-law. I embossed Whisper White card using the Country Floral 3D Embossing Folder. I cut a strip of Pear Pizzazz card using the border die from the Flourish Dies and attached it across the bottom of the embossed card. The whole panel is attached to scored and folded Calypso Coral card. I cut two sets of leaves from Pear Pizzazz card using the Flourish Dies and attached them to the card front.  I stamped the flower from the Flourishing Phrases stamp set twice onto scrap Whisper White card using Calypso Coral card. I cut out one whole flower and the centre only of the second flower. I attached the smaller flower to the centre of the large flower using dimensionals. The flower is attached to the card front also using dimensionals. I added a large Clear Faceted Gem to the centre of the flower.
  I stamped the greeting from the Itty Bitty Greetings stamp set onto Whisper White card and punched it out using the Classic Label Punch. The greeting is attached over the border using mini dimensionals.
To decorate the inside of the card, I stamped the flower onto the lower left hand corner using Calypso Coral ink. I stamped the greeting from the Well Said stamp set using Pear Pizzazz ink.
Made with love for you Gwen.
Bye for now,
Kris
Product Used:


Birthday Birdies
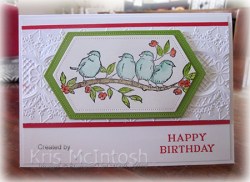
Today’s card features the Free As a Bird stamp set. I love this set, but I must admit it hasn’t seen ink in a while. I was browsing Pinterest and saw lots of cards using this set and thought I should get it out and ink it up. I embossed Whisper White card using the Lace 3D Embossing Folder and attached it to Poppy Parade card. I stamped the greeting from the Perennial Birthday stamp set onto the lower right hand corner of Whisper White card using Poppy Parade ink before attaching the embossed panel.  The whole piece is attached to scored and folded Thick Whisper White card. I stamped the image from the Free As a Bird stamp set onto Shimmery White card using Stazon Black ink. I coloured the image using Coastal Cabana, Granny Apple Green, Poppy Parade and Crumb Cake ink and an Aqua Painter.
  I cut out the image using the Stitched Nested Labels Dies and attached it to Granny Apple Green card which I had cut using the same dies. The image panel is attached to the card front using dimensionals.
To decorate the inside of the card, I simply stamped another of the greetings from the Perennial Birthday stamp set.
I am really pleased with the finished card. I love how using the Aqua Painter gives a really soft watercolour look for the birds. I’d love to hear what you think.
Bye for now,
Kris
Product Used:


Merry Christmastime
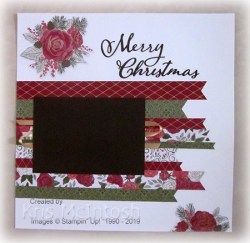
Today’s page is one I created with strips of the Christmastime is Here Specialty Paper, which is just about all I have left of my two packs of this gorgeous paper. I have used this sketch before and I love how it lets me use up lots and lots of scraps. The Designer Series Paper strips have been punched on one end using the Triple Banner Punch before being attached to a 12″ x 12″ Whisper White page. I die cut the flower from the Christmastime is Here Specialty Paper using the co-ordinating Roses Die and attached it to the top left hand corner of the page.  The flower on the bottom right hand corner of the page is one I fussy cut from the edge of the Designer Series Paper (waste not want not!). I cut the title from Early Espresso card using the Merry Christmas Dies.
  I attached a length of the Gold 1/4″ Shimmer Ribbon, also from the product suite, to the back of a piece of Early Espresso card and attached it over the strips of Designer Series Paper. This is where I will attach my photo.
I hope you have enjoyed the samples I have shared over the last week using the Christmastime is Here Product Suite. If you have, and you want these goodies, then you must place your order today or miss out completely. Because after today they will no longer be available.
Bye for now,
Kris
Product Used:


