Parisian Anniversary

My eldest daughter and son-in-law recently celebrated their Wedding Anniversary. As I had new product on my desk from my pre-pre-order, I decided to use the Parisian Blossoms Suite to create my card. I decided to create an Open Book card using the instructions which I purchased from Elizabeth Shannon. I stamped “happy Anniversary” from the Beautiful Bouquet stamp set onto the lower right hand corner of Whisper White card using Mossy Meadow ink. I stamped the Eiffel Tower image from the Parisian Beauty stamp set onto the same card using Crumb Cake ink which I had stamped onto scrap card first. I stamped the word background image from the same stamp set around the Eiffel Tower image using Petal Pink ink. Some of the images have been stamped onto scrap paper first to give variation in the colour. I attached a piece of the Parisian Blossoms Specialty Designer Series Paper across the stamped card. I stamped the floral image from the Forever Blossoms stamp set onto scrap Whisper White card using Memento Tuxedo Black ink and coloured the image using Cherry Cobbler and Light Mossy Meadow Stampin’ Blends. I cut out the flower image using the co-ordinating Cherry Blossoms Die. I attached the floral image to the card front, partially over the Designer Series Paper. I tied a knot in a length of Petal Pink 1/4″ Metallic Edge Ribbon and attached it over the end of the floral image. The panel is attached to scored and folded Petal Pink card.
 I created my book insert from Whisper White card following Elizabeth’s instructions. I stamped the greetings from the Beautiful Bouquet stamp set onto Whisper White card using Mossy Meadow ink. I masked the greetings using two post-it-notes and then stamped the floral image from the Forever Blossoms stamp set onto the centre of the stamped card. The image is again coloured using Cherry Cobbler and Light Mossy Meadow Stampin’ Blends. The stamped panel is attached to Petal Pink card and then the left hand page of the “book”. The right hand panel is where I will write my message.
You are going to fall in love with all the beautiful product in the Handmade For You Mini Catalogue to be released in January next year. Today’s card is just a taste of what’s to come.
Bye for now,
Kris
Product Used:


Love and Sympathy

Today’s card is for a lovely friend of mine who recently lost her daughter-in-law. I embossed Whisper White card using the Country Floral 3D Embossing Folder. I cut a strip of Pear Pizzazz card using the border die from the Flourish Dies and attached it across the bottom of the embossed card. The whole panel is attached to scored and folded Calypso Coral card. I cut two sets of leaves from Pear Pizzazz card using the Flourish Dies and attached them to the card front.  I stamped the flower from the Flourishing Phrases stamp set twice onto scrap Whisper White card using Calypso Coral card. I cut out one whole flower and the centre only of the second flower. I attached the smaller flower to the centre of the large flower using dimensionals. The flower is attached to the card front also using dimensionals. I added a large Clear Faceted Gem to the centre of the flower.
  I stamped the greeting from the Itty Bitty Greetings stamp set onto Whisper White card and punched it out using the Classic Label Punch. The greeting is attached over the border using mini dimensionals.
To decorate the inside of the card, I stamped the flower onto the lower left hand corner using Calypso Coral ink. I stamped the greeting from the Well Said stamp set using Pear Pizzazz ink.
Made with love for you Gwen.
Bye for now,
Kris
Product Used:


Birthday Birdies
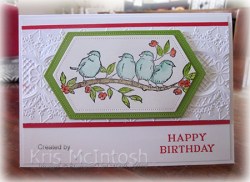
Today’s card features the Free As a Bird stamp set. I love this set, but I must admit it hasn’t seen ink in a while. I was browsing Pinterest and saw lots of cards using this set and thought I should get it out and ink it up. I embossed Whisper White card using the Lace 3D Embossing Folder and attached it to Poppy Parade card. I stamped the greeting from the Perennial Birthday stamp set onto the lower right hand corner of Whisper White card using Poppy Parade ink before attaching the embossed panel.  The whole piece is attached to scored and folded Thick Whisper White card. I stamped the image from the Free As a Bird stamp set onto Shimmery White card using Stazon Black ink. I coloured the image using Coastal Cabana, Granny Apple Green, Poppy Parade and Crumb Cake ink and an Aqua Painter.
  I cut out the image using the Stitched Nested Labels Dies and attached it to Granny Apple Green card which I had cut using the same dies. The image panel is attached to the card front using dimensionals.
To decorate the inside of the card, I simply stamped another of the greetings from the Perennial Birthday stamp set.
I am really pleased with the finished card. I love how using the Aqua Painter gives a really soft watercolour look for the birds. I’d love to hear what you think.
Bye for now,
Kris
Product Used:


Merry Christmastime
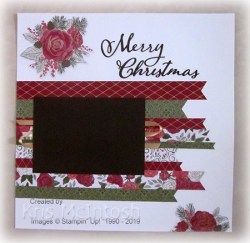
Today’s page is one I created with strips of the Christmastime is Here Specialty Paper, which is just about all I have left of my two packs of this gorgeous paper. I have used this sketch before and I love how it lets me use up lots and lots of scraps. The Designer Series Paper strips have been punched on one end using the Triple Banner Punch before being attached to a 12″ x 12″ Whisper White page. I die cut the flower from the Christmastime is Here Specialty Paper using the co-ordinating Roses Die and attached it to the top left hand corner of the page.  The flower on the bottom right hand corner of the page is one I fussy cut from the edge of the Designer Series Paper (waste not want not!). I cut the title from Early Espresso card using the Merry Christmas Dies.
  I attached a length of the Gold 1/4″ Shimmer Ribbon, also from the product suite, to the back of a piece of Early Espresso card and attached it over the strips of Designer Series Paper. This is where I will attach my photo.
I hope you have enjoyed the samples I have shared over the last week using the Christmastime is Here Product Suite. If you have, and you want these goodies, then you must place your order today or miss out completely. Because after today they will no longer be available.
Bye for now,
Kris
Product Used:


Happy Birthday

This card once more uses the beautiful Christmastime is Here Specialty Designer Series Paper. But this time I decided to use the paper for a birthday card. It is a really simple card but one that shows off this gorgeous paper to perfection. I simply attached the Designer Series Paper to Cherry Cobbler card and then scored and folded Thick Whisper White card.  I stamped the greeting from the Perennial Birthday stamp set onto Whisper White card using Cherry Cobbler ink. I attached a piece of the Gold 1/4″ Shimmer Ribbon to the bottom of the greeting before attaching the whole piece to the card front using dimensionals.
  To decorate the inside of the card, I stamped another greeting from the Perennial Birthday stamp set using Cherry Cobbler ink. I attached a narrow strip of Cherry Cobbler card to the back of one long edge of a strip of the same Christmastime is Here Specialty Designer Series Paper before attaching the panel to the bottom of the inside of the card.
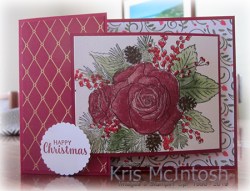
The ladies at Beachmere made the birthday card last week and I had a few kits left over. So, just to show how versatile this paper really is, I created the same basic card but this time, added a greeting from the Christmas Rose stamp set. I stamped the greeting onto Whisper White card using Cherry Cobbler ink and cut it out using the die from the Roses Dies.  I attached a length of the Gold 1/4″ Shimmer Ribbon to the back of the greeting before attaching the whole piece of the card front using dimensionals. I added another of the greetings from the Christmas Rose stamp set to the inside of the card using Cherry Cobbler ink.
So there you have it, the same Designer Series Paper used in exactly the same way to create cards for two different occasions. Time is running out for you to be able to purchase this gorgeous Christmastime is Here Product Suite, after tomorrow it will be gone forever.
Bye for now,
Kris
Product Used:


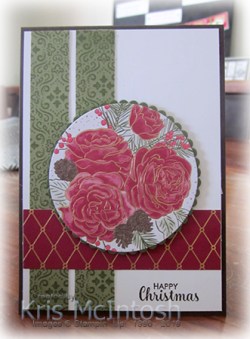
Joy Fold Card
Today’s card once again features products from the Christmastime is Here Product Suite. I cut and scored my card base from Cherry Cobbler card following instructions for the Joy Fold card I found on Splitcoast Stampers. I attached Christmastime is Here Specialty Designer Series Paper to the front of the small flap. I attached another pattern from the same Designer Series Paper to the inside of the panel. I cut the smaller panel from Cherry Cobbler card and scored it in half.  This panel is attached to the large Designer Series Paper panel on the inside of the card with the fold on the right hand side. I stamped the greeting from the Christmas Rose stamp set onto Whisper White card using Cherry Cobbler ink and attached it to the inside of the small folded card. I stamped the large floral image from the Christmas Rose stamp set onto Shimmery White card using Memento Tuxedo Black ink. I stamped the various fill images from the same stamp set using Cherry Cobbler, Poppy Parade, Mossy Meadow and Soft Suede ink.
  The stamped panel is attached to the front of the small folded card. I stamped “happy Christmas” from the Itty Bitty Christmas stamp set onto Whisper White card using Cherry Cobbler ink. I punched out the greeting using the 1-3/8″ Scalloped Circle Punch. The punched greeting is attached to the small front flap using dimensionals, making sure that the floral image panel slides behind it to hold the card shut.
This style of card is really fun to make and when you have such lovely product to work with it is truly a pleasure. Have you bought your product suite yet? If not, you better hurry before it disappears forever.
Bye for now,


Christmas Time is Here
but only for a short time. This special product suite will only be available to purchase until the 3oth November. That’s only until this Saturday. I cannot believe that we won’t be able to order these gorgeous products in just a few days. So this week, I am going to share a few more samples of what I have made using the Christmastime is Here product suite.
For today’s card, I stamped “happy Christmas” from the Itty Bitty Christmas stamp set onto the lower right hand corner of Whisper White card using Early Espresso ink. I attached two strips of the Christmastime is Here Specialty Designer Series Paper to the left hand side of the stamped card. I also attached another piece of the Christmastime is Here Specialty Designer Series Paper above the stamped greeting. The Whisper White card is attached to scored and folded Early Espresso card. I cut out the beautiful flowers from another sheet of the Christmastime is Here Specialty Designer Series Paper using the largest circle from the Layering Circle Dies.
  The flowers are attached to a Mossy Meadow scalloped circle cut using the same dies. The image panel is attached to the card front using dimensionals.
To decorate the inside of the card, I stamped the greeting from the First Frost stamp set onto Whisper White card using Early Espresso ink. I attached a narrow strip of Early Espresso card behind one long edge of a piece of the Christmastime is Here Specialty Designer Series Paper before attaching to the bottom of the stamped Whisper White card.
I just adore this paper, it truly is absolutely gorgeous. If you haven’t already purchased the paper, then don’t delay, make sure that you do before it disappears forever.
Bye for now,
Kris
Product Used:


Elfie Greetings

Today’s card is cased from one I found on Pinterest. The stamp set and embossing folders used on the card are long retired but I used the layout and used current stamp sets and embossing folders, etc. I stamped the greeting from the Still Scenes stamp set onto the bottom right hand corner of Whisper White card using Cherry Cobbler ink.  I embossed the top two-thirds of the stamped card using the Hammered Metal 3D Embossing Folder. I wrapped the bottom of the embossing using the Cherry Cobbler 3/8″ Diagonal Stripe Ribbon and attached the panel to scored and folded Shaded Spruce card. I cut Whisper White card using the 2nd largest oval from the Stitched Shapes Dies. I created a template for my Stamparatus, inserted the die into the template and stamped the image from the Elfie stamp set.
  I coloured the image using the Dark Shaded Spruce Stampin’ Blend, Dark Cherry Cobbler Stampin’ Blend and the Dark Daffodil Delight Stampin’ Blend. I cut a scalloped oval from Shaded Spruce card using the Layering Ovals Dies. The stamped oval is attached to the Shaded Spruce scalloped oval and then the card front using dimensionals.
To decorate the inside of the card, I stamped the greeting from the Elfie stamp set onto Whisper White card using Cherry Cobbler ink.
This is a relatively simple card but effective, don’t you think?
Bye for now,
Kris
Product Used:


Yellow River
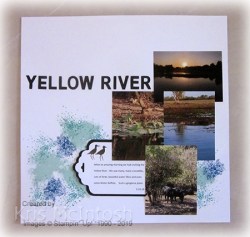
Today’s page shares a few photos from our amazing early morning cruise on the Yellow River in Kakadu. I used some of the images from the Artisan Textures stamp set to add interest to the Whisper White 12″ x 12″ card using Pool Party, Bermuda Bay and Pacific Point ink. I cut Basic Black and Whisper White card to create the tag, punching one end of each piece using the Scalloped Tag Topper Punch. Did you know that you can trick the Scalloped Tag Topper Punch to accept wider pieces of card.  You just need to trim the sides after it is punched. I also used an old corner rounder punch to soften the square ends. I inked the bird image from the High Tide stamp set using a Early Espresso Stampin’ Write Marker and stamped onto the card, after I had printed the journaling. The title is cut from basic Black card using the retired Little Letters Dies.
As usual this is a simple page, letting the photos bring back wonderful memories from this day.
Bye for now,
Kris
Product Used:


Celebrate with Gold

Today I decided to break out my Basic Pattern Decorative Masks to create the background for this card. I used the circle mask and the Delicata Golden Glitz ink to sponge the circles onto Whisper White card. I didn’t get perfect circles but I kind of like the effect. I attached the sponged card to Old Olive card and then scored and folded Real Red card. I stamped “celebrate the Season” from the Itty Bitty Christmas stamp set onto Whisper White card using Real Red ink. I cut out the greeting using one of the Stitched Rectangle Dies and attached it to Real Red card cut using the same dies. The greeting is attached to the card front.  I stamped the holly image from the Christmas Gleaming stamp set onto Whisper White card using Memento Tuxedo Black ink. I coloured the image using Real Red and Old Olive Stampin’ Blends before cutting out the image. I attached the holly to the card front using dimensionals where necessary.
 To decorate the inside of the card, I stamped the Holly image from the Christmas Gleaming stamp set onto the top left hand corner of Whisper White card using Memento Tuxedo Black ink. I stamped the same image onto a post-it-note and cut it out before attaching the post-it-note image over the stamped image. I stamped the Christmas Bauble image from the Christmas Gleaming stamp set using Delicata Golden Glitz ink and removed the post-it-note mask. I coloured the Holly image using the Real Red and Old Olive Stampin’ Blends.
I love the glimmer and shine you get from the Delicata inks. If you haven’t tried them, I recommend you give them a go.
Bye for now,
Kris
Product Used:


