Happy 70th

A friend of my husband and I just celebrated his 70th birthday and I just had to create a card to celebrate this milestone. I have used this idea on a card before but not with an easel. I stamped “Happy Birthday” from the Perennial Birthday stamp set onto Whisper White card using Bermuda Bay ink. To get this to work properly I used my Stamparatus and the hinge stamping technique. I also stamped the greeting from the A Good Man stamp set in between the “Happy Birthday” using the Stamaratus and Pacific Point ink.  I stamped the image from the A Good Man stamp set next to the greetings and coloured it in using Night of Navy, Bermuda Bay, Mango Melody and Ivory Stampin’ Blends.
  I attached the stamped panel to Night of Navy card and then the card base which is also cut from Night of Navy card. I attached a Whisper White panel to the inside of the card. I cut the label from Night of Navy card using one of the Ornate Dies and attached to the Whisper White panel using dimensionals. The numbers are cut from Whisper White card using the retired Timeless Type Alphabet Dies and attached to the label.
I think the gentleman receiving this card will enjoy it.
Bye for now,
Kris
Product Used:
Online Extravaganza
 Today marks the launch of an online extravaganza of discounts on selected products. The sale runs from today – 20th November until Friday – 22 November. This is a great opportunity to stock up on products that you need, like paper and ink. There are also a limited number of bundles with an additional 5% off the bundle price. That’s a huge saving! As well as 15% of a selection of ink pads and cardstock. Download the PDF or head over to my store to browse the products on offer.
This is a “while stocks last” offer, so don’t delay, if you want something, place your order early.
Happy Shopping!
Bye for now,
Kris
Above the Clouds Birthday

Today’s card is one that I cased from Teri Pocock, a UK Stampin’ Up! Demonstrator. I love the simplicity of this card. I embossed Whisper White card using the High Seas 3D Embossing Folder. The embossed card is attached to Balmy Blue card and then scored and folded Basic Black card. I stamped the cloud image from the Above the Clouds stamp set onto Whisper White card using Balmy Blue ink. I stamped the greeting from the Beautiful Bouquet stamp set onto the left hand side of the stamped Whisper White panel using Memento Tuxedo Black ink. I embossed Balmy Blue card using the Corrugated 3D Embossing Folder and attached it behind the stamped Whisper White card. The panel is attached to the card front. I stamped the outline of one large balloon from the Above the Clouds stamp set using Highland Heather ink and stamped the fill image using the same ink which I had stamped onto scrap paper first. I stamped the second large balloon from the same stamp set using Mint Macaron ink, again stamping onto scrap paper first for the fill image. I punched out both images using the Hot Air Balloon Punch. I stamped the basket image from the Above the Cloud stamp set using Sahara Sand ink and again stamped the fill image using the same ink which is stamped onto scrap paper first. I punched out the basket images using the Hot Air Balloon Balloon Punch. The baskets are attached to each of the balloons.
  I attached the Highland Heather balloon onto the card front and added the Mint Macaron balloon using dimensionals.
To decorate the inside of the card, I stamped the small three balloon image from the Above the Clouds stamp set several times onto a strip of Whisper White card using Balmy Blue ink. I stamped the fill image using the same ink stamped onto scrap paper first. I also stamped the cloud image from the same stamp set around the balloons, using post-it-notes where necessary to mask the balloon images. I attached a narrow strip of Balmy Blue card behind one long edge of the stamped card before attaching the panel to the bottom of Whisper White card.
Don’t you agree this is just so gorgeous. Thanks Teri for the inspiration.
Bye for now,
Kris
Product Used:


Birthday Wishes
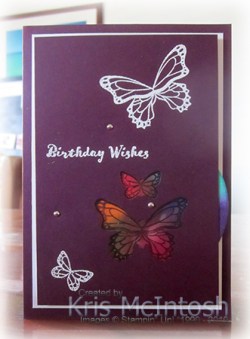
Today’s card was the first card I created following the directions by Sharni Haines on a Demonstrator only Facebook page I belong to (you have already seen one card using this idea). I loved how she made the card she created in the video and the colours she used. I began by punching Blackberry Bliss card using the Butterfly Duet Punch. I stamped the greeting from the Itty Bitty Birthday stamp set onto the punched card using Versamark ink. I sprinkled the ink with White Embossing Powder and heat set it. I stamped the butterfly image onto Window Sheet using Stazon ink and attached the images to the back of the punched butterfly shapes.  I wanted to add a little more interest to the card front so I stamped the butterfly images, from the Butterfly Gala stamp set onto the Blackberry Bliss card using Versamark making sure to mask them so I only got one image at a time. I repeated the process of sprinkling White Embossing powder and heat setting it. I cut a circle from Whisper White card using the largest die in the Layering Circle Dies. I used the following inks to add colour to the circle – Granny Apple Green, Balmy Blue, Mango Melody, Bermuda Bay, Gorgeous Grape, Calypso Coral and Melon Mambo.
  I attached the coloured wheel to the back of the stamped card using a retired brad. I added two more brads just for interest before attaching the stamped panel to Whisper White card using Adhesive Strips. The whole piece is attached to scored and folded Blackberry Bliss card.
To decorate the inside of the card, I stamped the same butterfly image onto Vellum card using Memento Tuxedo Black ink. I flipped the image and used Melon Mambo, Granny Apple Green and Mango Melody Stampin’ Write Markers to colour the large butterfly and Mango Melody and Granny Apple Green Stampin’ Write Markers to colour the small butterfly. I punched out the images and attached them to the lower left hand corner of Whisper White card. Once they were attached, I stamped the bodies and the antennae’s using Memento Tuxedo Black ink.
I have someone special in mind for this card, I hope she likes it as much as I do.
Bye for now,
Kris
Product Used:


Mamukala Wetlands

Today I am sharing a a couple of Pocket Pages that shows off some more pictures of our first day at Kakadu. The first page shows photos from our visit to Mamukala Wetlands on our way to Ubirr Rocks. What a great place. I created my journaling block, by stamping the sand image from the High Tide stamp set across the bottom of a 3″ x 4″ Whisper White panel.  I stamped the grass image from the same stamp set using Mossy Meadow ink. The birds from the High Tide stamp set are stamped using Early Espresso ink. I created the journaling on my computer to complete the page.
  The second page shows another stop on our way to Ubirr Rocks where Sarah was excited to see her first croc in the wild. I should say crocs because they were everywhere. My journaling is printed on Whisper White card 3″ x 4″. And onto another 3″ x 4″ piece of Whisper White card, I stamped the water image onto the lower left hand corner using one of the stamps from the Waterfront stamp set and Bermuda Bay ink.
 I stamped Crumb Cake card next to the water image using another of the Waterfront images. I used the same image as I did for the water to add Balmy Blue into to the top right hand corner of the Whisper White panel. I added a punched 1″ circle of Daffodil Delight card to represent the sun. The title is cut from Early Espresso card using the retired Timeless Type Dies.
These pocket pages co-ordinate perfectly with the page I shared last week. I love how you can mix and match, single pages with the pocket pages to get your Memory Keeping into the album a little quicker.
Bye for now,
Kris
Product Used:


Decorative Birthday
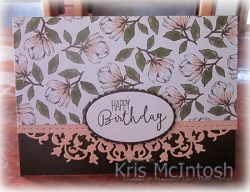
Today’s card is a really quick and simple card. I love the Magnolia Lane Designer Series Paper and it is so beautiful it doesn’t need much embellishment. So I decided to make it the star of the card. I cut Petal Pink card using the Delicate Lace Die and attached it behind one long edge of the Magnolia Lane Designer Series Paper. The panel is attached to scored and folded Early Espresso card.  I stamped the greeting from the Special Celebration stamp set onto Whisper White card using Early Espresso ink. The greeting is cut out using one of the Layering Ovals Dies and attached to an Early Espresso scalloped oval cut using the same dies.
  The greeting is attached to the card front using dimensionals.
To decorate the inside of the card, I cut one of the flowers from the Magnolia Lane Designer Series Paper and attached it to the left hand side of Whisper White card. I stamped the greeting from the Perennial Birthday stamp set using Early Espresso ink.
I love how simple and elegant this card is. Don’t you?
Bye for now,
Kris
Product Used:


Christmas Gift Card Holder

Today’s fancy fold creates a gift card holder which is standard card size for mailing. I watched a video by Lynn Dunn to get the idea of how this is created. Since Lynn is an American, I changed up the sizes so that it would be perfect for a standard metric card. I used Pretty Peacock card for my card base and the gorgeous Brightly Gleaming Designer Series Paper to decorate the front panel and the front of the gift card pocket.  I cut Pretty Peacock card using one of the Christmas Layers Dies and attached it across the top of Whisper White card. I stamped the bauble image from the Christmas Gleaming stamp set onto Whisper White card using Delicata Celestial Copper ink. I punched out the bauble using the co-ordinating Gleaming Ornaments Punch and attached it to the Whisper White panel. I punched Copper Foil card using the same punch and embossed the bauble using the Hammered Metal 3D Embossing Folder. The bauble is attached to the card front using dimensionals. I stamped the greeting from the Christmas Gleaming stamp set onto Whisper White card using the Delicata Celestial Copper ink and punched it out using the Classic Label Punch. Once punched, I trimmed away the remaining Whisper White card and attached the greeting to the card front using Mini Dimensionals.
To decorate the inside of the Gift Card Holder, I stamped the greeting from the So Many Stars stamp set onto Whisper White card using Pretty Peacock ink.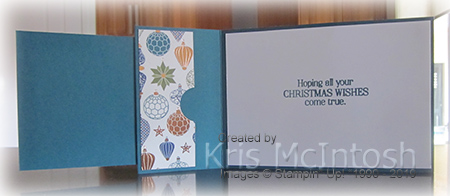
I can’t believe that this is the first time I have used this gorgeous Christmas Gleaming Specialty Designer Series paper, but I’m sure it won’t be the last time. I love how this looks just like a normal card but when you open it, you have the extra little pocket for the gift card.
So, would you like to create this Gift Card Holder you can find the instructions on my Free Tutorials page or download my instructions here.
Bye for now,
Kris
Product Used:


Framed Christmas
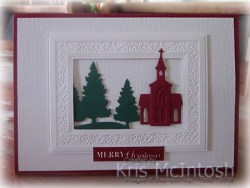
I wasn’t sure that I wanted to buy the Heirloom Frames and 3D Embossing Folders, but seeing all the gorgeous creations on Pinterest, I decided that I “needed” them. I have already shared a couple of cards I have made using these dies and embossing folders but today’s card was inspired by one I saw on Pinterest and gave me an opportunity to use part of the Still Scenes bundle I purchased on pre-order. I embossed Whisper White card using the Subtle 3D Embossing Folder and attached it to scored and folded Cherry Cobbler card. I cut the trees from Shaded Spruce card using the Snow Globe Scenes Dies and the church images from Cherry Cobbler card using the same dies.  I cut Whisper White card using the rectangle frame and embossed it using the Heirloom Frames Dies and 3D Embossing Folders. I attached the tree image to the back of the frame before attaching it to the card front using dimensionals. I attached the church dies together and then attached them inside the frame using mini dimensionals. I stamped “merry Christmas” from the Christmas Gleaming stamp set onto Whisper White card using Cherry Cobbler ink.
 I punched out the greeting using the Classic Label Punch. When you use this punch with this greeting it matches perfectly along the top and bottom edges. You are left with little pieces on the end of the label which are not stamped but are easily trimmed to leave just the greeting. I attached the greeting to the card front using dimensionals.
To decorate the inside of the card, I stamped the greeting from the Still Scenes stamp set onto Whisper White card using Cherry Cobbler ink.
I’m pretty happy with the way this card turned out and thank Elizabeth Price for the inspiration.
Bye for now,
Kris
Product Used:


A Lacey Birthday
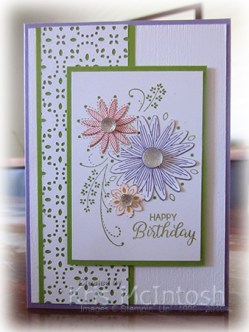
Today’s card is another I made for a friend who celebrated her birthday recently. I embossed Whisper White card using the Subtle 3D Embossing Folder and attached it to scored and folded Highland Heather card. I cut Whisper White card using the Stitched Lace Dies and attached it to Granny Apple Green card. The whole panel is attached to the left hand side of the card front. I stamped the large floral image from the A Little Lace stamp set using Granny Apple Green ink. I stamped “happy birthday” from the Beautiful Bouquet stamp set onto the lower right hand corner of the panel using Granny Apple ink.  I attached the image panel to Granny Apple Green card and then the card front using dimensionals. I stamped the image onto scrap paper three times, once using Highland Heather ink, once using Poppy Parade ink and once using Mango Melody ink. I cut one flower from each image and attached the cut flowers over the corresponding Granny Apple Green image.
  Lastly I added Clear Faceted Gems to the centres of the flowers.
To decorate the inside of the card, I inked the small floral image using Poppy Parade, Granny Apple Green and Highland Heather Stampin’ Write Markers and stamped onto Whisper White card. I stamped the greeting from the Varied Vases stamp set next to the floral image using Highland Heather ink.
This card kind of took me out of my comfort zone. All that fussy cutting and fussy inking but I think the finished card is amazing, don’t you? I hope my friend liked it too.
Bye for now,
Kris
Product Used:


Kakadu

We packed a lot into our trip to Darwin and it was really exciting reaching Kakadu. This page is really quite simple but it brings back lots of memories. This is where we stopped because Sarah and Sean’s car air conditioning had stopped working. The driving belt was a mangled mess and it took Sean and Ron a little while to remove the debris, which gave us time for a walk around and a photo opportunity! My page base is 12″ x 12″ Whisper White card. I attached a 6″ square piece of Early Espresso paper from the Neutrals Designer Series Paper to the left hand side of the page. I did sponge around the edges using Early Espresso ink first. I stamped the Birch Background stamp onto Crumb Cake card using Crumb Cake ink and sponged around the edges using the same ink. This panel is attached to the right hand side of the page. I cut a strip of Mossy Meadow paper from the Neutrals Designer Series Pack and trimmed one end with the Triple Banner Punch and sponged around the edges using Mossy Meadow ink. I did cut this strip in half so that it would reach further across the page and since my photo is on top, no-one knows! My journaling is printed onto Whisper White card, cut into strips and attached to Early Espresso card before being attached to the page. I didn’t add a title because the photo says it all.
It seems like only yesterday we were doing this trip and yet it is already over 12 months ago. I need to spend a bit more time scrapbooking!
Bye for now,
Kris
Product Used:


