Snorkling
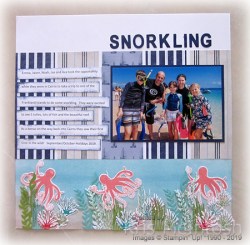
Today’s page shows off some photos that my daughter shared of her driving trip around Queensland. They spent some time in far north Queensland at Cape Tribulation and on their way home they stopped off at Cairns. They took a trip out to one of the reefs for some snorkling. I loved the photos and thought they deserved to be shown off. I began with a 12″ x 12″ Whisper White page. I masked off the top two-thirds of the page and used my sponge brayer to add Crumb Cake and Balmy Blue ink across the page. I removed the mask and then I spent some time playing around with stamps, ink and dies.  I stamped the Octopus from the Sea of Textures stamp set several times onto Whisper White card using Flirty Flamingo ink and cut them out using the co-ordinating Under The Sea Dies. I stamped the tall seaweed image from the Magical Mermaid stamp set onto Whisper White card using Granny Apple Green ink.
  I stamped over the image using the tall seaweed image from the Sea of Textures stamp set using Coastal Cabana ink. I die cut the stamped card using the large die from the Come Sailing Dies and one of the dies from the Under The Sea Dies. I stamped the seaweed images from the Sea of Textures stamp set onto Whisper White using Poppy Parade, Granny Apple Green and Coastal Cabana ink. I cut the images out using the co-ordinating Under The Sea Dies. I also used the large seaweed die from the Come Sailing Dies and the tall seaweed die from the Under The Sea Dies to cut Coastal Cabana and Granny Apple Green card.
  Before attaching the die cuts to the page, I attached five strips of Come Sail Away Designer Series paper 2-1/4″ x 6″ across the top of the area that I had coloured on the 12″ x 12″ Whisper White page. Then I had fun layering and adding the die cut pieces across the sponged card. I attached the photo to Night of Navy card before attaching to the page. I cut the title from Night of Navy card using the retired Little Letters Dies. I printed my journaling onto Whisper White card, cut it into strips and sponged the edges with Night of Navy ink before attaching to the page.
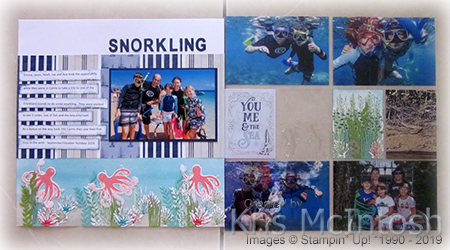
 Because I had more than one photo to show off I created a pocket page to co-ordinate. I printed the photos and added them to the pockets. At the moment I have one pocket with no image because I am waiting on a photo of the turtles. I attached one of the die cut pocket cards onto a 3″ x 4″ pocket card from the Come Sail Away Memories and More Card Pack. To fill the other pocket I stamped Whisper White card using the tall seaweed image from the Magical Mermaids stamp set using Granny Apple Green ink. I stamped the tall seaweed image from the Sea of Textures stamp set over the top using Coastal Cabana ink. I sponged around the top of the seaweed using Balmy Blue ink. I cut the stamped card using the fish die from the Under The Sea Dies. I coloured a piece of Sparkle Glimmer Paper using the dark Bermuda Bay Stampin’ Blend and attached it behind the cut out fish. I added some die cuts left over from the 12″ x 12″ page to finish off.
As you know I am a simple memory keeper so this is a little out of my comfort zone, however, I am thrilled with the results. I just love how these pages turned out. I’d love to know what you think.
Bye fornow,
Kris
Product Used:


Christmas Rose not just for Christmas

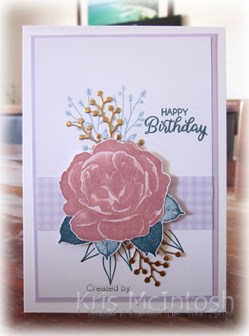
The card I am sharing with you today is made using the Christmastime is Here product suite and guess what, today is the day that you can begin purchasing this gorgeous product suite. Although this product suite is designed for Christmas, the flower is so beautiful you don’t have to use it just for Christmas. I began by embossing Whisper White card using the Subtle 3D Embossing Folder. I cut a strip of Gold Foil card using the border from the Rose Dies and attached it to the back of the bottom of the embossed card. The whole panel is attached to Whisper White card and then Gold Foil card. The Gold Foil card is attached to scored and folded Highland Heather card. I stamped the large flower image from the Christmas Rose stamp set onto Whisper White card using Versamark ink, sprinkled it with Gold Embossing Powder and heat set it. I used Highland Heather, Pear Pizzazz, So Saffron and Crumb Cake ink to add the fill images to the flower. I cut out the image using the co-ordinating Rose Die and attached it to the card front using dimensionals. I stamped “happy birthday” from the Special Celebrations stamp set onto Highland Heather card using Versamark ink, spinkled it with Gold Embossing Powder and heat set it.
  I cut out the greeting using the label die from the Rose dies. The greeting is attached to the card front also using dimensionals where necessary. As a last decorative touch I added three of the Gold Glitter Enamel Dots which are part of the product suite.
To decorate the inside of the card, I stamped the flower onto the lower left hand corner of Whisper White card, using the fill images only, and the same inks as on the front of the card. I like the effect of being a little more dreamy (maybe), don’t you?
Don’t forget that the Christmas Time is Here Product Suite is only available from the 1st November, while stocks last.
Bye for now,
Kris
Product Used:


Mermaid Kisses

and Starfish Wishes. Today I am sharing the card that I made for my Granddaughter Jae to celebrate her 11th birthday. While this is not strictly a Fancy Fold card, it does feature a spinning wheel to change the colour of the Mermaid’s tail. I followed a video that Sharni Haines shared on a demonstrator only Facebook Page. I began by stamping the mermaid image from the Magical Mermaid stamp set onto Whisper White card using Memento Tuxedo Black ink. I masked the mermaid image and stamped the tall seaweed image from the Magical Mermaid stamp set across the bottom of the card using Granny Apple Green ink. I stamped the tall seaweed image from the Sea of Textures stamp set across the bottom of the card using Old Olive ink. I also stamped the dotty image from the Magical Mermaid stamp set across the top of the seaweed images using Balmy Blue ink. I removed the mask and coloured the hair and body of the mermaid but not the tail using Ivory and Daffodil Delight Blends and a Melon Mambo Stampin’ Write Marker. I used my Paper Snips to cut out the tail image.  I stamped the tail image onto Window Sheet using Stazon ink and attached it to the back of the stamped card so that the tail showed through my cut out. I cut the largest scalloped circle from the Layering Circle Dies and coloured it using Poppy Parade, Melon Mambo, Flirty Flamingo, Old Olive and Granny Apple Green ink. Once coloured, I pierced the centre of the card and laid it behind the stamped panel. I attached the scalloped circle with a retired Silver Brad so that it would spin and add colour to the mermaid tail. I decided to add two more brads for a bit more sparkle before attaching the panel to scored and folded Melon Mambo card using Foam Adhesive Strips and making sure that they didn’t interfere with the spinning circle. I stamped the greeting from the Magical Mermaid stamp set onto Whisper White card using Memento Tuxedo Black ink and cut it out using one of the circles from the Layering Circles Dies. I attached the greeting to a Melon Mambo scalloped oval cut using the same dies, and then the card front. I cut a small “sand dollar” from Crumb Cake card using the Under The Sea Dies and attached the Crumb Cake starfish over the stamped starfish on the greeting panel.
To decorate the inside of the card, I stamped the tall seaweed image from the Magical Mermaid stamp set using Granny Apple Green ink. I stamped the tall seaweed image from the Sea of Textures stamp set using Old Olive ink. I cut the tall seaweed image from Granny Apple Green card using the Smooth Sailing Die. I cut the smaller seaweed image from Soft Sea Foam card using the Under The Sea Die. I cut one small and one large “sand dollar” image from Crumb Cake card. I layered the die cut images over the same seaweed before stamping another greeting from the Magical Mermaid stamp set using Memento Tuxedo Black ink.
I love how this turned out and can’t thank Sharni enough for sharing her video with other demonstrators. I know that Jae will love it too.
EDIT: I did a little more searching and found that Sharni has a post with a video creating this type of card on her blog here. Enjoy.
Bye for now,
Kris
Product Used:


Using up Scraps

Well not really scraps, but you remember this card, that I shared with you recently which has one of the images from the Christmas Time is Here Specialty Designer Series Paper. Well around the edges of the paper I found some half images which matched the Rose Die and I had to find a way to use them. I embossed Whisper White card using the Subtle 3D Embossing Folder and attached it to scored and folded Cherry Cobbler card.  I cut the images from the Designer Series Paper using the Rose Die and attached one to the top right hand corner and one to the bottom left hand corner of the embossed card. I stamped the greeting from the Christmas Rose stamp set onto Soft Sea Foam card using Memento Tuxedo Black ink and cut it out using one of the labels from the Rose Dies.
 I attached a length of the Gold 1/4″ Shimmer Ribbon behind the greeting before attaching to the card front using dimensionals.
To decorate the inside of the card, I found another partial floral bouquet on the edge of the paper and cut it out by hand before attaching it to the left hand side of Whisper White card.
I am so happy with this card. The Designer Series Paper is just so gorgeous, I didn’t want to waste any. I really would love to know what you think.
Bye for now,
Kris
Product Used:


Purple Birthday
I am pretty sure you will have heard the news, but just in case, Purple Posy ink pads are now available. You can buy the single ink pad but you can also buy the 2019-2021 Ink Pads as a set. Re-inkers are also available. Now I haven’t used that colour on my card today because my Purple Posy ink pad hasn’t arrived yet, but I was reminded to let you know because I used some of the other 2019-2021 In-Colours on the card I am sharing with you today. I began by stamped the foliage image from the Healing Hugs stamp set onto Whisper White card using Seaside Spray ink. I also stamped the open leaf image from the same stamp set using Pretty Peacock ink.  I attached a strip of Purple Posy Designer Series Paper across the Whisper White card. I cut two sets of foliage from Gold Foil card using the Frosted Bouquet Dies. I stamped the large flower from the Healing Hugs stamp set onto Whisper White card using Rococo Rose ink and cut it out. I stamped two sets of the double leaf from the same stamp set onto scrap Whisper White card using Pretty Peacock ink and cut them out.
  I attached the leaves to the back of the flower before attaching it to the card front using dimensionals. I stamped “Happy Birthday” from the Beautiful Bouquet stamp set onto the Whisper White card using Pretty Peacock ink. The Whisper White card is attached to Purple Posey card and then scored and folded Thick Whisper White card.
To decorate the inside of the card, I stamped the greeting from the Varied Vases stamp set using Pretty Peacock ink. I also stamped the foliage image from the Healing Hugs stamp set using Seaside Spray ink beside the greeting.
I really love how pretty this card is and I hope the friend I created it for loves it too.
Bye for now,
Kris
Product Used:


Award Night

My husband and I recently attendied our eldest grandchildren’s high school for an awards night. Both Abi and Ethan did extremely well. We are lucky to be able to attend these celebrations with them. Today’s page is a simple one showing off a couple of photos from the night. My page begins with a Basic Black 12″ x 12″ page. I embossed a length of Smoky Slate card using the Corrugated 3D Embossing Folder and attached it to the right hand side of the page. I embossed a length of Very Vanilla card using the Tin Tile 3D Embossing Folder and attached it to the left hand side of the page. I attached a strip of Bermuda Bay card across the width of the page before attaching the photos. I didn’t add any photo mats and the only embellishment on the page is the title which I cut from Basic Black card using the retired Little Letters Dies. I hand wrote the date.
A simple page but one that will bring back happy memories.
Bye for now,
Kris
Product Used:


Welcome Baby

Friends of my husband and I were recently blessed with a beautiful new granddaughter and I thought I would share the card I made for them. I must admit to not having many “baby” type stamp sets but I thought that the bunny rabbit from Fable Friends would do the trick. I stamped the check image from the Tiny Keepsake stamp set onto Whisper White card using Petal Pink ink. I wrapped the top of the stamped image using Silver 3/8″ Metallic Edge Ribbon which I coloured using the Dark Petal Pink Stampin’ Blend. I attached the stamped card to Petal Pink card and then Whisper White card which is embossed using the Subtle 3D Embossing Folder.  I stamped the bunny rabbit from the Fable Friends stamp set onto scrap Whisper White card using Memento Tuxedo Black ink. I coloured the image using the Petal Pink, Smoky Slate, Dark Flirty Flamingo Stampin’ Blends. I cut out the image and attached it to the card front using dimensionals.
  I cut “welcome” and “baby” from Smoky Slate using the Well Written Dies and attached the greeting over the stamped check image.
To decorate the inside of the card I stamped “congrats” and “So Happy For You” from the now retired Sunshine Sayings stamp set onto Whisper White card using Smoky Slate ink.
I am very pleased with this card, considering I didn’t think I had anything to make a baby card with! I’d love to know what you think?
Bye for now,
Kris
Product Used:


Open Book Card
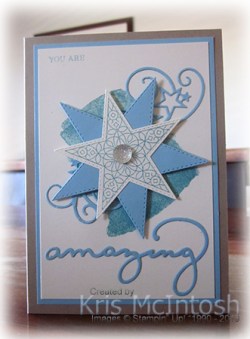
Now that sounds interesting doesn’t it. I have seen these cards in different forms on Pinterest and thought they would be too complicated to create. However, with my instructions from Elizabeth Shannon, it was fairly easy to do! I needed to create a couple of cards for my eldest two grandchildren who had their school presentation night recently. They both did very well, achieving academic awards as well as one retiring from the Junior School Council and one being elected for next year’s Junior School Council. I couldn’t be more proud of their achievements. So we have a Balmy Blue and a Blushing Bride version of this card. My card base is Crumb Cake card and I cut Very Vanilla for the inside of the card. I decorated the front of the card by stamping the background image from the Love What You Do stamp set onto Very Vanilla card using Balmy Blue ink.  I also inked the “you are” from the “you are wonderful” stamp from the Rooted in Nature stamp set using a Balmy Blue Stampin’ Write Marker and stamped it onto the top left hand corner of the Very Vanilla card. I stamped the star image from the So Many Stars stamp set onto scrap Very Vanilla card using Balmy Blue ink. I cut out the image using the co-ordinating Stitched Stars Die. I also cut Balmy Blue card using the star die one side larger than the stamped image, and, the filigree starry image, both from the Stitched Stars Dies. I also cut “amazing” from Balmy Blue card using the retired Celebrate You Dies.
  I attached “amazing” across the bottom of the stamped Very Vanilla card and the filigree star image across the stamped background. I attached the stamped panel to Balmy Blue card and then the card front. I attached the stamped star to the Balmy Blue star and then the card front using dimensionals. Lastly I added a Clear Faceted Gem to the centre of the star.
To decorate the book panels on the inside of the card, I stamped the greeting from the Strong and Beautiful stamp set onto Very Vanilla card using Balmy Blue ink. I added three of the stars which actually come from the filigree die cut to the panel before attaching it to Balmy Blue card. This panel is attached to the left hand side of the book panel. I attached a piece of Balmy Blue card to the right hand side of the book panel but I didn’t add the Very Vanilla layer yet. I wanted to write on it before I attach it to the card.
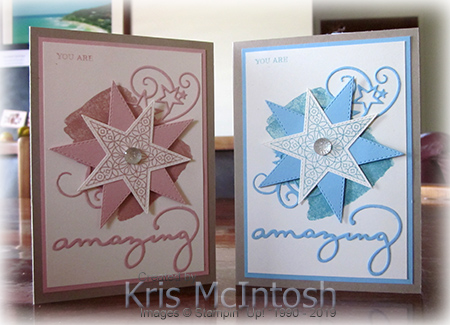
I love how these cards turned out and I think they are special enough to mark special achievements. Which version do you like, the Balmy Blue or the Blushing Bride one? Let me know what you think?
Bye for now,
Kris
Product Used:


24 hour Stamp Sale
And it’s already off and running. Stampin’ Up! are having a sale all day today right up until 11.50pm tonight. Lots of stamp sets at 15% off. 
You can download this brochure to take a look and see what’s on offer. There are so many great stamp sets available, so don’t delay. Check it out and place your order, you never know, the stamp set you love may also loved by everyone else and you might miss out.
Happy shopping.
Bye for now,
Kris
Wishing You…

Today’s card is another I made using the Christmastime is Here Product Suite. This card is created using a tutorial from Create with Connie and Mary and I love it. A piece of Whisper White card is attached to scored and folded Poppy Parade card. Gold Foil card is cut twice using the die from the Rose Dies and they are attached to the left hand side of the card front. The flower image from the Christmas Rose stamp set is stamped onto Whisper White card using Memento Tuxedo Black ink. The image is coloured using Poppy Parade, Mossy Meadow and Soft Suede ink and then cut out using the co-ordinating Rose Die.  The flower is attached to the card front using dimensionals. The greeting from the Christmas Rose stamp set is stamped onto Soft Sea Foam card using Memento Tuxedo Black ink and cut out using the label from the Rose Dies.
  A length of the Gold 1/4″ Shimmer Ribbon is attached to the back of the label before being attached to the card front using dimensionals.
To decorate the inside of the card, I stamped the flower image from the Christmas Rose stamp set using Memento Tuxedo Black ink. I stamped the fill images using Poppy Parade, Mossy Meadow and Soft Suede ink.
Isn’t this just so pretty? I love using a tutorial every now and then just to get me thinking about new ideas and Connie and Mary have some fabulous ideas.
Bye for now,
Kris
Product Used:


