For the Coach Take Two

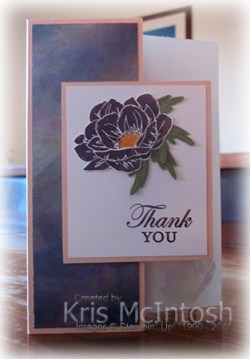
As you are already aware, I was asked by my daughter to make cards for her daughters Netball coaches, so the card I am sharing today is for Abigail’s team (I have already shared the one I made for Elyssa’s team). When creating this first card, I cut my Designer Series Paper deliberately so that I could get two cards from the one piece of Designer Series Paper. I cut my Magnolia Lane Designer Series Paper 11-1/2″ x 12cm, cut it in half on the diagonal before scoring as described in this Pinterest video by Nancy Novak.  I cut my Whisper White card to co-ordinate with the Designer Series Paper at 14.3cm x 12cm. As you can see this is going to be an oversized card, but all of the girls in the team need to be able to sign it and leave a message. I stamped “thank you” from the Magnolia Blooms stamp set onto the lower right hand corner using Memento Tuxedo Black ink. I attached my scored and folded Designer Series Paper across the card, making sure to add tape inside the folds as well as on the back of the folds.
  I tied a knot in the White 3/8″ Linen Ribbon which is part of the Magnolia Lane Combo Ribbon Pack and attached it across the top of the Designer Series Paper. The whole panel is attached to scored and folded Basic Black card. To create my flower I cut two of each of the three petal dies from the Magnolia Memory Dies from Whisper White card. I sponged So Saffron ink onto the centres of the petals and used my bone folder to curl the leaves. I stacked the petals one on top of the other, making sure to stagger the petals and using Glue Dots to hold them in place. I cut the large and small flower centres from So Saffron card using the Magnolia Memory Dies and sponged the edges using So Saffron ink. I stacked the flower centres before attaching to the centre of the flower. Lastly I added a Clear Faceted Gem to the centre of the flower. I cut Mossy Meadow card using the dies from the Magnolia Memory Dies and attached them to the back of the flower.
 I attached the flower to a Basic Black scalloped circle, cut using the Layering Circle Dies, before attaching to the card front.
I decorated the inside of the card by attaching Whisper White card to both panels. I stamped the small flower from the Good Morning Magnolia stamp set onto scrap Whisper White card using Memento Tuxedo Black ink. I coloured the flower using Petal Pink and Mossy Meadow Stampin’ Blends. I cut out the flower using the co-ordinating Magnolia Memory Die and attached it to the centre of one of the Whisper White panels.
Since the card is oversized and slightly bulky, I created a pizza box from Thick Whisper white card to house the card. I created a simple belly band by wrapping the box with a narrow strip of the same pattern of Magnolia Lane Designer Series Paper.  I cut the label for the front of the box from Basic Black card using the Detailed Band Dies and attached it over the ends of the Designer Series Paper. (The designer series paper piece is the left over strip when you #loveitchopit.) I stamped the greeting from the Beauty Abounds stamp set onto scrap Whisper White card and cut it out using the co-ordinating Detailed Band Die. The greeting is attached to the centre of the Basic Black label.
I love this card. My first time making one with the pleated designer series paper and I love the look. By making the card a little oversized and adding Whisper White card to both inside panels, the girls in Abigail’s team will have plenty of space to write a message to their coach.
I’d love to know whether you have made one of these pleated cards or what you think of mine.
Bye for now,
Kris
Product Used:


For the Coach
Both my granddaughters have the same netball coach and I was asked by my daughter to create cards for both girls teams to give to her for looking after them so well this season. Since both coaches are one and the same person, I couldn’t create two cards the same. I really love this dreamy double fold card that I found on Lisa Curico’s blog and decided that it would be perfect for Elyssa’s team. I used Petal Pink for my card base and attached a piece of Perennial Essence Designer Series Paper to the small panel on the left. I stamped “Thank you” from the Magnolia Blooms stamp set onto the lower right hand corner of the front Whisper White panel using Blackberry Bliss ink. I stamped the large and the small flowers from the Floral Essence stamp set onto Whisper White card using Blackberry Bliss ink.  I stamped the flower centre for the small flower using Crushed Curry ink. I stamped two sets of leaves onto Old Olive card using Old Olive ink. I hand cut the flowers and the leaves. I attached the small flower on top of the large flower using dimensionals and attached the leaves to the back of the large flower. The flower is attached flat to the stamped panel. I attached the greeting panel to Petal Pink card and then attached it to the small flap using dimensionals under the left hand side of the panel only. I used Whisper White to create the inside card and stamped the small flower onto the lower left hand corner using Blackberry Bliss and Daffodil Delight ink.
  This panel is attached to the inside back panel of the Petal Pink card. I stamped “worlds greatest” from the retired Guy Greetings stamp set onto Whsiper White card using Blackberry Bliss ink. I cut “coach” from Blackberry Bliss card using some non-Stampin’ Up! dies I have had for ages. I love the funky look to these dies. I also stamped the small flower from the Floral Essence stamp set once more using Blackberry Bliss and Crushed Curry ink. The stamped panel is attached to Petal Pink card and then the front of the folded Whisper White card, making sure that sits completely behind the stamped panel on the front of the card.
This such a lovely card fold and really simple to do but it packs a lot of punch, Don’t you think? AND it does leave lots of space for the girls to write their messages.
Bye for now,
Kris
Product Used:


Happy Snap

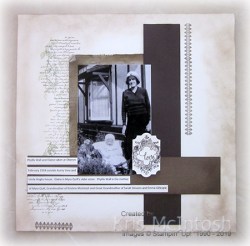
Today’s page features a photo of my Mum and Dad with my Dad’s mother and sister with me and my two sisters. The photo looks like it was taken around 1962-63 judging by the size of my sister Jenny. I love how happy everyone looks in this photo. I used the Gallery Grunge stamp set to add Petal Pink dots onto the top right and bottom left hand corners of a 12″ x 12″ Whisper White page. I also added a couple of the stripey images from the same stamp set using Blackberry Bliss ink.  I attached a piece of Blueberry Bushell card to the centre of the page and added strips of the beautiful Perennial Essence Designer Series Paper. I attached my photo to Blackberry Bliss card before attaching over the Designer Series Paper. I cut “happy” and “love” from Whisper White card using the Well Written Dies. Lastly I added a bit of journaling so my grandchildren would know who everyone is.
As you can see this is another simple page, as are most of my memory keeping pages.
Bye for now,
Kris
Product Used:


More Notes of Kindness
Earlier this week I shared with you the cards I made using the Notes of Kindness Card Kit. I told you that I had a few ideas for using these cards in a different way. To create my cards today, I took one of the cards from the kit and cut it in half. Both the front and back of this card have the same design. For one card, I attached the pieces from the kit in the same way as before. I attached this panel to Whisper White card using dimensionals and then to scored and folded Soft Sea Foam card. To decorate the inside of the card, I stamped the cross image onto the lower left hand corner of Whisper White card using Blushing Bride ink.  I stamped the leaf image twice over the crosses using Mossy Meadow ink. Both of these stamps are in the stamp set that comes with the Notes of Kindness Card Kit.
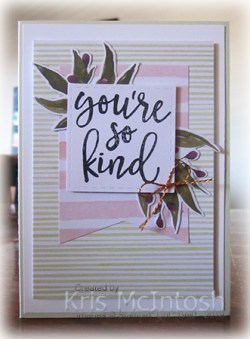
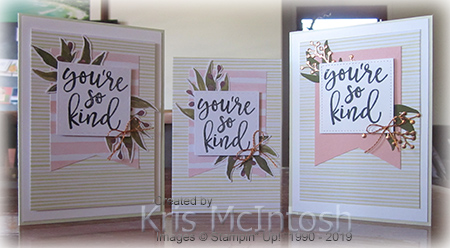
For the second card, I cut a banner from Blushing Bride card and attached it to the striped piece from the Notes of Kindness Card Kit.  I cut Copper Foil twice using one of the dies from the Frosted Bouquet Dies. I also cut two sets of leaves from Mossy Meadow card using another of the Frosted Bouquet Dies. I attached the die cuts over the banner. I cut Whisper White card using one of the squares from the Stitched Shapes Dies and stamped the same greeting specified in the card kit. I attached the greeting to the card front using dimensionals. I also added a bow tied using the Copper Twine from the kit. The striped panel is attached to Whisper White card using dimensionals and then scored and folded Soft Sea Foam card.
I decorated the inside of this card in the same manner as the other one using the cross and leaf images
.
So what do you think? I kind of like the idea of getting two for one from the card kit, what about you?
Bye for now,
Kris
Product Used:


Front Panel Pop Up Card

In case you hadn’t noticed, I have been having fun playing with fancy folds and today’s card is another one I have tried. This is called a front panel pop-up card. Long name for a simple card. Basically it has a back panel which folds up to create a space to add the front panel. You can fold the card flat which is awesome, because whoever receives this card won’t have to know how it works, it will pop up when it comes out of the envelope. I cut my card bases from Thick Whisper White card, which I think works well for this type of card. I attached pieces of the Perennial Essence Designer Series Paper to Blackberry Bliss card to decorate most of the panels.  I stamped the image from the Beautiful You stamp set onto Whisper White card using Memento Tuxedo Black ink. I coloured the “skin” areas of the image using the Ivory Stampin’ Blend and her hair using the Dark Soft Suede Stampin’ Blend. I stamped the image once more onto a different piece of the Perennial Essence Designer Series Paper and fussy cut the dress and hat. I glued the hat and the dress onto the stamped and coloured image.
  The image panel is attached to Blackberry Bliss card and then the front “pop-up” panel. I stamped the greeting from the Itty Bitty Greetings stamp set onto Whisper White card using Blackberry Bliss ink. The greeting is cut out using the Layering Ovals Dies. I attached the greeting to a Blackberry Bliss scalloped oval (cut using the same dies) and attached the panel to the card front. I added Whisper White card to Blackberry Bliss card and attached it to the back panel of the card to give me somewhere to write.
What do you think? Isn’t this a fun card?
Bye for now,
Kris
Product Used:


Happy Birthday Birdie

I saw a lovely card on Pinterest created by the talented Jan B using the now retired Petal Palette stamp set and co-ordinating Petals & More Dies. I loved the layout and decided to re-create it using the Free As A Bird stamp set. I cut a circle from a piece of Whisper White card and attached a panel behind it which I embossed using the Lace 3D Embossing Folder. I added dimensionals between these two layers. The whole piece is attached to scored and folded Thick Whisper White card using dimensionals where necessary. I stamped the leaves, flowers and bird from the Free As A Bird stamp set onto scrap Whisper White card using Memento Tuxedo Black ink.  I coloured them using the Poppy Parade, Flirty Flamingo, Granny Apple Green and Bermuda Bay Stampin’ Blends. I used the colour lifter on the bird, to lighten some of my colouring and the Dark Daffodil Delight Stampin’ Blend to colour the beak on the bird.
  I stamped “happy birthday” from the Itty Bitty Greetings stamp set onto scrap Whisper White card using Poppy Parade ink and used the Classic Label Punch to punch it out. I arranged the stamped images around the circle using mini dimensionals where necessary. I also added Basic Rhinestones to the centre of the flowers.
I kept the inside of the card very simple. I stamped one leaf and one large single flower onto scrap Whisper Whtie card using Memento Tuxedo Black ink. I coloured the images using the Poppy Parade and Granny Apple Green Stampin’ Blends. I attached the leaf and the flower to the top right hand corner of the inside of the card.
This is such a pretty card, so thank you, JanB, for the inspiration.
Bye for now,
Kris
Product Used:


Notes of Kindness

Today I am sharing the Notes of Kindness Card Kit with you. This is an all inclusive card kit. You will find all the product necessary to create five cards each of four different designs. The card size is not standard, more like a note-card. You also get a stamp set, clear block, a Basic Black Stampin’ Spot and 20 lined envelopes. The designs are really pretty and super quick to put together. Some of the pieces are like stickers so you don’t need to add Snail. The die cut pieces are all beautiful and you can add these with dimensionals if you wish. You also get plenty of Copper twine to create bows or just to add interest behind an image. The final finishing touch for some of the cards are lovely pearls which also come in the kit. The box everything is packed in is quite sturdy and would make a lovely gift box on its own. So far I have only create one each of the cards but I have a few ideas to maybe create some cards differently to the way they are intended.
I encourage you to take a look at the kits available in the Annual Catalogue and when you can the Holiday Catalogue. They truly are great quality and great value.
Bye for now,
Kris
Product Used:
Oberon
My Grandfather was born in Oberon and we spent a lot of time there visiting my Great Grandmother and assorted Aunts and Uncles. This photo was taken in 1934 outside my Aunty Vera and Uncle Hugh’s house. I spent many happy times in this house with my Grandparents and my Aunt and Uncle. This photo shows my Grandmother and my Mum’s sister in the garden. I decided to go with a vintage look because I thought it would suit the photo and because I was dying to try out the Very Versailles stamp set which I have only recently purchased.  I stamped the script image from the Very Versailles stamp set onto the left hand side of Very Vanilla 12″ x 12″ card using Crumb Cake ink. I stamped the leaf image from the same stamp set over the top using Mossy Meadow ink. I also stamped the border image from the Very Versailles stamp set onto the page using Soft Suede ink. Then I sponged around the edges using Crumb Cake ink. I stamped the script image and the leaf image onto a piece of Crumb Cake card, sponged the edges with Crumb Cake ink and distressed the edges using my bone folder and the retired Stampin’ Up! distressing tool. I sponged the edges of a long strip of Early Espresso card using Early Espresso ink and a piece of Soft Suede card using Soft Suede ink.
  Both pieces of sponged card are embossed using the Subtle 3D Embossing Folder. I attached the Crumb Cake piece to the page, layered on top the Early Espresso card and then the Soft Suede strip of card. The photo is attached on top. I printed the journalling onto Very Vanilla card and cut it into strips to attach to the page. I stamped the filigree image from the Very Versailles stamp set onto Very Vanilla card using Soft Suede ink and punched it out using the Everyday Label Punch. I stamped “love” into the middle of the image using a greeting from the Enjoy Life stamp set which I inked using an Early Espresso Stampin’ Write Marker. The filigree image is attached to the page using dimensionals.
I love the finished page. The vintage look suits the photo which has a couple of creases and tears in it. I don’t “photoshop” my photos, I just scan and print so you get the idea of the age of the photos.
Bye for now,
Kris
Product Used:


Sip Sip Hooray

I’m not sure exactly how I feel about the card I am sharing with you today, however, it is my first use of the Sip Sip Hooray and Cheers to That stamp sets. I had been trolling through my saved card sketches, one of which inspired me to create this card. I embossed Whisper White card using the Swirls and Curls Embossing Folder and wrapped the lower part using the Pretty Peacock 1/2″ Scalloped Linen Ribbon before attaching to scored and folded Pretty Peacock card. I cut a piece of Pretty Peacock 2019-2021 In-Colour Designer Series Paper using one of the Layering Circle Dies. I attached the Designer Series Paper to the embossed card. I stamped the glass from the Sip Sip Hooray stamp set onto Whisper White card using Smoky Slate ink.  I stamped the fill image using Rococo Rose ink before cutting the image with the same Layering Circle Die. I attached the stamped panel to a Pretty Peacock Scalloped Circle cut using the Layering Circle Dies before attaching to the card front, partially covering the Designer Series paper circle. I stamped the greeting from the Cheers to That stamp set onto Whisper white card using Rococo Rose ink.
  I stamped the leafy spray image from the Sip Sip Hooray stamp set below the greeting and cut it out using the Layering Circle Die. I cut a scalloped circle from Pretty Peacock card and attached the stamped panel before attaching to the card front using dimensionals. I tied a bow in the Pretty Peacock 1/2″ Scalloped Linen Ribbon and attached it to the left hand side of the card front using a Mini Glue Dot.
To decorate the inside of the card, I decided to die cut the top of Whisper White card using the bubble die from the Sip and Celebrate Dies.
I think I am having trouble with the fact that the colours are not truly “Christmassy”, what about you? Does it make the grade as a Christmas card? Let me know what you think.
Bye for now,
Kris
Product Used:


Triangle Corner Pop Up Card

I shared a pop up corner card recently which a lady from my Beachmere classes had asked me to have a look at. Well, included in the instructions for the card she was interested in was a link to a video for this style of card. I watched a couple and decided that Jan B’s video was the easiest to follow. I cut my card base from Thick Whisper White card and followed Jan’s instructions on scoring and cutting. My layers are all Whisper White card which I embossed using the Subtle 3D Embossing folder – except the one that is hidden which I wanted to be able to write a message on.  The embossed card is attached to Night of Navy card before attaching to the card base. I stamped the small daisy from the Daisy Lane stamp set onto Whisper White card 6 times and punched them out using the Medium Daisy Punch. I used my bone folder to add some dimension and then attached three flowers on top of each other. A daisy is added to each of the outside triangle panels. To create the easel for the focal panel, I cut Night of Navy card using the largest of the Scalloped Circles.
 I cut one full circle from Whisper White card using the largest circle from the Stitched Shapes Dies. I cut another circle using the Stitched Shapes Die from Whisper White card which I had scored. I cut the circle so that there was a little join at the top. I folded one of the joined circles in half. One the single stitched Whisper White circle I stamped the stem image from the Daisy Lane stamp set three times using Old Olive ink. I stamped the flower image onto scrap Whisper White card 3 times using Crushed Curry ink and cut them out.
  I attached one flower to each of the stems. The full circle is attached to the folded circle and the other full circle is attached to the Night of Navy scalloped circle which is attached to the card base. I stamped the greeting from the Daisy Lane stamp set onto Whisper White card using Night of Navy ink and punched it out using the Classic Label Punch. The greeting is attached to the circle die using dimensionals so that the folded circle will stand up. The last panel which you can’t see when the card is on display, has the leaf image stamped using Old Olive ink and the flower stamped using Crushed Curry ink. This leaves plenty of room to write a message and the card folds flat easily to go into an envelope!
I really love this card and truly it is very easy to create once you know how. Thanks Narelle for sending me the link. Have you made one of these, if not, I can thoroughly recommend it.
Bye for now,
Kris
Product Used:


