It’s Your Day
 I had a little fun yesterday afternoon playing with the Stamparatus and the Happiness Surrounds stamp set. The more I play with this stamp set the more combinations of images I come up with. I started by seeing if the small flower would fit inside the leaf medallion image and guess what it does. So using the Stamparatus I stamped several images using Merry Merlot for the flower and Mossy Meadow for the leaves. I used the co-ordinating Snowfall Thinlites Die to cut them out. Then once more setting up the Stamparatus I stamped the large medallion image onto Whisper White card using Merry Merlot ink. I was able to stamp a few onto one strip of card, using the hinged stamping technique.
 The large medallions were cut out using one of the Layering Circle Dies. I also cut out a scalloped circle from Mossy Meadow card using the same dies. I attached the small flower/leaf medallion to the centre of the large medallion using mini dimensionals and then added the scalloped circle to the back.
  These pieces turned out so pretty I wanted to turn them into cards. So I embossed Whisper White card using the Layering Leaves Dynamic Embossing Folder (remember you need to spritz the card with water before using a dynamic embossing folder). I attached some of the embossed card pieces to scored and folded Merry Merlot card and some to scored and folded Mossy Meadow card. The card needed something else so I cut a piece of 5/8″ Striped Burlap Ribbon and attached it to the card front using dimensionals. Once more setting up my Stamparatus and using the hinged technique I stamped “it’s your day” from the Happiness Surrounds stamp set multiple times onto Whisper White card using Mossy Meadow ink. The greetings are cut out using the smallest of the ovals from the Layering Ovals Framelits Dies. I attached the greetings to Merry Merlot card cut using one of the scalloped ovals from the same dies. The greeting is attached to the card front over the ribbon. These cards turned out so pretty, don’t you think?
Now what to do for the inside? Once more I set up the Stamparatus so that I could stamp the flower/leaf combination onto Whisper White card using Merry Merlot and Mossy Meadow ink.
I’m attending Onstage Local (a Stampin’ Up! Demonstrator only event) in Brisbane in a week or so and maybe I will use these as swaps. I haven’t swapped in years, but it might be fun to do so once more.
Bye for now,
Kris
Product Used:


Call Me Clover Kits
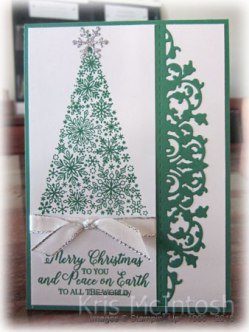
Remember this card I shared with you recently. Well we made the card recently at my Beachmere Classes and I had a few kits left over. So with the Snowflake Showcase products sitting on my desk, I decided to re-create the cards using these new products. For the first card the tree image and the greeting from the Snow is Glistening stamp set are stamped on to Whisper White card using Call Me Clover ink. I wrapped a piece of Silver 3/8″Metallic Edge Ribbon between the tree and the greeting and tied a knot. I cut Call Me Clover card using one of the Delicate Lace Edgelits Dies and attached it behind the right hand edge of the stamped card before attaching to Whisper White card and then scored and folded Call Me Clover card.  I cut Silver Glimmer Paper using one of the snowflake dies from the Snowfall Thinlits Dies and attached the snowflake over the top of the tree. To decorate the inside of the card, I cut Call Me Clover using the same Delicate Lace Edgelits Die and attached it to the left hand edge of Whisper White card.
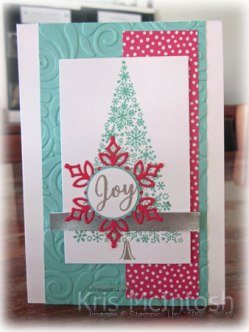
The second card using the same layout and dies but this time, I cut Call Me Clover card and Silver Glimmer Paper using the same die from the Snowfall Thinlits Dies.  I attached the Call Me Clover piece to the Whisper White card and stamped “Joy” from the Snow is Glistening stamp set using Call Me Clover ink. I wrapped the panel with Silver 3/8″ Metallic Edge ribbon and tied a knot before assembling the card in the same manner as described for the first card. I cut each of the snowflakes from the Silver Glimmer Paper and attached them over the corresponding snowflake on the Call Me Clover die cut piece. The inside is decorated in the same manner as the first card.
It’s fun to play with the pieces you have created for one card and turn them into something else, don’t you think?
And now for something really exciting. Today you can begin ordering this amazing product suite. Remember this the suite is only available until the end of this month on a while stock lasts basis. So do not wait, if you want these products, order them as soon as you can so you are not disappointed. I’m excited to see what wonderful things you create using the Snowflake Showcase product suite.
Bye for now,
Kris
Product Used:


Same card – different colours
The first card I am sharing today is also one of those from the tutorial I purchased from Create with Connie and Mary. I embossed Coastal Cabana card using the Swirls and Curls Embossing Folder and attached it to scored and folded Thick Whisper White card. I attached piece of Poppy Parade Designer Series Paper from the Brights 6″ x 6″ Designer Series Paper to the right hand side of the embossed card. I stamped the tree image from the Snow is Glistening stamp set onto Whisper White card using Coastal Cabana ink. I also stamped the tree trunk from the same stamp set using Gray Granite ink.  The image panel is attached to the card front using dimensionals. I attached a narrow strip of Silver Foil across the image panel. I cut the snowflake from Poppy Parade card using a die from the Snowfall Thinlits Dies and attached over the stamped tree and the Silver Foil card.
  I stamped “joy” from the Snow is Glistening stamp set onto Whisper White card using Gray Granite ink. The greeting is punched out using the 1″ circle punch before attaching to a Coastal Cabana 1-1/8″ scalloped circle. The greeting is attached to the centre of the snowflake.
To decorate the inside of the card, I stamped one of the greetings from the Snow is Glistening stamp set using Poppy Parade ink.
I really liked this card and wanted the ladies at my Beachmere class to be able to create it. I pulled out the Dashing Along Designer Series Paper which was free in a recent promotion and found one of the Designer Series papers was just perfect for this card. I still used Thick Whisper White for my base but embossed Shaded Spruce card and attached the Dashing Along Designer Series paper. The tree image is stamped using Shaded Spruce ink and the snowflake is cut from Cherry Cobbler card. I used Gold Foil card instead of Silver Foil on this card as well. The tree trunk and “joy” are stamped using Gray Granite ink. The greeting on the inside of the card is stamped in Cherry Cobbler ink.

I love both of these cards, but feel that the first card uses slightly non-traditional colours, while the second one is very traditional. What do you think?
Remember the Snowflake Showcase product suite becomes available for purchase on the 1st November.
Bye for now,
Kris
Product Used:


Happy Birthday Jae
 My granddaughter Jae is celebrating her 10th birthday today. Happy Birthday Jae. Jae loves cats and so I thought I would incorporate cats into her birthday card. I created a Waterfall card using the instructions from Splitcoast Stampers. However, I attached the front panel to scored and folded card. I attached a piece of Lovely Lipstick Designer Series paper from the 2018-2020 In-colour 6″ x 6″ Designer Series Paper to Whisper White card.
 I attached a piece of Lovely Lipstick card across the panel using a couple of brads from my retired stash. The waterfall mechanism is cut from Lovely Lipstick card. I used the Foxy Friends stamp set to stamp the images onto the four panels of Whisper White card using Gray Granite and Basic Gray ink. After attaching the images to the waterfall mechanism, I punched a hole in the end using my Crop-A-Dile and threaded a piece of Lovely Lipstick 1/8″ Grosgrain Ribbon to make it easy to pull and flip the images over. I stamped the greeting from the Picture Perfect Birthday stamp set onto Whisper White card using Lovely Lipstick ink to decorate the inside of the card. You can see how the images flip over when you pull on the ribbon in the pictures below.


 I had a lot of fun making this card for Jae and I know that Jae will enjoy the cats and the fact that the card moves. What about you, have you made one of these? If not, give it a try, it’s not as hard as it looks. Once again Happy Birthday Jae.
Bye for now,
Kris
Product Used:


Mini Mudder
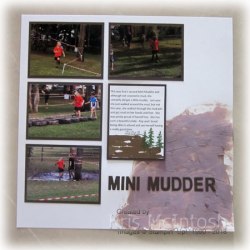
The school my youngest daughters children attend holds a Mini Mudder fundraiser each year and my husband and I attended recently to watch the event. Each class is brought out and completes the course before the next class starts. Ava, the youngest of the three, was first up. Last year she wouldn’t even touch the mud, walking around the pits but this year she did get a little muddy. Since the photos were not to great and I couldn’t get close ups, I decided to go with 4″ x 3″ photos for this layout. I added a little Early Espresso re-inker to White Embossing Paste and spread it across the bottom right hand corner of 12″ x 12″ Whisper White card to represent the mud pits. I am not sure if you can see just how much texture this adds. I attached each of the photos to Early Espresso card before attaching to the page.  My journaling block was printed on the computer but I did use the Waterfront stamp set to add a little mud using Soft Suede ink and a few trees using Garden Green ink to the bottom of the panel. I also stamped the date using the image from the Tabs for Everything stamp set. The journaling block is also attached to Early Espresso card. The title is cut from Early Espresso card using the retired Little Letters Thinlits Dies.
A simple page but one which will always remind me of Ava’s Mini Mudder run.
Bye for now,
Kris
Product Used:


More Snow is Glistening

Since this suite will soon be available for you to purchase, I thought you might want to see a few more examples of how to use this product suite. I did purchase a set of tutorials from Create with Connie and Mary and my card today features one of the cards. It begins with a piece of Gray Granite card embossed with the Curls and Swirls Embossing Folder. The embossed card is attached to scored and folded Coastal Cabana card. A piece of Coastal Cabana paper from the Brights 6″ x 6″ Designer Series paper is attached across the embossed card. The tree image from the Snow is Glistening stamp set is stamped onto Whisper White card using Granny Apple Green ink. I cut around the tree using my paper trimmer.  I stamped the tree trunk image onto Whisper White card using Gray Granite ink and cut it out. I attached the tree trunk to the tree and then the card front using dimensionals. I stamped the greeting from the Snow is Glistening stamp set onto the right hand edge of a strip of Granny Apple Green card using Memento Tuxedo Black ink. The greeting panel is attached to the card front over the tree using dimensionals.
  I cut one tiny snowflake and one larger snowflake from Silver Glimmer Paper using the Snowfall Thinlits Dies. The small snowflake is attached to the top of the tree and the larger one is attached to the left hand side of the greeting panel. I tied a bow using Silver Baker’s Twine and attached it to the centre of the larger snowflake.
To decorate the inside of the card I attached a narrow strip of Coastal Cabana card behind one long edge of Gray Granite card which is embossed using the Swirls and Curls Embossing Folder. The panel is attached to the bottom of Whisper White card.
This is a very pretty card and not overly snowy for an Aussie Christmas. What do you think?
Bye for now,
Kris
Product Used:


Snowfall CASE
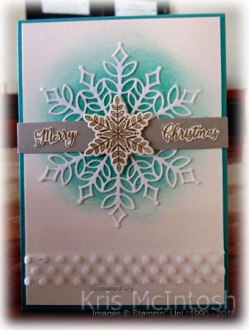
Today’s card is my version of a card shared by Stampin’ Up!. I started by sponging Bermuda Bay ink onto Shimmer Whtie card in a rough circle. I wrapped the bottom of the Shimmer Whtie card with 5/8″ Whisper White Polka Dot Tulle Ribbon and attached it to scored and folded Bermuda Bay card. I cut the large snowlake from a White Velvet sheet. Wow, this paper has to be seen and felt to be believed. So soft and pretty and – yes – velvety! The snowflake is attached to the card front on top of the sponged area. I cut a banner from Gray Granite card and attached it across the centre of the snowflake. I stamped the “Merry Christmas” from one of the greetings in the Snow is Glistening stamp set onto scrap Shimmer White card using Versamark.  I sprinkled the greeting with Gold Embossing Powder, heat set it and then cut out the individual words. The words are attached to the Gray Granite Banner.
  I stamped the leafy image from the Snow is Glistening stamp set onto Shimmer Whtie card using Versamark, sprinkled it with Gold Embossing Powder and heat set it. The image is cut out using the matching Snowfall Thinlits Die. The image is a perfect match for the “white space” in the large snowflake. The image is attached using dimensionals.
To decorate the inside of the card, I sponged Bermuda Bay ink onto Whisper White card in a smallish circle. I cut the snowflake from the White Velvet sheet and attached it over the sponged area.
This product suite is going to be a big hit when it becomes available in November, so if you want this product suite you do not want to delay purchasing it.
Bye for now,
Kris
Product Used:


It’s Our Birthday

Sooo, Stampin’ Up! is holding a one-day only sale today. The sale ends just before midnight tonight for online orders. There is an amazing array of stamp sets which are discounted by 15% for one day only. Please note that if a stamp set is part of a bundle, the discount applies to the stamp set only, NOT the bundle.
You can download the the PDF here. Or you can visit my online store and place your order directly. So don’t miss out on this opportunity to add to your stamp collection and save %15! I know that I am going to be saving a bundle on some sets I have had my eye on for a while. Have fun shopping.
Bye for now,
Kris
Something New

Have you heard? Stampin’ Up! are releasing an amazing product bundle which will only be available for customers to purchase during the month of November. As a demonstrator I was able to order this product suite in October and so I have been having a little play over the last week or so. Today’s card is inspired by the sketch challenge at Freshly Made Sketches and the colour challenge at the Paper Craft Crew. It is a simple card but shows off some of the images in the Happiness Surrounds stamp set and also the co-ordinating dies from the Snowfall Thinlits Dies.
 I started by stamping the large image from the Happiness Surrounds stamp set onto Whisper White card using Gorgeous Grape ink. The stamped panel is attached to scored and folded Gorgeous Grape card. I stamped the medium flower from the Happiness Surrounds stamp set onto scrap Whisper White card using Mango Melody ink.
  The colour challenge let you pick one colour yourself and I chose to stamp the small flower onto scrap Whisper White card using Poppy Parade ink. Both the large flower and the small flower have been cut out using the co-ordinating Snowfall Thinlits Dies. I also cut Granny Apple Green with the two leaf dies from the Snowfall Thinlits Dies. The leaves are attached to the back of the large flower before attaching to the card front. I attached the small Poppy Parade flower to the centre of the larger flower using dimensionals. I stamped the greeting from the Happiness Surrounds stamp set using Poppy Parade ink. I added a large Basic Rhinestone to the centre of the flower and a couple more around the greeting.
To decorate the inside of the card I stamped the border image from the Happiness Surrounds stamp set across the bottom of Whisper White card. I used the hinged stamping capablity of the Stamparatus to make sure that the border image was perfectly aligned.
To check out the products available for purchase watch this video by Stampin’ Up!.
These products will only be available for purchase during the month of November so don’t wait, if you want them order them as soon as you can to make sure you don’t miss out.
Bye for now,
Kris
Product Used:


Croc Farm
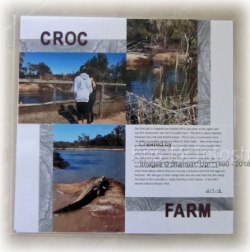
Today’s pages show off a couple of photos from our visit to the Croc Farm at Yeppoon. This is a commercial farm where the crocodiles are grown for their skin and incidentally their meat. We learned a lot about crocodiles and also the business of farming. This Croc Farm will also remove crocodiles from places where they are causing a nuisance or becoming a danger to humans.
To create the first page I cut one of the 6″ x 4″ Delightfully Detailed Memories and More cards into strips. I attached strips along the outside edges of the photos and also the journaling card. The title is cut from Blackberry Bliss card once more using the retired Little Letters Thinlits Dies.
The second page is also quite simple, with the photos of the girls and the journaling panel being attached to Basic Black card before being attached to the 12″ x 12″ Whisper White page. The photo of myself is attached to the journaling panel and the greeting from the Picture Perfect Birthday stamp set is stamped in Memento Tuxedo Black ink. I have also used the Tabs for Everything stamp set to add the date on both pages.
That brings me to an end of this series of pages from our holiday to Cooktown, I hope you have enjoyed them. You will notice that my style is quite simple. After the introduction of Project Life and now Memories and More, I try and keep all my layouts so that the panels and pieces are either 6″ x 4″ or 3″ x 4″. This makes it easy to create the page and add elements. I’d love to know what your style of Memory Keeping looks like.
Bye for now,
Kris
Product Used:


