Christmas Ornament and Presentation Box

This is another project we created for the All Day Class at Beachmere and my November classes at home. I found an online tutorial by Kim Oliver here which I used as the basis for my ornament. The leaves are cut using the large and small leaf die and the large and small leaf embossing die from the Natures Roots Framelits Dies – 5 large Call Me Clover leaves, 5 large Lovely Lipstick leaves and 10 small Lovely Lipstick leaves. It was a little time consuming getting all the pieces ready for the ladies to assemble their ornaments but totally worth it on the day. Each lady only had to emboss one leaf to complete their ornament. The ornament hangers were created using either Lovely Lipstick or Call Me Clover 1/8″ Grosgrain Ribbon. We added a Whisper White circle on the back of the ornament to add either the date or write a message if gifting the ornament.
Because most of the ladies in my classes are a little older, they have most of the ornaments that they wish to use at Christmas so gifting is most common. We created a pizza style presentation box using Lovely Lipstick card.  The Whisper White panel on the top is stamped using the swirl image from the Stylish Christmas stamp set and Call Me Clover ink. We stamped one flower from the Stylish Christmas stamp set onto Whisper White card using Lovely Lipstick ink and cut it out using the Layering Oval Framelits Dies. The panel is attached to a Call Me Clover scalloped oval and then the top of the box. We stamped another flower using Lovely Lipstick ink and two sets of holly leaves using Call Me Clover ink onto scrap Whisper White. The images were cut out, leaves attached to the back of the flower and then the whole piece is attached over the stamped flower using dimensionals. We added a few Basic Rhinestones to the centre of the flower to finish it off.
Because the ladies loved it so much and because it is fun to create gifts for your family and friends, please feel free to download the PDF tutorial.
I would love to know what you think?
Bye for now,
Kris
Product Used:


Fancy Fold Christmas
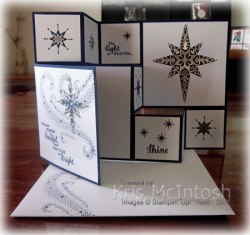
This card was created for my All Day Class at Beachmere and my November Class at home (the last one for the year). We usually make a few special items that can be used either by the class attendees or be gifted to someone else. I really love the fancy fold card that Julie Burt created and that I have shared with you previously. So it was only natural that this fancy fold would feature in these class. I cut the card base from Night of Navy and used the Star of Light stamp set and Starlight Thinlits Dies to decorate the card. There are two small panels of Whisper White card which have been stamped with one of the images from the Star of Light stamp set using Night of Navy ink. The panels are attached in the top left and bottom right hand corners of the card. I cut two small stars from Silver Foil card and attached them to the centre of the stamped images.  I cut the centre from two small panels of Whisper White card using the second smallest star from the Starlight Thinlits Dies. These panels are attached one at the top left and one at the bottom right of the card. Once the panels were attached to the card base, I added two small stars cut from Silver Foil card. I stamped one small panel of Whisper White card with “the star of light” image from the Star of Light stamp set using Night of Navy ink and added a small star also using Night of Navy ink. This panel is attached in the centre of the top of the card. I stamped another Whisper White panel using “shine” and three stars using Night of Navy ink. This panel is attached in the centre of the bottom of the card. I stamped the larger starry image onto another small panel using Night of Navy ink and this is attached to the very centre of the card.
  The large Whisper White panel on the right hand side of the card has been cut using the largest star framelit from the Starlight Thinlits Dies. After it was attached to the card base, I cut the detailed star image from Silver Foil card and attached it inside the die cut shape. The front panel of the small folded card has been stamped twice with the starry swirl from the Star of Light stamp set using Night of Navy ink. The greeting is added using the same ink. After the panel was attached to the card front, I cut Silver Foil card using the smaller detailed star image and attached it over the starry swirl. Inside the card, I added three stars from the Star of Light stamp set using Night of Navy ink.
  This is such a fun card to make. I love how using just the images from the Star of Light stamp set, created such a beautiful card. Of course, I am slightly biased as I do love Navy and White Christmas cards.
This card is 6″ square when folded and so we created an envelope from Whisper White card using the Envelope Punch Board and added the starry swirl image to the lower left hand corner.
Since the ladies loved this so much, I thought you might like to create it yourself, so click on the link below to download a PDF file.
I’d love to hear what you think.
Bye for now,
Kris
Product Used:


All Day Class
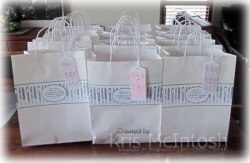
Yesterday I held the annual All Day Class with the ladies who attend my classes at Beachmere. Over the course of the day we create five projects – a piece of framed art, a fancy fold card, an ornament with presentation box, a set of four cards and a set of five tags. The cards and tags were created using the kits which are available in the Holiday Catalogue.  It takes me a while to prepare and set up for this class. I try to make it as fun as possible for the ladies by packaging each project individually and by doing a fair amount of the die cutting. This year our class was held at the Beach House. So that the ladies could keep all their projects in one place, I decorated a gift bag for each of them. I stamped the pen image from the Crafting Forever stamp set onto Whisper White card using Memento Tuxedo Black ink. I coloured the images using the Dark Night of Navy, Dark Bermuda Bay and Dark Old Olive Stampin’ Blends. I used the Decorative Ribbon Border Punch to cut Night of Navy, Bermuda Bay and Old Olive card and attached the punched strips along the edge of the stamped and coloured Whisper White card. The stamped panels are attached to the front of the gift bag.
  I stamped the Statement of My Heart stamp set (a limited release stamp now unavailable) onto Whisper White card using Memento Tuxedo Black ink and cut them out using the largest plain oval from the Layering Ovals Framelits Dies. The stamped panel is attached to a scalloped oval cut using the same dies from Night of Navy or Bermuda Bay or Old Olive card. The Statement of My Heart panel is attached to the centre of the stamped border. So that the ladies would be able to recognize their own bag, I printed their names onto Whisper White card using my computer. I punched one end using the Scalloped Tag Topper Punch and then over stamped the tag using the floral border image from the Touches of Texture stamp set. Some are stamped with Flirty Flamingo ink, some with Merry Merlot ink and some with Rich Razzleberry ink. The tags are tied to the bag with retired ribbon.
I’ll pop back over the next few days and share the projects we created with you.
Bye for now,
Kris
Product Used:


Take 2 – You’ve Got Style
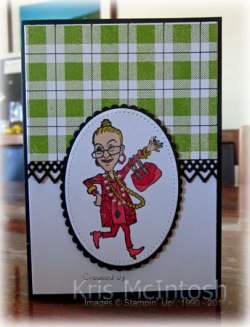
Since I had the left-over piece of the Buffalo Check Background that I created for the card I shared with you last week, I decided to make another card using the You’ve Got Style stamp set. I cut a piece of Basic Black card using one of the dies from the Delicate Lace Edgelit Dies and attached it behind the Buffalo Check stamped piece. The panel is attached to the top of Whisper White card and then scored and folded Basic Black card. I stamped the image from the You’ve Got Style stamp set onto Whisper White card using Memento Tuxedo Black ink. I coloured the image using Poppy Parade, Ivory, Bermuda Bay and Daffodil Delight Stampin’ Blends. The image is cut out using the largest oval from the Stitched Shapes Framelits Dies. I attached the image to a Basic Black scalloped oval cut using the Layering Ovals Framelits Dies. The whole panel is attached to the card front using dimensionals. Just to add a little more dimension I added small Basic Pearls to one of the necklaces.
 To decorate the inside of the card, I stamped one of the greetings from the You’ve Got Style stamp set onto Whisper White card.
What a great image this is, it certainly screams fabulous, don’t you think?
If you didn’t see my last post, here is a quick run down on how to add some extra dimension to the Buffalo Check Background stamp. Stamp the image onto whatever colour card you wish, using whatever colour ink you wish. Then you simply take a Stampin’ Write Marker in any colour you wish and draw lines across the whitish part of the design. You can add lines in more than one colour for even more dimension. This is a fun technique being shared by many Demonstrators across the internet.
Bye for now,
Kris
Product Used:


Not Memory Keeping

Today being Saturday I would normally post a Memory Keeping page, today I am doing something a little different because today I am attending Onstage Local in Brisbane. This is a demonstrator only event where we get to meet up with our fellow demonstrators and learn lots of great things from Stampin’ Up!. We also get to see product from the Occasions Catalogue and Sale-A-Bration catalogues to be released in January. I am lucky enough to be attending this with three of my team members and I know we are going to have a great time.  It is customary to give a gift to your traveling companions when you attend these events so here is what I gave to Jenny, Joyce and Elizabeth. I love the Snowflake Trinkets which are part of the Snowflake Showcase Product Suite and thought how pretty they would look as earrings. So I made a set of earrings for each of the ladies and of course a pair for me as well. They did turn out rather well and not so difficult to make. Of course you can’t just give a present without packaging them Stampin’ Up! style, so I created a little pizza box from Cherry Cobbler card and made an insert to hold the earrings from Whisper White card. Once I added the earrings, I closed the box, wrapped it with Gold 3/8″ Metallic Edge Ribbon and tied a knot. I stamped the outline image from the Label Me Pretty stamp set in Memento Tuxedo Black ink onto Whisper White card. I stamped “for you” from the Graceful Garden stamp set using Black ink. I used my Crop-a-dile to punch a hole in the end. The tag is attached to the Gold 3/8″ Metallic Edge Ribbon using Linen Thread. They look kind of pretty don’t they?
 I wanted to make the girls something practical as well, so I used the Full Wide Stamp Cases and added handles which I bought at Bunnings. They are all decorated using the beautiful Frosted Floral Specialty Designer Series Paper. These little cases are designed to hold your essential crafting supplies – scissors, adhesive, dimensionals and the like – when you are travelling to an event (like Onstage), but to gift them I filled them with chocolate. Chocolate and a Stampin’ Up! event – a match made in heaven! I created a tag for each bag using Whisper White card which I punched using the Scalloped Tag Topper Punch and I rounded the corners at the bottom using the Envelope Punch Board. I stamped the tall straight leaf from the First Frost stamp set using Mint Macaron ink. I stamped the larger leafy image from the same stamp set using Mossy Meadow ink. I added everyone’s names using the Stamparatus, the Labeler Alphabet and Merry Merlot Ink.
  The tags are attached using Silver 3/8″ Metallic Edge Ribbon and a hinged ring. I think these are a great idea and I am sure will be very useful.
I am going to try and add photos to my Facebook Page today (I’m not very tech savvy so we will see), so if you want to see what’s coming in the New Year, stop by and have a look.
One of the best things about attending these events is getting to catch up with friends you have probably only talked to online. I also get to catch up with other members of the Stampin’ Up! team I belong to – Steph’s Stampers, including my lovely upline Stephanie Pike.
Have a wonderful Saturday, I know that I will.
Bye for now,
Kris
Product Used:


You’ve Got Style

This You’ve Got Style stamp set was also part of the one day sale, which enabled me to buy it relatively guilt free. I just love the gorgeous ladies in this set and since most of my customers and I are not so young any more, I thought it would have lots of appeal. Today’s card also features a little technique that has been shared by many Demonstrators online for stepping up the Buffalo Check Background stamp. To do this, you stamp the background image as you normally would using whatever colour you wish. Then you take a Stampin’ Write Marker in the colour of your choice and add some lines into the “whitish” sections of the stamped image. To create my background, I stamped in Granny Apple Green and then added lines using my Basic Black Stampin’ Write Marker.  I actually stamped a 10cm x 14.3cm piece of Whisper White and then cut it down to the size I required. I cut a piece of Basic Black card using one of the Delicate Lace Edgelit Dies and attached it behind the top of the stamped card. The panel is attached to Whisper White card and then scored and folded Basic Black card. I stamped the image from the You’ve Got Style stamp set onto Whisper White card using Memento Tuxedo Black ink. I coloured the image using Poppy Parade, Daffodil Delight and Ivory Stampin’ Blends.
  The image is cut using the largest oval from the Stitched Shapes Framelits Dies. The image panel is attached to a Basic Black scalloped oval cut using the Layering Ovals Framelits Dies and then the card front using dimensionals. I stamped the greeting from the Half Full stamp set onto Whisper White card using Memento Tuxedo Black ink and cut it out using the Layering Ovals Framelits Dies. The greeting is attached to a Basic Black scalloped oval cut using the same dies and then the card front. Lastly I added a Basic Red Rhinestone to the each of the earrings.
To decorate the inside of the card, I added another of the greetings from the Half Full stamp set onto Whisper White card.
I love this card, I think this lady makes a great image for Christmas cards and I love the saying from Half Full, I know several people for whom this one is appropriate (maybe including me). I really would love to know what you think?
Bye for now,
Kris
Product Used:


Touches of Textures Thinking of You
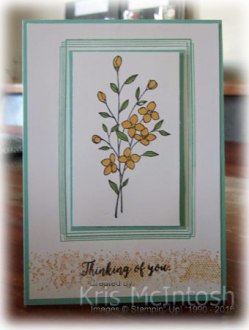
Recently I purchased the Swirly Frames stamp set, mostly because I have seen so many lovely projects created using this stamp set and it was part of the one day sale! So today I decided to have a little play. I stamped the rectangle outline image from the Swirly Frames stamp set onto Whisper White card using Coastal Cabana ink. I stamped the floral border image from the Touches of Texture stamp set across the bottom using Mango Melody ink. I stamped “thinking of you” from the Colourful Seasons stamp set over the top of the border image using Memento Tuxedo Black ink. I attached the stamped panel to scored and folded Coastal Cabana card.  I stamped the floral image from the Touches of Texture stamp set onto Whisper White card using Memento Tuxedo Black ink. I coloured the image using the Dark Mango Melody and the Dark Granny Apple Green Stampin’ Blends.
  The stamped panel is attached to Coastal Cabana card using dimensionals before attaching the panel inside the stamped rectangle outline.
To decorate the inside of the card, I stamped the border image across the bottom of Whisper White card using Mango Melody ink.
A simple card but I think rather a pretty one, don’t you?
Bye for now,
Kris
Product Used:


Just Add Ink 433

Today’s card was created using the colour challenge at Just Add ink. I was also inspired by the challenge at Case This Sketch this week. Although I did add a bit to the sketch. I cut four pieces of Lemon Lime Twist card using the die from the Flourish Thinlits Dies. I attached the die cut pieces across Whisper White card, leaving enough room to stamp the greeting from the Flourishing Phrases stamp set using Blueberry Bushell ink. I stamped the flower from the Flourishing Phrases stamp set onto scrap Whisper White twice using Berry Burst ink. I cut out one full flower and the centre from the second flower. I attached the smaller flower on top of the full flower using dimensionals before attaching to the card front. I added a large Basic Rhinestone to the centre of the flower and three small Basic Rhinestones around the greeting.
 To decorate the inside of the card, I stamped the flower from Flourishing Phrases onto the lower left hand corner using Berry Burst ink. I stamped the leaves from Flourishing Phrases using Lemon Lime Twist ink.
What a fun colour combination, probably not one I would pick on my own but very effective don’t you think. So thank you Just Add Ink and also Case this Sketch for the inspiration.
I’d love to hear what you think.
Bye for now,
Kris
Product Used:


Freshly Made 361

Today’s card is created using this week’s sketch at Freshly Made. I started by embossing Whisper White card using the Tin Tile Dynamic Embossing Folder. I attached a piece of Gold Glimmer Paper to the left hand side of the embossed card. I stamped the tree from the Winter Woods stamp set onto Whisper White card using Mossy Meadow ink. The stamped panel is attached to Mossy Meadow card and then the right hand side of the embossed card. The whole panel is attached to scored and folded Mossy Meadow card.  I stamped the tree from the Winter Woods stamp set onto scrap Whisper White card using Mossy Meadow ink and cut it out using the co-ordinating In The Woods Framelits Die. I fluffed up the die cut openings and attached the die cut tree over the stamped tree.
 I stamped Merry Christmas from the Merry Christmas to All stamp set onto Whisper White card using Mossy Meadow ink. The greeting is attached to Mossy Meadow card and then the card front using dimensionals.
To decorate the inside of the card, I stamped the greeting from the Winter Woods stamp set onto Whisper White card.
A simple card but I just love the layout. Thanks Freshly Made for another great sketch challenge.
Bye for now,
Kris
Product Used:


Noah’s Mud Run

It is my grandson Noah’s last year in Primary School and he really had a good time at the Mini Mudder. He ran with his friends in a large group and they got down and really dirty. I think they were almost swimming in the mud. He looked so happy when he reached the finish line. I created my page by firstly stamping onto the lower left hand corner. I used the sand image from High Tide and Soft Suede ink to create a puddle of mud. I stamped the double tree image from the Rooted in Nature stamp set around the “mud” using Mint Macaron ink.  I stamped the tall single tree from the same stamp set using Tranquil Tide ink on the branches and Soft Suede on the stem. I cut strips of the Natures Poem Designer Series Paper and punched one end using the Triple Banner Punch. The strips are attached to the page above the stamping. I added a Cajun Craze cardstock mat to my photo before attaching over the Designer Series Paper.
 I cut “you” from Soft Suede card and “amazing” from Cajun Craze card using the Celebrate You Thinlits Dies and attached them to the top of the page. I stamped “are” using a stamp from the Thoughtful Banners stamp set and Soft Suede ink. I printed my journaling onto Whisper White card and cut it into strips. The journaling is attached to Cajun Craze card and then the lower right hand corner. I added the date using the image from the Tabs For Everything stamp set using Memento Tuxedo Black ink. I love this page and know that Noah will too.
Bye for now,
Kris
Product Used:


