Freshly Made Sketch 365

Today’s card was inspired by the current sketch at Fab Friday I had been wanting to get out the Cookie Cutter Christmas stamp set for a while and for some reason, this sketch just seemed perfect. I embossed Cherry Cobbler card using the Cable Knit Dynamic Embossing Folder and attached it to scored and folded Early Espresso card. I stamped the reindeer image from the Cookie Cutter Christmas stamp set onto Whisper White card using Early Espresso ink. I used my Stamparatus to set up and stamp “Merry Christmas” from the Star of Light stamp set using Early Espresso ink. I stamped once and then moved the plate one step down the hinge and stamped again.  I removed the “Merry Christmas” stamp and re-set it to stamp between the two Early Espresso greetings and stamped once more using Cherry Cobbler ink. I absolutely love my Stamparatus! I punched a 1/2″ circle from Cherry Cobbler card, trimmed it slightly and attached it over the stamped nose on the reindeer and, now, it looks like Rudolph!
  I trimmed the bottom of the Whisper White panel into a slight “v” and attached it to the right hand side of the card front.
To decorate the inside of the card, I stamped one of the greetings from the Cookie Cutter Christmas stamp set onto Whisper White card using Early Espresso ink. I stamped the reindeer image below the greeting using Early Espresso ink. I added a red nose in the same manner as the one on the front of the card.
I am loving the clean and simple lines of this card and I know that my grandchildren would love to receive this card for Christmas. I bet you know someone who would love it too!
Bye for now,
Kris
Product Used:


Case This Sketch 298

The idea for this card grew from this week’s sketch challenge at Case This Sketch. It’s a simple sketch and I kept the card simple as well. I embossed Whisper White card using the Softly Falling Embossing Folder before attaching two pieces of Under The Mistletoe Designer Series paper to the right hand side of the embossed card. The panel is attached to scored and folded Early Espresso card. I stamped the Santa image from the Hearts Come Home stamp set onto Whisper White card using Memento Tuxedo Black ink. I stamped the greeting from the same stamp set using the same ink.  I cut out the image using one of the Layering Circle Framelits Dies. I punched a 1″ circle from a Post-It-Note and masked part of the Santa image and then sponged Night of Navy ink over the Whisper White circle.
  I removed the mask and very lightly added a little more Night of Navy ink so the white space wasn’t so stark. The stamped panel is attached to a scalloped circle cut from Early Espresso card using the Layering Circle Framelits Dies.
To decorate the inside of the card, I stamped another of the greetings from the Hearts Come Home stamp set using Memento Tuxedo Black ink. The photo of the inside of the card is really not very good but I took it this morning and I can’t seem to get the light right. So, although it looks like the card is blue, it is really white.
As I said a simple card but one that is quite easy to reproduce.
Bye for now,
Kris
Product Used:
I can’t add icons for some of the product used as the items have been turned off because of the Extravaganza Sale. I believe they will be back on line in a day or so.


Last Mediterranean Moments

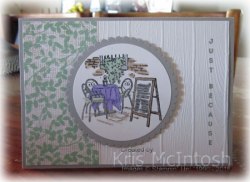
So this is the final card I made after my colouring session. For this card, I stamped Congratulations from the Flourishing Phrases stamp set onto Whisper White card using Smoky Slate ink. I embossed the stamped card using the Pinewood Planks Dynamic Embossing Folder. I attached a piece of Natures Poem Designer Series Paper across the bottom of the embossed card. I wrapped the top of the card with Whisper White 5/8″ Polka Dot Tulle Ribbon and tied a knot before attaching the panel to scored and folded Smoky Slate card.  I stamped the image from the Mediterranean Moments stamp set onto Whisper White card using Memento Tuxedo Black ink.
 I coloured the image using Highland Heather, Soft Sea Foam, Mint Macaron, Smoky Slate and Crumb Cake Stampin’ Blends. The image is cut out using one of the circles from the Layering Circles Famelits Dies and attached to a Smoky Slate scalloped circle and then the card front using dimensionals.
To decorate the inside of the card, I attached a narrow strip of the same Natures Poem Designer Series paper across the bottom of Whisper White card.
I hope you have enjoyed seeing these cards, and just to refresh your memory here is a photo of all four cards.

I’d love to know which one is your favourite. I love the simplicity of the “Just Because” card but I do love the addition of the 5/8″ Polka Dot Tulle Ribbon on this card.
Bye for now,
Kris
Product Used:


Congratulations…..

….to my eldest daughter Sarah and Son-in-Law Sean who celebrated their 18th Wedding Anniversary yesterday. Of course I had to make them a card! I embossed Whisper White card using the Tufted Dynamic Embossing Folder and attached it to scored and folded Flirty Flamingo card. I cut the large flourish from Granny Apple Green card using the Flourish Thinlit Dies. The flourish is attached to the top right hand side of the embossed card. I stamped the flower from the Flourishing Phrases stamp set onto Whisper White card twice using Flirty Flamingo ink.  I cut out one whole flower and just the centre from the second flower. The smaller piece is attached to the full flower using dimensionals. The flower is attached to the left hand side of the card front, covering the end of the Granny Apple Green flourish, also using dimensionals.
  I stamped “happy Anniversary” from the Beautiful Bouquet stamp set onto Whisper White card using Flirty Flamingo ink. I cut out the greeting using one of the Layering Ovals Dies. The greeting is attached to a Flirty Flamingo scalloped oval cut using the same dies and attached to the card front. Lastly I added a Clear Faceted Gem to the centre of the flower, ’cause you gotta have bling!
To decorate the inside of the card, I stamped the flower from the Flourishing Phrases stamp set onto the lower left hand corner of Whisper White card. I also stamped the leaf image from the same stamp set using Granny Apple Green ink.
Congratulations again to the happy couple.
Bye for now,
Kris
Product Used:


Travelling to Darwin

In the September School Holidays, Ron and I were invited to travel to Darwin with our eldest daughter, son-in-law and three grandchildren. We decided to leave home a few days before them so we could have a few days in Mt. Isa before we travelling into the Northern Territory. We stopped overnight in Mitchell, Blackall and Winton and then Mt. Isa. Funny but true story, we went into the Post Office in Winton and Ron ran into an old friend from Laurieton. We had a great afternoon catching up. I created a quick overview page as the cover for our travel story. This is the same layout I used for the trip to Cooktown in the June school holidays. This time the photos are attached to Early Espresso card. I used the retired Date It stamp set to stamp the date onto Whisper White card using Early Espresso ink. I punched out the date using the Every Day Label Punch. I used the same punch to cut Early Espresso card and attached it behind the stamped card. The piece is attached to the back of the photo layout before being attached to a Whisper White 12″ x 12″ page.  The title is cut from Early Espresso card using the Large Letters Framelits Dies. So simple to create but effective for a title page, don’t you think?
While in Mt. Isa we took a drive to Lake Moondarra. We had never been out there before and weren’t we surprised. Such a fabulous waterway with beautiful picnic areas, and a boat ramp. According to friends of ours who live in Mt. Isa, it is well used by the locals. For this page, I attached a piece of Blueberry Bushell card to a Whisper White 12″ x 12″ page. I attached the photos and the Best Route Memories and More journaling card to the page over the Blueberry Bushell card. I cut the letters for the title from Blueberry Bushell card using the retired Timeless Type Alphabet.
Pretty simple, but really, that it my favourite style.
Bye for now,
Kris
Product Used:


Another Mediterranean Moments

For today’s card I stamped the greeting from the Best Birds stamp set onto the lower right hand corner of Whisper White card using Smoky Slate ink. I embossed the stamped card using the Pinewood Planks Embossing Folder. I attached a piece of Natures Poem Designer Series Paper across the top of the embossed card before attaching to scored and folded Smoky Slate card.  The image panel is coloured in using Highland Heather, Soft Sea Foam, Mint Macaron, Smoky Slate and Crumb Cake Stampin’ Blends. I cut out the image using one of the circles from the Layering Circles Framelits Dies.
  The image panel is attached to a Smoky Slate scalloped circle cut using the same dies and attached to the card front using dimensionals.
To decorate the inside of the card, I attached a narrow strip of the same Natures Poem Designer Series paper across the bottom of Whisper White card.
I’m having fun with these cards, hope you are enjoying them. I have one more card left to share with you.
Bye for now
Kris
Product Used:

More Mediterranean Moments

This is the second card I created after my colouring session. This time I stamped the greeting from the Flourishing Phrases stamp set onto the lower right hand corner of Whisper White card using Momento Tuxedo Black ink. The stamped card is embossed using the Pinewood Planks Dynamic Embossing Folder (remember to spritz lightly with water before embossing the card). I attached a strip of Natures Poem Designer Series Paper down the left hand side of the embossed card before attaching to scored and folded Smoky Slate card.  The image is coloured using Highland Heather, Mint Macaron, Soft Sea Foam, Smoky Slate and Crumb Cake Stampin’ Blends.
  I cut out the image using the Layering Circle Framelits dies and attached it to a Smoky Slate scalloped circle cut using the same dies. The image panel is attached to the card front using dimensionals.
To decorate the inside of the card, I attached a strip of the same Natures Poem Designer Series paper down the left hand side of Whisper White card.
Simple but pretty, don’t you think. I am loving the colour combination.
Bye for now,
Kris
Product Used:
The First of Four
Today’s card is one of four cards I made using the same products. I felt like spending time colouring using my Stampin’ Blends and this card is one of the results. I stamped the greeting from the Vertical Greetings stamp set onto Whisper White card using Smoky Slate ink and embossed the stamped card using the Pinewood Planks Dynamic Embossing Folder. I attached a piece of Natures Poem Designer Series Paper to the left hand side of the embossed card and attached the panel to scored and folded Smoky Slate card. I stamped the image from the Mediterranean Moments stamp set onto Whisper White card using Memento Tuxedo Black ink. I coloured the image using Highland Heather, Smoky Slate, Mint Macaron, Soft Sea Foam and Crumb Cake Stampin’ Blends.
  The image is cut out using one of the circles from the Layering Circle Framelits Dies and attached to a Smoky Slate scalloped circle cut using the same dies. The image panel is attached to the card front using dimensionals.
To decorate the inside of the card, I attached a piece of the same Natures Poem Designer Series Paper across the bottom of Whisper White card.
I actually created four cards and I will pop back and share the other cards with you over the next few days.
Bye for now,
Kris
Product Used:

Framed Art

For quite a few years now, the All Day Class at Beachmere and the November Classes at home have featured a piece of framed art work which can be displayed over the Christmas season. Some of my ladies look forward to creating this art work as it is gifted to a special family member. This year piece features the Peaceful Poinsettia stamp set and the Detailed Poinsettia Thinlits Dies as well as the Joy and Noel stamp set. The cardstock colours used are Real Red, Shaded Spruce, Whisper White and Basic Black.  The piece fits in an A4 document frame. The colouring is done using the Real Red and Shaded Spruce Stampin’ Blends. Each of the ladies brings their own frame and once all the panels are assembled, the A4 Real Red card is placed into the frame and the panels attached. If they don’t have their frame with them, they assemble the piece at home. For this class each of the attendees is given a bag with different jewels, pearls and faceted gems, which they can use to decorate the panels. It is amazing how different each individual framed art can look. Three of the ladies who participated in this class had their frames with them and they were happy for me to share their photos. Thank you so much Joyce,

Lyn,

and Gloria.

Joyce and Lyn came to my November Class at home and Gloria attended the All Day class at Beachmere. Once again thanks ladies for sharing.
Since the ladies liked it so much, I thought you might like to create this yourself. So feel free to download the PDF and don’t forget to share your creation.
Bye for now,
Kris
Product Used:


Melbourne Cup

For several years now, Ron and I have been joining my Mum and Dad at their Retirement Resort on Melbourne Cup Day. This year was no exception. However, it occurred to me that with my parents now in their 80’s I should take an occasional photograph and since we were all dressed up, what better time. I have used this layout for Memory Keeping on a number of occasions and have always loved the finished result. This time I used the Frosted Floral Specialty Designer Series Paper which I cut into 2″ x 6″ strips to go across the top of a Whisper White page.  I cut Basic Black card using the Delicate Lace Edgelits Dies and attached it across the bottom of the Designer Series Paper. I attached the photo of Mum and Dad and the one of Ron and I to Basic Black card before attaching to the page. I cut the letters for the title from Basic Black card using the retired Little Letters Thinlit Dies. I used the stamp from the Tabs for Everything stamp set to add the date.
Maybe not the best photos or the most elaborate layout but it brings to mind happy memories.
Bye for now,
Kris
Product Used:


