Framed Art – Panel 2

Today’s card, features the second panel of the Framed Art piece we created at this year’s Christmas class. You can get the Free Tutorial here. I punched a narrow strip of Basic Black card using the Decorative Ribbon Border Punch which I attached behind one long edge of Real Red card embossed using the Tufted Dynamic Embossing Folder. The panel is attached to the left hand side of Whisper White card and then scored and folded Basic Black card. I stamped the greeting from the First Frost stamp set onto the Whisper White card using Memento Tuxedo Black ink.  I cut two sets of leaves from Shaded Spruce card using the leaf from the Detailed Poinsettia Framelits Dies. I cut the same leaf from Real Red card so that I could add the berries to the leaves.
  The leaves and berries are attached to the Whisper White card, which is attached to Basic Black card and then the card front using dimensionals.
To decorate the inside of the card, I cut two sets of leaves from Shaded Spruce card using the Detailed Poinsettia Dies, which I attached to the top right hand corner of Whisper White card. I used the same die to cut Real Red card so that I could add the berries to the image.
This card is relatively simple to create but rather lovely even if I do say so myself!
Bye for now,
Kris
Product Used:


Using Up My Kits

When I hold an event with my ladies at Beachmere I am never really sure how many ladies will attend,. The All Day Class is usually an exception, but this year I was away leading up to the event, so I prepared more kits than I needed. So to make a long story short, I am trying to use up the kits and decided to create cards using the individual panels for the Framed Art we made. Today’s card uses Panel 1. You can download a free PDF tutorial for this on my Free Tutorials Page.
I embossed Real Red card using the Tufted Dynamic Embossing Folder and attached a piece of Basic Black card, punched using the Decorative Ribbon Border Punch, behind one long edge. The panel is attached to Whisper White card and then scored and folded Basic Black card. I stamped the image from the Joy and Noel stamp set onto Whisper White card using Memento Tuxedo Black ink and coloured the image using the Real Red, Shaded Spruce and Daffodil Delight Stampin’ Blends. I attached the stamped panel to Basic Black card and then the card front using dimensionals.
 To decorate the inside of the card I punched a length of Basic Black card using the Decorative Ribbon Border Punch. The punched card is attached behind one long edge of a narrow piece of Real Red card embossed using the Tufted Dynamic Embossing Folder. The panel is attached to the bottom of Whisper White card.
Just for a bit of fun, I added three Basic Rhinestones to the stamped image on the card front. I think this card turned out very nicely and gives you another way of using the pieces created for the Framed Art.
I’ll be sharing the cards made using the other panels over the next few days.
Bye for now,
Kris
Product Used:


Merry Christmas 4 ways
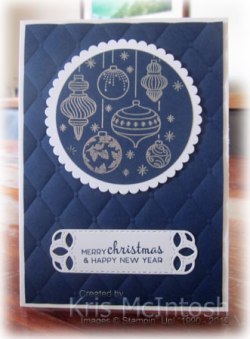
Today I am sharing with you a set of four cards I made using the same design and layout but four different colours. The first card uses my favourite Christmas combination of Night of Navy and Whisper White. I embossed Night of Navy card using the Tufted Dynamic Embossing Folder before attaching to scored and folded Thick Whisper White card. I stamped the bauble image from the Beautiful Baubles stamp set onto Night of Navy card using Versamark ink. I sprinkled the image with Silver Embossing powder and heat set it.  I cut out the image using one of the circles from the Layering Circles Framelits Dies and attached it to a Whisper White scalloped circle cut using the same dies. The image panel is attached to the card front using dimensionals.
  I stamped the greeting from the Beautiful Baubles stamp set onto Whisper White card using Night of Navy ink. I cut out the greeting using one of the Stitched Labels Framelits Dies. The greeting is attached to the card front below the bauble panel.
To decorate the inside of the card, I stamped the same bauble image across the top of Whisper White card using Night of Navy ink.
Because I liked the effect so much, I created a Mossy Meadow version which is embossed also using Silver Embossing powder. I created another using Real Red and a fourth using Merry Merlot. These two cards are embossed using Gold Embossing Powder.

I think this would make a great Christmas gift packaged in one of the Acetate Card Boxes, don’t you agree?
Bye for now,
Kris
Product Used:


Poinsettia Christmas
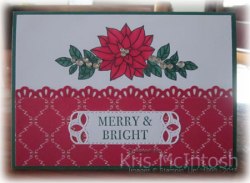
I have only a couple of classes to go at Beachmere to finish off this year and I thought I would get in and have a little play with some ideas for class. This is one result. I punched a length of Real Red card using the Decorative Ribbon Border Punch and attached it behind a piece of Under The Mistletoe Designer Series Paper. The panel is attached to the bottom half of Whisper White card. I stamped the image from the Peaceful Poinsettia stamp set onto the Whisper White card using Memento Tuxedo Black ink. I coloured the image using the Light and Dark Real Red Stampin’ Blends and the Light and Dark Shaded Spruce Stampin’ Blends. I added various Basic Rhinestones to the image and attached the panel to scored and folded Shaded Spruce card. I stamped “Merry and Bright” from the Hearts Come Home stamp set onto Whisper White card using Shaded Spruce ink. The greeting is cut out using one of the Stitched Labels Framelits Dies and attached across the Designer Series Paper.
 To decorate the inside of the card, I punched a long strip of Real Red card using the Decorative Ribbon Border Punch and attached it behind a narrow piece of Under the Mistletoe Designer Series Paper. The panel is attached across the bottom of Whisper White card. I stamped the small holly image from the Peaceful Poinsettia stamp set onto the top right hand corner of the Whisper White card. The image is coloured using the Light and Dark Shaded Spruce and the Light and Dark Real Red Stampin’ Blends.
This card is so pretty, don’t you think? I think I am a little biased, as Poinsettia’s are one of my favourite flowers.
Bye for now,
Kris
Product Used:


Decorating the Tree

Today I want to share with you a very simple pocket page I created using photos taken while three of my grandchildren decorated my Christmas Tree. We had lots of food, Christmas music, some selphies and plenty of fun. I put the tree together during the day and had everything ready for them to come after school and get to work. The finished tree looks amazing! The one thing we did really miss was having my three other grandchildren there to help. I used the Santa’s Workshop Memories and More cards to add to a couple of pockets purely for decoration and also one for my journaling.  Other than that, I used the Tabs for Everything stamp set to add the date. So simple really. I love that the photos have actually been printed and are not hiding on some device or lost on a CD somewhere in the cupboard (don’t worry I still have plenty of those but I am working on it). I love this photo of the three kids wrapped in a paper chain, hamming it up for the camera. I think they took a million selphies of this one too!
How do you go about sharing your photo memories? Do you always do traditional scrapbook pages, always do pocket pages or do you use a blend of both? Blending is my style, however, my traditional pages are still very simple.
Bye for now,
Kris
Product Used:
I can’t show the icon for the Memories and More cards but they are available if you just click here.


Happy 40th Wedding Anniversary

My sister Karyn and her husband Jim recently celebrated their 40th Wedding Anniversary and this is the card I made for them. I embossed Real Red card using the Tufted Dynamic Embossing Folder which I attached to the left hand side of Whisper White card. The Whisper White panel is attached to Gold Foil card and then scored and folded Real Red card. I cut “happy” from Gold Foil card using the Merry Christmas Thinlits Dies and attached it to the top left and corner of the card. I stamped the wine glass from the Half Full stamp set twice onto Whisper white card. I coloured the image using the Dark Daffodil Delight Stampin’ Blend.  The image is cut out using one of the circles from the Stitched Shapes Framelits Dies and attached to Gold Foil card cut using the Layering Circles Framelits Dies. The image panel is attached to the centre of the front of the card using dimensionals.
  I inked “anniversary” from the Best Birds stamp set using a Real Red Stampin’ Write Marker and stamped onto Whisper White card. I cut out the greeting using the larger frame from the Merry Christmas Thinlits Dies, which I cut down slightly. The greeting is attached to Gold Foil card cut using the same die. I trimmed down the right hand edge and attached the greeting to the lower right hand corner of the card front.
To decorate the inside of the card, I cut “40” from Real Red card using the retired Large Numbers Framelits Dies.
I love the look of Gold and Red together, don’t you? Once more Happy Anniversary Karyn and Jim.
Bye for now,
Kris
Product Used:


Sunday Stamps Challenge 192
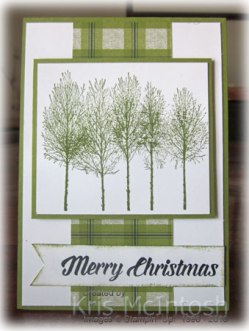
Today’s card was inspired by the sketch challenge at Sunday Stamps this week. I wasn’t quick enough to actually enter the challenge but thought I would share anyway. I began by attaching a piece of Under the Mistletoe Designer Series Paper to Whisper White card and then scored and folded Old Olive card. I stamped the tree image from the Winter Woods stamp set onto Whisper White card using Old Olive ink. I attached the tree panel to Old Olive card and then the card front using dimensionals. I stamped “Merry Christmas” from the Timeless Tidings stamp set onto a narrow strip of Whisper White card using Memento Tuxedo Black ink.  I punched one short end using the Triple Banner Punch and sponged the edges of the banner using Old Olive ink. The greeting banner is attached to the card front, this time without using dimensionals.
 I kept the inside of the card simple by stamped another of the greetings from the Timeless Tidings stamp set onto Whisper White card using Memento Tuxedo Black ink.
I love the pattern on this Designer Series Paper, kind of like the Buffalo Check background but a bit more “stepped up”. What do you think?
Bye for now,
Kris
Product Used:


Freshly Made 365

There is a great sketch challenge at Freshly Made this week which inspired the card I am sharing with you today. I did make one change and turned the sketch on its side. I love the Under The Mistletoe Designer Series Paper, especially this lovely green pattern. So, I was happy to find a way to use it on this card. I embossed Whisper White card using the Tin Tile Dynamic Embossing Folder before attaching it to scored and folded Shaded Spruce card.  I attached a piece of the Under The Mistletoe Designer Series Paper onto the top right hand corner. I stamped the greeting from the Merry Christmas To All stamp set onto Whisper White card using Shaded Spruce ink.
  I attached the stamped Whisper White card to Shaded Spruce card and then the card front using dimensionals. I cut two small stars and one larger star from Gold Glimmer Paper using the Starlight Thinlits Dies and attached them around the greeting.
To decorate the inside of the card I stamped the greetings from the Merry Christmas To All stamp set using Shaded Spruce ink.
Simple isn’t it, but I love it. You might say, this is just my style. My apologies however, for the quality of the photos. I shouldn’t have left it till this morning to take the photos. Too many shadows!
Bye for now,
Kris
Product Used:


Party Time

Last Saturday, I held a Christmas party for my customers and downline, firstly to celebrate Christmas and the end of a great crafting year, but also to thank them so much for supporting me and my business. I am really lucky that my husband and the rest of my family are always ready to help out and support me in any way they can as well.  I thought I would share with you the little gift that I made for each of the ladies who attended. I decorated some plain kraft gift bags with a piece of the Dashing Along Designer Series paper. Some have a Garden Green theme and some have a Cherry Cobbler Theme. I cut Whisper White card using the Stitched Labels Framelits Dies.
  I created a template for the Stamparatus and stamped each of the labels using the greetings from the Merry Christmas To All stamp set and either Garden Green or Cherry Cobbler ink. I love how easy the Stamparatus makes it to stamp multiple images in a very short time. Now you can’t give an empty gift bag, so I filled a small jar with some Peppermint Body Scrub and created a tag by firstly printing onto Whisper White card, then I stamped the outline image from the Label Me Pretty stamp set using Memento Tuxedo Black ink.
  The images were punched out using the co-ordinating Pretty Label Punch. One tag has the name on it and the other tag a list of ingredients. You have to be careful as many people are allergic or have reactions to different products. I made some homemade Rocky Road which is housed in one of our gussetted cellophane bags and also has a tag made in the same fashion as the one for the body scrub. I created a small chocolate slider using Real Red card. I decorated the slider by stamping the “ho, ho, ho” image from the Candy Cane Season stamp set onto Whisper White card using Garden Green ink.
  I actually stamped across a length of Whisper White card and punched out 2″ circles. I stamped the candy cane and bow using Memento Tuxedo Black ink and then stamped the fill images using Real Red ink. The candy cane and the bow are punched out using the co-ordinating Candy Cane Builder Punch. The candy cane and the bow are attached to the stamped Whisper White circle and then attached to the front of the slider.
  Each of the bags also contained a small selection of ribbon and embellishments. The ribbon is mostly retired but the colours are still current and the embellishments are all still current.
For my downline I decorated larger White bags using the same Dashing Along Designer Series paper. These ladies received the same chocolate slider and rocky road, but their jars of Body Scrub were larger.  They also received a selection of ribbon and embellishments all of which are current or will be when the Occasions Catalogue goes live.
  I also filled an Acetate Card Box with a selection of Whisper White cards and envelopes which are available from Stampin’ Up! – Note cards, Memories and More, Narrow Note cards and 3″ x 3″ envelopes. I decorated the Acetate Card Boxes by wrapping the box with Real Red card and attaching the same embellishment which I created for the Chocolate Slider.
I am feeling somewhat blessed today, reflecting on all the friends I have made through Stampin’ Up!. I want to also thank each and every one who attended and gave me beautiful gifts and cards. I so appreciate the time it takes to choose something that I will love. I wish you all a wonderful Christmas and holiday season and look forward to catching up with all of you in the New Year. Thank you so much.
Bye for now,
Kris
Product Used:


More Than Tags
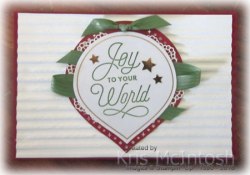
I had quite a few Sincerely Santa Tag kits left over from my recent classes and I thought that I would try and upscale them for another use. Soooo, I used some of the tags to create pocket pages for my Christmas Memory Keeping. For the first tag – Joy to the World, I created the tag pretty much according to the kit, however, I used a piece of the Garden Green Satin Ribbon and tied a knot and added it where the string to hang the tag would normally go.  I attached the tag to Whisper White card which I had embossed using the Corrugated Dynamic Embossing Folder before attaching it to Cherry Cobbler card. This creates a lovely 6″ x 4″ card to go in one of my pockets or maybe even on one of my more traditional Memory Keeping Pages.
The second tag is the “Fa La La” tag which I created using the pieces which came in the kit, except this time, I used two of the pieces of White Twine and tied a bow which I attached where the string would normally be to hang the tag. Once more the tag is attached to Whisper White card which is embossed using the Corrugated Dynamic Embossing Folder and then Garden Green card. Again this creates a 6″ x 4″ card for my Memory Keeping.
 For the last tag, I decided not to use the greeting as per the instructions and instead stamped the tree from the Timeless Tidings stamp set several times onto the greeting panel using Garden Green ink. I did stamp several times without re-inking to give a little depth. I also trimmed a little from the length of the tag. I tied one of the pieces of Garden Green Satin Ribbon into a bow and attached it where the string to hang the tag would normally go. Again the tag is attached to Whisper White card embossed using the Corrugated Dynamic Embossing Folder before being attached to Cherry Cobbler card. This time, I have a 3″ x 4″ card for my Memory Keeping.
These pocket page cards were a lot of fun to create and I think I will be using more of the tags this way for my December Memory Keeping. How about you, have you thought about using these kits in a different way than the one they were created for?
Bye for now,
Kris
Product Used:
Although I cannot show the icon for the Sincerely Santa Tag Kit, it is still available for order here.


