For My Sister

This Christmas card is one that I have wanted to make for a while, however, you need to know the person you are giving it to will take it in spirit it is intended. This is the last Christmas card I am going to share with you using the template that Julie Burt shared on a Demonstrator only Facebook page. She gave me permission to share this with you and you can find the template in the Fancy Fold card on my Free Tutorials page. I used Basic Black to cut the base card and additional small card which fits on the left. To decorate the front panel, I stamped the Buffalo Check background using Granny Apple Green ink onto Whisper White card. I used my Basic Black marker to add the Black lines, which is such an easy thing to do and really takes this stamp to another dimension.  I cut a strip of Basic Black card using one of the Delicate Lace Thinlit Dies and attached it to the back of the Buffalo Check panel. The whole piece is attached to another piece of Whisper White card and then to the front of the small folded card. I stamped the lady from the You’ve Got Style stamp set onto Whisper White card using Memento Tuxedo Black ink. I coloured the image using Dark Poppy Parade, Dark Daffodil Delight and Ivory Stampin’ Blends. The image is cut using one of the Layering Ovals Framelits Dies and attached to a Basic Black scalloped oval cut using the same dies. To decorate the inside of the small card, I stamped the row of wine glasses from the Half Full stamp set across the bottom of Whisper White card using Memento Tuxedo Black ink. I coloured the image using Dark Daffodil Delight and Dark Poppy Parade Stampin’ Blends.
  The top left and bottom right corners of the card are decorated with the Buffalo Check Background, stamped in Granny Apple Green and once more with Basic Black lines drawn by hand. The second panel in on the top and bottom of the card are stamped using three of the glasses from the image in the Half Full stamp set using Memento Tuxedo Black ink. I inked the grape image from the label in the Half Full stamp set using a Basic Black Stampin’ Write Marker and stamped in the top right hand corner of these panels. One image is coloured using Dark Daffodil Delight and Dark Granny Apple Green Stampin’ Blends and the other using Dark Poppy Parade and Dark Granny Apple Green Stampin’ Blends. These images are attached to Granny Apple Green card before being attached to the card base.
  The middle images on the top and bottom rows are stamped using the row of glasses and a greeting from the Half Full stamp set onto Whisper White card using Memento Tuxedo Black ink. Again one image is coloured using the Dark Daffodil Delight Stampin’ Blend and the other using Dark Poppy Parade Stampin’ Blend. These panels are also attached to Granny Apple Green card before being attached to the card base. The middle panel on the card has the holly image and another greeting from the Half Full stamp set. The images are stamped using Memento Tuxedo Black ink and coloured using the Dark Poppy Parade and Dark Granny Apple Green Stampin’ Blends. This panel is also attached to Granny Apple Green card before being attached to the card base. The large panel on the card has the wine bottle, glass (stamped in Memento Tuxedo Black ink) and grape images (inked using the Basic Black Stampin’ Write Marker) from the Half Full stamp set along with one of the greetings (also stamped in Memento Tuxedo Black ink). The images are coloured using the Dark Poppy Parade, Dark Granny Apple Green and Ivory Stampin’ Blends.
This was such a fun card to make. Do you know someone who would appreciate this card? Thank goodness my sister did!
Bye for now,
Kris
Product Used:


For my Daughters
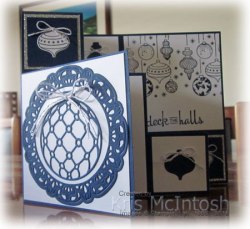
I made this card for each of my daughters using the template that you can find in the Fancy Fold card on my Free Tutorials page. I cut the card base from Night of Navy card using the aforementioned template. The large panel on the right is stamped using the multiple bauble image from the Beautiful Baubles stamp set and Night of Navy ink. I stamped the greeting from the same stamp set below the baubles using the same ink before attaching the panel to the card base.  I attached Night of Navy card to Silver Glimmer paper and attached the panels to the top left and bottom right of the card base. I stamped the same multiple bauble image onto Whisper White card using Night of Navy ink and used the co-ordinating Detailed Baubles Thinlits Die to cut out the image. I attached one bauble to each of the Night of Navy squares. I embossed Whisper White card using the Tin Tile Dynamic Embossing Folder and then cut out two of the “tiles”.
  These are attached to Night of Navy card and Whisper White card before being attached to the card base. I attached two Whisper White panels to the card base, one in the centre of the top of the card and one in the centre of the bottom of the card. I cut Night of Navy card using the Detailed Baubles Thinlits Die and attached one bauble to each of the panels. I stamped the greeting from the Beautiful Bauble stamp set onto Whisper White card and attached it to the centre panel of the card base.
  To decorate the front of the small card, I cut the large “doily” from Night of Navy card using the Detailed Baubles Thinlits Dies. The die is attached to Whisper White card and then the card front. I cut the bauble image from Night of Navy card using the same dies and attached it to the centre of the “doily”. To decorate the inside of the card, I stamped a small part of the bauble image onto the top left hand corner using Night of Navy ink. Lastly I tied bows in Silver Bakers Twine and attached the bows to each of the baubles.
I am really happy with this card and of course, it is in my favourite colour combination for Christmas.
Bye for now,
Kris
Product Used:


For my Grandsons

The card base for this card is cut from Gray Granite card following the template you can find under Fancy Fold card on my Free Tutorials page. I cut four pieces of Festive Farmhouse Designer Series paper and attached them to the card base. I stamped the tree from the Timeless Tidings stamp set onto Whisper White card using Mossy Meadow ink. I stamped “joy” from the retired Snow is Glistening stamp set using Memento Tuxedo Black ink. The stamped Whisper White card is attached to Mossy Meadow card and then the card base. I stamped the christmas lights image from the Farmhouse Christmas stampset onto Whisper White card using Memento Tuxedo Black ink.  I coloured the lights using the Dark Real Red Stampin’ Blend. I stamped “Merry and Bright” from the Hearts Come Home stamp set using Memento Tuxedo Black ink. The stamped panel is attached to Mossy Meadow card and then the card base. I stamped the greeting from the Farmhouse Christmas stamp set onto Whisper White card using Memento Tuxedo Black ink. I stamped the house image from the Hearts Come Home stamp set using Gray Granite ink below the greeting.
 The stamped panel is attached to Mossy Meadow card and then the card base. The panel on the right has a piece of Festive Farmhouse Designer Series Paper attached to Mossy Meadow card and then the card base. I stamped the greeting from the Farmhouse Christmas stamp set onto Whisper White card using Mossy Meadow ink. The greeting is cut out using one of the Layering Circle Framelits Dies and attached to a Mossy Meadow scalloped oval cut using the same dies. I stamped the greeting once more onto Whisper White card using Real Red ink. The “Merry Christmas” is cut out using one of the co-ordinating Farmhouse Framelits Dies.
  The “Merry Christmas” is attached over the stamped greeting using dimensionals. To decorate the small card front, I stamped the row of trees from the Winter Woods stamp set onto Whisper White card using Mossy Meadow ink. I cut the fence image from Crumb Cake card using the Farmhouse Framelit Die. The fence is attached across the tree image. I stamped the car image from the Farmhouse Christmas stamp set onto Whisper White card using Memento Tuxedo Black ink. I coloured the image using Real Red, Dark Smoky Slate Stampin’ Blends and Basics Black and Mossy Meadow Stampin’ Write Markers. The image is cut out using the co-ordinating Farmhouse Framelit Die and attached to the card front. To decorate the inside of the card, I stamped a small portion of the row of trees image from the Winter Woods stamp set onto the lower left hand corner of Whisper White card using Mossy Meadow ink.
This card has a kind of “boy” feel to it, don’t you think? In any cases, my grandson’s loved it.
Bye for now,
Kris
Product Used:


Another one for the Grandchildren
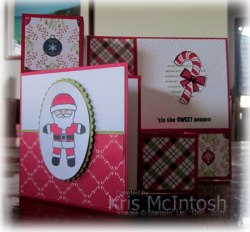
This card is made for Elyssa and Jae and uses the same template which you can find in the Fancy Fold card on my Free Tutorials page. I cut the base from Real Red card and added four small pieces of Under the Mistletoe Designer Series Paper. I stamped the double candy cane image from the Candy Cane Season stamp set onto Whisper White card using Real Red ink and attached it to Old Olive card and then the card base. I stamped the leaf image from the same stamp set onto Whisper White card using Old Olive ink, add the berries using Real Red ink and stamped the greeting using Memento Tuxedo Black ink. This panel is also attached to Old Olive card and then the card base.  The middle panel is stamped using the greeting from the Half Full stamp set and the holly image from the same stamp set using Memento Tuxedo Black ink. The holly is coloured using the Dark Real Red and Dark Old Olive Stampin’ Blends. Once more this panel is attached to Old Olive card before being attached to the card base. The large panel on the right hand side is stamped with the greeting from the Candy Cane Season stamp set using Memento Tuxedo Black ink and then embossed using the Softly Falling Embossing Folder.
  I stamped the “ho ho ho” stamp from the Candy Cane Season onto Whisper White card using Old Olive ink and punched out the image using the 1-3/4″ circle punch. I stamped the candy cane and the bow, firstly using Memento Tuxedo Black ink for the outline images and then Real Red ink for the fill images. The candy cane and bow are punched out using the co-ordinating Candy Cane Builder Punch. To decorate the front of the small card, I punched attached a narrow strip of Old Olive card behind one long edge of a piece of the Under The Mistletoe Designer Series Paper.
  I stamped the Santa image from the Cookie Cutter Christmas stamp set onto Whisper White card using Memento Tuxedo Black ink and coloured the image using the Dark Real Red, Ivory and Light Smoky Slate Stampin’ Blends, as well as the Basic Black Stampin’ Write Marker. The image is cut out using one of the Layering Ovals Framelits Dies. The image panel is attached to an Old Olive scalloped oval cut using the same dies and then the card front using dimensionals. To decorate the inside of the card, I stamped the holly image from the Detailed Poinsettia stamp set using Memento Tuxedo Black ink. The image is coloured using the Dark Real Red and Dark Old Olive Stampin’ Blends.
Another card I am really happy with. What do you think?
Bye for now,
Kris
Product Used:


For my Grandchildren
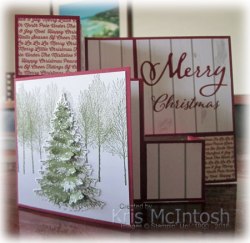
When it comes to making cards for my grandchildren, I go the extra mile and make them something special. They love receiving cards from me and always like it when it “does something”, pop, slide, stand up! Anyway this year I created two each of three different cards. Today I will share the first one with you. This card has a base of Cherry Cobbler and uses the template which you can find under Fancy Fold card on my Free Tutorials Page. I cut four small pieces of Festive Farmhouse Designer Series Paper and attached them to the card base. I stamped the tree trunk image from the Winter Woods stamp set onto Whisper White card using Gray Granite ink.  I embossed the stamped pieces with the Corrugated Dynamic Embossing Folder, attached them to Gray Granite card and then the card base. I stamped the small branch image from the Winter Woods stamp set onto Whisper White card using Mossy Meadow ink several times. I stamped the pine cone image onto Whisper White card using Gray Granite card and cut them out using the co-ordinating In the Woods Framlites Die. The pine cone image is attached over the ends of the stamped branches.
  The stamped card is attached to Gray Granite card and then the card base. For the large panel on the right hand side of the card, I cut a piece of the Festive Farmhouse Designer Series paper and stamped “Christmas” from the Merry Christmas to All stamp set using Cherry Cobbler ink. I cut “Merry” from Cherry Cobbler card using the Merry Christmas Thinlits Dies.
 To decorate the front of the small folding card, I stamped the multiple tree image from the Winter Woods stamp set using Mossy Meadow ink. I stamped the single tree image twice onto Whisper White card using Mossy Meadow ink. I cut out one complete tree and then one detailed tree using the In the Woods Framelits Die. I attached the complete tree over the stamped trees and then attached the detailed tree over the top. To decorate the inside of the card, I stamped the small branch image using Mossy Meadow ink. I stamped and cut out one pine cone as before and attached it over the ends of the stamped branches.
I love the way this card turned out and I am sure so will the granddaughters who receive it.
Bye for now,
Kris
Product Used:


Framed Art – Last One
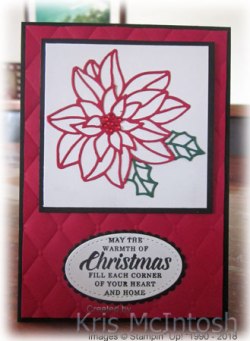
This card uses the last panel from the Framed Art piece for this year’s Christmas classes. You can get your copy of the free tutorial here. For this card, I embossed Real Red card using the Tufted Dynamic Embossing Folder before attaching it to scored and folded Basic Black card. I cut the detailed poinsettia image from Real Red card using the Detailed Poinsettia Thinlit Dies. I also cut the leaf image from the same dies from Shaded Spruce card. I trimmed the leaf into two smaller leaves and attached them to the back of the flower.  I trimmed away any of the leaf that showed in the wrong place. The flower/leaf is attached to Whisper White card card and then Basic Black card. The panel is attached to the card front using dimensionals. I stamped the greeting from the Timeless Tidings stamp set onto Whisper White card using Memento Tuxedo Black ink and cut it out using one of the ovals from the Stitched Shapes Framelits Dies.
  The greeting is attached to a Basic Black scalloped oval cut using the Layering Ovals Framelits Dies. The greeting is attached to the card front below the flower panel.
To decorate the inside of the card, I stamped the poinsettia flower from the Timeless Tidings stamp set onto the lower left hand corner of Whisper White card using Memento Tuxedo Black ink. The images is coloured using the Real Red Stampin’ Blends and the Dark Daffodil Delight Stampin’ Blends.
Well that’s the end of this series of cards. I hope you have enjoyed seeing how to use the panels from this Framed Art piece in a different way. Just to refresh your memory here is a photo of all six cards. Which one is your favourite?
Bye for now,
Kris
Product used:


Framed Art – Panel 5

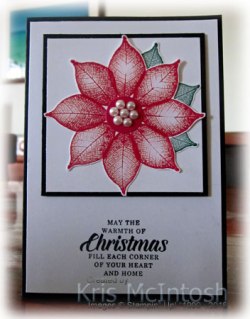
Today I am sharing Panel 5 from the Framed Art piece. You can download your free tutorial for this project on my Free Tutorials page. I did change this panel up just a little but not too much. I attached the Whisper White card for this panel to the Basic Black piece and then to Whisper White card. The whole piece is attached to scored and folded Basic Black card. I punched a piece of Basic Black card using the Decorative Ribbon Border Punch and attached it behind one long edge of Real Red card embossed using the Tufted Dynamic Embossing Folder.  I stamped the poinsettia image from the Peaceful Poinsettia stamp set onto Whisper White card using Basic Black ink and coloured the image using Shaded Spruce and Real Red Stampin’ Blends. I cut out the panel using the matching Detailed Poinsettia Framelits Dies and attached it to the smaller Whisper White panel. I stamped Happy Christmas Wishes from the Farmhouse Christmas stamp set onto Whisper White card using Memento Tuxedo Black ink. The greeting is cut out using one of the ovals from the Stitched Shapes Framelits Dies before attaching to a Basic Black scalloped oval cut using the Layering Ovals Framelits Dies.
  The greeting is attached to the card front. I added Basic Pearls to the stamped and coloured Poinsettia image.
To decorate the inside of the card, I stamped the poinsettia image onto Whisper White card using Memento Tuxedo Black ink. The image is coloured using the Shaded Spruce and Real Red Stampin’ Blends. I cut out the image as before and attached it to the top of Whisper White card. I added three tiny Basic Pearls to the centre of the poinsettia flower.
I hope these cards are giving you some ideas about how to create and use the different panels in this Framed Art piece.
Bye for now,
Kris
Product Used:


Happy Birthday Abigail

My eldest granddaughter celebrated her 14th birthday yesterday, Happy Birthday Abigail. Today I am sharing the card I made for her. I created a screen divider card using the instructions at Splitcoast Stampers with Basic Black card.  I cut the bottom of the screen using the Everyday Label Punch to create the legs. I used the Decorative Ribbon Border Punch to add interest to each of the four panels but punching once only in the centre of each panel. To decorate the first panel I stamped the greeting and image from the Beautiful You stamp set onto Whisper White card using Memento Tuxedo Black ink.
  The image of the lady is coloured using Highland Heather and Ivory Stampin’ Blends. To decorate the second panel I stamped the image of the lady from the Beautiful You stamp set onto Whisper White card using Memento Tuxedo Black ink. I stamped the same image onto a post-it-note and cut it out. I attached the post-it-note image over the stamped image and then stamped the scene from the Mediterranean Moments stamp set using Memento Tuxedo Black ink.
  I removed the post-it-note mask and coloured the images using Highland Heather, Mint Macaron, Crumb Cake and Ivory Stampin’ Blends. I also stamped “celebrate” from the Beautiful You stamp set using Memento Tuxedo Black ink. For the third panel I stamped the lady with the umbrella image from the Beautiful You stamp set using Memento Tuxedo Black ink.
  I also stamped the greeting from the same stamp set using the same ink. I coloured the lady image using Highland Heather and Ivory Stampin’ Blends. For the fourth panel, I stamped the last lady image from the Beautiful You stamp set using Memento Tuxedo Black ink. I stamped the same image onto a post-it-note and cut it out. I placed the post-it-note image over the stamped image.
 I stamped the sand image from the High Tide stamp set using Crumb Cake ink. I stamped the sea image from the High Tide stamp set using Balmy Blue ink. I sponged the remainder of the panel using Pool Party ink. Lastly I stamped the bird image from the High Tide stamp set using Memento Tuxedo Black ink. I removed the post-it-not mask and stamped the greeting from the Beautiful You stamp set.
 On the back of the card, I attached a Whisper White panel so that I could write a greeting. I stamped the greeting from the soon to be released Incredible Like You stamp set using Memento Tuxedo Black ink onto another panel. This last panel is only attached around three edges, because I wanted to be able to add the remainder of her birthday money in there for Abigail to buy something lovely for herself.
 Of course I had to create an envelope especially for this card and I decorated it by stamping the same image from the Beautiful You stamp set that I used on the first panel of the card. I once again stamped in Memento Tuxedo Black ink and coloured the image using Highland Heather and Ivory Stampin’ Blends. Abigail received a Pandora charm to add to the bracelet that we bought her for her 13th birthday. The charm came in a lovely little box which I also decorated by making a belly band from Highland Heather card. I stamped the same image as the first panel and the envelope and coloured it as before. I cut out the image using one of the Layering Ovals Framelits Dies. The image panel is attached to a Highland Heather scalloped oval cut using the same dies before being attached to the belly band.
I love how easy it is to create co-ordinating packaging and cards using Stampin’ Up! products, don’t you.
Once more a very happy birthday Abigail.
Bye for now,
Kris
Product Used:


Framed Art – Panel 4
This card uses Panel 4 for the Framed Art piece. You can get the free instructions here. For this card I stamped the greeting from the Timeless Tidings stamp set onto the bottom of Whisper White card using Memento Tuxedo Black ink, before attaching to scored and folded Basic Black card. I used the Stamparatus to stamp the small leaf from the Rooted in Nature stamp set in a circle using Real Red ink. I also used the same image to stamp three leaves in Shaded Spruce. I cut out the circle of Real Red leaves and also the three Shaded Spruce leaves.  The Shaded Spruce leaves are attached to the back of the Real Red leaves before attaching to the Whisper White card. The panel is attached to Basic Black card and then the card front using dimensionals.
  I added a 3/4″ circle of Real Red card to the centre of the Real Red leaves. Seven large Basic Pearls are added to the top of the 3/4″ circle.
To decorate the inside of the card, I stamped the small poinsettia image from the Timeless Tidings stamp set onto the lower left hand corner of Whisper White card using Memento Tuxedo Black ink. I coloured the image using Real Red Stampin’ Blends and the Dark Daffodil Delight Stampin’ Blend.
This card is really quite simple but I think the flower is so pretty, it doesn’t need anything else. What do you think?
Bye for now,
Kris
Product Used:


Framed Art – Panel 3
 I hope you are enjoying these cards I am creating using the panels from the Framed Art piece. The card today features Panel 3 from the Framed Art. You can get your Free Tutorial here. Today’s card has Real Red card embossed using the Tufted Dynamic Embossing Folder and then attached to scored and folded Basic Black card. To create the main panel for this card I cut down the Whisper White card for Panel 3 to measure 9.3 x 11cm. I cut the Whisper white card using the dies from the Detailed Poinsettia Thinlits Dies.
  I cut the solid poinsettia flower from Real Red card and attached it behind the flower cut out. I attached pieces of Shaded Spruce across the back of the card to show through the rest of the image cut outs. I cut Real Red card once more, and saved the small circles that represent the berries so that I could add them back in from the front, which covers the Shaded Spruce card.
  The panel is attached directly to the card front without adding the Basic Black layer. I stamped the greeting from the Timeless Tidings stamp set onto Whisper White card using Memento Tuxedo Black ink. The greeting is cut out using one of the circles from the Stitched Shapes Framelits Dies. The greeting is attached to a BAsic Black scalloped circle cut using the Layering Circles Framelits Dies and then the card front using dimensionals. I added Real Red Basic Rhinestones to the centre of the Poinsettia flower.
To decorate the inside of the card, I cut the leaf and berry die from the top left and bottom right hand corner of Whisper White card. I love the way the die cuts pop from the Whisper White once it is attached inside the card.
I am really happy with this card, what about you, do you love it?
Bye for now,
Kris
Product Used:


