An Old Memory

Over the Christmas period I have been doing a little bit of de-cluttering. I have been going through some of the wardrobes in our home and cleaning out the things that I don’t want. The top shelf of one wardrobe held a huge collection of picture frames which I no longer have anywhere to display or they have been replaced by newer photos. So I removed the photos from the frames with the intention of scrapping what I could. This is one of the photos I found. It brought back happy memories of our time at Kew. This photo was taken on the front porch and Sarah is wearing her school uniform which helps me date the photo as sometime in 1985. To show off the photo I used a layout shared by Jacqui Crouch on a Demonstrator only Facebook Page. I love the way Jacqui uses Designer Series Paper on her layouts. You can visit her blog here. So following Jacqui’s idea I added pieces of the Frosted Boutique Specialty Designer Series Paper (just retired) to Early Espresso card which I trimmed down to 11-3/4″ x 11-3/4″ and then to a 12″ x 12″ Very Vanilla page. I punched Very Vanilla and Blackberry Bliss card using the Everyday Label Punch. I attached the Very Vanilla punched piece on top of the Blackberry Bliss punched card leaving a little border. I attached the punched pieces behind to the lower right hand corner of the photo and attached the whole piece to the card front. I used a Journaling pen to write the location and date. I thought the Designer Series Paper might be too busy, however, I think it works because the photo is black and white. What about you, what do you think?
Bye for now,
Kris
Product Used:


Happy Birthday Dad
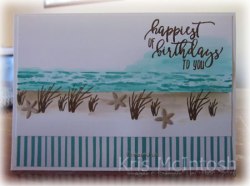
My Dad celebrated his birthday on Wednesday, the same day as my Mum, and today I am sharing the card I made for him. I have to let you in on a little secret, the card on page 145 of the Annual Catalogue was so pretty that I was driven to purchase the Sea of Textures stamp set and the co-ordinating Under the Sea Framelites Dies. However, it has taken me until now to re-create this beautiful card. I started by placing post-it-notes across the centre of Whisper White card.  I used my Aqua Painter and Crumb Cake ink to create the sandy area of the card. I removed the post-it-notes and replaced them to cover the sand. I stamped the sea image from the High Tide stamp set across the top of the sand using Bermuda Bay ink. I used the Aqua Painter and some additional ink to create the sea.
  I removed the post-it-notes and stamped “happiest of birthdays to you” from the Picture Perfect Birthday stamp set using Soft Suede ink onto the top right hand corner of the card. I stamped the double grassy image from the High Tide stamp set across the sand using Soft Suede ink. I cut Crumb Cake card using the sand dollar image from the Under the Sea Framelits three times and attached the “starfish” images to the card front. I attached a piece of Brights 6″ x 6″ Designer Series Paper behind the bottom of the stamped panel. The whole piece is attached to scored and folded Thick Whisper White card.
To decorate the inside of the card, I attached a piece of the same Designer Series Paper across the bottom of the card.
I really love how this card turned out and so did my Dad.
Bye for now,
Kris
Product Used:


Happy Birthday Mum

My Mum celebrated her birthday yesterday, and today I thought I would share the card I made for her with you. However, before I do, are you excited? Today is the day, the Occasions catalogue and the Sale-A-Bration catalogue go live, so you can start ordering all the wonderful things you have been seeing here and elsewhere on the internet.
I always create a card for my Mum early because it is so busy over Christmas and I don’t want to run out of time to make her a special card. I used the sketch challenge at Freshly Made which has already finished, unfortunately, however it was a great sketch. I embossed Whisper White card using the Subtle Dynamic Embossing Folder and attached it to scored and folded Blackberry Bliss card. I attached two pieces of Frosted Floral Specialty Designer Series Paper to the embossed card. I cut Whisper White card using one of the Layering Ovals Framelits Dies and stamped “happy birthday” from the Best Birds stamp set using Blackberry Bliss ink.  I stamped the large leaf from the First Frost stamp set using Tranquil Tide ink and cut it out using the co-ordinating Frosted Boutique Framelits Die. I stamped three small flowers from the same stamp set using Petal Parade ink and cut them out using the co-ordinating Frosted Boutique Framelits Die.
  I inked the smaller flower using Blackberry Bliss and Tranquil Tide Stampin’ Write Markers, stamping twice onto Whisper White card, and cut them out using the co-ordinating Frosted Boutique Framelits Die. I attached the leaf and small flower as well as two small Petal Parade flowers directly onto the left hand side of the stamped oval, I attached the third Petal Parade flower using a dimensional. The whole panel is attached to the card front using dimensionals.
To decorate the inside of the card I attached one of the small Blackberry Bliss/Tranquil Tide flowers.
I love this paper and am a little sad it is now retired, however, the stamp set First Frost and the co-ordinating Frosted Boutique Framelites Dies have carried over and are still available for purchase. This stamp set has so many possibilities beyond Christmas!
Bye for now,
Kris
Product Used:


It’s nearly time
to order from the new Occasions Catalogue and earn some Free product from the Sale-a-bration catalogue. Both these catalogues go live tomorrow and you can begin purchasing your must have’s and along the way earn some oh so gorgeous freebies. The photo on the left shows images from the Gingham Gala Product Suite in the Occasions Catalogue and also some of the freebies from the Sale-a-bration catalogue you can earn with a qualifying order. I love that some of the product in the Occasions Catalogue co-ordinates with some of the free product in the Sale-A-Bration catalogue. If you don’t have a Stampin’ Up! Demonstrator already and you live in Australia, then please contact me so that we can organise to these catalogues to you. 
Now not only is it a fabulous time to buy some really gorgeous product and earn some freebies but it is also a great time to become a Stampin’ Up! Demonstrator. You can pick from two options to sign up during Sale-A-Bration. The first option lets you select any current product up to the value of $315.00 for the fabulous price of $169.00. The second option lets you select any current product up to the value of $315.00 for the price of $210.00 and get a fabulous tote only available to new demonstrators. Of course, you don’t earn free product when you purchase your starter kit, but you will with your subsequent orders and you get a discount too. So if you would like to become a member of my team, please contact me so that we can discuss the details. If you asked anyone what’s the best thing about being a demonstrator, most people would say it’s not the discount or the great product or the way we get spoilt by Stampin’ Up!, rather it’s the people you meet and the new friends you make.
So get your wish list written up ready to go tomorrow. If you don’t have catalogues and you really need to have a look you can download a PDF tomorrow here.
Bye for now,
Kris
Happy New Year
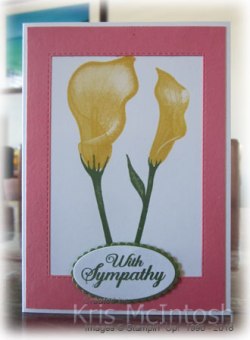
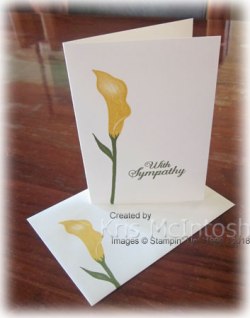
Wishing everyone a fabulous New Year full of love, happiness and good health. My card today has nothing to do with a Happy New Year, however, I have already shared with you a couple of Simple Stamping cards I made using this stamp set and since I was already creating with it, I decided to create a couple more cards using the same colours. For today’s card, I cut a rectangle in Flirty Flamingo card using the Rectangle Framelits Dies. Using the frame as a guide I stamped the large and small stems onto Thick Whisper White card using Old Olive ink. I stamped the large and small flowers using Daffodil Delight ink. Once the stamping was done I attached the Flirty Flamingo frame to the stamped Thick Whisper White card.  I stamped “With Sympathy” from the Lasting Lilly stamp set onto Whisper White card using Old Olive ink. The greeting is cut out using one of the Layering Ovals Framelits Dies. I attached the greeting to an Old Olive scalloped oval cut using the same dies and then the card front using dimensionals.
 To decorate the inside of the card, I stamped the small flower and matching stem using the same inks as the card front. Sympathy cards are not the easiest to create so this stamp set is going to be a great help to have a stash of cards on hand for those often distressing times when they are needed.
Are you getting excited for all the new product in the Occasions and Sale-A-Bration catalogues. You are going to love these Rectangle Framelits Dies. They cut the card leaving a stitched edge on the inside and outside of the cut, making both pieces decorative. The stamp set itself is Free with a qualifying order during Sale-A-Bration and I am sure you will love it as well. So do you like this card, I think it suits a casual stamper, someone who loves to create cards for their family and friends and has a moderate amount of product on hand. What do you think?
Bye for now,
Kris
Product Used:


Four Ways
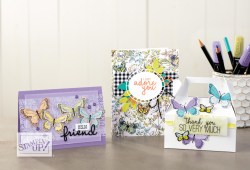
The cards I am sharing today use the Incredible Like You stamp set and Garden Impressions 6″ x 6″ Designer Series Paper. I cut the paper using a template that I found online. You line up one 6″ edge on the paper trimmer at 10cm and cut down the length of the paper and then rotate it 90 degrees and cut at 10cm. You take the 10cm square piece and cut it on the diagonal to create two triangles. The long piece needs to be trimmed down to a length of 14.3cm. Fairly simple isn’t it? Now you have four pieces of paper for the four cards.
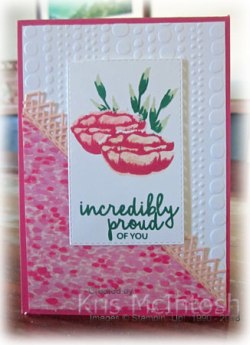
I embossed the Whisper White card using the Dot to Dot Embossing folder (from the Occasions Catalogue) before attaching to scored and folded Melon Mambo card.  I cut Petal Pink card using one of the dies from the Delicate Lace Edgelit Dies and attached the die cut behind one edge of the Designer Series paper. The Designer Series Paper is attached to the embossed card. To create the image panels, I cut Whisper White card using one of the Stitched Rectangle Dies (from the Occasions Catalogue) and stamped a greeting onto the bottom of the card using Shaded Spruce ink.
  Three of the greetings are from the Incredible Like You stamp set and one (Happy Birthday) is from the Special Celebration stamp set. I stamped the first flower using Petal Pink ink and Melon Mambo ink, firstly stamping the darker Melon Mambo image so that it is easier to line up the solid lighter image. I stamped the solid image onto a post it note and cut it out and placed the post-it-note image over the stamped image. I stamped the flower once more using the same inks and again placed a post-it-note image over the top. I stamped the solid leaf using Soft Sea Foam ink and the detailed leaf using Shaded Spruce ink. Once the post-it-notes are removed, the image panel is attached to the card front using dimensionals.
To decorate the inside of the card, I attached the lace edge behind a narrow piece of Whisper White card embossed using the Dot to Dot Embossing Folder, before attaching the panel to the bottom of Whisper White card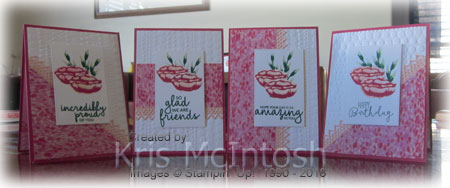 .
.
I really love how these cards turned out. What about you? Are you excited to be able to purchase this stamp set? It really is pretty amazing.
Bye for now,
Kris
Product Used:


Daly Waters
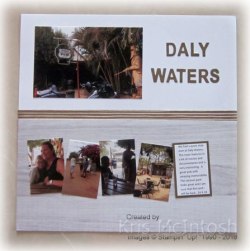
I’m back on track to share a Memory Keeping page on Saturdays. I didn’t quite follow the plan over the last couple of weeks as I had so many Christmas projects to share with you. Today’s page was created to remember our quick stop at Daly Waters on our way from the Devils Marbles to Katherine. This town is just off the highway and has an airfield which was used in WWII and a great little pub with a caravan park attached. We stopped in an had a quick look around town and a drink at the pub. Oh My Goodness what a lot of memorabilia this pub holds. It also has a great beer garden with a stage and during the peak season they have lots of entertainment.  Ron and I have already decided to make this a stop over when we head up to Darwin again. Anyway, the base for the page is 12″ x 12″ Whisper White. I added the striped piece of Frosted Boutique Designer Series paper behind the top edge of the Festive Farmhouse Designer Series Paper before attaching to the Whisper White card. I printed a few photos at 2″ x 3″ and attached them across the designer series paper. I printed the journalling on the computer, attached it to Soft Suede card and then to the page. The larger photo is 6″ x 4″ and attached to the top left hand corner. I cut the title from Soft Suede card using the retired Little Letters Framelits Dies.
As you can see, a simple page, but one that will always bring a smile to my face as I remember our first visit to this town.
Bye for now,
Kris
Product Used:


Simple Sale-A-Bration
Today’s cards again focus on simple or beginner stamping. I have used the Lasting Lilly stamp set which is one that you can earn FREE during Sale-A-Bration. The card bases are once more note cards. I have stamped the leaf images using Old Olive ink and the small flower using Daffodil Delight ink and the larger flower using Flirty Flamingo ink. The greetings which are also from the Lasting Lilly stamp set are stamped using Old Olive ink. These images are Distinktive which means that you need to add your ink carefully so that it is not overloaded.  If there is too much ink on your stamp you won’t get the wonderful detail that is present in each of the stamps. If your pad is really wet and leaves bubbles on your stamp, use a spoon to push the ink back into the pad, to make sure that you get a great image.
I have decorated the envelopes for each card using the same inks and images to co-ordinate. I do think these cards really suit simple or beginner stamping, don’t you?
 This is a really lovely stamp set with some great sayings for sympathy or get well type cards, but not exclusively so.
Make sure that during the Sale-A-Bration period you place your orders so that you can qualify for something free every time. There is a wonderful selection of stamp sets and accessories to choose from. If you don’t have a demonstrator and you live in Australia, please contact me so we can organise to get the catalogues to you.
Bye for now,
Kris
Product Used:


Simple Incredible Like you

When we were are our Onstage Local event in November, Stampin’ Up! issued a challenge to try more simple stamping. Now this is harder than you think to do once you have been stamping for a while. But I thought about the idea behind simple stamping – to showcase Stampin’ Up!’s wonderful products to new, beginner stampers. The first thing you need is something to stamp on and our note cards with envelopes are a great starting point for a new stamper. You get 20 pre-scored cards and envelopes in the pack at a really good price. So I created both of the cards I am sharing with you today on note cards. I am excited to be sharing a stamp set that is being released in the Occasions Catalogue and will be available for purchase on the 3rd January. For the first card, I stamped the striped image from the Incredible Like You stamp set using Daffodil Delight ink. I did use a post-it-note to cover the striped image before stamping the flower and leaves. The flower is stamped using Blushing Bride ink and Calypso Coral ink. I stamp the darkest colour first as it makes it easier to add the lighter solid image exactly where you want it. I stamped the solid leaf using Mint Macaron ink and the detailed leaf image using Pear Pizzazz ink.
  I removed the post it note and stamped the greeting from the same stamp set using Pear Pizzazz ink. I also decorated the envelope in the same manner. Because it is a note card, I didn’t add any stamping to the inside of the card. Simple enough and it doesn’t take too many supplies.
For the second card, I used post-it- notes to mask across the card on an angle. I stamped the flower and leaves using the same inks as the first card. I removed the post-it-notes, rotated the card 180 degrees and attached the post-it-notes again.  Once more I stamped the flower and leaves using the same inks as for the first card. To make this work and keep it simple I use my grid paper to align the card and I mark the positions for the edges of the post-it-notes. This makes it simple to leave about a 1″ gap between the stamped flowers by moving the card downwards from the top position to add the post-it-notes the second time. Anyway once the stamping is done, I removed the post-it-notes and stamped the greeting from the Incredible Like You stamp set using Pear Pizzazz ink. I also decorated the envelope for this card to match.
What do you think, have I created simple stamping or are there too many colours for a beginner stamper? I’d love to know what you think.
bye for now,
Kris
Product Used:


Merry Christmas
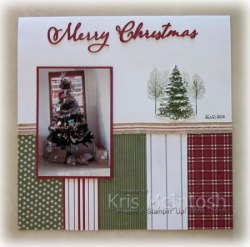
Wishing you all a very Merry Christmas and a Happy New Year. It’s very quiet here at the moment. I still have a little preparation to do before the family arrives, but I thought I would share a page I made to showcase a photo of my tree with the presents underneath. Of course there will be more when everyone arrives but for the moment these are from Ron and I to the members of our family. I attached pieces of the Festive Farmhouse Designer Series paper across the bottom of a Whisper White 12″ x 12″ page. The pieces are random in width but all the same height. I attached piece of the 5/8″ Striped Burlap Ribbon across the top of the Designer Series Paper. I stamped the row of trees from the Winter Woods stamp set on the right hand side of the page above the Designer Series Paper using Mossy Meadow ink. I stamped the single tree from the same stamp set twice onto Whisper White card using Mossy Meadow ink and cut them out using the outline die and the intricate die from the In The Woods Framelits Dies. I attached the intricate tree onto the full tree and then attached them over the stamped trees. I cut “Merry” and “Christmas” three times from Cherry Cobbler ink using the Merry Christmas Thinlits Dies. The dies are attached on top of each other and then to the page which gives the title lots of dimension. I attached the photo to Cherry Cobbler card before attaching the panel to the left hand side of the page. I used the Tabs for Everything stamp to add the date. Simple I know, but I love the way the page has come together.
Anyway, have a wonderful time over this Christmas Season, and if you are on the road, please travel safe.
Bye for now,
Kris
Product Used:


