New from Memories and More

Have you seen the new card and envelope packs that Stampin’ Up! released in the new catalogue that are designed to be used with the Memories and More cards.  There is a large card which you can use with the 6 x 4″ Memories and More cards and a smaller card which you can use with the 4 x 3″ cards. Today I am sharing a couple of cards that I created using these cards and the Delightfully Detailed Memories and More Card pack.
  The first card has a 3″ x 4″ Delightfully Detailed Memories and More card attached to the front with one of the laser cut specialty cards attached over the top. I stamped the greeting from the Detailed with Love stamp set onto Whisper White card using Blackberry Bliss ink. I cut out the image using one of the ovals from the Layering Ovals Framelits Dies.
  The die doesn’t match the stamp perfectly but by adding a Whisper White scalloped oval behind the greeting you can’t see where the stamp ends. The greeting is attached to the card front using dimensionals.
 I decorated the inside of the card by stamping the larger flower from the Detailed With Love stamp set using Blackberry Bliss ink. This card didn’t really take any time to create and I think it is beautiful.
The second card uses one of the 6″ x 4″ cards from the Delightfully Detailed Memories and More Card Pack . I punched a narrow strip of Mint Macaron card using the Decorative Ribbon Border Punch and attached it across the centre of the card. I wrapped the card over the bottom of the Mint Macaron Ribibon Border with the Whisper White 5/8″ Polka Dot Tulle Ribbon and tied a knot.  The whole piece is attached to one of the large Whisper White Memories and More Cards. I stamped the greeting from the Detailed With Love stamp set onto Whisper White card using Mint Macaron ink. The images is cut out using the Layering Ovals Framelits Dies and attached to a Whisper White scalloped oval. The greeting is attached to the card front using dimensionals. To decorate the inside of the card, I used several of the stamps from the Detailed with Love stamp set which I stamped using Mint Macaron ink.
Truly a gorgeous creation and so simple to achieve. I hope you will take a look at the possibilities for using your Memories and More Card Packs with these card and envelope packs.
Bye for now,
Kris
Product Used:


More Accented Blooms
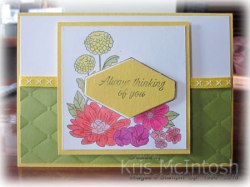
Here is the second card I created using the Accented Blooms stamp set. This time I embossed a piece of Old Olive card using the Tufted Dynamic Embossing Folder and attached it to Whisper White card. I wrapped the top of the embossed card using the Daffodil Delight 1/4″ Double Stitched Ribbon before attaching to scored and folded Daffodil Delight card.  I stamped the large floral image from the Accented Blooms stamp set onto Whisper White card using Memento Tuxedo Black ink. This time I coloured the image using Watercolour Pencils and a Blender Pen. The image is attached to Daffodil Delight card and then the card front using dimensionals.
  I stamped the greeting from the Accented Blooms stamp set onto Daffodil Delight card and used the Tailored Tag Punch to cut it out. The greeting is also attached to the card front using dimensionals.
To decorate the inside of the card, I embossed a strip of Old Olive card using the Tufted Dynamic Embossing Folder and attached it to Whisper White card. I wrapped the top of the embossing with the Daffodil Delight 1/4″ Double Stitched Ribbon.
I wasn’t sure about the colours in this one but the more I look at it the more I like it. What about you?
Bye for now,
Kris
Product Used:


Accented Blooms

Here is my first attempt at using the gorgeous new stamp set Accented Blooms. For this card, I embossed Whisper White card using the beautiful new Tufted Dynamic Embossing Folder. This is a truly gorgeous embossing folder and needs to be seen to understand just how beautiful it is. I wrapped the card with Rich Razzleberry 1/4″ Velvet Ribbon and tied a knot before attaching the embossed card to scored and folded Rich Razzleberry card. I stamped the large floral image from the Accented Blooms stamp set onto Whisper White card using Memento Tuxedo Black ink. The image is coloured using Rich Razzleberry, Daffodil Delight, Cherry Cobbler, Calypso Coral and Old Olive Stampin’ Blends. I attached the image panel to Rich Razzleberry card and then the card front.
  I stamped the “hello” from the Accented Blooms stamp set onto Whisper White card using Rich Razzleberry ink and punched it out using the Tailored Tag Punch. The greeting is attached to the card front using dimensionals.
To decorate the inside of the card, I stamped another of the greetings from the Accented Blooms stamp set onto Whisper White card using Memento Tuxedo Black ink. The leaf image is also from the same stamp set and is stamped just below the greeting using the same ink. I coloured the leaf image using the light Old Olive Stampin’ Blend.
This is such a pretty stamp set and teamed with this gorgeous embossing folder, I think looks quite stunning. I hope you agree.
Bye for now,
Kris
Product Used:


Happy Birthday Ethan
Today my eldest grandson is celebrating his 12th birthday, his last year before becoming a teenager! I can’t believe how fast the years have gone. Anyway I thought I would share with you the card that I made for him and since I am not seeing him till after school, I have scheduled this post a little later in the day.
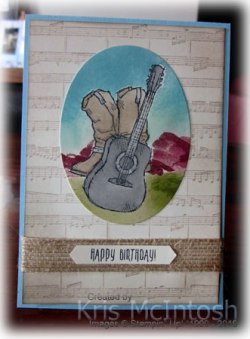
Ethan loves to play guitar in any form and is developing a keen interest in perhaps learning the drums as well. Luckily he can do quite a lot of this at school. Anyway I wanted to make him a card that reflects this love as well as his love of the great outdoors. I started by stamping the Sheet Music Background stamp onto Very Vanilla card using Crumb Cake ink. I sponged all around the edges of the card using the same ink and then wrapped it with a piece of 5/8″ Burlap Ribbon.  The panel is attached to scored and folded Balmy Blue card. I stamped the guitar from the Country Livin’ stamp set onto Very Vanilla card using Memento Tuxedo Black ink. I covered it with a post-it-note mask before stamping the boots from the same stamp set using Memento Tuxedo Black ink. I covered the boots with a post-it-note mask and then covered the panel from the bottom of the boots up before sponging with Crumb Cake ink and a little Granny Apple Green ink. I removed the mask across the panel but left the ones covering the boots and guitar and stamped the mountain image from the Waterfront stamp set using Blackberry Bliss ink. With the masks still covering the boots and the guitar I sponged Pool Party ink close to the mountains and then Balmy Blue ink across the rest of the panel.
  Once I had done all of that, I removed the masks and then used the largest oval from the Layering Oval Framelits Dies to cut out the image. I coloured the guitar and boot images using Smoky Slate, Crumb Cake and the Bronze Stampin’ Blends. I attached the panel to the card front but didn’t add any dimensionals as I felt that the colours made it stand out enough. I stamped “happy birthday” from the Picture Perfect stamp set onto Very Vanilla card using Memento Tuxedo Black ink and used the Classic Label Punch to cut it out. The greeting is attached to the 5/8″ Burlap Ribbon.
To decorate the inside of the card, I masked across the bottom of Very Vanilla card with Post-It- Notes and stamped the Sheet Music Background using Crumb Cake ink and sponged over the stamped image using the same ink before removing the masks. I stamped the greeting from the Picture Perfect Birthday stamp set using Memento Tuxedo Black ink before attaching the panel to the inside of the card.
I love the way the sky looks just like it does on a winter’s day in outback Queensland at Longreach or Winton or somewhere similar. I’d love to hear what you think.
Bye for now,
Kris
Product Used:


Happy New Home
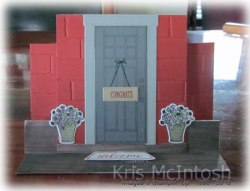
Today I am sharing a card I made for a dear friend who has just move house. I followed a basic tutorial by Amanda Bates to create my card. I cut my card base from Thick Whisper White following Amanda’s instructions and I must admit I was inspired by a card I had seen that she posted but can’t find it now. I embossed Cajun Craze card using the Brick Wall Embossing Folder which, unfortunately, has now retired. This is one embossing folding I will miss very much. I attached a strip of Wood Textures Designer Series Paper across the bottom of the card front and also across the bottom of the easel part of the card. I attached the embossed card to the centre panel as well as both side panels. I attached another piece of the same Wood Textures Designer Series Paper across the bottom of the centre panel, covering the bottom of the embossed Cajun Craze card, to “hopefully” look like a step. I stamped the door from the At Home With You stamp set onto Smoky Slate card using Smoky Slate ink and cut out the image using the matching At Home Framelits Die. I stamped the door image once more onto Basic Gray card using Basic Gray ink and cut out the door. The door is hinged, so I cut down the score line to separate the door from the frame and attached the Basic Gray door to the Smoky Slate frame. I stamped the “hanger” image onto the door using Memento Tuxedo Black ink. I attached the door to the centre of the card front. I stamped the small frame image onto Crumb Cake card using Crumb Cake ink and then stamped “congrats” into the centre of the frame. I cut out the image using the matching At Home Framelits Die and attached the sign to the bottom of the stamped “hanger”.
 I stamped the flower pot images onto Whisper White card using Memento Tuxedo Black ink and cut them out using the matching At Home Framelits Die. I coloured the images using Rich Razzleberry, Blackberry Bliss, Granny Apple Green and Crumb Cake Stampin’ Write Markers. I attached one of the flower pots to each side of the door. I stamped the “welcome” image onto Whisper White card using Cajun Craze ink and cut it out using the matching At Home Framelits Die. I attached the “welcome” to the Wood Textures Designer Series Paper on the easel part of the frame using dimensionals. This is what holds the card open.
I stamped “on your new home” on the inside of the easel part of the frame using Cajun Craze ink. I must admit that this is not a stamp set that I use very often, but I am so happy with this card that I think it will now see more ink.
This card was made for a very dear friend who has just moved house. Unfortunately, I had the wrong address and so it has been sent and resent and hopefully has now reached the correct destination.
Bye for now,
Kris
Product Used:


Beach Day

Today’s page showcases a photo of my Dad, his mother and Aunty on the way to the beach. I’m pretty sure they used to go to Brighton-Le-Sands by train. I used the Sea of Textures stamp set to add some interest to the lower right hand side of a 12″ x 12″ Whisper White page. I stamped the border image across the section using Balmy Blue ink (did I tell you that I am truly loving this colour). To add a little more interest I stamped the tall seaweed image using Mint Macaron ink over the top. I stamped clusters of the large seaweed image using Fresh Fig ink and also some smaller seaweed images using Night of Navy ink. I layered four pieces of the Tranquil Textures Designer Series Paper onto Night of Navy 12″ x 12″ card and attached it to the left hand side of the stamped page. I attached my photo to Night of Navy card and then to the Designer Series Paper panel.  I printed my journalling onto Whisper White card and cut it into strips. The journaling is attached to Night of Navy card before being attached over the stamping. I stamped the letters from the Lined Alphabet onto Balmy Blue card using Night of Navy ink to create the title. I cut out the letters using the Layering Alphabet Edgelits Dies. You do have to fussy cut them just a little to completely release the letters.
I love how the photo on this page showcases how different life was when my Dad was young. A trip to the beach was a full day event and was a wonderful opportunity for whole families to come together. I hope you like my page and that it inspires you to do some more Memory Keeping with your treasured photos.
Bye for now,
Kris
Product Used:


Paper Craft Crew 295
 Today’s card was inspired by the sketch challenge at Paper Craft Crew. I used the Sea of Textures stamp set to create my card. Firstly I attached a piece of the Tranquil Textures Designer Series paper to Whisper White card before attaching the panel to scored and folded Tranquil Tide card. Next I cut crumb cake card using the Under the Sea Framelits Dies to create a net which I attached to the Designer Series Paper. I cut a circle from Whisper White card using the Stitched Shapes Framelits Dies and cut it using the die with the little fish from the Under the Sea Framelits Dies. The Whisper White circle is attached to a Tranquil Tide scalloped circle cut using the Layering Circle Framelits Dies before being attached to the card front.
  I stamped the greeting from the Itty Bitty Greetings stamp set onto a narrow strip of Whisper White card using Tranquil Tide ink. I used the Triple Banner Punch to cut both short ends and lightly sponged around the banner using Tranquil Tide ink. Using the Under The Sea Framelits Dies I cut three pieces of seaweed, one from Soft Sea Foam card, and two from Fresh Fig card and also one sand dollar from Crumb Cake Card. I attached the small Fresh Fig and the Soft Sea Foam pieces of seaweed to the Whisper White circle. The banner is attached to the card front covering part of the seaweed.
  I attached the large Fresh Fig seaweed piece and the sand dollar over the end of the banner.
To decorate the inside of the card, I stamped the long border image using Crumb Cake ink to represent sand. Next I stamped the long seaweed stamp from the Sea of Textures stamp set using Tranquil Tide ink onto the lower left hand corner of Whisper White card. I stamped another of the seaweed images using Fresh Fig ink over the top and lastly added the “starfish” which came from the centre of the sand dollar.
This is a fun card and one that would be great for the sea-lovers/fisherman in your life. I am certainly loving the possibilities that the Sea of Textures stamp set and the matching Under The Sea Framelits offer.
Bye for now,
Kris
Product Used:


Sunday Stamps Sketch
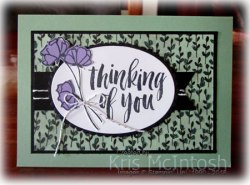
I created the card I am sharing with you today using the sketch challenge at Sunday Stamps. I love the colour combination on this card and hope that you do too. I attached a piece of the Share What You Love Specialty Designer Series Paper to Basic Black card and then to scored and folded Mint Macaron card. I punched one end of a strip of Basic Black card using the Triple Banner Punch and wrapped it with Silver Baker’s Twine before attaching it to the Designer Series Paper. I stamped the greeting from the Rooted in Nature stamp set onto Whisper White card using Memento Tuxedo Black ink. The greeting is cut out using one of the Layering Ovals Framelits Dies and is attached to a Basic Black scalloped oval which is cut using the same Dies. The oval is attached to the card front using dimensionals. I stamped the flower from the Love What You Do stamp set onto Whisper White card using Memento Tuxedo Black ink and stamped the flower fill image over the top using Highland Heather ink.
  I cut out the flower and attached it next to the greeting using Multipurpose glue and a couple of dimensionals. I tied a bow in a length of the Silver Baker’s Twine and attached it to the flower stem with a small dot of Multipurpose Glue.
To decorate the inside of the card, I stamped and cut out another flower to match the one on the front of the card. The flower is attached to the lower left hand corner of Whisper White card.
This card is so pretty. Can you see I am still loving and chopping my designer series paper?
Bye for now,
Kris
Product Used:


Sea of Textures
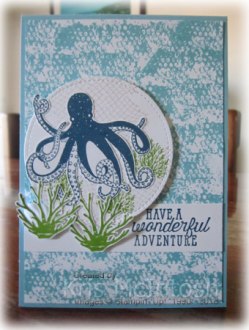
Here is another card I created for my catalogue launch, this time using the Sea of Textures stamp set. When I put my pre-order in I forgot to order the matching Under The Sea Framelits Dies so I had to do some fussy cutting for this card. I stamped the long skinny background image across the entire area of a piece of Whisper White card using Balmy Blue ink. I attached the panel to scored and folded Balmy Blue card. I stamped the greeting from the Sea of Textures stamp set onto Whisper White card using Night of Navy ink and attached the panel across the lower part of the stamped Whisper White card.  I cut a circle from Whisper White card using the Stitched Shapes Framelits Dies and stamped the “fishing net” image onto the Whisper White card using Crumb Cake ink. I also stamped several of the small “seaweed” images using Granny Apple Green ink. I attached the stamped circle to the card front using dimensionals.
  I stamped the octopus image onto Whisper White card using Night of Navy ink and the large “seaweed” image twice onto Whisper White card using Granny Apple Green ink. I cut out the images and attached the octopus to the stamped circle. I attached the “seaweed” images partially over the circle using mini dimensionals under the bases.
To decorate the inside of the card, I stamped the “fishing net” image onto the lower left hand corner of Whisper White card using Crumb Cake ink. I stamped one small and one large “seaweed” image over the top using Granny Apple Green ink.
This is such a fun set and I am so glad that I bought it. Of course I now have the The Under The Sea Framelits and do not have to fussy cut, but all the same it wasn’t hard to do. Hope you take a look at this fabulous stamp set and perhaps see some possibilities for your crafting.
Bye for now,
Kris
Product Used:
Varied Vases
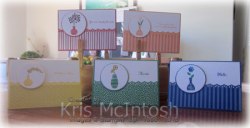
This is one of the stamp sets that I purchased on my pre-order and I love it. The stamp set has a matching punch as well. I made a set of cards for my catalogue launch using this set and the new 2018-2020 In-Colour Designer Series paper.  This 6″ x 6″ designer series paper is really lovely, you get four each of two double-sided designs in each of the five new in-colours. So pretty. I created a card in each of the colours – Lovely Lipstick, Grapefruit Grove, Pineapple Punch, Call Me Clover and Blueberry Bushel.
  I created each card by punching a strip of card using the Decorative Ribbon Border Punch and attaching behind a co-ordinating piece of the Designer Series Paper. I attached the designer series paper to Whisper White card and stamped a greeting from the Varied Vases stamp set using the co-ordinating ink.
  The Whisper White card is attached to scored and folded co-ordinating card. I stamped one of the vase images using the co-ordinating colour and a flower from the stamp set which is either stamped in Memento Tuxedo Black ink or Call Me Clover ink. The flowers are stamped in one of the new in-colours to co-ordinate with the designer series paper.
  For each of the central images I used the Vases Builder Punch to create a mask from Post-it-notes to cover the vase before stamping the stem images. The vase images where cut out using one of the circles from the Layering Circles Framelits Dies and attached to a scalloped circle cut from co-ordinating card using the same dies.
  The image panels are attached to the card front using dimensionals.
To decorate the inside of the card, I attached a narrow strip of co-ordinating card behind one long edge of a piece of the designer series paper.  The panel is attached across the bottom of Whisper White card.
I love how bright and cheerful this set of cards is, the colours are really lovely and I think it will be hard to pick a favourite. The greetings in this stamp set make it really versatile and you can layer up the vases and flowers to create so many different variations. I hope I have inspired you to take a good look at this stamp set and think about the possibilities.
Bye for now,
Kris
Product Used:


