Grandparents

Today my Memory Keeping page shows off a photo of my Dad’s parents. Unfortunately I don’t know when or where this photo was taken but I don’t have many photos of them together so I wanted to record this one. I used one of the Pattern Party Decorative Masks and Shimmery White Embossing Paste to randomly decorate the 12″ x 12″ Whisper White page. The background is created by attaching strips of the Colour Theory Designer Series Paper across the width of the page. (This paper is on the retiring list but still available at the moment, so don’t delay if you need this designer series paper.) I cut pieces of Dapper Denim, Berry Burst and Old Olive card and punched one short end using the Triple Banner Punch. I attached the photo to Dapper Denim card and attached the banners to the back of the Dapper Denim card before attaching the panel to the page using dimensionals. I cut the title from Dapper Denim card using the Little Letters Thinlits Dies (retired). I printed my journalling onto Whisper White card and cut it into strips. The journalling is attached to Dapper Denim card and then the page. A simple page but one that captures a memory for me as well as my grandchildren. I tried to show off the shimmer in this embossing paste but it is very hard to capture in a photo.
Bye for now,
Kris
Product Used:
I don’t have an icon for the Colour Theory Designer Series Paper but you can view it here.


Paper Craft Crew Sketch Challenge 291
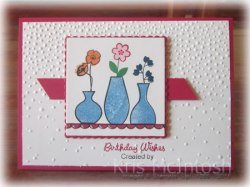
I had a little play with one of the stamp sets I purchased on my demonstrator pre-order for the 2018-2019 Annual Catalogue using the sketch challenge at Paper Craft Crew. The stamp set is called Varied Vases and will be available to purchase either alone or as a bundle with the Vases Builder Punch. I stamped the greeting from the Varied Vases stampset onto Whisper White card using Lovely Lipstick ink. The stamped Whisper White card is embossed using the Softly Falling Embossing Folder and attached to scored and folded Lovely Lipstick card. I cut a narrow strip of Lovely Lipstick card and cut each end on the diagonal before attaching to the card front.  I stamped the scalloped outline onto Whisper White card using Memento Tuxedo Black ink and then stamped the fill image using Lovely Lipstick ink. I stamped the outline for each of the vases using Memento Tuxedo Black ink and the fill image using Blueberry Bushel ink which I had stamped onto scrap paper first. I stamped the outline images for the flower on the left and the one on the right using Memento Tuxedo Black in. The stem in the central vase is stamped using Call Me Clover ink. I also stamped two leaves onto the stem using the same ink. The flower fill image on the left is stamped in Grapefruit Grove and the flower fill image on the right in Blueberry Bushel. I stamped the outline flower in the centre using Lovely Lipstick ink and the fill image using the same ink which I stamped onto scrap paper first.
  The images were cut out using one of the squares from the Layering Squares Framelits Dies and attached to a Lovely Lipstick scalloped square cut using the same dies. The image panel is attached to the card front using dimensionals.
To decorate the inside of the card, I attached a narrow strip of Lovely Lipstick ink behind one long edge of Whisper White card embossed using the Softly Falling Embossing Folder. The panel is attached to Whisper White card onto which I had stamped another of the greetings from the Varied Vases stamp set. I am sure this is going to be a firm favourite with everyone, there are just so many gorgeous things you can do with the images in this set.
Bye for now,
Kris
Product Used:


Goodbye Picture Perfect

This is the third card design to use up my stash of Picture Perfect 6″ x 6″ Designer Series Paper. This time I trimmed down the 3″ x 6″ pieces to 5cm x 14.3cm and attached it to Peekaboo Peach card. The panel is attached to Whisper White card and then scored and folded Peekaboo Peach card.  I stamped the greeting from the Picture Perfect Birthday stamp set onto Whisper White card using Peekaboo Peach ink and cut it out using one of the ovals from the Stitched Shapes Ovals Framelits Dies. The greeting is attached to a Peekaboo Peach scalloped oval cut using the Layering Ovals Framelits Dies. The greeting panel is attached to the card front using dimensionals. The piece of Designer Series Paper I trimmed off is attached across the bottom of Whisper White card.
  The panel is attached inside the card base. Because this paper is so pretty and has lots of colour in it, I created the same card using Lemon Lime Twist, Pool Party, Berry Burst, Bermuda Bay and Basic Black.
So another simple card design and I am slowly whittling down the pieces from the Picture Perfect 6″ x 6″ Designer Series Paper. So far I have created 42 cards using these three designs and I really only have a small amount of the paper stack left. I hope you have been busy creating and using up your Designer Series Paper because it is only a little over three weeks and you will be able to choose from a whole new range of lovely Designer Series Paper.
Bye for now,
Kris
Product Used:


Another Picture Perfect Card
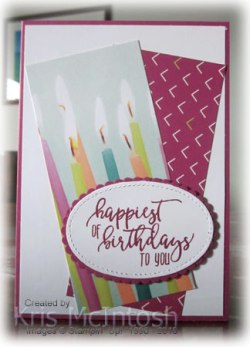
This is the second design I came up with to use up the Picture Perfect 6″ x 6″ Designer Series paper I have been hoarding since I bought it. This design uses two patterns of the 3″ x 6″ pieces of Designer Series Paper. I don’t know about you but when I get this gorgeous paper with the photograph images on one side, I kind of don’t know what to do with it. Well once you cut it in half, it becomes a little easier to cut it again. Each of these pieces of Designer Series Paper is trimmed to 2-1/4″ x 12.5cm (sorry, my brain just works better if I work it out in inches and centimetres!). I attached them on the diagonal to Whisper White card and then to scored and folded Berry Burst card.  I took the base card colour from the patterned piece not the candle piece of designer series paper. I stamped the greeting from the Picture Perfect Birthday stamp set onto Whisper White card using Berry Burst ink. I cut out the greeting using one of the ovals from the Stitched Shapes Framelits Dies. I attached the greeting to a Berry Burst scalloped oval cut using the Layering Ovals Framelits Dies and then to the card front using dimensionals.
 To decorate the inside of the card, I took the piece I cut from the Berry Burst Designer Series Paper and attached it down the left hand side of Whisper White card. I also created cards in Lemon Lime Twist, Pool Party and Bermuda Bay. I used different pieces of Designer Series paper to co-ordinate the colours with the base card. I might have to have a look and see if I can make this one in some more colours. Again, I hope I am inspiring you to cut into your Designer Series paper stash and create some cards.
Bye for now,
Kris
Product Used:
Picture Perfect Cards

You all know I am on a mission to try and use up some of my Designer Series Paper before this catalogue ends. I bought 2 packs of the Picture Perfect Party 6″ x 6″ Designer Series Paper and have probably only used one of the designs. Sooo, I have Loved it and Chopped it (Thank you Kylie Bertucci) and yesterday I created three different designs which I can use with all of the co-ordinating cardstock colours, except maybe Peekaboo Peach because I have used nearly all of that card stock. I am going to share the three different designs with you over a few days but believe me they are literally under 5 minute cards. The first card might even take less time than that. I cut the Designer Series Paper 6″ x 6″ sheets into 3″ x 6″ sheets (I had done this previously) and then after selecting the paper I wanted to use, I cut the 3″ x 6″ sheets in half again to create two 3″ x 3″ pieces.  I attached the designer series paper to Basic Black card and then to Whisper White card. I stamped the greeting from the Perennial Birthday below the designer series paper using the same Memento Tuxedo Black ink. The Whisper White card is then attached to scored and folded Basic Black card. I cut strips of the Designer Series Paper into 10cm x 3cm pieces and got 3 from one 6″ x 6″ piece of Designer Series Paper with another piece left over for another project. (I am on a roll here thinking about all the different ways to use these papers.)
  The small piece of Designer Series Paper is attached to the bottom of another piece of Whisper White card. I created this card and four more colours – Bermuda Bay, Berry Burst, Lemon Lime Twist and Peekaboo Peach. Now that I have the design, I am going to precut the cardstock and I will be creating these at night when I am watching TV with my hubby. I hope I have inspired you to use your Designer Series Paper – yes even the ones you cannot bear to use because they are so pretty – because you know what, pretty soon you are going to find something just as pretty to replace it.
Bye for now,
Kris
Product Used:

Let’s Talk Storage

With the approach of a new Annual Catalogue, I have been doing lots of clearing out and taking stock. I am finding that I don’s use lots of product simply because I cannot find it. I’m sure that many of you are the same. So today I did a search of YouTube and found a video by Tracy Elsom. The video shows how to create a storage box for your Memories and More Card Collections. Since this fits with my re-organising at the moment, I thought I would create her box and share it with you in the hopes that it may also help some of you. I have to admit to not rocking the boat too much, by using the same cardstock and Designer Series Paper that Tracy used. However, I am thinking that this could be a good way to use up some of my retired/retiring designer series paper. I also believe that the storage system has lots more use than just storing Memories and More cards.  So the basic idea is that you create the base box and then create small boxes that fit inside to hold the 6″ x 4″ cards and the 3″ x 4″ cards. You can fit up to four rows of small boxes inside the base box. I decided to create two boxes to hold the 6″ x 4″ cards and two boxes to hold the 3″ x 4″ cards. I liked the idea Tracy shared of placing the specialty cards in your card pack at the back – the clear acetate sheets as well as the sticker and die cut sheets to help protect them from being squashed inside the box. I used the next box to hold the rest of the 6″ x 4″ cards and the two smaller boxes to hold the 3″ x 4″ cards. I liked the idea of being able to store photos which I want to scrap using the particular collection in the space at the front of the box. I liked the idea of creating a label so that I would know exactly which cards are stored in that particular box.
  It also means that when one card collection is finished, I can change out the label and add a new label to store a new collection. I am hoping this will mean that I have less of the cards in a particular collection hanging around when I want to purchase a new collection. Because we have all got to have new, don’t we? I created the label by using the Layering Square Framelits Dies and the second largest square from the Stitched Shapes Framelits Dies. Basically the Basic Black card is cut using the Stitched Shapes Framelits Dies. I cut the centre from this shape using one of the Layering Squares Framelits Dies. I cut a slightly large square from Powder Pink Card as well. The Basic Black card has a piece of Window Sheet attached at the back and then I used the Foam Adhesive Strips to attach the Basic Black card to the Powder Pink card. I cut a piece of Whisper White card and printed the label details on my computer. I attached a Basic Black Circle Tab to the top of the label so that I can easily remove it.
I think I am going to create a few more of these today to get ready for the new catalogue. I am going to use these for storing the 6″ x 6″ Designer Series Papers too. So thanks once more to Tracy for the awesome tutorial and inspiration.
Bye for now,
Kris
Product Used:


Freshly Made 335

This week’s sketch at Freshly Made is so versatile. The sort of sketch you can do very simple or you can step it up as much as you like. Today’s card is very simple. I decided to showcase the beautiful flower from the Butterfly Basics stamp set which is retiring at the end of May. This is one flower, that I have used as a “go to” every since I purchased it and I will miss it when it is gone. I also decided to feature a couple of retiring colours – Wisteria Wonder and Always Artichoke.  I embossed Whisper White card using the Layering Leaves Dynamic Embossing Folder and attached it to scored and folded Wisteria Wonder card. I stamped the flower from the Butterfly Basics stamp set onto Whisper White card using Memento Tuxedo Black ink. I coloured the image using Wisteria Wonder, Always Artichoke and Daffodil Delight Stampin’ Write Markers.
 I cut out the image using the largest oval from the Stitched Shapes Framelits Dies. The image is attached to a Wisteria Wonder scalloped circle cut using the Layering Ovals Framelits Dies before attaching to the card front. I didn’t use any dimensionals on the image panel because I think it “pops” off the Whisper White without them.
To decorate the inside of the card, I stamped the leaf image from the Butterfly Basics stamp set three times onto the lower left hand corner of Whisper White card using Always Artichoke ink.
So thanks for the sketch challenge Freshly Made it gave me a chance to use these retiring products one more time.
Bye for now,
Kris
Product Used:
So sorry, the Regal Stampin’ Write Markers are no longer available.


One Sheet Wonder

Recently I saw the most gorgeous set of cards made using a One Sheet Wonder which was shared by Dawn Bougette on a Facebook page I belong to where she shared a link to the template for the One Sheet Wonder.  Since I am trying to use up both my retired and soon to be retired Designer Series Paper I decided to create my own set of cards using one of the papers from the Delightful Daisy Designer Series paper.
  I cut the paper following the template (or so I thought) but made a little mistake and so I only created eight cards instead of the 14 in the template. I used the Daisy Delight stamp set to create the focal panels and flowers as well as for the “Thank you”. I also used the Beautiful Bouquet stamp set for the “Happy Anniversary” and “Happy Birthday”.
  The Stitched Shapes Framelits Dies and the Layering Ovals Framelits Dies helped me to create some of the image panels. I used the Daisy Punch to create the flowers and the Triple Banner Punch where necessary to complete the greeting panels. I used Old Olive, Daffodil Delight and Night of Navy inks for the images and greetings. Since I had some designer series paper left over because of my “mistake”, I used the pieces to decorate the inside of the cards.
 One Sheet Wonders are so much fun because they allow you to finish your cards in any manner you wish. The set of cards Dawn shared only used a greeting with no image panels at all. I hope I have inspired you to use some of your Designer Series Paper to create your own set of cards. I also must say a special thanks to Kylie Bertucci for her Love it Chop it inspiration.
Bye for now,
Kris
Product Used:
I can’t add the icon for the Delightful Daisy Designer Series paper item no. 144137 but you can view it here.


First Share
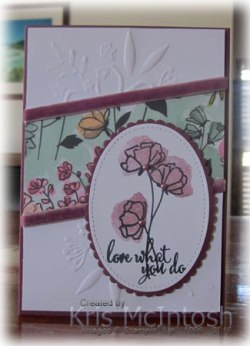
Yesterday, I shared the exciting news that today you could begin ordering from the Share What You Love product suite and I promised to show a card I made using the product. So here it is! I embossed Whisper White card using the Lovely Floral Dynamic Embossing Folder, once in the top right hand corner and once in the bottom left hand corner. I cut a piece of the really awesome Share What You Love Specialty Designer Series Paper on the diagonal and attached it across the embossed Whisper White card. I wrapped the top and the bottom edges of the Designer Series paper using the Rich Razzleberry 1/4″ Velvet Ribbon which is also part of the product suite.  The embossed card is attached to scored and folded Rich Razzleberry card using dimensionals, because the ribbon is quite bulky and I wanted the embossed card to sit nicely. I stamped the flower image from the Love What You Do stamp set onto Whisper White card using Memento Tuxedo Black ink. I stamped the solid flower over the top of the image using Rich Razzleberry ink. I cut out the image using the largest oval from the Stitched Shapes Framelits Dies. I stamped the greeting from the Love What You Do stamp set onto the stamped Whisper White card using Memento Tuxedo Black ink.
  The stamped oval is attached to a scalloped oval cut from Rich Razzlesberry card using the Layering Ovals Framelits Dies. The image panel is attached to the card front using dimensionals, so that the panel would sit over the ribbon. I added three of the Artisan Pearls which are part of this product suite to each of the flowers.
To decorate the inside of the card, I attached a narrow strip of Rich Razzleberry card behind one edge of the same Share What You Love Designer Series Paper before attaching to Whisper White card.
I know you are going to love this Product Suite whether like me, you can’t wait and have to have it all now, or you purchase the Getting Started Bundle and add to it over time. Can’t wait to see all your creations.
Bye for now,
Kris
No icons today but here are the links to the bundles you can purchase beginning today.
Just Getting Started bundle – item no. 149804
A Little More, Please – item no. 149808
Gotta Have It All – item no. 149812
In-Colour 2018-2020 Ink Pad Assortment – item no. 147153
Share What You Love

This week demonstrators can pre-order certain products from the Annual Catalogue to be released in June. Soooooo exciting! One of the things I love about being a demonstrator is early access to new products. However, tomorrow you get to share some of that excitement with me, because tomorrow you can pre-order from the gorgeous Love What You Do product suite from the upcoming Annual Catalogue. This is an amazing range of products. You can purchase from four bundles – Just Getting Started, A Little More Please and Gotta Have It All, plus a bundle of ink pads in the new 2018-2020 In-Colours. So everyone should be catered for from those that are just beginning their love of Stampin’ Up! to those of you who are already avid fans. Personally, I believe, if you “Gotta Have It All” you might be just as well to sign up as a demonstrator. If you need any information about this, please do not hesitate to contact me.
To get an idea of how wonderful this Product Suite is, check out this video by Brandy from Stampin’ Up!.
You will love all the options available to you in this Product Suite. The Artisan Pearls come already coloured to match the Designer Series paper. The Share What You Love Designer Series Paper is also awesome because you get four of each of the six double sided patterns in each pack. So download the PDF to print out and study to your heart’s content.
If you pop back tomorrow I will share a card I made using this amazing Product Suite.
Bye for now,


