More Free Product

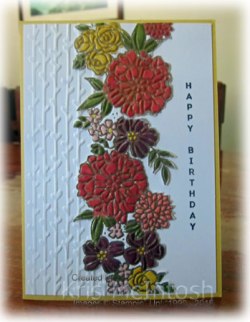
From the 16th of February till the end of Sale-A-Bration on the 31st March, Stampin’ Up! have added additional free product that you can earn with a qualifying sale to the already fantastic selection. Today I am sharing with you a couple of cards I made using the Blossoming Basket Bundle. This bundle includes the stamp set and the Basket Weave Dynamic Embossing Folder.  You need to spend $180.00 (Aus) to earn this bundle for free but the embossing folder will also be available in the next Annual Catalogue. So this is your chance to get you hands on this gorgeous embossing folder early. Anyway onto my card. I stamped the greeting from the Rose Wonder stamp set onto the top right hand corner of Whisper White card using Calypso Coral ink.
 I embossed Calypso Coral card using the Basket Weave Embossing Folder and attached it to the stamped Whisper White card. I coloured a length of Whisper White 1/4″ Organza Ribbon using the Dark Calypso Coral Stampin’ Blend and wrapped it across the top of the embossed card and tied a knot.
  (Isn’t it fantastic that we can use the Stampin’ Blends to change the colour of our ribbon – Love it.) The Whisper White card is attached to scored and folded Crumb Cake Card. I stamped the flower basket image from the Blossoming Basket stamp set onto Whisper White card using Memento Tuxedo Black ink. The image is coloured using the Crumb Cake, Old Olive, Calypso Coral and Daffodil Delight Stampin’ Blends. I cut out the image and attached it to a Whisper White circle and then a Crumb Cake scalloped circle cut using the Layering Circle Framelits Dies.
  The image panel is attached to the card front using dimensionals.
To decorate the inside of the card, I embossed a narrow strip of Calypso Coral card using the Basket Weave Embossing Folder. I attached a narrow strip of Crumb Cake card behind one long edge and attached it to Whisper White card. I stamped the butterfly from the Blossoming Basket stamp set three times onto the left hand side of the Whisper White card.  The butterfly is coloured using the Calypso Coral Stampin’ Blends before attaching the panel to the inside of the card.
This card is so beautiful and I hope my friend loves it as much as I do. In fact I loved it so much, I made another card in exactly the same manner using Rich Razzleberry card and Stampin’ Blends. I also changed the colour of the contrast from Crumb Cake to Smoky Slate which just looks fantastic. Then I decided that I would step it up a little and this time I used Bermuda Bay card and Stampin’ Blends. The card base is once more Crumb Cake and the greeting is from the Blossoming Basket stamp set. This time i stamped the basket twice so that I could fussy cut a second set of flowers and attach them over the top using dimensionals. This gives it just a little more dimension.
I’d love to hear what you think of this fantastic bundle and these cards.
Bye for now,
Kris
Product Used:


Double Embossed Birthday
This is the last card I created using the Double Embossing Technique which you can learn by watching this great video by BJ Peters. For this card I embossed the left hand side of Whisper White card using the vine image from the Petal Pair Embossing Folder. I stamped the greeting from the Vertical Greetings stamp set onto the right hand edge of the embossed card using Memento Tuxedo Black ink. The embossed card is attached to scored and folded Daffodil Delight card. I used the floral image from the Petal Pair Embossing Folder to create my Double Embossed Panel.  This panel is embossed with Gold Embossing Powder and coloured using the Calypso Coral, Daffodil Delight, Pink Pirouette, Rich Razzleberry and Old Olive Stampin’ Blends. I cut out the floral image and attached it to the card front over the edge of the embossing.
 To decorate the inside of the card, I embossed a narrow section of the left hand side of Whisper White card using the vine image from the Petal Pair Embossing Folder. I punched a piece of card using the Decorative Ribbon Border Punch and attached it over the edge of the embossing.
This card is ever so pretty and my embossing didn’t smudge too much to spoil the finished image. I hope I have inspired you to give this technique a try. I must also say a big Thank You to BJ Peters for the wonderful video tutorial.
Bye for now,
Kris
Product Used:


Simply Amazing
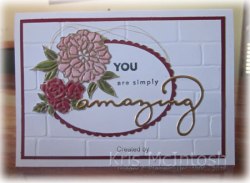
Here is another card I created using the Double Embossing Technique. The layout is pretty similar to the card I shared yesterday but with different colours. I embossed Whisper White card using the Brick Wall Embossing Folder before attaching it to Cherry Cobbler card and then scored and folded Thick A4 Whisper White card. I cut an oval from Whisper White card using the Layering Oval Framelits Dies and stamped “you are simply” from the Amazing You stamp set using Memento Basic Black ink.  I attached the greeting panel to a Cherry Cobbler scollaped oval cut using the same dies. Before attaching the greeting panel to the card front I attached a length of Gold Metallic Thread to the back. I double embossed the floral Petal Pair Embossing Folder following BJ Smith’s instructions. The image is embossed using Gold Embossing Powder and coloured using Cherry Cobbler, Pink Pirouette and Old Olive Stampin’ Blends. I attached the image to the stamped panel.
  Lastly I cut the word “amazing” from Gold Foil using the Celebrate You Thinlits Dies and attached it to the greeting panel.
I kept the inside of the card simple by punching a length of Cherry Cobbler card using the Decorative Ribbon Border Punch. The punched border is attached behind a narrow strip of Whisper White card which I embossed using the Brick Wall Embossing folder.
Simple but I think this one packs a little more punch than the one yesterday. I think it’s the Gold Foil that makes the difference, don’t you?
Bye for now,
Kris
Product Used:


Coral Birthday

I needed to make a card for a friend’s birthday and since I had the Amazing You stamp set out on my desk, I put it to good use. I stamped the floral image from this stamp set onto the upper left hand corner of Whisper White card using Wild Wasabi ink. I cut Basic Black card using the largest scalloped square from the Layering Squares Framelits Dies and attached it to the Whisper White card, partially covering the stamped image. The Whisper White card is attached to scored and folded Calypso Coral card. I stamped “you” and “are simply” from the Amazing You stamp set onto Whisper White card using Memento Tuxedo Black ink. I cut out the greeting using the 2nd largest of the circles from the Stitched Shapes Framelits Dies. I cut “amazing” from Gold Foil using the Celebrate You Thinlits Dies and attached it beneath the greetings. I stamped the floral image twice onto scrap Whisper White card using Memento Tuxedo Black ink and coloured the images using the Calypso Coral Stampin’ Blends. I cut out one full flower and one partial flower. I attached the partial flower to the full flower using a dimensional. The flower is attached to the card front so that it covers the stamped flower.
 I added a large Gold Faceted Gem to the centre of the flower as well.
To decorate the inside of the card I stamped the floral image onto the lower left hand corner of Whisper White card using Wild Wasabi ink. I stamped the floral image onto scrap Whisper White card using Memento Tuxedo Black ink and coloured the image using the Calypso Coral Stampin’ Blends. I cut out the flower and attached it over the stamped image.
Some of the pieces for this card were in my “another day” bag, which contains left over shapes and die cuts that didn’t make it onto whatever project I was working on but I love how it came together. It is so pretty that I created the same card using several different coloured flowers.
Bye for now,
Kris
Product Used:


Just Add Ink Sketch Challenge #396

Today I decided to play along with the Just Add Ink sketch challenge. I also decided that it was time I used some of the Tutti-Frutti Cards and Envelopes that I earned for free from the Sale-A-Bration catalogue. I used the Pool Party card and envelope which has a lovely dotted pattern across the front and the back. I stamped the car image from the Country Livin’ stamp set onto Whisper White card using Memento Tuxedo Black ink.  I coloured the truck using Night of Navy, Crumb Cake, Smoky Slate and Old Olive Stampin’ Blends. I punched the two left hand corners using the Envelope Punch Board and attached it to the card front.
  I punched one end of a strip of Night of Navy card using the Triple Banner Punch and attached it over the lower part of the image panel.
To decorate the inside of the card, I simply stamped the greeting from the Picture Perfect Birthday stamp set.
So, so simple, but the card bases make it easy. If you haven’t checked these out, I recommend you do. The card bases are a good thickness and all the designs come with envelopes which are decorated to match.
Bye for now,
Kris
Product Used:


Double Embossing

I saw a video by the very talented BJ Peters which demonstrated how to create double embossing with your embossing folders which I found very interesting. The video demonstrates how to add Versamark ink to your embossing folder, run it through the Big Shot and then add embossing powder to the image and heat set it. She used the floral folder from the Petal Pair Embossing Folders. So I just had to give it a try. Let me say that I think that I need to practice this technique a bit more to produce a really good result but I will share with you the cards I have created.
 I coloured Whisper White 1/4″ Organza Ribbon using the dark Rich Razzleberry Stampin’ Blend. I wrapped the ribbon across the top left and the bottom right hand corners of Whisper White card which I had embossed using the Brick Wall Embossing Folder. I did tie a knot in the section of the ribbon I attached across the top left hand corner. The embossed card is attached to Rich Razzleberry card and then scored and folded Thick Whisper White. I cut a circle from Whisper White card and a scalloped circle from Rich Razzleberry card using the Layering Circle Framelits Dies. The Whisper White card is attached to the Rich Razzleberry card and then the card front. To create my focal image I used the same Petal Pair Embossing Folder and added the Versamark ink. I sprinkled the folder with Gold Embossing Powder and then heat set it.
  This technique produces a stunning image, but you do need to be careful that you are not smudging the Versamark. Once the image was heat set I used Rich Razzleberry, Daffodil Delight and Old Olive Stampin’ Blends to colour in the image before cutting out a small part of the image to use on my card front. The floral image is attached to the centre of the Whisper White circle.
I kept the inside of the card simple by punching a piece of Rich Razzleberry card using the Decorative Ribbon Border Punch. The punched piece is attached behind one long edge of a strip of Whisper White card embossed using the Brick Wall Embossing Folder before attaching to the inside of the card.
I was pretty happy with this first attempt at this Double Embossing technique, what do you think?
Bye for now,
Kris
Product Used:
Amazing Birthday

I needed to create a birthday card and decided to use the Amazing You stamp set which is one of the products you can earn for free during Sale-A-Bration (ends 31st March). I punched a length of Cherry Cobbler card using the Decorative Ribbon Border Punch and attached it behind the diagonal edge of a piece of Designer Series Paper. I had quite a bit of this pretty leaf piece left from the Merry Little Christmas Designer Series Paper which is now retired but thought it would go with this card design. The designer series paper is attached to the top half of Whisper White card. I stamped “lets” using Early Expresso ink and “celebrate” using Cherry Cobbler ink onto the lower part of the Whisper White card.  The greetings are from the Amazing You stamp set. I stamped the floral image from the Amazing You stamp set onto Whisper White card using Old Olive ink. I cut out the image using one of the Layering Circle Dies. The image is attached to an Old Olive circle and then an Early Expresso scalloped circle cut using the same dies. The image panel is attached to the card front. I stamped the floral image twice onto Whisper White card using Memento Tuxedo Black ink and coloured the flower using Cherry Cobbler Stampin’ Blends. I cut out one complete flower and then the central leaves of the second flower. I stacked the partial flower onto the full flower using a dimensional.
  The image is attached over the stamped flower on the image panel. I also added a Gold Faceted Gem to the centre of the flower.
To decorate the inside I stamped two more greetings from the Amazing You stamp set – “amazing” using Cherry Cobbler ink and “you” using Early Espresso ink. I also stamped the floral image using Old Olive ink. I stamped the flower again onto scrap Whisper White card using Memento Tuxedo Black ink and coloured the image using Cherry Cobbler Stampin’ Blends. I cut out the Cherry Cobbler flower and attached it over the stamped flower. I add a little Clear Wink of Stella to the centre of the flower.
I don’t usually share projects with retired product but I believe this Designer Series Paper works really well on this card, don’t you? I think you will agree that this is an awesome stamp set and deserves to see more ink.
Bye for now,
Kris
Product Used:


More Lots of Lavender
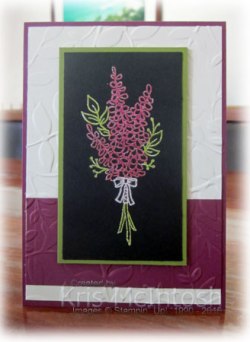
This is the third card I created using the Black Magic technique and it once more uses the Lots of Lavender stamp set. I attached Rich Razzleberry card across the bottom of Very Vanilla card and embossed the whole piece using the Layered Leaves Dynamic Embossing Folder. The embossed panel is attached to scored and folded Rich Razzleberry card. I stamped the floral image from the Lots of Lavender stamp set onto Basic Black card using Versamark ink. I covered the image with White Embossing powder and heat set it. I coloured the image using Rich Razzleberry, Old Olive and Pink Pirouette Stampin’ Blends before attaching to Old Olive card. The image panel is attached to the card front using dimensionals.
 To decorate the inside of the card, I stamped the same image from the Lots of Lavender stamp set onto Very Vanilla card using Memento Tuxedo Black ink. I stamped the fill images for the leaves and stem using Old Olive ink, the fill images for the bow using Powder Pink ink and filled the flower using Rich Razzleberry ink.
Bet you can’t wait to earn this stamp set for free during Sale-A-Bration, can you? You will not regret it, it has such pretty images.
I’d love to know which of the three cards using this technique you love the most.
Bye for now,
Kris
Product Used:


Birthday Lavender
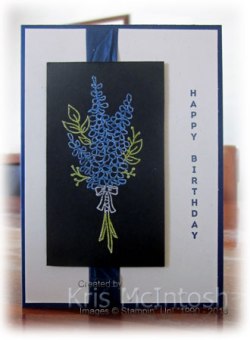
Here is a simple card once more using the Black Magic Technique. I stamped “happy birthday” from the Vertical Greetings stamp set onto Very Vanilla card using Night of Navy ink. I wrapped the left hand side of the stamped card using the Night of Navy 5/8″ Crinkled Seam Binding before attaching to scored and folded Night of Navy card. I stamped the image from the Lots of Lavender stamp set onto Basic Black card using Versamark ink. I covered the image with White Embossing powder and heat set it before colouring the image using the Night of Navy, Old Olive and Smoky Slate Stampin’ Blends. The image panel is attached to the card front using dimensionals.
 To decorate the inside of the card, I stamped the greeting from the Perennial Birthday stamp set onto Very Vanilla card using Night of Navy ink. I stamped the image from the Lots of Lavender stamp set using Memento Tuxedo Black ink. I stamped the fill images using Night of Navy and Old Olive ink.
This card is very pretty and really quite simple to create. I love the clean and simple lines, don’t you?
Bye for now,
Kris
Product Used:


Black Magic
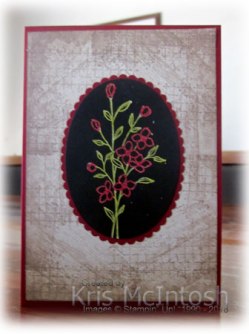
This is an old technique which someone shared on a demonstrator facebook page I belong to. So, of course, I had to give it a try with some of my current stamps. For this card I created a background using the Timeless Textures stampset. I stamped three of the images from the stamp set onto Very Vanilla card using Crumb Cake ink. Once I had finished stamping, I sponged around the edges using the same ink. I attached the Very Vanilla card to scored and folded Cherry Cobbler card. I stamped the image from the Touches of Texture stamp set onto Basic Black card using Versamark ink. I covered the image with White Embossing Powder and heat set it.  Then I used my Cherry Cobbler and Old Olive Stampin’ Blends to colour the image. I cut the image out using one of the Layering Ovals Framelits dies and attached it to a Cherry Cobbler scalloped oval cut using the same dies.
  I attached the image panel to the centre of the stamped Very Vanilla card.
To decorate the inside, I once more stamped a small piece of Very Vanilla card using the images from the Timeless Textures stamp set and Crumb Cake ink. I attached a narrow strip of Cherry Cobbler card behind one long edge before attaching to the Very Vanilla card.
I love this card, it is simple but also very detailed. I didn’t add a greeting because I think it would fit many occasions, anniversary, birthday or even as a sympathy card. I’d love to hear what you think.
Bye for now,
Kris
Product Used:


