Stylin’ Stampin’ INKspiration Challenge CS50

I saw a card sketch challenge the other day and created a card but have spent a couple of days trying to find the challenge again. I have since found it at Stylin’ Stampin’ INKspiration but the challenge has ended, which doesn’t matter but I am glad I found it because I thought I had made it up! Anyway here is the card. I attached a piece of Tranquil Tide card across Whisper White card. I attached a piece of 5/8″ Burlap Ribbon over the Tranquil Tide card and attached the panel to scored and folded Chocolate Chip card. I attached a strip of Chocolate Chip card to the card front using dimensionals. I also attached a piece of True Gentleman Designer Series Paper to the left hand side of the Chocolate Chip card.  The designer series paper has dimensionals under the left hand side so that it would sit properly onto the Chocolate Chip Card. I stamped the car image from the Guy Greetings stamp set onto Whisper White card using Basic Black Archival ink.
  The image is coloured using Tranquil Tide and Smoky Slate Stampin’ Write Markers. The stamped image is attached to Chocolate Chip card and then the card front using dimensionals.
To decorate the inside of the card, I stamped “world’s greatest” and “husband” onto Whisper White card using Chocolate Chip ink. These greetings are also from the Guy Greetings stamp set.
I love the clean and simple lines of the card but I also love the colours. The pop of Tranqil Tide card gives it just the right amount of colour to lift the Chocolate Chip. Do you struggle to match colours when you are creating? Well so do I! However, the easiest way to come up with a colour combination is to take inspiration from the colours used in Stampin’ Up!’s Designer Series Paper. The colours for this card were selected from the ones used in the True Gentleman Designer Series Paper.
Bye for now,
Kris
Product Used:


Challenge Take 2

I was so happy with the card I made for Stephanie’s challenge that I just had to create another. I stamped the greeting from the Bird Banter stamp set onto the lower right hand corner of Whisper White card using Memento Tuxedo Black ink. This time, I attached the Bermuda Bay card across the Whisper White card before attaching the Bubble and Fizz Designer Series Paper to the left hand side of the card. The whole panel is once more attached to scored and folded Basic Gray card. I stamped the branch and bird from the Bird Banter stamp set onto Whisper White card using Memento Tuxedo Black ink.  I coloured the images using the Old Olive, Bermuda Bay, Pool Party and Daffodil Delight Stampin’ Blends. The image is cut out using the largest circle from the Stitched Shapes Framelits Dies and attached to a Basic Gray scalloped circle cut using the Layering Circle Framelit Dies.
  The image panel is attached to the card front using dimensionals.
I kept the inside of the card simple by attaching a narrow strip of Basic Gray card behind one long edge of the Bubble and Fizz Designer Series Paper. This panel is attached to the bottom of Whisper White card.
I’d love to know what you think of my efforts for the challenge. Which card do you like the best?
Bye for now,
Kris
Product Used:


A team challenge
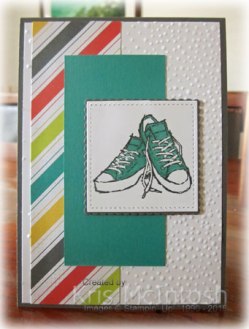
My upline the very lovely Stephanie Pike gave out some designer series paper and card stock at the last team meeting and issued a challenge to everyone to create a card. I didn’t make the meeting but I had the designer series paper on hand so thought I would give it a try. I did perhaps cheat just a little because I cut down the width of my designer series paper but I did use it on the inside of the card. Anyway, I love the card and it gave me a chance to use the Epic Celebration stamp set. I embossed Whisper White card using the Softy Falling Embossing Folder.  I attached the striped Bubble and Fizz Designer Series paper to the left hand side of the embossed card before attaching to scored and folded Basic Gray card. I attached the piece of Bermuda Bay card to the card front, partially over the designer series paper. I stamped the shoe image from the Epic Celebration stamp set onto Whisper White card using Memento Tuxedo Black ink. The shoes are coloured using Bermuda Bay Stampin’ Blends.
  I cut the image out using the 2nd largest square from the Stitched Shapes Framelits Dies. The image is attached to a Basic Gray scalloped square cut using the Layering Squares Framelits Dies. I attached the image panel to the card front using dimensionals.
To decorate the inside of the card, I stamped the greeting from the Epic Celebration stamp set onto Whisper White card using Memento Tuxedo Black ink. I attached a strip of Basic Gray card behind one long edge of the Bubble and Fizz Designer Series paper before attaching to the stamped panel.
The Epic Celebration stamp set and the Bubble and Fizz Designer Series Paper are both items you can earn for free with a qualifying order during Sale-A-Bration. I am certain that you will be seeing more of both of these items of the next few months.
Bye for now,
Kris
Product Used:


Hearts and Pandas

Here is another card I created using the Bubble and Fizz Designer Series Paper and the Party Panda’s stamp set. I stamped the greeting from the Party Pandas stamp set onto Whisper White card using Basic Gray ink before embossing the card using the Softly Falling Embossing Folder. I attached a piece of the Bubble and Fizz Designer Series Paper across the bottom of the embossed card.  I wrapped the top of the Designer Series Paper with a length of Basic Gray Ribbon from the Shimmer Ribbon Pack and tied a knot. The panel is attached to scored and folded Basic Gray card. I stamped the panda with balloon onto Whisper White card using Memento Tuxedo Black ink and cut it out. The image is attached to the card front. I punched a small balloon from Calypso Coral card using the Balloon Bouquet Punch. The balloon is attached over the stamped balloon.
 To decorate the inside of the card, I stamped the party hat panda onto both lower corners of Whisper White card using Memento Tuxedo Black ink. I coloured the party hats using a Calypso Coral Stampin’ Write Marker.
I truly am loving this stamp set and isn’t that paper gorgeous. The Bubble and Fizz Designer Series Paper is another great product you can earn for free with a qualifying order during Sale-A-Bration.
Bye for now,
Kris
Product Used:


February Memory Keeping
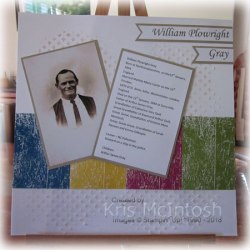
I love creating pages with the photos I have taken from different events and holidays but I am finding that as I get older, I am want to learn more about all the photos that my parents have and creating pages or even a book (if I get really enthusiastic). So the page for this month’s class came about because I wanted to document this photo of my Great, Great Grandfather, William Plowright Gray. Can you image losing that information? I wouldn’t have a clue who it was without my Dad telling me. He was born in Stepney in England and emigrated with his wife and at least one son to Australia.
So I started by adding some Crumb Cake re-inker to White Embossing Paste and randomly applying it to my page using one of the Pattern Party Decorative Masks. I cut four pieces of Colour Theory Designer Series Paper – one in each colour – to add across the page. Because the photo was sepia, I wanted to add some colour to the page and because William is smiling I wanted a happy page. I created the banners for my title by printing onto Whisper White card and punched one end using the Triple Banner Punch before attaching to Crumb Cake card which I trimmed to match. I also printed onto Whisper White card what information my Dad had given me about William. It’s a simple page, but one that I love and hopefully during my Memory Keeping Classes I can document more information about my family history.
So if you are interested in documenting the important things in your life, and you live in the Narangba area of Brisbane, why not join me for this class. The classes are going to be held on a Sunday from 10.30am to around 2.30pm. You can check out all the information on my Classes and Workshop page. Please note that you do need to bring along your own basic took kit including adhesives. I will supply the product to complete the page or you can use it on your own projects, the choice is yours. You can use my stamp sets and accessories to complete your projects. I will also provide morning and afternoon tea and plenty of tea and coffee. You will need to bring along your own lunch.
Please remember that space is limited, so let me know as soon as you can if you wish to attend our first class for the year on the 25th February.
Bye for now,
Kris
Product Used:


Dapper Day

Do you struggle with where to begin when you want to make a card? Well I do, not all the time but sometimes, so here is what I do. I either go to my favourite challenge sites and use the sketch challenge or even the colour challenge to begin my creation. If that doesn’t inspire me then I will go to my Card Sketch Pinterest Board and scroll through my pins until I find something that suits my purpose. Today I used one of the sketches from my Pinterest Board to create another card featuring the Truly Tailored stamp set and True Gentleman Designer Series Paper. This time I cut a piece of Tranquil Tide card using the largest square in the Layering Squares Framelits Dies and attached it to Whisper White card.  I embossed the piece using the Simple Stripes Embossing Folder and attached the panel to scored and folded Chocolate Chip card. I cut a strip of the True Gentleman Designer Series Paper and punched one short end using the Triple Banner Punch before attaching to the left hand side of the card front.
 I stamped the greeting from the True Gentleman stamp set onto Whisper White card using Tranquil Tide ink and cut it out using one of the circles from the Layering Circles Framelits Dies. The greeting is attached to the card front using dimensionals.
To decorate the inside of the card, I attached a narrow strip of Chocolate Chip card behind one long edge of a narrow strip of the same True Gentleman Designer Series Paper. The panel is attached to the bottom of Whisper White card.
This truly is another clean and simple card but I think they make the best kind of manly card, don’t you. I’m pretty sure my husband would love this card. I certainly am loving this great product suite.
Bye for now,
Kris
Product Used:


Truly Tailored

I got quite a lot in my pre-order from the Occasions Catalogue and some of them still haven’t seen ink. So today I got out the Truly Tailored stamp set and the True Gentleman Designer Series paper. I was very excited to see these in the Occasions Catalogue because we don’t have a lot of “manly” stamp sets. However, I don’t make a lot of male cards and so this has sat gathering dust for a couple of months now. Anyway I had a look at my card sketch Pinterest board and this is what I created.  I cut three pieces of the True Gentleman Designer Series paper – one 7.5cm x 9.5cm and two pieces 6cm x 4.6cm. I attached the designer series paper to Whisper White card and then scored and folded Night of Navy card. I inked the “to a classy kind of guy” stamp from the Truly Tailored stamp set using a Night of Navy Stampin’ Write Marker without inking the comb on the image. I stamped onto scrap Whisper White card and punched out the image using the matching Tailored Tag Punch.
  The greeting is attached to the card front using dimensionals. I stamped the bow tie image from the Truly Tailored stamp set onto scrap Whisper White card using Night of Navy ink and cut it out. The bow tie is attached to the greeting panel using Mini Glue Dots.
To decorate the inside of the card, I stamped “today is your day celebrate in style”, which is another of the greetings from the Truly Tailored stamp set, onto Whisper White card using Night of Navy ink.
This stamp set, the co-ordinating punch and designer series paper is just delightful. I am sure you will see me using this more in the coming weeks.
Bye for now,
Kris
Product Used:


Same but different
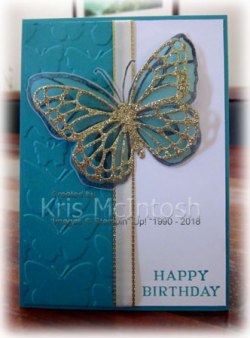
I was inspired by yesterday’s card to create another one using the same sketch from Fab Friday, this one for a friend’s birthday. I embossed Bermuda Bay card using the Fluttering Embossing Folder and attached it to the left hand side of Whisper White card. I stamped the greeting from the Perennial Birthday stamp set onto the lower right hand corner using Bermuda Bay ink before attaching Gold 3/8
Metallic Edge Ribbon over the edge of the embossed card. The panel is attached to scored and folded Bermuda Bay card. I stamped the butterfly from the Beautiful Day stamp set onto Vellum Cardstock using Memento Tuxedo Black ink. I flipped the image over and used the Bermuda Bay Stampin’ Blends to colour in the butterfly. I cut out the butterfly and attached it to the card front using glue dots (in the centre only). I cut out the medium detailed butterfly from Gold Glimmer Paper using the Butterflies Thinlits Dies.
 I attached the Gold butterfly to the centre of the stamped butterfly.
To decorate the inside of the card, I embossed Bermuda Bay card using the Fluttering Embossing folder and attached it to the bottom of Whisper White card. I wrapped the top of the embossed card using the Gold 3/8″ Metallic Edge Ribbon before attaching the panel to the inside of the card. I cut the small detailed butterfly from Gold Glimmer Paper using the Bold Butterfly Framelits Dies and attached it to the embossed card.
I am really happy with this card. I think the detailed butterfly die on top of the stamped butterfly adds a lot of extra dimension, don’t you?
Bye for now,
Kris
Product Used:


Fab Friday #129
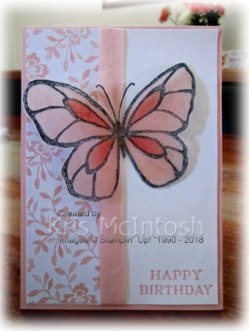
The sketch challenge at Fab Friday this week is awesome and I decided to create my card using the butterfly from the Beautiful Day stamp set. I stamped “happy birthday” from the Perennial Birthday stamp set onto the lower left hand corner of Whisper White card using Powder Pink ink. I attached a strip of Powder Pink Fresh Florals Designer Series Paper to the left hand side of the stamped Whisper White card. I attached a piece of Powder Pink 1/2″ Finely Woven Ribbon over the edge of the Designer Series Paper before attaching to scored and folded Powder Pink card.  I stamped the butterfly from the Beautiful Day stamp set onto Vellum Cardstock using Memento Tuxedo Black ink.
  I flipped the stamped vellum over and used the Light and Dark Pink Pirouette Stampin’ Blends to colour in the butterfly. I cut out the butterfly and attached it to the card front using Mini Glue Dots in the centre only.
To decorate the inside of the card, I stamped the butterfly once more onto the lower left hand corner of Whisper White card using Memento Tuxedo Black ink. The butterfly is also coloured using the Pink Pirouette Stampin’ Blends.
This card is super cute and super simple. I love it so much it will be part of an upcoming class at Beachmere.
Bye for now,
Kris
Product Used:


Some inspiration from Pinterest

You already know that I love Pinterest and this card is inspired by several I have seen recently (thanks so much for the inspiration). I stamped “happy birthday” from the Perennial Birthday stamp set all over a piece of Pool Party card using Pool Party ink. I did use my stamp-a-ma-jig to make sure it was pretty straight. After stamping I punched three holes in the card using the 1-3/8″ Circle Punch. I stamped the panda from the Party Pandas stamp set onto Whisper White card three times using Memento Tuxedo Black ink and cut them out. (There is no matching framelit you need to use your paper snips.) I coloured in the party hats using the Pool Party Stampin’ Write Marker and attached each Panda so that they would be popping through the circles.
  The panel is attached to Sahara Sand card and then scored and folded Pool Party card.
To decorate the inside of the card I stamped another of the Panda images from the Party Pandas stamp set using Memento Tuxedo Black ink. I also inked the “love” from the love you stamp in the same stamp set using Memento Tuxedo Black ink and stamped the word inside the banner the Panda is holding.
These Pandas really are very cute. I bet you cannot wait to place your qualifying order and earn this stamp set for free during Sale-A-Bration.
Bye for now,
Kris
Product Used:


