Framed Art

This is another project which we made at our All Day Class at Beachmere a couple of weeks ago. Every year I try to come up with a piece of what I call Framed Art to display over the Christmas season. This year, because I love working with uniform sizes, I was inspired by the sizing of our Memories and More cards. So four of the panels for this piece are 3″ x 4″ and the remaining two panels are 3″ square.  The central piece of designer series paper was added to close in the open space in the middle of the page. I am not going to go into too much detail because I am including a Free Tutorial for this project here and also on my Free Tutorials page so you can create this Framed Art for yourself. The panels are attached to Crumb Cake card and the whole thing fits into an A4 or document frame (that’s how it is sold in Australia). All of the stamp sets, dies and accessories are current, except for the Merry Patterns stamp set which of course was a limited release stamp set. However, it would be easy to use another set on this panel if you didn’t get this one while it was available. I’ll include all of the product used in the information below this post.
The ladies look forward to creating their Framed Art each year and this year was no exception. I believe several of the ladies will be gifting their projects to family members. I myself will be gifting a couple of these as well.

Click here to download your Free Tutorial
Bye for now,
Kris
Product Used:


;
Blue Christmas

Some of the pieces for this card have been floating around my desk for a while, it’s about time they made it onto an actual project. I embossed Whisper White card using the Holly Embossing Folder before attaching it to scored and folded Night of Navy card.  The greeting from the Carols of Christmas stamp set is stamped onto Whisper White card using Night of Navy ink and then cut out using one of the circles from the Stitched Shapes Framelits Dies. The greeting is attached to a Night of Navy scalloped circle cut using the Layering Circles Framelits Dies before being attached to the card front.
  The trees are cut from Night of Navy card using the Card Front Builder Dies and attached to the card front using mini dimensionals. The deer is cut from Silver Glimmer paper and also attached to the card front using mini dimensionals.
To decorate the inside of the card a narrow strip of Night of Navy card is attached behind one long edge of Whisper White card which is embossed using the Holly Embossing Folder. The embossed panel is attached to the bottom of Whisper White card.
This is so pretty don’t you think? I really love Navy and White for Christmas.
Bye for now,
Kris
Product Used:


Thinking of you
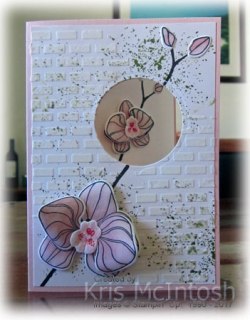
The idea for this card has been in my head for a while but it kind of took its own direction once I got started. I attached Whisper White card to scored and folded Pink Pirouette card using repositional glue and cut a circle through both pieces using one of the Layering Circle Framelits Dies. I removed the Whisper White card and used the brick wall stencil from the Pattern Party Decorative Masks and the Embossing Paste to add some texture to the card. I also stamped one of the dotted images from Touches of Texture over the embossing using Old Olive ink. I re-attached the Whisper White card to the scored and folded Pink Pirouette card.  I scored and folded a piece of Whisper White card and attached it inside the Pink Pirouette card with the fold on the right hand side. I stamped the branch images from the Climbing Orchids stamp set onto the front of the card and also inside the circle cut out using Early Espresso ink. I opened the front of the card and continued to stamp the branch images onto the front of the folded Whisper White card. I stamped the small orchid images as well as the single two leaf image for the medium flower onto Whisper White card using Memento Tuxedo Black ink. I stamped the large orchid image and the two leaf image twice onto Whisper White card using Memento Tuxedo Black ink.
  I also stamped the two small flower buds twice onto Whisper White card using Memento Tuxedo Black ink. I coloured all of the images using the Light and the Dark Pink Pirouette Stampin’ Blends. Once coloured I cut each of the images using the matching Orchid Builder Framelits Dies. Lastly I stamped one small and two large flower centres using Pink Pirouette ink. I stamped the small detailed flower centre image over the top using Rose Red in. These images were also cut out using the matching Orchid Builder Framelits Dies. I curled the petals on the medium flower and one of the large flowers to add a little dimension. The two petal image is attached to the full flower using a Mini Dimensionals. The flower centres are attached using a glue dot. The large flower is attached to the lower left hand corner of the front of the card over the branch image using a couple of Mini Dimensionals.
  The medium flower is attached in the centre of the circle opening using Mini Dimensionals. One each of the flower buds is attached to the front of the card. The second large flower and the remaining flower buds are attached to the folded Whisper White card over the branch images. I stamped “Thinking of You” from the Thoughts and Prayers stamp set onto the inside of the folded Whisper White card using Early Espresso ink.
What do you think? I am really happy with this card and feel I will make more of these in the future.
Bye for now,
Kris
Product Used:


Online Extravaganza and Free Shipping
Today is the last day that you can purchase from the Online Extravaganza list of discounted products. So if there is anything on that list you need, then better get in quick sale ends at midnight tonight (don’t forget to factor in daylight saving). To mark the end of this fantastic extravaganza, for tomorrow only Stampin’ Up! is offering free shipping on any order. So now is the time to pop on over to my store to place an order for any goodies that you may need/want and save the cost of postage. Woohoo.

Bye for now,
Kris
Happy Anniversary

Today is my eldest daughter’s 17th Wedding Anniversary. How quickly time flies, it doesn’t seem that long ago we were making preparations for the wedding. I liked the challenge at Freshly Made Sketches this week and thought that I would use it to create my card. I have to say that I stepped completely out of my comfort zone with this one. I embossed Whisper White card using the Pinewood Plank Embossing Folder before attaching to scored and folded Fresh Fig card.  I took a length of 1/4″ Copper Trim, stretched it out and attached it to the embossed card. I cut the large heart from a piece of Naturally Eclectic Designer Series Paper using one of the Sweet and Sassy Framelit Dies and attached it over the 1/4″ Copper Trim. I cut a piece of Lemon Lime Twist card and attached it over the top of the large heart. I stamped the heart image from the Bloomin’ Love stamp set onto Whisper White card using Fresh Fig ink and cut it out using a smaller die from the Sweet and Sassy Framelits Dies.
  The stamped heart is attached over the large heart and the Lemon Lime Twist card. I cut “congrats” from Copper Foil using the Sunshine Wishes Dies and attached it across the front of the card.
To decorate the inside of the card I stamped the greeting from the Best Birds stamp set onto Whisper White card using Fresh Fig ink.
I would really love to know what you think of this card because I am torn between loving it and hating it!
Bye for now,
Kris
Product Used:


Fab Friday 125
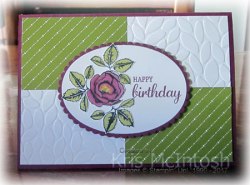
Since I had the Graceful Garden stamp set on my desk and I loved the sketch this week from Fab Friday, I used both to create a birthday card which I needed to send. I embossed Whisper White card using the Petal Burst Embossing Folder and attached it to scored and folded Rich Razzleberry card. I cut two pieces of the Merry Little Christmas Designer Series Paper and attached one to the top left hand corner and one to the bottom right hand corner of the embossed card. I adore how this gorgeous Designer Series Paper is not limited to Christmas. I stamped the flower from the Graceful Garden stamp set onto Whisper White card three times using Memento Tuxedo Black ink. I coloured the flower on one image using the Light and Dark Rich Razzleberry Stampin’ Blends and the leaves on all three flowers using the Light Old Olive Stampin’ Blend. Once coloured I cut out the coloured flower and leaves and just the leaves on the other two images. I cut an oval from Whisper White card and a scalloped oval from Rich Razzleberry card using the Layering Ovals Framelits Dies and attached them together. I stamped the greeting from the Best Birds stamp set onto the right hand side of the Whisper White oval using Rich Razzleberry in.
  I attached the extra two sets of leaves behind the flower and attached the whole piece to the left hand side of the stamped oval. The image panel is attached to the card front using dimensionals.
To decorate the inside of the card, I stamped the same flower image onto the bottom left hand corner of Whisper White card and coloured the image once more using the Light and Dark Rich Razzleberry Stampin’ Blends and the Light Old Olive Stampin’ Blend.
Simple but really quite pretty isn’t it? I hope the lovely lady this is destined for is happy to receive it.
Bye for now,
Kris
Product Used:


Sympathy

I had the need for a sympathy card and thought that I would share it with you today. I embossed Whisper White card using the Petal Burst Embossing Folder. I punched a length of Calypso Coral card using the Decorative Ribbon Border Punch and attached it behind one long edge of a piece of Painted Autumn Designer Series Paper. The Designer Series Paper is attached to the embossed Whisper White card and then scored and folded Calypso Coral card. I cut Whisper White card and Calypso Coral card using the Layering Ovals Framelits Dies. The dies are attached to each other and then the card front using dimensionals. I stamped the flower from Graceful Garden stamp set onto Whisper White card using Memento Tuxedo Black ink. I coloured the flower using the Light and Dark Calypso Coral Stampin’ Blends. I coloured the leaves using the Light and Dark Old Olive Stampin’ Blends. I cut out the flower and attached it over the Whisper White oval. I added pieces of dimensionals to the back of the stem. I didn’t want to trim the stem of the flower, I love how it looks floating off the ovals.
 To decorate the inside of the card, I stamped the greeting from the Thoughts and Prayers stamp set onto Whisper White card using Old Olive ink. I punched Calypso Coral card using the Decorative Ribbon Border Punch and attached it behind a piece of the same Designer Series Paper before attaching to the bottom of the stamped card. I stamped two sets of leaves from the Graceful Garden stamp set onto Whisper White card using Memento Tuxedo Black ink. I coloured the flowers using the Light Old Olive Stampin’ Blend before cutting out the images. I attached both sets of leaves to the lower left hand corner of the stamped Whisper White card.
I’d love to hear what you think of this card.
Bye for now,
Kris
Product Used:


Special Request

Sorry for being so late posting today but I have been busy. Firstly we only got home Monday from a few days away with my Mum and Dad at Woodgate, a very beautiful coastal town near Bundaberg in Queensland. Tuesday I had my weekly class at Beachmere and this morning I had to go shopping, don’t know why my husband thinks we have to eat.  Anyway, after all that I spent some time making this card for my husband to give to a friend for his 50th birthday. Ron and a few of his mates got together and purchased a framed photo of the Parramatta football team, apparently Scot is a huge fan. So with a little help from the internet, I put this card together. He wanted a large card so I created a tri-fold card 7″ x 6″ which gives plenty of room for everyone to sign.
  I attached four strips of Daffodil Delight card across Night of Navy card and attached it to scored and folded Whisper White card. I used my Layering Circle Framelit Dies to cut a circle from the right hand side. I attached the second double folded Whisper White card inside the first one, so that the fold was on the bottom of the card. I found an image on the internet, printed it onto Whisper White card and cut it out using the same circle die.
 I attached the image inside the circle I cut in the front of the card so that it sits inside the card. I cut the numbers and letters from Night of Navy card using retired dies and attached them next to the image. I cut Night of Navy card using the Happy Birthday Thinlits Die and attached it to the middle of the card. I used my Envelope Punch Board (love how it gives dimensionals for various card sizes) and Night of Navy card to create an envelope. I punched Daffodil Delight card using the Balloon Bouquet Punch and attached some retired gold Bakers Twine to the back of each balloon before attaching to the front of the envelope using dimensionals. I tied the ends of the twine in a knot and attached them to the card front using a Glue Dot. Ron seems pretty happy with the card – I hope Scotty likes it too.
Bye for now,
Kris
Product Used:


Christmas Ornament

This is one of the projects that we made at the All Day Class at Beachmere last week. Everyone got to create one of the ornaments from the Be Merry Kit which can be found on Page 32 of the Holiday Catalogue. These ornaments are so pretty and really quick to put together. The only thing that can be a little tricky is using the hot glue gun and this sometimes leads to a very messy work area. I thought these ornaments were so fabulous that they would make an awesome gift for Christmas, so we also created a lovely presentation box. The box base is created from Basic Black card and the lid is Whisper White card. I cut the pieces for the lid and base at 6-1/2″. The base is scored at 1″ on all four sides using my Simply Scored Scoring Tool. The base is also scored at 1″ but I used a box making shim which was shared by Connie Stewart on a You Tube. This shim is fabulous because it makes the scored line on the lid just under 1″ so that when you put your box together it fits perfectly. To decorate the lid of the box we did a little fussy work cutting circles and scalloped circles of different sizes to create a layered look. The first thing we did was attach a piece of Merry Music Designer Series Paper 4″ square to a 4-1/4″ piece of Basic Black card. Making sure to centre the die we cut a scalloped circle using the Layering Circle Framelits Dies.
  Once the designer series paper piece is cut we attached it to the centre of the box lid inside the scoring lines using repositional glue and cut a slightly smaller circle from the Whisper White card making sure to centre the die inside the scalloped circle in the designer series paper again using the Layering Circle Framelits Dies. Once the circle was cut from the Whisper White card, the designer series paper piece was removed and repositional glue was used to hold a 4″ square of Real Red inside the scoring lines on the back of the box lid. A slightly smaller scalloped circle was cut from the Real Red card, again making sure to line up the die within the circle already cut from the box lid.
  Once the scalloped circle was cut the Real Red card was removed from the box lid. We used a 1″ circle punch to punch a finger grip on two opposite sides of the box lid. We also cut the box from the outside edge to the score line on two opposites sides. Once this was done we glued the Designer Series Paper piece to the top of the box. We used Glue Dots to attach a piece of Window Sheet onto the back of the box lid before attaching the Real Red card. Once this was done we assembled the box lid. The base is cut from the outside to the score line on two opposite sides and also assembled. This produced a lovely box which shows off the ornament once it is placed inside. I am pretty sure these are going to make an appearance both on and under my tree this year. If you would like to complete this project, please click on the link below to download your free PDF tutorial here. You will also find this tutorial on my Free Tutorial page.
Bye for now,
Kris
Product Used:


Online Extravaganza
Today marks the beginning of a great opportunity to purchase some great stamp sets and accessories at greatly reduced prices. The online extravaganza starts today and ends on the 26th November and to kick things off with a bang from midnight on the 20th November till 11.59pm on the 20th November you can purchase from a list of great stamps at a 20% off saving. For the whole of the period you can purchase from a select list of accessories including some great framelits and thinlits, some of which are up to 50% off the normal price. To see what is available please click on the photo below to download the PDF.

To mark the end of the sale there will be another 24 hour flash sale on the 27th November, after the end of the purchase period for the items on the list. So don’t miss out, check out what you need and then visit my online store to place your order and take advantage of a whole range of fantastic deals.
Bye for now
Kris


