More Climbing Orchids

I had so much fun using the Climbing Orchids bundle that I thought I would share another couple of cards I made. The colour inspiration once more comes from the fabulous Bronwyn Eastley and I am in love with how gorgeous these flowers look in real life. For each of these cards I die cut Whisper White card using the Orchid Builder Framelits dies.  The Whisper White card is coloured using a sponge to add the ink. The card on the left uses Daffodil Delight, Wisteria Wonder and Berry Burst. The stem is cut from Crumb Cake card using the Seasonal Layers Thinlits Dies. I embossed the Whisper White card using the Petal Burst Embossing Folder and used Wisteria Wonder for the card base. The greeting from the Dragonfly Dreams stamp set using Berry Burst ink. I stamped Whisper White card using the image from the Graceful Garden stamp set and Wisteria Wonder ink to decorate the side panels of the card.
The card on the right uses Daffodil Delight, Crushed Curry and Cajun Craze. The branch is cut from Old Olive card using the Seasonal Layers Thinlits Dies and the card base is Cajun Craze.  The side panels are decorated by stamping the image from the Graceful Garden stamp set using Cajun Craze ink. The greeting is also stamped using Cajun Graze ink.
To decorate the inside of the card, I attached a medium flower and a flower bud to a short piece of the stem to match the card front. I love centre step cards and they are such fun to decorate. I’d love to hear what you think.
Bye for now,
Kris
Product Used:


Beachmere Christmas Class
 I shared some photos of the bags I decorated to hold the supplies the ladies at Beachmere would need to create their projects last Wednesday and thought you might like to see some of the set up. There were 11 ladies in all who participated in the day and we created 5 different projects.
  I set up 5 tables one for each project and the ladies could move from table to table as they completed the projects. We shared a lovely lunch (unfortunately I forgot to take photos) and spend a lovely day together creating.
  We created a framed art piece, a set of three tags, a boxed set of four cards, an ornament and presentation box and a Pop and Twist card. To help things along I walked everyone through the projects at the start of the day and I also created interactive displays so that they could see all the different steps to creating both the Pop and Twist card as well as the Ornament Presentation Box.
  Each table was set for four people to make it easy for everyone to get through the projects. We started at 9am and finished around 4pm, with a break for a morning cuppa and also for lunch. Everyone completed all of their projects and I think all in all were very happy with what they created. It’s a once a year day and while it takes a while to prepare for such an event, it is always lovely to watch everyone enjoying creating their projects. I’ll pop in soon with photos of the projects and maybe some free PDF’s so you can create these great projects as well.
Bye for now,
Kris
Christmas Class

Every year since I have started teaching card classes at Beachmere Retirement Resort we have had an all day event about this time in November. It’s a fun day, we get together and spend the day creating some great projects for the Christmas Season. This year I decided to decorate gift bags to hold all of the project kits for each of the ladies attending.
I stamped Whisper White card with the starry background stamp from the Star of Light stamp set using Smoky Slate ink. I stamped the greeting from the Carols of Christmas stamp set onto the right hand side of the stamped card using Night of Navy ink. I punched 1″, 1-1/2″ and 2″ circles from Cherry Cobbler card and embossed each of the circles using the Sparkle Embossing Folder. I attached the embossed circles to the left hand side of the stamped Whisper White card and drew strings using the Cherry Cobbler Stampin’ Write Marker. I cut Night of Navy card using the scalloped border from the Seasonal Layers Thinlits Dies and attached a strip behind each long edge of the stamped card. The panel is them attached to the front of the plain white gift bag. I used some retired Gold Cord and tied bows which I attached to each of the circles using a small amount of Tombow Multipurpose glue.
I love how these turned out and the ladies appreciated the new and improved packaging for our day of crafting.
Bye for now,
Kris
Product Used:


Not Stampin’ Blends

I thought you might like a change from the cards I have been sharing using the Stampin’ Blends. Don’t get me wrong I am totally addicted to them but thought you might like to see something different. I only gave in and bought the Climbing Orchid stamp set and the co-ordinating Orchid Builder Framelits Dies when the Stampin’ Blends were released. I have always loved this set but thought that I wouldn’t use it enough.  Anyway, any excuse will do, isn’t that right? I saved some information that an Aussie Demonstrator Bronwyn Eastley shared when the current Annual Catalogue was released. She created a whole list of colours to use to recreate different varieties of these beautiful flowers.
  I put them to use to create two cards for a couple of friends, one who has a broken wrist and one who has just had a back operation. I cut the flowers from Whisper White card and then coloured them using a sponge. The large and medium flowers are firstly sponged with Flirty Flamingo ink and then Melon Mambo ink. The flower centres and the small flower buds are sponged with Real Red ink.
  I did use my bone folder to add a little dimension to the petals before attaching them together with glue dots. I stamped the branch images from the Climbing Orchid stamp set onto Whisper White card using Early Espresso ink. The flowers are attached using dimensionals and the small flower buds are attached using Tombow Multipurpose glue. I stamped the greeting from the Lift Me Up stamp set using Early Espresso ink. The first card has two medium flowers because I needed to cover a small smudge on the card front.
  That’s what you get when you sponge – inky fingers – and smudges. This card has the image panel attached to Melon Mambo card and then scored and folded Thick Whisper White card.
To decorate the inside of this card, I created one more medium flower and two flower buds and attached them over the stem images which are again stamped in Early Espresso ink.
 The second card has the image panel attached to Flirty Flamingo card and then scored and folded Thick Whisper White card. To decorate the inside of this one I added a layer of Flirty Flamingo under the Whisper White card. The flower and flower buds are created in the same manner as the ones for the card front and the stem image is again stamped in Early Espresso ink. These extra layers of card are also to cover a smudge. This time, I completed the card and when I turned it over there was a huge smudge of dirty reddy/brown ink on the card. So I removed the front layer, cut down the inside panel and attached them both to new scored and folded Thick Whisper White.
I’m not usually this messy but I do seem to have red ink everywhere at the moment. I don’t think my fingers will be clean for quite a while! Oh well, I think it was worth it. I absolutely love both cards and hope that my friends Lyn and Gwen do too.
Bye for now,
Kris
Product Used:


Home Again
 I had the best weekend with my friends Jenny and Joyce at the Gold Coast to attend the Stampin’ Up! Onstage event. We are always spoilt by the company and all of the staff who attend and this year was no exception. I was lucky enough to come home with three new stamp sets all from the Occasions Catalogue and Sale-A-Bration catalogues which will be released in the New year. We also had the priviledge of having lots of other product from the Occasions and Sale-A-Bration catalogues showcased by some great demonstrators and Stampin’ Up! Home Office staff including Sara, the company CEO. We got a head start on the company’s 30th year celebrations with a carry bag and a beautiful badge.
One really exciting announcement was for a new tool called the Stamparatus. Wonder if you can guess what it is. Well, it is a stamp positioner but so much more. The plates on the Stamparatus are moveable and you can position up to 4 stamps so that you can have a real production line going. The Stamparatus works with clear mount and photopolymer stamps. It is amazing and it is being released on a reservation basis. You can jump online on the 17th to the 3oth November and reserve your Stamparatus which would be shipped around the 1st February next year.  There will be three such periods for you to reserve one of these fantastic tools. Second reservation period starts on the 6th to the 30th December with an expected shipping date of 19th March and the last reservation period is from 16th to the 30th January with an expected shipping date of the 15th April. Stampin’ Up! is determined that no-one will be disappointed. If there is an overwhelming response to the first reservation period, they will turn off the availability until the next reservation period. This will ensure that there are no backorder issues and everyone receives what they order in a timely manner.
Having seen this awesome tool in operation I cannot wait to have my own to make the creative process even better. Here is a video which Stampin’ Up! has created so that you can see for yourself how awesome it will be.
So don’t forget your first opportunity to purchase this tool is the 17th November which is only four days away.
I forgot to say that this awesome tool will be available in the 2018 Annual Catalogue. So it is going to be a permanent addition to the already fabulous tools we have available for purchase.
Bye for now,
Kris
Bag Tags
Heading to Onstage Local today on the Gold Coast. This is a demonstrator only Stampin’ Up! event where we are given lots of ideas on how to run our business as well as seeing what is in store in the Occasions Catalogue to be released in the New Year. We will also get a sneak peak as to what goodies can be earned during Sale-A-Bration. It’s very exciting and I am so glad to be with two of my friends and team members, Jenny and Joyce. It’s also a great opportunity to catch up with friends, other team mates and those we may only know online.
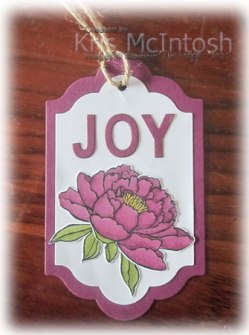
We also receive a bag which holds some goodies and make and take materials. As you can imagine it’s pretty hard to pick your own bag from the 500 or so other’s laying around, so I created a tag for the three of us to help identify our bags quickly and easily.
I stamped the flower from the You’ve Got This stamp set onto Whisper White card, three times. I coloured one flower using the Rich Razzleberry Stampin’ Blends, one using the Pumpkin Pie Stampin’ Blends and one using the Calypso Coral Stampin’ Blends. I also coloured the leaves (not the stem) using the Old Olive Stampin’ Blends.  The flower centres are coloured using the dark Daffodil Delight Stampin’ Blend. I cut out the flowers and each of the leaves. I cut Whisper White card using the second largest of the Lots of Labels Framelits Dies and attached the flower and leaves to each of the tags. I cut tags using the largest of the Lots of Labels Framelits Die from Rich Razzleberry, Pumpkin Pie and Calypso Coral card. I attached the Whisper White tags to the co-ordinating coloured tags. I also cut letters from the co-ordinating card to create our names. Unfortunately this alphabet is retired (Little Letters Thinlits Dies). I punched a hole in the top of the tags and threaded them with a length of Jute Twine so that we can attach them to our bags.
So excited to see what the day has in store.
Bye for now,
Kris
Product Used:


Happy Birthday Jason
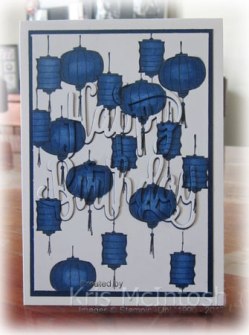
My son-in-law celebrated his birthday recently and I haven’t shared the card I made for him with you. This card again uses the Stampin’ Blends and the Colour Me Happy stamp set. Have you got your blends and this fabulous stamp set yet? You know you can delay placing your order as this stamp set is only while stocks last. I stamped Whisper White card with each of the lanterns from the Colour Me Happy stamp set using Memento Tuxedo ink. I actually used a masked a couple of the images so that I could stamp them on top of each other. I wanted it to look like Chinese New Year when they let the lanterns drift up into the sky. I coloured the lanterns using the Night of Navy Stampin’ Blends and also used the Colour Lifter to add a little more lightness to some of the lanterns. Once I had coloured in all of the lanterns, I cut the Whisper White card using the Happy Birthday Thinlit Die.  The stamped card is attached to Night of Navy card and then scored and folded thick Whisper White card. I also cut Night of Navy card twice using the same thinlit die. I used one of the Night of Navy die cuts to position all the little background pieces. Once I had all the background pieces in place, I attached the two Night of Navy die cuts to each other and attached the stamped die cut on the top. The stacked die cuts are attached back into the stamped card. I’m pretty sure you call this the eclipse technique and you will find all sorts of amazing tutorials out there to help you create this kind of card.
To decorate the inside of the card I stamped the two lantern images across the top of Whisper White card and coloured the images using the Night of Navy Stampin’ Blends. The stamped panel is attached inside the scored and folded Thick Whisper White card. Normally I wouldn’t use a second layer inside a Thick Whisper White card base, but when you use the Stampin’ Blends, they bleed through the card slightly, so you do need a second layer to hide the back of the coloured card.
Jason liked his card and hopefully you do too.
Bye for now,
Kris
Product Used:


This time a birthday card
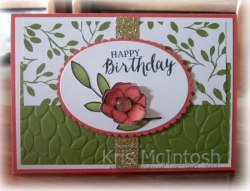
Here I am again using that gorgeous sketch from Pinterest. This is the third variation of the sketch I have used with the Merry Little Christmas Designer Series paper. This time I embossed the Old Olive card using the Petal Burst Embossing Folder before attaching to the bottom of Whisper White card. I attached the designer series paper to the top half of the card front before adding a strip of Gold Glimmer paper. The Whisper White card is attached to scored and folded Calypso Coral card. I stamped the leaf image from the Rose Wonder stamp set onto Whisper White card using Memento Tuxedo Black ink and coloured it using the Old Olive Stampin’ Blends. I stamped the flower from the Colour Me Happy stamp set twice onto Whisper White card using Memento Tuxedo Black ink and coloured them using the Calypso Coral Stampin’ Blends.  I cut out the leaf image and one full flower. For the second flower I only cut out the image with four petals. The leaf is attached to the left hand side of a Whisper White oval cut using the Layering Ovals Framelits Dies. I used my bone folder to slightly curl the petals on both flowers before attaching the four petal flower to the top of the full flower using a Glue Dot. The flower is attached over the leaves. I stamped the greeting from the Rose Garden stamp set onto the top right handside of the Whisper White oval using Memento Tuxedo Black ink. The image panel is attached to a scalloped oval of Calypso Coral card cut using the Layering Ovals Framelits Dies before attaching to the card front using dimensionals. Lastly I coloured a Clear Faceted Gem using the darkest of the Calypso Coral Stampin’ Blends and added it to the centre of the flower.
 To decorate the inside I stamped one leaf and two flower images using Memento Tuxedo Black ink. The images are coloured using the Old Olive and Calypso Coral Stampin’ Blends before being cut out. I attached the flower over the leaf on the lower left hand corner of Whisper White card.
Another card I am truly happy with. I love the addition of the Calypso Coral with the Old Olive card and Merry Little Christmas Designer Series Paper. I am also loving that I can colour the embellishments to match the colours in my images. I’d love to know what you think.
Bye for now,
Kris
Product Used:


Stylin’ Stampin’ redo

I shared a card I made using the sketch at Stylin’ Stamping recently and after we made these cards at Beachmere I had a couple of kits left over. They sat on my desk for a while and I thought I would share how I changed this one up a bit. I embossed the Basic Black card using the Basic Polka Dot Embossing Folder and attached it to scored and folded Thick Whisper White card. I attached half a Silver Foil Doily behind the Merry Little Christmas Designer Series Paper before attaching across the Basic Black card. I stamped the image from the Half Full stamp set onto Whisper White card using Memento Tuxedo Black ink. I trimmed the image and punched the top edge with the Scalloped Tag Topper Punch which matches this image perfectly. I coloured the grapes using the Cherry Cobbler Stampin’ Blends and the leaves using the Old Olive Stampin’ Blends. I wanted to give the tag an aged look, so I used my Crumb Cake Stampin’ Blends to colour and age the image. I tied a knot in a length of Silver 1/8″ Ribbon and attached it to the tag which is attached to the card front using dimensionals.
 To decorate the inside of the card, I stamped the bottle and glass images from the Half Full stamp set onto Whisper White card using Memento Tuxedo Black ink. I coloured the images using the Cherry Cobbler and Crumb Cake Stampin’ Blends. I cut out the images and attached them to the lower left hand corner of the inside of the card.
This card looks completely different to the first card I created, just by flipping the Designer Series paper and using new images. I love it. I must say that I really love my Stampin’ Blends. If you haven’t tried them yet, you just don’t know what you are missing.
Bye for now,
Kris
Product Used:


Same layout, different card
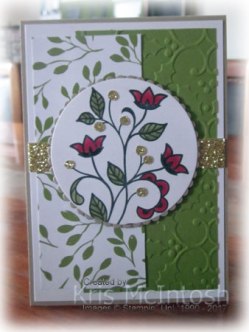
This is the second card I made using the sketch layout I found on Pinterest – here is a link to the first card. Once more I am using the same colours and Designer Series Paper for this second card as on the previous one. I embossed the Old Olive card using the Holly Embossing Folder before attaching it to the right hand side of Whisper White card with the Merry Little Christmas Designer Series paper attached to the left hand side. I attached a strip of Gold Glimmer Paper across the middle of the card before attaching to scored and folded Crumb Cake card. I stamped the image from the Flourishing Phrases stamp set onto Whisper White card using Memento Tuxedo Black ink. The image is coloured using the Cherry Cobbler and Old Olive Stampin’ Blends.  I cut the image using one of the Layering Circle Framelits Dies and attached it to a scalloped circle of Crumb Cake card cut using the same dies. I cut Gold Glimmer paper with the die from the Flourish Thinlits Dies that is a stem with round berries on the ends (not sure how else to describe this but if you have the dies you will know the one I mean). I cut the berries from the die cut and attached them over the circles on the stamped image.
  The image panel is attached to the card front using dimensionals.
To decorate the inside of the card, I partially inked the image from the Flourishing Phrases stamp set with Memento Tuxedo Black ink and used my stamp-a-ma-jig to get the placement right on the Whisper White card. I stamped “Merry Christmas” from the Merry Patterns stamp set (no longer available) again using Memento Tuxedo Black ink. I coloured the floral image using the Cherry Cobbler and Old Olive Stampin’ Blends. I also added the Gold Glimmer paper circles onto the circles on the stamped image as I did on the front.
I am happy to say that I am extremely happy with the finished card. I have used this image before on Christmas cards and love that I can extra mileage from the stamp set. What do you think? Do you like it?
Bye for now,
Kris
Product Used:


