More Hearts Come Home

I’m not sure if I actually really like this card or not. I am unsure about the Foil Snowflake, however, I thought I would share it and see what you think. I stamped the greeting from the Hearts Come Home stamp set onto the lower right hand corner of Whisper White card using Cherry Cobbler ink before embossing using the Woodland Embossing Folder. The embossed card is attached to scored and folded Cherry Cobbler card. I cut the Hometown Greetings Edgelits Die from Crumb Cake card. I trimmed the snowman off the diecut because that just doesn’t fit with Christmas in Australia before sponging the Crumb Cake card with Garden Green ink.  In the summer we usually don’t have very green grass so this kind of browny/green colour suits perfectly. I sponged a piece of Whisper White card using Soft Sky ink and attached the Crumb Cake die cut, lining up the lower edges, before attaching the panel to Cherry Cobbler card.
  I attached the die cut panel onto the centre of a Gold Foil Snowflake. I don’t think it really looks very much like a snowflake when so much is hidden behind the image panel. The snowflake and die cut are attached to the card front.
To decorate the inside of the card I stamped the greeting from the Hearts Come Home stamp set onto Whisper White card using Cherry Cobbler ink. I attached a narrow strip of Cherry Cobbler card behind one long edge of a piece of Whisper White card which is embossed using the Woodland Embossing Folder. The embossed panel is attached to the lower edge of the stamped Whisper White card.
I’d love to hear what you think of this card.
Bye for now,
Kris
Product Used:


Christmas with a difference

I created this card after seeing a card sketch layout on Pinterest which actually gives you four orientations for the same sketch, so you may see more of this layout in the future. Since I am also addicted to my Stampin’ Blends at the moment I had to use them as well. I embossed Old Olive card using the Holly Embossing Folder and attached it to the left hand side of Whisper White card. I attached a piece of the Merry Little Christmas Designer Series paper to the right hand side of the Whisper White card. I attached a strip of Gold Glimmer Paper across the middle of the panel before attaching to scored and folded Crumb Cake card. I had a piece of Whisper White card on my desk which was cut using the second largest of the Lots of Labels Framelits Dies which was perfect for this card.  I stamped the wine bottle and the wine glass from the Half Full stamp set onto the label using Memento Tuxedo Black ink. I did mask the bottle before stamping the first glass and then I masked the glass before stamping the second one. I also used my stamp-a-ma-jig to ensure they were straight on my label. I coloured the images using the Daffodil Delight, Crumb Cake and Pink Pirouette Stampin’ Blends. I also stamped the holly image from the Half Full stamp set onto the top left hand corner of the label using Memento Tuxedo Black ink. I coloured the holly images using the dark Cherry Cobbler and the dark Old Olive Stampin’ Blends. The label is attached to the card front using dimensionals.
 To decorate the inside of the card I stamped “Merry Christmas” from the Half Full stamp set using Memento Tuxedo Black ink. I also stamped two of the wine glasses and one of the holly images using the same ink. The images are coloured using both of the Daffodil Delight and the dark Cherry Cobbler and the dark Old Olive Stampin’ Blends.
Well, what do you think? It’s a bit quirky but I like it. I know quite a few people who will get it as well. My husband doesn’t think it is Christmassy at all! Oh well, you can’t please everybody, can you? Even if you are on the fence about this card, I know you will all agree with me that the Stampin’ Blends are sensational. Have you purchased yours yet?
Bye for now,
Kris
Product Used:


Christmas Blends
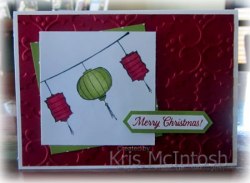
Since Stampin’ Blends are now available for everyone to purchase, I thought I would share a card that was inspired by one shared by Kelly Kent recently. I was immediately struck by the idea that it would make a lovely Christmas card. The card uses the Colour Me Happy stamp set which is not really a Christmas stamp set. I embossed Cherry Cobbler card using the Holly Embossing Folder and attached it to scored and folded Thick Whisper White card. I stamped the “string” across the top left hand corner of Whisper White card using Memento Tuxedo Black ink.  I stamped both the lanterns using the same ink and also using my Stamp-a-ma-jig to get the placement perfect. I coloured two of the lanterns using the Cherry Cobbler Stampin’ Blends and the centre lantern using Old Olive Blends. I also used the colour lifter to add a little more lightness to the lanterns. I attached a piece of the Merry Little Christmas Designer Series Paper behind the stamped Whisper White panel before attaching to the card front. I stamped “merry Christmas” from the Merry Patterns stamp set onto Whisper White card using Cherry Cobbler ink. I used the Classic Label Punch to cut out the greeting.
  To create a mat for the greeting, I attached the stamped Whisper White card to Old Olive card and trimmed the ends to match the shape of the punched greeting.
To decorate the inside of the card, I stamped the same images across the top left hand corner of Whisper White card. The images are coloured using the same Cherry Cobbler and Old Olive Stampin’ Blends.
I so love this card and can’t thank Kelly enough for her inspiration, and thank you Stampin’ Up! for creating these fabulous Stampin’ Blends.
Bye for now,
Kris
Product Used:


Stampin’ Blends are available tomorrow

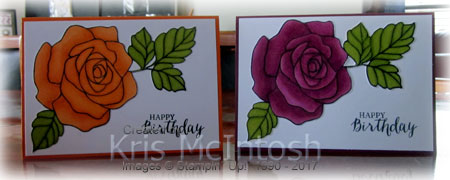
These wonderful alcohol markers will be available for purchase tomorrow. Woohoo! They will be included in the 2018 Annual Catalogue, so they will be available for some time to come – hopefully forever. I have had a wonderful time working with the Stampin’ Blends since the beginning of the month. Stampin’ Up! allowed Demonstrators to purchase these markers at the beginning of October, so I have had a whole month to fall in love with them.  The markers are available to purchase as a combo pack for $15.50 or individually for $7.75. Each colour comes in a light and a dark shade. To show you just how lovely they are I am sharing some cards I made using the Rose Wonder stamp set. This first card uses the Rich Razzleberry and Old Olive Stampin’ Blends. I love how much depth of colour you get when you use both the light and dark shades together. Firstly I stamped the image using Memento Tuxedo Black ink and then I coloured the image and cut it out.
  The image is attached to Whisper White card which I stamped using the greeting from the Rose Wonder stamp set and Memento Tuxedo Black ink. The image panel is attached to scored and folded Rich Razzleberry card.
To decorate the inside of the card I cut the small flower from Whisper White card using the Rose Garden Thinlit Dies. I attached the Whisper White flower to Rich Razzleberry card and cut around the edges of the thinlit. The flower is attached to the lower left hand corner of Whisper White card. A very simple card really, but I love how beautiful the flower looks. In fact I loved it so much I continued to create this card using each of the colours available in the Stampin’ Blends.
Here are Rich Razzleberry and Pumpkin Pie.
Now we have Smoky Slate, Pink Pirouette and Pool Party.

Next is Daffodil Delight, Crumb Cake and Night of Navy.
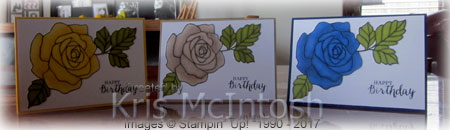
And last but not least is Bermuda Bay, Calypso Coral and Cherry Cobbler.

I have used the Old Olive Stampin’ Blends for the leaves on each of the cards. As well as these awesome colours there are also two skin tones in Ivory and Bronze. The skin tone markers do not have a light and a dark shade. A set of Blends would not be complete without a Colour Lifter and let me tell you it is awesome at picking up the colour from outside the image so it looks perfect every time.
If you are like me and love every single one of these colours, you can purchase a complete set which includes all 26 of the individual colours plus the colour lifter for a total cost of $209.25.
As if that wasn’t enough with this release you can also purchase the beautiful Colour Me Happy Project Kit and the co-ordinating Colour Me Happy stamp set which I have already shared with you in this post. Both the card kit and the stamp set will be available while stocks last.
I hope you are as excited by this fantastic product as I am.
Bye for now,
Kris
Product Used:


Happy Birthday Jae
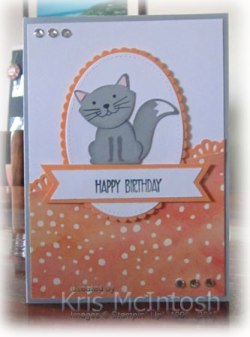
My granddaughter Jae celebrated her 9th birthday yesterday with a trip to Aussie World. It was a perfect, sunny day and Jae and her brother and sister had a lot of fun (I might add so did her Mum and Dad). So I thought I would share the card and gift box I made for her. I punched a strip of Peekaboo Peach card using the Decorative Ribbon Border Punch and attached it behind the top edge a piece of Painted Autumn Designer Series Paper which I cut with the top edge on the diagonal. The designer series paper is attached to the bottom of Whisper White card before attaching to scored and folded Smoky Slate card. I cut Whisper White card using an oval from the Stitched Shapes Framelits dies. The Whisper White oval is attached to a Peekaboo Peach scalloped oval cut using the Layering Ovals Framelits Dies before attaching to the card front using dimensionals. I stamped “happy birthday” from the Sunshine Sayings stamp set onto Whisper White card using Memento Tuxedo Black ink. I punched both ends of the greeting using the Triple Banner Punch. The Whisper White card is attached to a Peekaboo Peach banner and then the card front with dimensionals under both ends. I punched the pieces for the “cat” from Smoky Slate card using the Fox Builder Punch.
  The face is created by stamping the image from the Foxy Friends stamp set using Memento Tuxedo Black ink. I stamped the “leg image” from the Foxy Friends stamp set onto the punched body using Smoky Slate ink. I sponged lightly around the edges of all the Smoky Slate pieces using Smoky Slate ink. I punched the tail piece from Whisper White card using the Fox Builder Punch and the ears from Pink Pirouette card using the same punch. The pieces are attached to the Whisper White oval using Tombow Multi Purpose glue. Lastly I added three large Basic Rhinestones to the top left and bottom right hand corners.
To decorate the inside of the card, I punched Peekaboo Peach card using the Decorative Ribbon Border Punch. The punched card is attached behind one long edge of a piece of the same Painted Autumn Designer Series Paper before attaching to Whisper White card.
I needed a box to house my gift and wanted it to co-ordinate with the card. I love the Window Box but it is a little too short for what I wanted so I downloaded a free tutorial from Kirsteen Gill which showed how to adjust the height of the box.  Once I had cut the pieces, I attached the same Painted Autumn Designer Series paper to Peekaboo Peach card to decorate the sides of my box. I cut a Peekaboo Peach panel and a Whisper White panel for the top of the box. I attached a piece of Peekaboo Peach 5/8″ Crinkled Seam Binding underneath the panels for the top of the box to make it easier for Jae to open. I created another cat in the same manner as the card to finish decorating the top of the box.
I am so happy with this cute card and matching gift box. I have not used this stamp set, matching dies or for that matter the Window Box much at all, but when I do I am so impressed with how gorgeous my creations turn out.
Happy Birthday for yesterday Jae, so happy we were able to spend an amazing day with you.
Kris
Product Used:


Happy 60th Birthday

A friend of mine celebrated a milestone birthday recently and I thought you might like to see the card I made for him. I cut the Happy Birthday Thinlits Die from a piece of Wood Textures Designer Series Paper. I cut Early Expresso card twice using the same die. I attached the Designer Series paper to scored and folded Early Espresso card. No comes the slightly tricky bit. You need to save all of the pieces that are cut by the die from the Designer Series Paper. I placed one of the Early Espresso die cuts into the space on the designer series paper and then by adding a drop of Tombow Multipurpose glue into the gaps added all of the additional pieces around the happy birthday.  Some of them are quite small, so it is a little fiddly. Once they were all in place, I attached the two Early Espresso die cuts together, placed the Designer Series Paper die cut on top and glued them into the space on the card front. I punched two balloons from Crumb Cake card using the Balloon Bouquet Punch. I cut the numbers from Early Espresso card (sorry the Timeless Type Alphabet dies are long retired). I attached the numbers to the balloons and then ran them through the Big Shot using the Softly Falling Embossing Folder. I attached a length of Linen Thread behind each of the balloons and attached them to the card front using Mini Dimensionals.
  I cut the strings and attached them to the top of the letter “h” by using a small amount of the Liquid glue. Once that was done I attached the “happy birthday” onto the card front. I love how you get that slight shadow of the darker card behind the greeting.
To decorate the inside of the card I stamped the mug from the Hug in a Mug stamp set using Memento Tuxedo Black ink. I stamped the fill using Crushed Curry and added the greeting from the Half Full stamp set using Memento Tuxedo Black ink. I die cut a small cloud from Whisper White card using the Up and Away Thinlits Dies. I placed the Whisper White card on top of the mug so that the cloud looked like the froth on top of a beer. I added some Dazzling Diamonds Stampin’ Glitter to some Embossing Paste and filled the cloud. When you remove the mask it does look like a mug of beer.
I hope that Kerry loves his card and that he has an awesome birthday.
Bye for now,
Kris
Product Used:


Seaside birthday

My husband and I have a friend celebrating his birthday this week and this is the card I made for him. I cut the swirly border from Marina Mist card using the die from the Swirly Scribbles Thinlits Dies. I attached the swirly border across Whisper White card and stamped the “sun” using one of the images from the Swirly Birds stamp set and Daffodil Delight ink. I cut the second largest Lots of Labels die from the stamped Whisper White card and attached the outside panel to scored and folded Marina Mist card.  I cut three of the same labels from Marina Mist card and attached them to each other with the stamped Whisper White label on the top. I attached the stacked labels into the space in the Whisper White card.
  I stamped the boat image using various images from the Swirly Birds stamp set and Night of Navy and Marina Mist ink . I hand cut the boat and attached it to the card front.
To decorate the inside of the card, I attached a Marina Mist swirly border to the bottom of Whisper White card. I stamped the greeting from the Butterfly Basics stamp set using Night of Navy ink.
I know that our friend will appreciate this card, as he lives on the coast and loves to fish.
Bye for now,
Kris
Product Used:


Moving House

My girlfriend (and her husband) recently moved from Sydney to North Haven (near Port Macquarie) to begin retired life. It’s a big move, leaving behind the children and grandchildren but sometimes big decisions have to be made. Having lived in the North Haven area for several years, I know they will love it – it is, a most beautiful place. Anyway I thought I should make a card to send to celebrate the move. I started by cutting a square of Whisper White card using the Hometown Greetings Edgelits Dies. I cut Cajun Craze and Garden Green using the same Edgelit Die. I sponged Garden Green ink onto the Whisper White card to represent “grass”.  I cut another square of Whisper White card and sponged the top two-thirds using Pool Party ink to represent the “sky”. I cut the two house images from the Cajun Craze card and attached them over the Whisper White houses. I cut the tree from the Garden Green piece and attached it over the Whisper White tree. I attached this panel to the panel sponged with Pool Party ink.
  I cut the largest circle from the Layering Circles Framelits Dies from the top half of Whisper White card and attached the sponged/die cut panel behind the opening. I stamped the greeting from the Dare to Dream (hostess) stamp set using Memento Tuxedo Black ink. I attached the whole panel to scored and folded Cajun Craze card using dimensionals.
To decorate the inside of the card I stamped the three houses from the Hearts Come Home stamp set using Cajun Craze ink. The two trees from the same stamp set were stamped in Garden Green.
I love how this card turned out. It did take a little fussy cutting and playing with the dies but sometimes that’s half the fun. It also makes my heart happy when I can use a stamp set for a purpose other than the one it was intended for. I hope Kerry and Dave settle into their new home well and that we can catch up soon.
Bye for now,
Kris
Product Used:


Merry & Bright

I have been playing with the Hearts Come Home stamp set to create cards to my upcoming Beachmere classes. I thought this one would be easy but it seems to have taken on a mind of its own. However, while we might not make this in class, it is still a lovely card and I thought I would share with you my attempted case of one (which I can’t find now) by Lorraine Clinch. I stamped the greeting from Hearts Come Home onto the lower right hand corner of scored and folded Thick A4 Whisper White using Dapper Denim ink. I embossed a panel of Whisper White card using the Softly Falling Embossing Folder and attached it to the left hand side of the card front. I cut a circle from Dapper Denim card and used the “star” die in the Hometown Greetings Edgelits Dies to create the starry night sky.  I cut the houses from Whisper White card, also using one of the Hometown Greetings Edgelits Dies. I also cut Dazzling Diamonds Glimmer Paper using the same die. I cut the houses from the Glimmer Paper die cuts and attached the glimmer paper over the Whisper White die cuts. I attached the two die cuts one on top of the other to the Dapper Denim circle.
  I cut a circle from Whisper White card using the Layering Circle Framelits Dies. The Dapper Denim circle is attached behind the circle opening in the Whisper White card. I wrapped the bottom of the Whisper White card with Dapper Denim Ruffled Ribbon (retired) and tied a knot. The Whisper White panel is attached to the card front using dimensionals.
To decorate the inside of the card, I cut Dapper Denim card with the Hometown Greetings Edgelits Dies. I also cut the same die from Whisper White card. I trimmed the houses from the Whisper White card and embossed it using the Softly Falling Embossing Folder. I attached the Whisper White card to the Dapper Denim Edgelit before attaching to the bottom edge of the inside of the card.
Although this card wasn’t as simple as I thought it would be I am still very happy with the way it turned out. What do you think?
Bye for now,
Kris
Product Used:


Colour Theory
With the release of the new Annual Catalogue in June, I had to change the way I ran my Memory Keeping Classes, so for the past six months we have been using the Colour Theory Memories and More Card Pack as well as the Colourful Seasons stamp set and the Seasonal Layers Thinlits Dies. This ladies purchased a small kit which I put together (not including the stamp set and dies) and this month is the last time we will use it. I decided to have a play with some of the cards I had left and see if I could change them up a bit. Not that there is anything wrong with the cards as they are but being card makers and scrapbookers we often want to push the design limits.
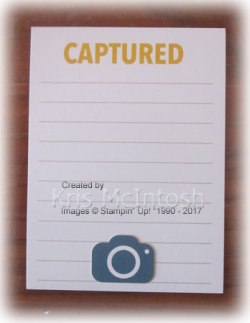
For the first card I simply added one of the die cut camera images to the bottom of the pre-stamped card. Not very exciting, but a little stepped up and easy enough for anyone to do, no extra supplies needed, just your Colour Theory Memories and More Card pack.
For the second card, I used two 3″ x 4″ cards. I laid one horizontally onto the other and trimmed the sides away. Then I stamped the greeting from the Colourful Seasons stamp set onto Whisper White card and used the Layering Circle Framelits Dies to cut it out. I attached the greeting to a Crumb Cake scalloped circle cut using the same dies. The greeting is attached to the centre of the circle on the Colour Theory Memories and More card. Still pretty simple but you do need a few extra supplies.
 The third card uses two 3″ x 4″ cards once more, and, this time I have cut the greeting from one using the Layering Squares Framelits Dies. I attached the greeting to a Crumb Cake scalloped square cut using the same dies before attaching to the other Colour Theory Memories and More card. I also attached one of the die cut “suns” to the top left hand corner. Once more, simple and the only extra supply is the Layering Squares Framelits Dies.
The fourth card uses one of the 3″ x 4″ Colour Theory Memories and More cards and this time I have die cut two of the chairs from Whisper White card using the Seasonal Layers Thinlits Dies. One of the chairs has the back trimmed away and is turned upside down to create a table. I also stamped the drink and the lime images from the Colourful Seasons stamp set which I die cut using the matching Seasonal Layers Thinlits Dies. Cute isn’t it and this card only uses the supplies we had in our kits and the stamp set and matching dies.
The last card is a little stepped up and I did case this one from one I found on Pinterest. This time I used a 4″ x 6″ card and cut out the greeting using the Layering Square Framelits Dies. Once I cut out the greeting, I covered the square hole by attaching a 3″ x 4″ Memories and More card over the top. I attached the greeting to a Pink Pirouette scalloped square cut using the same dies. The greeting is attached to the centre of the Memories and More Card using dimensionals. I stamped two flowers in Pink Pirouette and two flowers in Berry Burst using the images from the Colourful Seasons stamp set. I stamped the centre onto each flower using Early Espresso ink. I cut out the images using the matching die from the Seasonal Layers Thinlits Dies. I also cut two detailed leaf images from Old Olive card, also using the die from the Seasonal Layers Thinlits Dies. I attached the leaves to the top left and bottom right corner of the image panel so that the stems are hidden behind the greeting panel and then attached the flowers over the top using dimensionals.
So there you have five stepped up cards using the Colour Theory Memories and More card pack, as well as the co-ordinating Seasonal Layers Thinlits Dies and the Colourful Seasons stamp set. I hope these have inspired you to get creative your Memories and More card packs.
Bye for now,
Kris
Product Used:


