Brayer Dry Embossing
H ere is another technique card I made for my Technique Class which will be held in October. You can check out my Classes and Workshops page to get more details. For this card, I used Always Artichoke ink to cover the Petal Burst Embossing Folder and then embossed Whisper White card. I love how this technique really shows off the detail in the embossed panel. I punched a strip of Always Artichoke card using the Decorative Ribbon Border Punch and attached it behind one long edge of the embossed card before attaching to Whisper White card. I stamped the greeting from the Best Birds stamp set onto the bottom right hand corner using Always Artichoke ink. The Whisper White card is attached to scored and folded Crushed Curry card. I stamped the stem images from the Daisy Delight stamp set onto Whisper White card and cut out the image using the second largest oval in the Layering Ovals Framelits Dies. I attached the stamped oval to an Always Artichoke scalloped oval cut using the same Framelits Dies.
  The panel is attached to the card front using dimensionals. I stamped two daisy images onto Whisper White card using Crushed Curry ink and punched them out with the matching Daisy Punch. I cut one daisy into two sections, one with three petals and one with two petals. The pieces are attached on top of each other and then I used Glue Dots to attach them to the top of one of the stamped flower stems. The second flower I cut into two sections, one with four petals and the other with three petals. The pieces are once more attached to each other and then the card front using Glue Dots. I stamped the flower centre onto Whisper White card using Crushed Curry ink and punched out the image using the 1/2″ Circle Punch.
  The flower centres are attached to each of the flowers and then just for fun I added a large Clear Faceted Gem as well.
To decorate the inside of the card, I once more embossed a piece of Whisper White card using Always Artichoke ink and attached a piece of Always Artichoke card punched with the Decorative Border Punch behind one long edge. I stamped another daisy onto Whisper White card using Crushed Curry ink and punched it out. This flower is cut into two sections, each with four petals before being attached over the embossed card. I stamped the flower centre once more using Crushed Curry ink and punched it out and attached to the flower.
What a fun technique! I actually held this Technique Class yesterday for some ladies who can’t come in October and we all got a little inky but everyone enjoyed learning how to get more from one embossing folder. I am so looking forward to holding more of these classes. Hope you can make it too.
Bye for now,
Kris
Product Used:


A Sailing we will go

I thought it might be time to move onto something new before you got sick of me creating Christmas cards. Although I am sure that I will be back with more samples soon. This card is for my next class with the ladies at Beachmere Retirement Resort. I embossed Whisper White card using the Seaside Embossing Folder and attached it to scored and folded Marina Mist card. I cut a circle from Whisper White card and a scalloped circle from Night of Navy card using the Layering Circles Framelits Dies.  The circles are attached to each other and then the card front. I cut the swirly, scribbly image from Marina Mist card using the Swirly Scribbles Thinlits Dies and attached it on top of the Whisper White circle. I stamped the boat onto scrap Whisper White card using the images from the Swirly Bird stamp set and Marina Mist and Night of Navy ink.
 The boat is cut out and attached to the centre of the circle using dimensionals. I stamped “happy birthday” from the Sunshine Sayings stamp set onto Whisper White card using Night of Navy ink. I punched both ends of the stamped card using the Triple Banner Punch and attached it a Night of Navy banner. The greeting banner is attached to the card front.
To decorate the inside of the card, I attached a narrow strip of Night of Navy card behind one long edge of Whisper White card embossed using the Seaside Embossing Folder. The panel is attached to the bottom of Whisper White card.
I think this card has a masculine feel to it, or at least I hope it does.
Bye for now,
Kris
Product Used:


Fab Friday 121
 You have already seen one card I created using the new (to me) stamp set Hearts Come Home and for this one I decided to play along with the Fab Friday 121 Sketch Challenge. The one thing that I find hard about some of the gorgeous stamps in the Holiday Catalogue is that the Christmas themes have a lot to do with snow and being cold. Now where I live in Brisbane it is more likely to be hot, dry and dusty. So I created my card today hoping to give the feeling of Christmas in the summer. The first step was to emboss Very Vanilla card using the Woodland Embossing Folder and attached it to scored and folded Crumb Cake card. I coloured the bottom half of a piece of Watercolour Paper using Always Artichoke ink and an Aqua Painter and when it was a little dry I added some Crumb Cake ink. I coloured the top half of the Watercolour Paper using Soft Sky ink and then add some Tempting Turquoise, because when it’s hot and dry the sky is nearly always blue.
  I added both the tree images from the Hearts Home Home stamp set to the one clear block, inked them with Always Artichoke ink and stamped all over the top half of the card, sometimes several times without re-inking. I wanted to convey the feeling of a small community in the bush. The Watercolour Paper is cut out using one of the ovals from the Layering Ovals Framelits Dies. I inked the first house image using Tempting Turquoise and Smoky Slate Stampin’ Write Markers, stamped onto Whisper White card and cut out the image. The second house is created the same way using Pacific Point, Tempting Turquoise and Smoky Slate Stampin’ Write Markers. The third house is created using Cajun Craze and Smoky Slate Stampin’ Write Markers, although the Cajun Craze did blend into the Smoky Slate a little.
  I attached the houses to the Watercolour Paper oval, before attaching to a Crumb Cake scalloped oval cut using the Layering Ovals Framelits Dies. The panel is attached to the card front using dimensionals. I stamped the greeting from the same stamp set onto Very Vanilla card using Crumb Cake ink, sponged the edges lightly with the same ink and attached it to the card front over the image panel using dimensionals.
To decorate the inside of the card, I once more stamped the tree images across the bottom of Very Vanilla card using Always Artichoke ink, again stamping several times without re-inking. I cut a strip of Crumb Cake card using one of the Hometown Greetings Edgelits Dies (this can be purchased as a bundle with the stamp set). The row of houses is added across the stamped Very Vanilla card.
I’d love to hear what you think. Have I succeeded in my quest to create an Aussie style Christmas card?
Bye for now,
Kris
Product Used:


Hearts Come Home

Hearts Come Home is one of the stamp sets in the Holiday Catalogue. When I saw this stamp set, I had an idea of what I wanted to do with the Santa’s Sleigh image. I often struggle to use the window die in the Hearth and Home Thinlits Dies because you can’t have a window without a view. Do I make it a looking out or a looking in scene? Anyway this image gave me the idea of looking out the window. I started by embossing Sahara Sand card using the Pinewood Planks Embossing Folder. I attached it to the bottom of Very Vanilla card. I embossed a narrow strip of the same card through the same embossing folder and attached it across the top of the previous embossed panel.  I stamped the Santa’s sleigh image onto Whisper White card using Memento Tuxedo Black ink. I punched a post-it-note using the 1-1/4″ circle punch and attached it over the image. I sponged all over the Whisper White card using Pacific Point ink and then went over the outside of the image using Night of Navy ink. I cut Crumb Cake card using the window frame from Hearth and Home Thinlits Dies and attached the stamped scene behind it. The window frame is attached to the top left hand corner of the card front.
 I cut the tree from Always Artichoke card using the Santa’s Sleigh Thinlits Dies and wrapped it with the Real Red Mini Tinsel Trim before attaching to the card front using dimensionals. I punched Silver Glimmer Paper using the Owl Builder Punch (retired) and added the circles to the tree. I also used the Santa’s Sleigh Thinlits Dies to cut the star from Gold Glimmer Paper which is attached to the top of the tree.
To decorate the inside of the card I stamped the greeting from the Watercolour Christmas stampset onto Very Vanilla card using Real Red ink.
Lots of product used to make this card but I think I pulled it off. What do you think?
Bye for now,
Kris
Product Used:


Save
Match The Sketch 194

The challenge at Match the Sketch this week gave me the opportunity to try out another new stamp set from the Holiday Catalogue – Hug in a Mug. I am not usually drawn to the “coffee” style stamp set but I liked the idea of this one. I think it will be great for decorating tags for lots of different presents, not necessarily just at Christmastime. However, my card today does have a Christmas theme. I embossed Whisper White card using the Cable Knit Embossing Folder and attached it to scored and folded Cherry Cobbler card.  I cut two different designs from the Be Merry Designer Series Paper using the two largest circles from the Stitched Shapes Framelits Dies. I attached the largest Circle to the card front. I stamped the greeting from the Hug in a Mug stamp set onto Whisper White card using Cherry Cobbler ink and punched one end using the Triple Banner Punch.
  I attached the greeting to the card front on top of the designer series paper circle. I attached the second designer series paper circle so that it partially covered the end of the greeting. I stamped the coffee mug outline using Early Espresso ink and added the “fill” using Chocolate Chip. I also added the “steam” image using Early Espresso ink. The coffee mug is cut out using the second smallest of the circles in the Stitched Shapes Framelits Dies and attached over the circles and the end of the greeting banner.
To decorate the inside of my card I stamped the greeting which is from the Hearts Come Home stamp set using Cherry Cobbler ink.
I love the play on words in the greeting on this card, don’t you?
Bye for now,
Kris
Product Used:


Merry Patterns Joy Fold

I am still on a roll using the Merry Patterns stamp set but wanted to do something a little different so decided on a Joy Fold card. The measurements for the card base are 21cm x 10.5cm, with the 21cm length scored at 14.8cm. This gives me the card base and the small flap on the left. I embossed Whisper White card using the Holly Embossing Folder and attached it to the inside of the card. I attached a piece of the Merry Music Specialty Designer Series Paper to Basic Black card and then to the front of the small flap. The inside layer of my card is 20cm x 7.5cm, scored along the 20cm length at 10cm. The Real Red card is attached to the embossed Whisper White card with the fold line on the right.  I stamped “to be jolly!” from the Merry Patterns stamp set onto Whisper White card using Memento Tuxedo Black ink and attached it to the inside of this layer. To decorate the front panel, I stamped the candles onto Whisper White card using Memento Tuxedo Black ink. I stamped the leaf image across under the candles using Old Olive ink to create a lovely wreath effect. I stamped “’tis the Season” over the top of the stamped images using Real Red ink. I stamped the fill image for “season” onto scrap Whisper White card using Real Red ink and cut out each letter, which I attached over the stamped letters. I also stamped the fill for the candles using Daffodil Delight ink.
  The image panel is attached to Basic Black card and then the card front.
A Joy Fold card needs something to keep the top flap closed, so I stamped the reindeer image from the Carols of Christmas stamp set onto Whisper White card using Basic Black ink and punched it out using the 1″ Circle Punch. The image is attached to a Basic Black 1-1/4″ Circle and then to a Real Red 1-3/8″ circle. The circles are attached to the small flap using dimensionals so that the card front can be slipped in behind the reindeer image.
I love Joy Fold cards, in fact I love making all sorts of fancy folds, but often don’t make the time. I’d love to hear what you think about this one.
Bye for now,
Kris
Product Used:


’tis the Season

Here is another card I created using the Merry Patterns stamp set. This time I used the branch image to create a background frame for the sentiment. I stamped “’tis the Season onto Whisper White card using Memento Tuxedo Black ink. I stamped the fill image for “season” using Real Red ink. I cut the image using one of the ovals from the Stitched Shapes Framelits Dies. I laid the die cut onto a piece of Whisper White card and used a pencil to trace around the oval.  I stamped the branch image from the Merry Patterns stamp set to stamp around the oval using Garden Green ink. I over stamped the images a little to get a dense image. Once I was happy with the “frame” I had created, I attached the sentiment oval to a Whisper White scalloped oval cut using the Layering Oval Framelits Dies and then the Whisper White card with the stamped “frame”. The whole piece is attached to scored and folded Real Red card.
 To decorate the inside of the card, I stamped the reindeer image onto the lower left hand corner using Soft Suede ink. I didn’t stamp the complete image, just a partial image which I think is enough.
I hope you are enjoying the cards I have made using this great stamp set. Maybe you are inspired to check your wish list and see if you can earn it for free. Maybe you and a couple of friends could get together and create a workshop order of $450.00 so that you can earn the stamp set.
Bye for now,
Kris
Product Used:


Not Just For Christmas
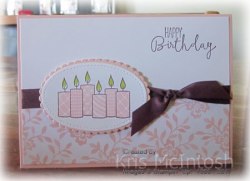
The Merry Patterns promotion is well underway and I have been having a little play with my stamp set. The last card I shared with you was the first I made using this set, well this is the second card and it’s not a Christmas Card. No, it’s a birthday card. I was looking for ideas for my weekly class at Beachmere and this is what happened. I started by attaching a piece of Powder Pink Fresh Florals Designer Series paper across the bottom of Whisper White card. I stamped the greeting from the Special Celebrations stamp set onto the top right hand corner using Fresh Fig ink. I wrapped the top of the Designer Series paper with Fresh Fig 1/2″ Finely Woven Ribbon and tied a knot. The panel is attached to scored and folded Powder Pink card. I stamped the candle image onto Whisper White card using Fresh Fig ink. I stamped both of the candle fill images using Powder Pink ink. Just to be a little different, I used Lemon Lime Twist ink to fill the candle flames.
  The image is cut using one of the ovals from the Stitched Shapes Framelits Dies and attached to a Powder Pink scalloped oval cut using the Layering Ovals Framelits Dies (I love how I can interchange the Stitched Shapes Framelits Dies and any of the Layering Framelits Dies don’t you?) The image panel is attached to the card front using dimensionals.
To decorate the inside of the card, I attached a narrow strip of Powder Pink card behind one long edge of Powder Pink Fresh Florals Designer Series Paper before attaching to Whisper White card. Simple but just adds a finish to the inside of the card.
I have more cards using the set to share with you, so I’ll be back. Don’t forget the Merry Patterns stamp set is only available for a limited time and you can’t purchase it, you need to earn it by placing an order of $450.00. You can do this in many ways and if you would like more information, please contact me so that we can discuss how you can earn this fabulous stamp set.
Bye for now,
Kris
Product Used:


Merry Patterns Promotion
 This month and next month Stampin’ Up! is running a promotion where you can earn an exclusive, limited time only stamp set. The set is called Merry Patterns and it is gorgeous. The images are mostly two-step which gives them lots more useability (is that a word?). All you need to do is host a workshop or place an order worth $450.00 and you will automatically receive the stamp set in addition to your %10 which you can spend on free product.
  Anyway today I am sharing with you the first card I made using this stamp set. I started by attaching a piece of the Be Merry Designer Series Paper across the bottom of Whisper White card. I attached a strip of Gold Glimmer Paper above the Designer Series Paper. I stamped the greeting from the Merry Patterns stamp set onto the right hand side of the Whisper White card above the Gold Glimmer Paper using Soft Suede ink. I stamped the reindeer image onto Whisper White card using Soft Suede ink and cut it out using the largest square from the Stitched Shapes Framelits Dies.
  I attached the image to a scalloped square of Garden Green card which I cut using the Layering Squares Framelits Dies. I attached the image panel to the card front using dimensionals.
To decorate the inside of the card, I stamped the candle image onto the bottom of Whisper White card using Memento Tuxedo Black ink. I stamped one of the fill images over the top using Real Red ink and the other fill image using Garden Green ink. I stamped the flame image using Daffodil Delight ink.
What great images and so easy to use because it is photopolymer and you can line up the two-step images so easily. I’ll be back with more creations using this stamp set.
Bye for now,
Kris
Product Used:


Happy Father’s Day
 I am very late sharing this card with you because I forgot to take photos before I delivered it to my Dad. So I had to wait till I saw him again to get these photos. I wanted to try adding letters to my card with the stamping raised up on top. (Sounds like double dutch doesn’t it?) Anyway, I am not sure how other crafter’s go about doing this but I will share my version with you.
I started by stamping my card front using the High Tide stamp set. The lighthouse was first – it’s a two step and I stamped it in Sahara Sand and Memento Tuxedo Black.  The sand is stamped in Sahara Sand, the water in Island Indigo. I stamped the water birds using Memento Tuxedo Black ink and the grass using Always Artichoke. I punched Post-it-Notes using the Tree Builder Punch, added the post-it-note clouds to the card front and sponged Soft Sky ink over them and around the lighthouse.
  I removed the masks and stamped the greeting from Guy Greetings using Memento Tuxedo Black ink. Last thing I stamped was the flying birds, also using Memento Tuxedo Black ink. Then I cut the D, A, D from the stamped card front using the Large Letters Framelits Dies. Let me tell you that’s a bit scary because if you get it wrong you have to start all over again. I removed the letters and attached the stamped card to scored and folded Basic Black card. I laid the letters back into the cut outs and glued down the centre of each of the letters. The letter itself is attached using Mini Dimensionals. I am pretty happy with the look.
To decorate the inside of the card, I once more stamped the water, sand, grass and sea birds using the same inks as I had on the front of the card.
I guess this is a bit busy but I love the finished card and my Dad did too.
Bye for now,
Kris
Product Used:


