Painted Harvest Gift Set
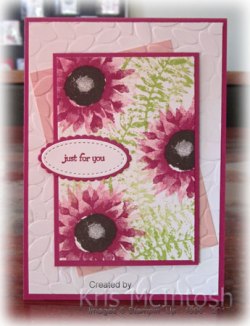
You have already seen a couple of cards I have made using the Painted Harvest stamp set. I think this stamp set is going to be an all time favourite from the Holiday Catalogue. Since I love it so much I wanted to play around with some of the colour combinations I have seen used by other Demonstrators and shared on Pinterest. All of the cards are created with the same layout but use different colours. This first card using Powder Pink and Berry Burst ink for the flower, Early Espresso ink for the flower centre and Lemon Lime Twist ink for the leaves.  I only used the solid leaf image and stamped several times without re-inking. The Powder Pink rectangle is attached to Whisper White card and then embossed using the Petal Burst Embossing Folder. The card base is Berry Burst and so is the layer that the stamped panel is attached to. The image panel is attached using dimensionals.
  The greeting for this card and all of the cards comes from the Teeny Tiny Sentiments stamp set and is cut out using the smallest of the ovals in the Stitched Shapes Framelits Dies. The scalloped oval is cut using the Layering Ovals Framelits Dies. For this card the greeting is stamped in Berry Burst ink and attached to Berry Burst card.
To decorate the inside of the card I simply stamped the flower once more onto the lower left hand corner. I also decorated the envelope in the same manner with the flower stamped onto the lower left hand corner of the envelope front.
The second card uses Pool Party and Marina Mist for the flower, Crumb Cake for the flower centre and Wild Wasabi for the leaves. The card base is Marina Mist and the image panel and the greeting are also attached to Marina Mist card. The embossed panel uses Pool party card and the greeting is stamped using Marina Mist ink. The inside of the card and the envelope have the flower stamped in the matching colours.
 The third card uses Crushed Curry and Tangerine Tango for the flower, Early Espresso for the flower centre and Garden Green ink for the leaves. The embossed panel is Crushed Curry. The card base is Tangerine Tango and the image panel and the greeting are also attached to Tangerine Tango card. The greeting is stamped using Tangerine Tango ink. Again the inside of the card and envelope use the same inks for the flowers.
The fourth card uses Berry Burst and Rich Razzleberry for the flowers, Crumb Cake for the flower centre and Tranquil Tide for the leaves. The embossed panel is Berry Burst. The card base is Rich Razzleberry and the image panel and greeting are also attached to Rich Razzleberry card. The greeting is stamped using Rich Razzleberry ink. The inside of the card and the envelope are stamped to match the card.
 The last card uses Wisteria Wonder and Elegant Eggplant for the flowers, Crumb Cake for the flower centre and Wild Wasabi for the leaves. The embossed panel is Wisteria Wonder. The card base is Perfect Plum and the image panel is also attached to Perfect Plum card. The greeting is stamped using Elegant Eggplant and attached to Elegant Eggplant card. The flower to decorate the inside of the card and the envelope uses the same inks.
Once I had progressed this far, I thought the cards needed a presentation box and guess what on page 13 of the Holiday Catalogue you will find Acetate Card Boxes. These Card Boxes are designed to hold five cards and envelopes. Woohoo! Perfect for these cards. So I followed the same design and decorated the front of the Acetate Card Box. I used Dapper Denim for the flowers, which for the first flower is stamped off once onto scrap paper. The second flower uses full strength ink. The leaves are stamped using Pear Pizzazz ink and the flower centre is Soft Suede. The embossed panel is Pear Pizzazz and the mounting card is Dapper Denim. The greeting from the Watercolour Wings stamp set is stamped using Dapper Denim ink. The greeting and the image panel are attached to Dapper Denim card.
I am really happy with all of the cards and just love the fact that they fit in this great Acetate Card Box. I can image these being great for gift giving at Christmas Time, can’t you?
 (Sorry about the lighting for this last photo but it is quite a sunny morning here in Naranba and I couldn’t avoid it’s reflection on my table.)
Hope you are still enjoying your new catalogue and that I have inspired you to take a look at the Acetate Card Boxes with new eyes.
Bye for now,
Kris
Product Used:


Just Add Ink #375

I found a sketch challenge at Just Add Ink this week but unfortunately couldn’t complete my card until after the closing date. However, I decided to share my card as it was a great sketch, one which I am sure we could all use over and over again. I embossed the lower two-thirds of Whisper White card before stamping the greeting from the Flourishing Phrases stamp set onto the top right hand corner using Tranquil Tide ink.  I wrapped the top of the embossing using the Berry Burst 1/2″ Woven Ribbon and tied a knot. I stamped the stems and leaf image from the Wild About Flowers stamp set onto Whisper White card using Tranquil Tide ink. I stamped the flowers onto the stems using Berry Burst ink. The flower image is cut out using the second largest circle in the Stitched Shapes Framelits Dies and attached to a scalloped oval cut from Tranquil Tide card using the Layering Circles Framelits Dies.
  The image panel is attached to the card front using dimensionals.
Decoration on the inside of the card is super simple. I simply embossed a narrow strip of Whisper White card before attaching a narrow strip of Tranquil Tide card behind one long edge. The embossed panel is attached to the bottom of Whisper White card.
I like the simplicity, what about you?. Wild About Flowers stamp set is one that I love but it has been sadly neglected of late with all the new goodies in the Holiday catalogue.
Bye for now,
Kris
Product Used:


More Watercolour Christmas

When I purchased the Watercolour Christmas Project Kit, I purchased the stamp set so that I could complete the cards in the kit. I didn’t realise, how much I was going to love this stamp set. Sometimes it’s fun to play around with small images to see just how many different options there are for using them on your cards and I am sure this one will feature in my Memory Keeping as well. For my card today I stamped the lower right hand corner of Whisper White card with one of the greetings from the Watercolour Christmas stamp set using Cherry Cobbler ink.  Once I had stamped the greeting I embossed the card using the Sparkle Embossing Folder. I stamped the tree image from the Watercolour Christmas stamp set three times onto Whisper White card using Always Artichoke ink. I used the smallest square from the Stitched Shapes Framelits Dies to cut out the images. They are each attached to a square of Silver Foil card and a scalloped square of Cherry Cobbler card, cut using the Layering Squares Framelits Dies. I attached the images across the top of the embossed card and wrapped the centre of the card using the Cherry Cobbler Stitched Ribbon and tied a knot. The embossed panel is attached to scored and folded Cherry Cobbler card.
 To decorate the inside of the card I stamped the sentiment from the Watercolour Christmas stamp set using Cherry Cobbler ink.
So happy with this card, clean and simple and so easy to make lots for the Christmas season. Don’t you think? I told you that I was sure this stamp set was going to be extra versatile didn’t I? Anyway I am sure you are starting to see more and more possibilities! I know that the ladies at my Beachmere class loved making this one last week.
Bye for now,
Kris
Product Used:


Watercolour Christmas Take 2

A couple of days ago I shared with you the four cards I made using the Watercolour Christmas Project Kit. Well a very talented American Demonstrator Rachel Tessman shared a video showing how to get double the amount of cards from the Watercolour Christmas Project Kit. It is simple and easy to do and at Christmas when we all need to make lots of cards, this makes it very economical. This link will take you to Rachel’s blog post which has a video which shows what she does. I couldn’t wait to see how the cards would turn out so I made my own versions following her instructions.
I love how simple and easy it was to add a few extra card bases and create an extra four cards. Rachel used the “left over” pieces from the die cut pages and used those to add extra pieces to help create the extra four cards. She also cut two of the card bases from the kit to create four card fronts.  It’s a very clever idea and I am sure given enough time playing with this kit, you will find many ways to create extra cards using the pieces supplied.
It’s so easy to overlook project kits in the catalogues, there are so many gorgeous things to take our eye, however, they are excellent quality and the finished product is always lovely. So which version of these cards will you be making?
Product Used:


Watercolour Christmas

Hope you have all had a look at the new Holiday Catalogue by now. Isn’t it amazing? There are some great stamp sets and dies and all sorts of inspiration for our holiday creating. Something you might have overlooked on page 33 of your catalogue is the Watercolour Christmas Project Kit. This kit contains everything you need to create 20 cards – five each of four designs, except the co-ordinating Watercolour Christmas stamp set, dimensionals, adhesive and a Basic Black ink pad. It’s a fabulous idea to get together with friends or just to use to create lots of cards for your Christmas mail outs. The quality of the card bases and the extra pieces if really excellent and the co-ordinating stamp set is a great one to have in your stash. You have already seen a couple of cards I have created using this stamp set and I am sure you will see many more. I love it’s simplicity and the beautiful font in the greeting stamps. There is also a great stamp to add to the inside of your cards, making them complete. Here is a bit closer photo of two of the cards.
 and two more –
 Lovely aren’t they? I didn’t mention that the kit also contains envelopes and beautiful gold envelope liners. I love this idea, now not only have I got some sensational cards to send out, the envelope will be a show piece as well.
 I hope that you take the time to have another look at this kit and see the possibilities.
And just to give you a little more idea about the kit, take a look at this video with Holly from Stampin’ Up!.
Bye for now,
Kris
Product Used:
Save
It’s arrived
Today is the day that you too can start purchasing from the 2017 Holiday Catalogue. What a great catalogue it is too! If you don’t have a catalogue and don’t have a Stampin’ Up! Demonstrator, please contact me so that we can talk about how you can get one. There is a link to the catalogue in the side-bar so that you can download it and have a look before you get a copy. Or you can click on the photo to download the catalogue.

Today also marks the beginning of an opportunity to earn an exclusive stamp set. The stamp set is called Merry Patterns and is available to anyone who Hosts a Party or creates an order which reaches $450.00. This is in addition to any other benefit or Freebies you might qualify for. So with the launch of a new catalogue, everyone has a long wish list, so why not buy what you want and pick up a bargain at the same time. You do not have to host a party as such, although this is a great way to get the things on your Wish List without spending so much money yourself, you can simply place a qualifying order of $450.00 and you will automatically receive the Merry Patterns stamp set. There are many ways you can qualify for this stamp set, so if you need any details please do not hesitate to contact me.

Sooo, while all these great things are happening today, I have to apologise for having the worst blogging week I have had in a long time. Things just didn’t go my way this week, visitors and other things just kept getting in my way. Not that I’m complaining we had a lovely time with our visitors, I just didn’t get time to create. So hopefully, life is back to normal and my blogging will get back to being more regular.
Don’t forget to check out the Holiday Catalogue and the Merry Patterns stamp set.
Bye for now,
Kris
With Sympathy
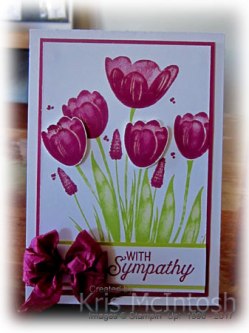
Today’s card was created using the sketch challenge at Case This Sketch. I decided to use the Hostess Set Tranquil Tulips to create my card. I started by stamping the long single stem and the short narrow stem using Lemon Lime Twist ink onto Whisper White card. I added several leaves, long and short to the page using the same ink. I stamped the large flower and two medium flowers directly onto the Whisper White card using Berry Burst ink. I also added the cone shaped flowers using the same ink. I stamped two medium flowers onto scrap Whisper White card using Berry Burst ink and cut them out. I attached them to the flower stems using dimensionals. Lastly I stamped the small dots around the flowers for some added interest. I stamped “with Sympathy” from the Flourishing Phrases stamp set onto Whisper White card using Berry Burst ink and attached it to a strip of Lemon Lime Twist card. The greeting panel is attached across the bottom of the stamped card. I attached the Whisper White card to Berry Burst card and then scored and folded Thick A4 Whisper White card.
  I tied a bow in a length of Berry Burst 1/2″ Crinkled Seam Binding and attached it to the left hand side of the greeting panel.
To decorate the inside of the card, I stamped one lone and one short flower stem and one large and one small leaf using Lemon Lime Twist ink. I stamped the flowers directly onto the card using Berry Burst ink.
I did alter the sketch slightly by adding my ribbon to the left hand side and not the right, but I don’t think that will matter. I love the colours in this card, even for a Sympathy card, don’t you.
Bye for now,
Kris
Product used:


Wedding Washi

Recently I shared this card with you that I created for my Technique Class in October? Well, when I created that card I had a couple of pieces of card decorated with Pick a Pattern Washi Tape left over. So I decided to create another card. I embossed Whisper White card using the Sweetheart Embossing Folder and attached it to scored and folded Basic Black card. I cut a layer of Whisper White card and Basic Black card and attached them together.  I used the rectangle of card that I cut the hearts from as a guide and stamped the greeting from the Butterfly Basics stamp set onto the Whisper White card using Real Red ink. I attached the stamped panel to the card front. I tied a bow around one edge of the Washi Tape rectangle using Cherry Cobbler 1/4″ Double Stitched Ribbon and attached it to the card front using dimensionals.
 To decorate the inside I embossed a narrow strip of Whisper White card using the Sweetheart Embossing Folder. I attached a narrow strip of Real Red card behind one long edge before attaching to the bottom of Whisper White card. I attached the last Washi Tape heart over the left hand side of the embossed card.
I love using up bits and pieces like this – a two for one – if you like. Hope you enjoyed my “leftover” card, let me know what you think. Just to show you the two variations here is a photo of both cards together.

Now let me tell you, it wasn’t until I was putting the icons together for the product used that I realised that the ribbon was Cherry Cobbler and not Real Red. Lucky for me it works anyway!
Bye for now,
Kris
Product Used:


Global Design 101

The current challenge at Global Design Project is a colour challenge. I don’t usually play along with these, however, I had seen a card by Rebecca Borkowski which used the Wood Words stamp set to create a background and I thought I would combine my CASE with the colour challenge.
I stamped the large circle image from the Wood Words stamp set onto Whisper White card using Flirty Flamingo, Night of Navy and Bermuda Bay ink. I alternated the colours in rows across the Whisper White card. I embossed another piece of Whisper White using the Polka Dot Basics Embossing Folder and attached the stamped panel to the bottom.  I attached a strip of Bermuda Bay card across the top of the stamped card and then cut a Delicate White Doily in half and attached it so that the cut edge matched the top of the Bermuday Bay card. The Whisper White panel is attached to Bermuda Bay card and then scored and folded Night of Navy card. I stamped the greeting from the Butterfly Basics stamp set onto Whisper White card using Night of Navy ink. The greeting is cut out using one of the circles from the Layering Circles Framelits Dies. I cut a scalloped circle from Bermuda Bay card using the same dies and attached the greeting. The greeting is attached to the card front using dimensionals.
  I tied a bow in the Night of Navy 5/8″ Crinkled Seam Binding and attached it to the greeting panel using a glue dot.
To decorate the inside of the card, I stamped a narrow panel of Whisper White, once more using the circle image from Wood Words and Flirty Flamingo, Bermuda Bay and Night of Navy ink. I attached a narrow strip of Bermuda Bay card behind one long edge and attached the panel to Whisper White card.
I do not have a link to the actual card shared by Rebecca (I can’t seem to find it), but here is a link to her blog. Thank you so much Rebecca for sharing your card and giving me the inspiration I needed. Thanks also to Global Design Project for the colour inspiration.
I’d love to hear what you think of my card.
Bye for now,
Kris
Product Used:


Washi Tape Technique
 A little while ago I bought a set of technique tutorials from Elizabeth Shannon, a very talented UK Stampin’ Up! Demonstrator. I have slowly been working on my collection and trying to decide how to share these techniques with my customers. So to cut a long story short, I have decided that every couple of months, my monthly class will be based on techniques. We will create five technique cards with instructions and we will make one card using each of the 5 techniques. I am storing my technique and sample cards in the 6″ x 8″ Memories and More Album, however, I am leaving their storage option up to my customers.
Today I am going to share with you the card I created to go with the Punched Washi Tape technique (only my card uses framelits to create the shapes. I embossed Whisper White card using the Sweetheart Embossing Folder to emboss the top half of the card only. I stamped the greeting from the Rose Wonder stamp set onto the bottom right hand corner of the embossed card. I wrapped the bottom of the embossing using the Silver 1/8″ Ribbon and tied a knot before attaching to scored and folded Thick A4 Whisper White card. I attached lengths of the Pick a Pattern Washi Tape across a piece of Whisper White card and then used the Sweet and Sassy Framelits Dies to cut out 3 different heart sizes. I attached the largest of the pieces I created to the card front and attached the smallest heart inside the larger heart shape using Mini Dimensionals.
To decorate the inside of the card, I embossed a strip of Whisper White card using the Sweetheart Embossing Folder and attached it across another piece of Whisper White card. I ran a length of Pick a Pattern Washi Tape across the top of the embossed card.
I love how cute this card turned out. Don’t you. I am also a big fan of black and white cards, another reason to love this card.
Bye for now,
Kris
Product Used:


