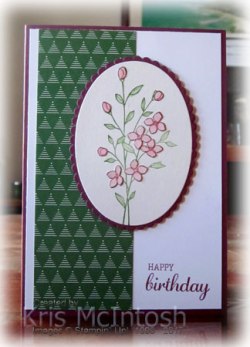
A Floral Case
 This is the last card I CASED last weekend. It is cased from my friend and fellow demonstrator Vicky Wright. Vicky’s card is so gorgeous I CASED it almost exactly. I embossed Whisper White card using the Softly Falling Embossing Folder and attached it to scored and folded Rich Razzleberry card. I inked the image from the Floral Phrases stamp set using Rich Razzleberry and Old Olive Stampin’ Write Markers. I cut the image using the largest oval in the Stitched Shapes Framelits Dies.
  I also cut a scalloped oval from Whisper White card using the Layering Oval Framelits Dies. I stamped the greeting from the Floral Phrases stamp set onto Whisper White card using Rich Razzleberry ink. I punched each end of the greeting using the Triple Banner Punch. I attached the greeting to a banner cut from Rich Razzleberry card.
  I attached the banner to the ovals and then the card front using dimensionals.
To decorate the inside of the card, I followed Vicky’s lead and inked the border image using the same markers and stamped down the left hand side of the Whisper White card.
Oh my goodness, this card is so pretty. Thank you so much Vicky for the inspiration. I’m not sure if I like the addition of the Rich Razzleberry behind the greeting or not. What do you think? Should I have left if off like Vicky did?
Bye for now,
Kris
Product Used:


Another Idea Cased

Here is another card inspired by one I saw when I was browsing the internet on Saturday. This one is inspired by one share by Angelique Nederpel in a blog hop post. I loved her layout and the use of a butterfly which inspired me to break out my butterfly stamps. I stamped the border image from the Watercolour Wings stamp set across the Whisper White card using Fresh Fig ink. I attached a piece of Tranquil Tide paper from the Florals Designer Series Paper Stack. I stamped the greeting from the Window Shopping stamp set below the stamping using Fresh Fig ink. I attached the stamped panel to scored and folded Fresh Fig card. I stamped the first image for the large butterfly from the Watercolour Wings stamp set onto scrap Whisper White card using Powder Pink ink. I stamped the second image over the top using Berry Burst ink. The third image is stamped using Fresh Fig ink.
  I cut the image using the matching Bold Butterfly Framelit Die. I stamped the body of the butterfly using Fresh Fig ink. I cut the matching detailed butterfly from Vellum Cardstock using the matching Butterflies Thinlits Die. I attached the Vellum butterfly to the stamped butterfly using Glue Dots along the back of the body. I attached the butterfly to the card front also using Glue Gots along the back of the body only. I did fluff the wings a little so as it has some dimension.
To decorate the inside of the card, I stamped the dotted border image across the bottom of the Whisper White card using Fresh Fig ink. I stamped the small butterfly image onto scrap Whisper White using Powder Pink ink. I stamped the detailed image over the top using Berry Burst ink. I cut the butterfly using the matching Butterflies Thinlits Die and then stamped the body using Fresh Fig ink. I attached the butterfly image onto the lower left hand corner of the Whisper White card.
Thanks again Angelique for the inspiration to create my card.
Bye for now,
Kris
Product Used:


Casing Ideas
Today I spent a little time following a blog hop with ideas for the Holiday Catalogue and spying on what other demonstrators are sharing on a Demonstrator only facebook page. I was inspired to create several cards, some are an exact case and some use the same products but in a slightly different way.
The first card I am sharing with you is inspired by a card on this post by Chris Smith. I used the same designer series paper and lace trim but changed the orientation and greeting. So thank you Chris for your inspiration.
I attached Very Vanilla 1/2″ Lace Trim behind each long edge of a strip of Painted Harvest Designer Series Paper. This paper is absolutely gorgeous and you will be able to purchase it once the Holiday Catalogue has gone live on 1st September. The Designer Series Paper is attached to Very Vanilla card.  I stamped the greeting from the Butterfly Basics stamp set onto the top right hand corner using Early Espresso ink. I stamped the long frilly edged leaf from the Painted Harvest stamp set onto the top left hand corner. This is a two step image, so the first image is stamped in Lemon Lime Twist and the second image in Garden Green. I stamped the three petal leaf onto scrap Very Vanilla card. This is also a two step image and I used the same inks – Lemon Lime Twist and Garden Green. I punched the leaf using the matching Leaf Punch. The punched leaves are attached over the top of the stamped leaf using Glue Dots. I stamped the flower onto scrap Very Vanilla card. This is also a two step image. I stamped the first image in Peekaboo Peach and the second image over the top using Tangerine Tangeo.
 I punched the image using the Starburst Punch. I stamped the centre of the flower using Early Espresso ink which I stamped onto scrap paper first to give a lighter image. The flower is attached to the card front using dimensionals.
To decorate the inside of the card I once more stamped the frilly edged leaf using Lemon Lime Twist and Garden Green ink. I also stamped and punched the three petal leaf using the same colours.
I am really loving the Painted Harvest stamp set and the co-ordinating products. I am sure that you will love it too once you begin to imagine the possibilities. I’d love to hear what you think.
Once more a big thank you to Chris for her inspiration.
Bye for now,
Kris
Product Used:


August Memory Keeping Class

I have updated my Classes and Workshops page with details for the August Memory Keeping Class but I thought I would share the page here as well.
We are still using our kits with the Colour Theory Memories and More Card Pack and the Colour Theory Designer Series Paper. For this page I cut the darker piece of Dapper Denim Designer Series paper into 2″ strips and used two pieces to create the long strip on the right hand side of the Whisper White 12″ x 12″ card. I stamped the outline circle image from the Playful Background stamp set onto the left hand side of the page using Dapper Denim ink. I stamped the solid circle image from the same stamp set over the top of the Dapper Denim Circles using Crushes Curry ink. I cut the other piece of Designer Series paper in half and attached it to the page over the top of the strip of Designer Series paper. I attached two 3″ x 4″ photos, one to the left hand side of the page and the other to the right hand side of the page. I attached the 3″ x 4″ journaling card to the 4″ x 6″ photo, wrapped them with Crushed Curry Mini Chevron 3/8″ Ribbon and tied a knot. The photo and journaling card are attached to the page slightly covering each of the smaller photos. A simple page but that’s my favourite kind of Memory Keeping. Stampin’ Up! make it so easy with so many co-ordinating products, don’t you think?
Check out the Class and Workshops page for more details about the class and if you live near me and would like to attend, don’t delay in reserving your place as space is limited.
Bye for now,
Kris
Product Used:


Christmas Sneak Peak

Today I am sharing a very quick card I made using up some left over kits from my card class last Tuesday. I was also lucky enough to receive delivery of some more goodies from the upcoming Holiday Catalogue this morning and I decided to use the Watercolour Christmas stamp set to create this quick but cute Christmas Card.
I embossed the top two-thirds of Whisper White card using the Softly Falling Embossing Folder and stamped the tree image from the Watercolour Christmas stamp set onto the bottom right hand corner of the embossed card using Garden Green ink. I wrapped the bottom of the embossing using the Real Red Mini Tinsel Combo Trim before attaching to scored and folded Real Red card. I stamped the greeting which is also from the Watercolour Christmas stamp set onto Whisper White card using Real Red ink before cutting it out using the largest of the circles in the Stitched Shapes Framelits Dies. I attached the greeting to a Real Red scalloped circle cut using the Layering Circle Framelits Dies and then the card front using dimensionals. I added a small Basic Rhinestone to the centre of the stars at the top of the trees.
To decorate the inside of the card I attached a narrow strip of Real Red card behind one long edge of Whisper White card embossed using the Softly Falling Embossing Folder. The embossed card is attached to the bottom of Whisper White card.
 This is such a great stamp set which I am sure you will love. It has three very large greetings in the set, three tree images and a great stamp to complete the inside of your cards. The stamp set is designed to co-ordinate with the Watercolour Christmas card Project Kit. This kit contains everything you need (except the stamp set) to create 20 Christmas cards.
I was happy to use up the pieces I had laying on my desk. I usually end up with a fair bit of waste from my card classes but not this time. I think I will create a few more cards using up the remaining pieces.
I’d love to know what you think.
Bye for now,
Kris
Product Used:


Playing with Touches of Texture
Today’s card, came about because I saw one where a card had been created using the Touches of Texture stamp set with some fussy cutting. The card was gorgeous and much more detailed than mine but I am happy with my card none the less.
I attached the Be Merry Designer Series Paper to the left hand side of Whisper White card. Don’t you love it when you can use something in a way other than the purpose for which it was designed! I stamped the greeting from the Best Birds stamp set onto the lower right hand corner using Rich Razzleberry ink.  I attached the Whisper White card to scored and folded Rich Razzleberry card. I stamped the flower image from the Touches of Texture stamp set onto Shimmery White card using Garden Green ink. I used my Aqua Painter to move the ink around to colour in the leaves. I stamped the image once more onto Shimmery White card using Rich Razzleberry ink. Again I used an Aqua Painter to move the ink around and colour in the flowers.
  Once they were coloured in I cut out all the flowers and attached them over the stamped Garden Green image. I cut the image using one of the Layering Ovals Framelits Dies and attached it to a scalloped oval cut from Rich Razzleberry card using the same dies. The image panel is attached to the card front using dimensionals.
I kept the inside of the card pretty simple by adding a strip of Rich Razzleberry card behind one long edge of the same Be Merry Designer Series Paper before attaching to the bottom of the Whisper White card.
I think the fussy cutting on this card was totally worth it. It gives the image so much dimension because the flowers seem to pop off the stamped image. I’d love to hear what you think.
Bye for now,
Kris
Product Used:


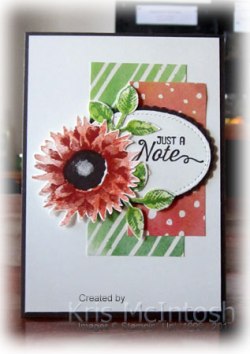
Freshly Made Sketch #300
Congratulations to Freshly Made for being around for 300 sketches and providing awesome sketch challenges each week. I don’t always get to play along but I try to as often as I can because I love these challenges. Since I had the Painted Harvest stamp set still on my desk, I had to use it for this challenge. So check out the sketch and maybe you can play along too, although I think this challenge has almost finished.
I attached two pieces of the Painted Harvest Designer Series Paper to Very Vanilla card before attaching to scored and folded Early Espresso card. I stamped “just a note” from the Flourishing Phrases stamp set onto Very Vanilla card using Early Espresso ink and cut it out using one of the ovals from the Stitched Shapes Framelits Dies. I attached the greeting to a scalloped oval cut from Early Espresso card using the Layering Ovals Framelits Dies. I stamped the first image for the flower from the Painted Harvest stamp set onto Very Vanilla card using Tangerine Tango ink. I stamped the second image for the flower over the top using Cajun Craze ink. I stamped the flower centre using Early Espresso ink and then fussy cut the flower. I stamped the solid leaf image from the Painted Harvest stamp set onto Very Vanilla card using Lemon Lime Twist ink and stamped the detailed leaf image over the top using Garden Green ink.
  The leaves are punched out using the co-ordinating Leaf Punch. I attached the flower and the leaves to the greeting oval and then to the card front using dimensionals.
To decorate the inside of the card I stamped the long solid leaf image twice onto the lower left hand corner of Very Vanilla card using Lemon Lime Twist ink and stamped the detailed image over the top using Garden Green ink. I stamped and punched out one more leaf the same as the card front and attached it over the stamped leaves.
This Painted Harvest stamp set and co-ordinating products is, I am sure, going to be a favourite from the Holiday Catalogue when it is released next month. It is certainly going to be a favourite of mine.
Bye for now,
Kris
Product Used:


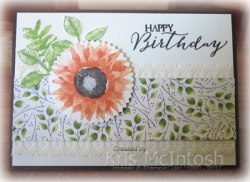
Painted Harvest

I have been creating a lot of cards using the Carols of Christmas stamp set and co-ordinating products but thought I would share a card I made using the Painted Harvest stamp set from the soon to be released Holiday Catalogue. The stamp set seems to be primarily aimed at Thanksgiving which we do not celebrate here in Australia. However, it is such a beautiful flower and the leaves and co-ordinating punch are just so fantastic. Soooo, I was inspired by a card I saw on the Demonstrator Facebook Page to create a version of the cards created by Mieke Op T Hof from the Netherlands.
There are two images to create the leaves and petals for this flower. I started by stamping the first image onto Whisper White card in Crushed Curry and stamped the second image over the top using Pumpkin Pie ink. I stamped the flower centre using Early Espresso ink.  I stamped the leaves onto the Whisper White card using Old Olive ink which I stamped off first and then stamped twice without re-inking. I stamped the greeting from the Window Shopping stamp set onto Crumb Cake card using Early Espresso ink. I punched one end of the Crumb Cake card using the Triple Banner Punch. I stamped the solid leaf onto Whisper White card using Old Olive ink which I had stamped off first. I stamped the detailed leaf over the top using Old Olive ink and punched them out using the matching Leaf Punch. The banner is attached to the card front using dimensionals with the punched out leaves tucked underneath. The stamped card is attached the Crumb Cake card and then scored and folded Early Espresso card.
To decorate the inside of the card I stamped the flower using the same inks and once more stamped the leaves.
Now that I have started playing with this set, I think it is going to be hard to stop. I love the detail of the image and can’t wait to play with more colour combinations. I think this one kind of looks like a Sunflower, don’t you?
Bye for now,
Kris
Product Used:


High Tide again

Is anyone else in love with the gorgeous High Tide stamp set? I think it is so cool how you can create beautiful landscape scenes using these awesome stamps. The card I am sharing today will make its debut in one of my Beachmere classes. I think it has a male kind of feel to it and because I haven’t added a sentiment, hopefully it will fit the bill for several kinds of occasions.
I attached Sahara Sand card to the left hand side of Whisper White card and attached Basic Black card across the bottom of the panel. I embossed the card using the Seaside Embossing Folder and attached the panel to scored and folded Island Indigo card.  Because I wasn’t sure just how much of the picture would show in the largest Oval from the Layering Ovals Framelits Dies, I created the image panel on a larger than necessary piece of Whisper White card. The lighthouse from the High Tide stamp set is stamped in Smoky Slate and Memento Tuxedo Black ink with the sand stamped in Sahara Sand ink.
 I stamped the sea using Island Indigo ink and the grass using Always Artichoke ink. The lighthouse beam is stamped in Crushed Curry and the flying birds using Memento Tuxedo Black ink. Once I had stamped all the pieces, I laid the oval over the top and because the panel was larger than I needed I could choose which section I wanted to cut out. The image panel is attached to the card front using dimensionals.
To decorate the inside of the card, I stamped the small sand image onto the bottom left hand corner of Whisper White card Smoky Slate ink. The grass is stamped using Always Artichoke ink.
So, so simple but I love it. What about you? What do you think?
Bye for now,
Kris
Product Used:


A Christmas Bear

This is a card that kind of grew and grew. I wanted to use the bear from the Baby Bear stamp set on a Christmas card and this is the end result.
I embossed Whisper White card using the Cable Knit Embossing Folder and attached it to scored and folded Real Red card. I stamped the greeting from the Santa’s Sleigh stamp set onto Whisper White card and cut out the words individually. I attached the greeting to a circle of Whisper White card cut using the Stitched Shapes Framelits Dies. I stamped the first image using Sahara Sand ink, the second image using Crumb Cake ink and the third image using Soft Suede ink. I cut the image out using the largest circle from the Stitched Shapes Framelits Dies.  To create the parcel image, I stamped the square parcel from the Santa’s Sleigh stamp set onto Whisper White card using Memento Tuxedo Black ink. I also stamped the image onto a post-it-note and cut it out. I attached the post-it-note image over the stamped image and then stamped the other two parcel images from the Santa’s Sleigh stamp set using Memento Tuxedo Black ink. I removed the mask and then used post-it-notes to mask off the other two parcels so that I could stamp one of the flower centres from the Oh So Eclectic stamp set using Real Red ink to decorate the square parcel. I removed the post-it-notes, cut out the image and coloured the remaining parcels using Real Red and Crumb Cake Stampin’ Write Markers.
 The parcels are attached to another circle of Whisper White card cut using the Stitched Shapes Framelits dies. I cut Real Red scalloped circles for each Whisper White circle using the Layering Circle Framelits Dies. The greeting circle is attached flat to the card front and each of the other circles has dimensionals under the outside so that it can sit over the other circles. I stamped the large bow from the Santa’s Sleigh stamp set onto Whisper White card using Crumb Cake ink. I stamped the small bow and the round bow onto Whisper White card using Real Red ink. Each of the bows is cut out using the matching Santa’s Sleigh Thinlits Dies. I attached the bows to the parcels to finish off the look. The large bow is attached using a Mini Dimensional and the other bows are attached using Glue Dots.
Since there was so much happening on the card front, to decorate the inside, I simply embossed a strip of Whisper White card using the Cable Knit Embossing folder and attached a narrow strip of Real Red card behind one long edge.
I think this card will be just perfect for someone small. I am sending this one as part of a pack to my Aunty and I am sure she will find someone special to give it to at Christmas.
Bye for now,
Kris
Product Used:


