Another Case
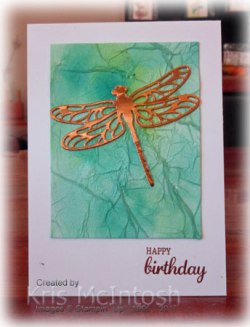
Recently I shared with you a card which I CASED from Heidi Baks and today I am sharing my version of a card which my lovely upline Stephanie Pike shared on her blog recently. She has a video which shows you how to go about creating your background, which is a bit of a variation on faux silk. Anyway I loved her card and found the video easy to follow so I had some fun getting inky and created my focal panel using the same colours as she did – Lemon Lime Twist, Pool Party and Bermuda Bay. You need Tissue paper, a Window Sheet, ink refills in the colours stated and a spritzer filled with water. Be prepared to make a mess while you have fun.  I think my paper turned out a lot darker than Stephanie’s, but I was still very happy with it. The tissue paper is allowed to dry (and yes I did speed mine up a bit with the heat tool but be warned that this can make your colours a little lighter) before being attached to a piece of Whisper White paper.
 The panel is attached to scored and folded thick Whisper White A4 card . I stamped the greeting from the Best Birds stamp set onto the bottom right hand corner using Versamark ink, sprinkled it with Copper Embossing Powder and heat set using my heat tool. I cut the dragonfly from Copper Foil card using the Detail Dragonfly Thinlits Dies and attached it over the tissue paper.
To decorate the inside, I used a piece of left over tissue paper which I attached to a narrow strip of Whisper White card. Very simple, but I think the tissue paper and the Copper Foil are striking enough, don’t you? Once again my thanks to Stephanie for providing such beautiful inspiration.
Bye for now,
Kris
Product used:


Case this Sketch #323

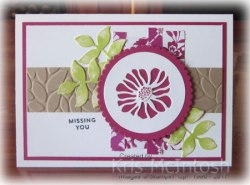
Sometimes when your mojo just kind of goes quiet, I find that playing along with a sketch challenge will get me going again. Today I decided to play along with the Case This Sketch challenge. It was a very simple sketch leaving lots of room for creativity. I stamped Whisper White card using the leaf image from the Butterfly Basics stampset using Pear Pizzazz ink. I stamped several times and sometimes without re-inking. I stamped the flower image from the same stamp set onto scrap Whisper White card using Memento Tuxedo Black ink and coloured the image using a Blender Pen and Wisteria Wonder, Pear Pizzazz and Daffodil Delight inks. I cut out the image and attached it over the stamped leaves.  I used the border die from the Swirly Bird Framelit Dies to cut Soft Suede card, I only wanted to create a semi-rounded edge for the bottom of my card. I embossed the card using the Softly Falling Embossing Folder before attaching it to the bottom of the stamped card. I stamped the long border image onto a strip of scrap Whisper white card using Wisteria Wonder ink.
  I hand cut it to create a narrow border which I attached to the card front to the right of the flower image. The border is trimmed to match the edge of the stamped Whisper White card. I stamped the greeting from the Butterfly Basics stamp set onto the card front using Soft Suede ink. The Whisper White panel is attached to Pear Pizzazz card and then scored and folded Soft Suede card.
To decorate the inside of the card, I stamped the border image twice across the bottom of Whisper White card using Pear Pizzazz ink. I am pretty happy with this card and I am very happy to have used this stamp set once more. It is one of my favourites but neglected lately for some newer ones. So thanks to Case This Sketch for some great inspiration.
Bye for now,
Kris
Product Used:


More Carols of Christmas

My August card class features the Carols of Christmas stamp set and the Card Front Builder Framelits Dies. So I have been making lots of card to showcase how amazing this bundle is. This card was inspired by one I saw on the internet somewhere and I am sorry I am not sure whose card it was. If it is yours please let me know so that I can give you credit.
I embossed Whisper White card using the Softly Falling Embossing Folder, attached it to Cherry Cobbler card and then scored and folded Thick A4 Whisper White card (what did we do without this thick card, I just love it).  I cut the double and single trees from Always Artichoke card using the Card Front Builder Framelits Dies and attached them to the embossed Whisper White card. I stamped the deer from the Carols of Christmas stamp set onto Whisper White card using Chocolate Chip ink and cut it out with the matching Card Front Builder Framelit Die. I stamped the greeting from the Hang Your Stocking stamp set onto Whisper White card and used the new Pretty Label Punch to punch it out. I punched a 1-3/4″ circle from Cherry Cobbler card and attached it behind the greeting before attaching to the card front.
 To decorate the inside of the card, I cut the double tree from Always Artichoke card using the Card Front Builder Framelits Dies and attached them to the lower left hand corner. I stamped the deer once more using Chocolate Chip ink, cut it out using the matching die and attached it in front of the trees.
I am loving how easy it is to create a beautiful Christmas card using the amazing bundle. If you haven’t already purchase yours – what’s stopping you? I believe that his set is going to be a best seller and when you see all the other products which co-ordinate with this stamp set, you will truly be amazed.
Bye for now,
Kris
Product Used:


Oh So Cased

I am trying to work on cards for my September class and I was inspired by this gorgeous card by Heidi Baks for my creation today.
I stamped the greeting from the Vertical Greeting stamp set onto the right hand side of scored and folded Thick A4 Whisper White card using Emerald Envy ink. I used an Aqua Painter and Lemon Lime Twist ink to colour a piece of Watercolour Paper. Once dried I attached a narrow strip of Lemon Lime Twist card to the left hand side and a strip of Gold Glimmer Paper to the right hand side. The panel is attached to the card front using dimensionals.  I stamped the leaves onto Whisper White card using Emerald Envy ink and cut them out using the matching Eclectic Layers thinlits Dies and attached them to the card front. I stamped the flowers onto Whisper White card using Memento Tuxedo Black ink and cut them out using the matching Eclectic Layers Thinlits Die.
  I coloured the flowers using an Aqua Painter and Berry Burst and Lemon Lime Twist ink. The flowers are attached to the card front over the leaves. I tied a knot in a length of Emerald Envy Crinkled Seam Binding Ribbon and attached it over the flower stems using a rolled up Glue Dot.
To decorate the inside of the card, I stamped the leaf image twice, once more using Emerald Envy ink and attached another flower stamped, cut and coloured to match the ones on the front of the card.
Thanks you so much Heidi for the inspiration. I love this card. It is beautiful, don’t you think?
Bye for now,
Kris
Product Used:


Match The Sketch #187
Since I am on a roll with challenge sketches this week, I also decided to play along with Match The Sketch, unfortunately I missed the deadline but thought I would share anyway. I cut strips of Berry Burst paper from the Fresh Florals Designer Series Paper stack in varying lengths and widths and attached them vertically to Whisper White card. I embossed a strip of Crumb Cake card using the Petal Burst Embossing Folder and attached it horizontally across the Whisper White card and the designer series paper strips. The Whisper White card is attached to Berry Burst card and scored and folded Thick A4 Whisper White card. I stamped the leaf from the Oh So Eclectic stamp set three times onto Whisper White card using Lemon Lime Twist ink and cut them out using the matching Eclectic Layers Thinlits Die.  I attached the leaves to the card front using Multipurpose Glue. I cut a circle from Whisper White card using the Layeirng Circles Framelits Dies and then cut the flower from the centre using the Eclectic Layers Thinlits Dies. I attached the Whisper White circle to a Berry Burst scalloped circle cut using the Layering Circle Framelits Dies. I attached the circle to the card front over the ends of the leaves using dimensionals. I stamped the flower centre onto Whisper White card using Berry Burst ink and cut it out using the matching Eclectic Layers Thinlits Die before attaching to the flower centre. Lastly I stamped the greeting from the Oh So Eclectic stamp set using Memento Tuxedo Black ink.
 To decorate the inside of the card, I stamped the large flower background using Berry Burst ink. I stamped the detailed flower over the top, also using Berry Burst ink. I inked the three leaves from the leaf image using the Lemon Lime Twist Stampin’ Write Marker and used the stamp-a-ma-jig to place them on either side of the flower.
I was really happy with this card until I realised that although I used my stamp-a-ma-jig to line up the greeting, I must have moved it slightly because the greeting is crooked. Since this only just became obvious to me, I am sharing it “warts and all”. Does this happen to you? Everything is done and then you notice something is wrong. I might have to work on a way to “embellish”.
Bye for now,
Kris
Product Used:


Customer Pre-Order

Well today is the day when you can pre-order the Carols of Christmas stamp set or bundle from the Holiday Catalogue. This is a fantastic stamp set with matching Card Front Builder Framelits. Placing your order this month instead of waiting till September means you can get a jump start on your Christmas Cards.
I have already shared a couple of card using this stamp set but here is another one to share the versatility. I embossed Whisper White card using the Softly Falling Embossing Folder.  I attached a strip of the Be Merry Designer Series Paper to the bottom of the Whisper White card. I wrapped the top of the designer series paper with the Gold 3/8″ Metallic Edge Ribbon before attaching to scored and folded Real Red card. To create the front panel I used the frame from the Card Front Builder Framelits on Whisper White card. You can cut the frame once to create the top and sides and then line up the frame so that you can complete the frame.
  I thought it might be a little difficult but it was easy to do. Once I had created the frame I stamped the greeting from the Carols of Christmas stamp set using Real Red ink. To highlight the die cut frame, I attached a piece of Gold Foil card behind the Whisper White card. The whole piece is attached to the card front using dimensionals.
To decorate the inside of the card, I attached a narrow strip of the same Designer Series Paper across the bottom of Whisper White card. I wrapped the top of the DSP once more using the Gold 3/8″ Metallic Edge Ribbon.
I hope you are inspired to take a look at this stamp set and perhaps see how you can use it in your Christmas Card making this year.
Bye for now,
Kris
Product Used:


Freshly Made Sketch #298

The sketch challenge at Freshly Made this week is a kind of interesting one. It lends itself to all sorts of interpretations but I chose to go with simple. I attached a narrow strip of Be Merry Designer Series paper to Smoky Slate card. The panel is attached across Whisper White card, before attaching to scored and folded Cherry Cobbler card. I stamped the starry swirly image from the Star of Light stamp set onto the top right and bottom left corners using Smoky Slate ink.  I stamped the greeting, also from the Star of Light stamp set onto the bottom left hand corner of the Whisper White card using Cherry Cobbler ink. I cut the star image from Cherry Cobbler card using the Starlight Thinlits Dies. I attached the star to the top right hand corner of the Whisper White card and added a Metal Rimmed Pearl to the centre.
 To decorate the inside I created a designer series paper strip in the same manner as the one on the front of the card and attached it across the bottom of Whisper White card. I stamped the starry, swirly image from the Star of Light stamp set across the centre of the Whisper White card.
I am sorry if you can’t see the swirly image, the Smoky Slate is a little hard to see in my photos, but it really does add a lot to the card.
It’s a simple card, but kind of special too. I love the colour combination, the Smoky Slate gives a real “silver” feel to the card. What do you think?
Bye for now,
Kris
Product Used:


Just Add ink Challenge
This week Just Add Ink has a sketch challenge and I decided to play along. I embossed Whisper White card using the Woodland Embossing Folder which I attached to scored and folded Flirty Flamingo card. I cut Emerald Green card twice using the leaf die from the Flourish Thinlits Dies. The leaves are attached to the card front using Tombow Multipurpose Glue. I cut Whisper White card using one of the circle dies in the Stitched Shapes Framelits Dies and attached it to a Flirty Flamingo scalloped circle cut using the Layering Circle Framelits Dies. The circle is attached to the card front over the ends of the leaves using dimensionals.  I cut the large flower from Flirty Flamingo card and the small flower from Powder Pink card using the Flourish Thinlit Dies. The small flower is attached to the large flower with Tombow Multipurpose Glue but only in the very centre of the flowers.
  The flowers are attached to the centre of the Whisper White circle, again only using the glue in the very centre of the flower. I wanted to be able to “fluff up” the petals on each of the flowers. I stamped “Just for you” from the Watercolour Wings stamp set onto Whisper White card using Flirty Flamingo ink. I punched one end using the Triple Banner Punch and lightly sponged Flirty Flamingo ink around the edges. The greeting is attached to the card front using dimensionals under the right hand edge. I added a Metal Rimmed Pearl to the centre of the flowers.
To decorate the inside, I cut the small flower stem from Flirty Flamingo card and attached to the lower left hand corner of Whisper White card.
I haven’t used these dies in ages, so it was fun to get them out and dust them off for this challenge. What do you think? Should I use these dies more often?
Bye for now,
Kris
Product Used:


You’re Lovely

I absolutely adore the Oh So Eclectic stamp set but I haven’t used it very much, so I thought it was about time I got it out and created something. I was inspired by a card on pinterest for the colours I used in my creation today.
I decided to cut So Saffron card using the large background die from the Eclectic Layers Thinlit Dies. Once I had cut the So Saffron card I cut the shape out to have a dimensional piece to add to the Whisper White card. I stamped the leaves in Old Olive ink onto Whisper White card and cut them out with the matching Eclectic Layers Thinlit Dies.  The background for each of the flowers is stamped onto Whisper White card using Cherry Cobbler ink. The pieces were cut using the matching Eclectic Layers Thinlit Dies. I did use my Aqua Painter to add a little So Saffron ink to the centre of the large flower. I then cut the overlay pieces from Cherry Cobbler card using the same dies. I also cut the flower with the stem from Old Olive card.
  Once I had all the pieces cut, trimmed and layered, I attached the flowers and the leaves to the card front. The large single flower is attached using dimensionals. I stamped the greeting from the Oh So Eclectic stamp set onto the top left hand side of the card front using Memento Tuxedo Black Ink. The Whisper White card is attached to scored and folded Cherry Cobbler card.
To decorate the inside of the card, I once more cut the large background and this time cut a strip out to add across the bottom of the Whisper White card. I created a large single flower in the same way as the one on the front of the card and attached it to the left hand side of the So Saffron trim.
I am really happy with this card, I love how well the colours work together and I do love the way you can cut lots of different shapes from the background piece. I think I will need to spend some more time creating with this stamp set. Let me know what you think.
Bye for now,
Kris
Product Used:


More Carols of Christmas

I have been working on cards for my August class which will be all about Christmas and I thought I would share this simple card I made using some old and some new product.
Firstly I embossed the bottom 3/4 of Whisper White card using the Holly Embossing Folder. I wrapped the top of the embossing with Night of Navy 1/2″ Gingham Ribbon and tied a knot. I attached the embossed card to scored and folded Night of Navy card. I cut the trees from Dazzling Diamonds Glimmer paper using the Card Front Builders Thinlits Dies and then sponged the Glimmer paper with some Night of navy ink.  I attached the trees to a circle cut using the Layering Circles Framelits Dies. I cut the deer from Night of Navy card using the Card Front Builders Thinlits Dies and attached the deer in front of the trees. The decorated circle is attached to a Night of Navy scalloped circle cut using the Layering Circles Framelits Dies.
  I attached the image panel to the card front using dimensionals.
To decorate the inside I simply stamped the greeting from the Carols of Christmas stamp set using Night of Navy ink.
The Carols of Christmas stamp set and co-ordinating Card Front Builders Thinlits Dies are from the soon to be released Holiday Catalogue. However, Stampin’ Up! is pre-releasing the stamp set for purchase on the 1st August, so you can get a jump start on your Christmas cards and perhaps some Christmas decorating. You can also get this stamp set for free by becoming a demonstrator during the month of July. You still have time! If you need any more information regarding the fabulous opportunity to become a Stampin’ Up! Demonstrator, contact me so that I can answer your questions.
In any case, I’d love to know what you think of my card.
Bye for now,
Kris
Product Used:


