Mediterranean Madness
This stamp set didn’t rate a second look from me when I first saw the Occasions Catalogue but then I started seeing examples on the boards and demonstrations using this set and I had to have another look.  With the inclusion of the Watercolour Pencils in the catalogue as well, these fine line images become more and more appealing.
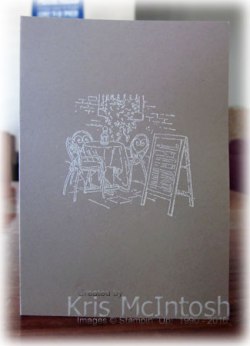
Since I have been taking a break from classes, I had time to clean my office work space and I found some Crumb Cake Note Cards. These note cards are gorgeous and I wondered what they would look like if I stamped the Mediterranean Madness images using Versamark ink and then embossed the images using White embossing powder. I think the images are kind of dreamy and lend themselves to lots of different occasions for card giving. I decided to share them with you to see what you think. They have inspired me to try some different looks using this stamp set, so I might be back with some more real soon.
I’d love to hear what you think of this set of cards. I believe they might need stepping up a bit.
Bye for now,
Kris
Product Used:


Sending Love
This is one of the first product suites that I bought from the soon to be released Occasions Catalogue. The colours are amazing and I love that although it seems particularly geared towards Valentines, it can be used all year round to give someone a little lift or even to add small notes to your children’s lunch boxes to let them know that even though you are not there, you are with them in spirit. When we were at Onstage Live in November, we were given the opportunity to use this product suite to create some 3 x 3″ note cards.  I decided to CASE one of the note cards and create this card using the current Freshly Made Sketch challenge.
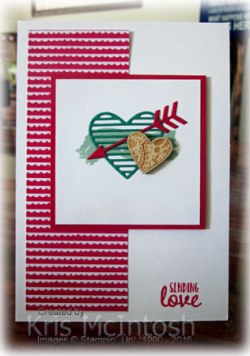
I added a strip of the Sending Love Designer Series paper to the left hand side of scored and folded Thick A4 Whisper White card. I stamped the greeting from the Sealed With Love stamp set using Real Red ink. To create the image panel I stamped the background stamp from the Sealed With Love stamp set using Mint Macaron ink. I cut the large heart from Emerald Green card using the Love Notes Framelits Dies and attached it over the stamped image. I cut the arrow from Real Red card again using the Love Notes Framelits Dies and attached it over the large Emerald Green heart. Lastly I attached the wooden heart from the Sending Love Embellishments using Glue Dots. The image panel is attached to Real Red card and then the card front using dimensionals. Inside the card I stamped the row of four hearts from the Sealed With Love stamp set using Real Red ink across the top of Whisper White card. The Whisper White card is attached to Real Red card.
This Product Suite will form the basis of my first class for 2017. I really love the prodseucts and can’t wait to share them with my customers.
I’d love to hear what you think.
Bye for now,
Kris
Product Used:


The Perfect Mix

Here is an idea which might be useful to some of you who love to cook but also love Project Life. My granddaughter Elyssa loves to cook and is really keen to create her own recipe book. She has made up a folder and puts in recipes that she might like to try – I might add at this stage it only has two sections, Desserts and Dinners. Desserts fills the book with about 3 dinner options! I guess I know what her priorities are.
Anyway last year we spent a day creating some Donut Muffins which were a big hit with everyone. At the time I took a photo of her with her muffins to show to her Mum. Since she loves to cook and is always asking her Mum to let her make something, I decided that once she has created a recipe and finds that she likes it and will make it again, that her Mum or I will take a picture and add the recipe to her 6 x 8″ Project Life Recipe Book. So I was very excited when I saw the Perfect Mix stamp set in the Occasions Catalogue and had to get it in my pre-order. I created the “Ingredient” and “Method” cards in MDS, once printed I added the stamped images using Memento Tuxedo Black ink and coloured using the soon to be released Watercolour Pencils. Doesn’t she look happy with herself? I love to see my grandchildren with smiles on their faces, especially when they have achieved something special.
The recipe pages will work perfectly with this particular pocket option and the other option that has the 4″ x 6″ pocket at the top and the two 3″ x 4″ pockets at the bottom of the page.
Well, what do you think? This is just another way that Project Life can help you in your every day life. I don’t know about you but I have a collection of recipes that I have had for many years, which I use constantly. I hope that this becomes Elyssa’s most used recipe book.
Bye for now,
Kris
Product Used:


Sitting Here

Today I am sharing with you a card I made using the Sitting Here stamp set. This stamp set was given to me by Stampin’ Up! at the Onstage Local event in April this year. This is the first card I have made using it (apart from one greeting) – I know, it’s embarrassing. However, the release of the Watercolour Pencils has made me view this stamp set in a new light. (I told you I have been scouring my stash of stamps to find images to colour.) Anyway the SUO Challenge to use Circles, Ovals or Squares on your creation inspired me to create this card. I stamped the greeting from the Thoughtful Banners stamp set onto the lower right hand corner of Crumb Cake card using Early Espresso ink.  I embossed the stamped card using the Brick Wall Embossing Folder and then used a sponge to add Crumb Cake lightly across the embossed card before attaching to scored and folded Early Espresso card. I stamped the swing seat image onto Shimmer White card using Memento Tuxedo Black ink. I coloured the image using Early Espresso and Old Olive Watercolour Pencils and a Blender Pen. The image was cut using one of the oval Stitched Shapes Framelits Dies, attached to an Early Espresso scalloped oval cut using the Layering Ovals Framelits Dies before attaching to the centre of the embossed Crumb Cake card. I stamped the pillows onto Shimmer White card using Memento Tuxedo Black ink, coloured them using the Real Red and Basic Gray Watercolour Pencils and a Blender Pen.
  The pillows were hand cut and using the stylus from my scoring Tool, and a foam mat, I gave them a little dimension. They are attached to the image panel using dimensionals.
To decorate the inside of the card, I embossed Crumb Cake card using the Brick Wall Embossing Folder and once more used a sponge to add Crumb Cake ink across the card. I attached a narrow strip of Early Espresso card behind one long edge of the embossed card before attaching to Whisper White card.
Well I am impressed, I love this card. It’s just the right sort of card to send to a friend who you haven’t seen for a while. What do you think?
Bye for now,
Kris
Product Used:


Merry Christmas

It’s Christmas morning and all is quiet before everyone arrives. I love how organised and pretty the tree looks with the presents all wrapped and waiting. The cooking is done and all is ready to spend a wonderful day with my family. Soon there will be lots of laughter and lots of paper spread all around the house. It’s the kind of chaos that I love.
I want to wish each and everyone of you a Merry Christmas and a happy and prosperous New Year. If you are on the road this Christmas please take care and keep safe.
I will be back to share with you again in a couple of days.
Merry Christmas and bye for now.
Kris
Sale-a-Bration Sneak Peak

Today I thought I would share a card I made using the Avant Garden stamp set which will be Free with a qualifying order during the Sale-A-Bration period from 4th January to 31st March. The stamp set contains three greetings and seven images of flowers and leaves and also a background stamp. I stamped the flower stem image onto Shimmer Paper using Memento Tuxedo Black ink and then used my Watercolour Pencils and Blender Pen to add Real Red to the flowers and Old Olive to the leaves and stem. Can you tell I am loving these Watercolour Pencils? I always think that I am not the “colour in” type, but I have been searching through my stamp sets and looking for sets that contain images I can colour in just to use these Watercolour Pencils.
Anyway, once the image was coloured I attached the image panel to Old Olive card and then Whisper White. The Whisper White panel is attached to scored and folded Real Red card.  I attached a strip of Whisper White Mini Pompom Trim to the back of a piece of the Sending Love Designer Series Paper (from the Occasions Catalogue) and attached it to the card front, covering the lower part of the flower stem. I ran some Fast Fuse onto the Designer Series Paper and attached a length of Whisper White 5/8″ Organza Ribbon. I stamped the greeting from the Avant Garden stamp set onto Whisper White card using memento Tuxedo Black ink and cut it out using an oval from the Stitched Shapes Framelit Dies. I attached the greeting to an Old Olive scalloped oval cut using the Layering Ovals Framelits Dies and then to the card front using Mini Glue Dots.
Can you tell this is the same layout as the card I made for the Stampin Gals Gone Wild challenge recently. I love the sketch and thought it work well for this card too.
Now that Christmas is almost here and most of my shopping, wrapping and cooking is done, I might get a chance to create some more with the new products that I purchased on the demonstrator pre-order.
Bye for now,
Kris
Product Used:


Grandchildren’s Christmas Cards

I like to create something special for my grandchildren’s Christmas cards each year. This year I decided to do a Waterfall card. I haven’t done one of these in ages and if you want some instructions look no further than Splitcoaststampers. It is fairly easy to make.
Once again I have used the Candy Cane Lane Designer Series Paper to create my cards. I attached the Designer Series paper to Whisper White card. Then I added the cross bar of Whisper White and used the retired Antique Brads to attach it to the Whisper White card. Next I attached the waterfall piece in the centre of the cross bar.  The whole piece is attached to scored and folded Early Espresso card. There are four little panels which are attached to the waterfall. I stamped “Merriest wishes” from the Merriest Wishes stamp set (this stamp set is also on the Year End Closeout sale at a reduced price) onto the lower right hand corner of one of the Whisper White cards using Early Espresso ink. The four Whisper White panels are embossed using the Softly Falling Embossing Folder. I attached the embossed card to Early Espresso card and then they are attached to the waterfall.
  The lowest panel – in my case the one with the greeting is attached to the lowest part of the waterfall and then the other three cards were attached. To decorate the top panel, I cut the little gingerbreadman from the Designer Series Paper and attached him using Tombow Multipurpose Glue. I added a little candy cane which I stamped onto Whisper White card using the image from the Candy Cane Christmas stamp set using Real red ink and hand cut. The second panel has the little mittens attached.
  Once more these are hand cut from the Designer Series Paper and attached using the Tombow Glue. The third panel has a little star and the fourth panel has the Christmas Tree, also hand cut from the Designer Series Paper.
To decorate the inside of the card I attached a narrow strip of Early Espresso card behind one long edge of Designer Series Paper and attached it to Whisper White card.
Since I have six grandchildren, four girls and two boys, I made six of these cards. However, I used the Crumb Cake Designer Series Paper from the Candy Cane Lane Designer Series Paper on the boys cards.
The little tassels at the bottom of the Waterfall were made using the Candy Cane Lane Baker’s Twine. This Twine is so pretty. The Whisper White Twine has a red metallic thread running through it which makes it really sparkle. The twine is on the Year End closeout sale at a reduced price. 
I love these cards and fortunately so did my grandchildren. I’d love to hear what you think.
Don’t forget if you need to purchase any of the supplies I have used (except unfortunately the Designer Series Paper which is sold out), the click on the links below to take you to my online store.
Bye for now,
Kris
Product Used:


Christmas Double Z-Fold
Thought I would pop in and share with you the card I made for my daughters and their families this year. I had some die cut pieces left over from the Framed Art piece that we made at the All Day Class and so I thought I would use them up on these Christmas cards.
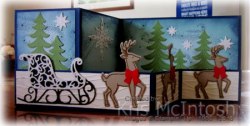
I sponged Soft Sky and Night of Navy ink around the edges of the Soft Sky card. I stamped the starry image from the Star of Light stamp set using Night of Navy ink and attached the pieces to the scored and folded Night of Navy card.  The trees from the Santa’s Sleigh stamp set are stamped with Wild Wasabi ink onto Wild Wasabi card and cut out using the matching die from the Santa’s Sleigh Thinlit Dies. I attached a few stars cut from Dazzling Details Glimmer Paper using the Starlight Thinlits Dies. I embossed Very Vanilla card using the Seaside Embossing Folder and attached them to the scored and folded Night of Navy card. The panel was then attached to the card base. The sleigh pieces were cut from Basic Black card and Dazzling Details Glimmer Paper using the Santa Sleigh Thinlit Dies and attached to the left hand side of the Very Vanilla card.
  The reindeer from the Santa’s Sleigh stamp set were stamped on Crumb Cake card using Soft Suede ink and then cut out using the matching dies. The reindeer are placed across the Very Vanilla card. The bows are cut from Real Red ink using the Santa’s Sleigh Thinlit Dies. I have attached a Very Vanilla panel to the back of the card to add my message. I love these Z-Fold cards, don’t you.
Remember to purchase any of these products, just click on the link below to take you to my online store.
Bye for now,
Kris
Product Used:


SUO Challenge and a Sneak Peak
Ok I’m still on a roll, posting just about every day with a new project for your enjoyment and mine. Today’s card was made to meet the criteria for the Stampin’ Up! Only challenge. All you had to do was use a shape, oval, square or round. I chose round.
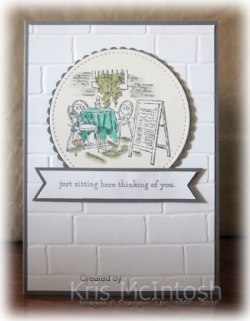
I embossed Whisper White card using the Brick Wall Embossing Folder and attached it to scored and folded Basic Gray card. I stamped the image from the Mediterranean Moments stamp set onto Shimmery White card using Memento Tuxedo Black ink.  I coloured parts of the image using the Bermuda Bay, Old Olive and Basic Gray Watercolour Pencils (Oh My, you guys are going to love these) as well as a Blender Pen. . I cut the image using the largest circle in the Stitched Shapes Framelits Dies. I attached the image to a scalloped circle of Basic Gray card cut using the Layering Circles Framelits Dies. I attached the image to the card front using dimensionals. I stamped “just sitting here thinking of you” from the Sitting Here stamp set onto Whisper White card using Basic Gray ink.
  I punched the ends using the Triple Banner Punch, attached it to Basic Gray card and snipped the ends to match. The banner has dimensionals under each end to attach it slightly over the image panel.
To decorate the inside I attached a narrow strip of Basic Gray card behind one long edge of Whisper White card embossed using the Brick Wall Embossing Folder. The embossed panel is attached to Whisper White card.
When I received my Occasions Catalogue at Onstage Live earlier this year, I didn’t look twice at the Mediterranean Moments stamp set. However, after seeing all the beautiful samples shown on stage and also on the boards I was hooked. I am happy to report that I am not disappointed with my first effort. What do you think? I’d love to hear.
Bye for now,
Kris
Product Used:


Gift Tags
 What present is complete without a beautiful Gift Tag created by Nan. I love wrapping the Christmas presents and putting them under the tree. The grandchildren, love to pick them up and oh and ah over what might be in it. They get especially excited when they find one that is just for them.
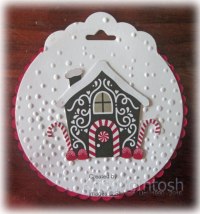
Anyway, as you know I hand cut the images from the Candy Cane Lane Designer Series Paper for the gift bags I made for my customers and I had a few left over so I put them to good use. I punched one side of a 10 x 10cm square of Whisper White card using the Scallop Tag Topper Punch and then ran them through the big shot with one of the largest Layering Circle Dies.  The resulting tag was embossed using the Softly Falling Embossing Folder and then I attached one of the cute little houses I had already hand cut. I cut another tag shape from Whisper White but this time I stamped with a greeting and “to/from” from the Candy Cane Christmas stamp Set using Early Espresso ink. I cut Real Red card using the largest scalloped circle from the Layering Circles Framelits Dies. The Real Red scalloped circle is sandwiched between the two Whisper White tags. I did have to trim some of the Real Red scalloped circle so that it wouldn’t cover the slot for the ribbon.
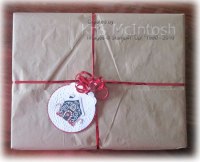
I used the brown paper that Stampin’ Up! supplies with all my orders to wrap the presents. The tags are attached using curling ribbon. I think they look cute, don’t you.
Unfortunately the Candy Cane Lane Designer Series Paper has already sold out. It was on a while stocks last basis, so I am sorry if you missed out. The Candy Cane Christmas stamp set is on the Year End closeout sale at a reduced price. So if you want this stamp set (believe me you do) then you need to order it right away as these products are on a while stocks last basis as well. I guess the best way to make sure you never miss out is order anything that you want from a catalogue right away.
Bye for now,
Kris
Product Used:


