Beautiful You
After watching the video I shared with you yesterday I had time to sit down and do some colouring. I coloured several images and, of course, I needed to create cards to use them.
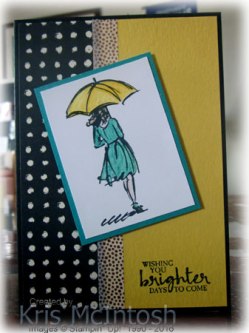
For this card I stamped the greeting from the Beautiful You stamp set onto Daffodil Delight card using Memento Tuxedo Black ink. I attached a piece of the Playful Palette Designer Series Paper down the left hand side and added a piece of the Affectionately Yours Washi Tape over the edge of the Designer Series Paper. The Daffodil Delight card is attached to scored and folded Basic Black card. I stamped the lady with the umbrella image from the Beautiful You stamp set onto Whisper White card using Memento Tuxedo Black ink. The image is coloured using Bermuda Bay, Daffodil Delight, Calypso Coral and Early Espresso Watercolour Pencils and a Blender Pen. I attached the stamped image to Bermuda Bay card and then the card front using dimensionals.
To decorate the inside of the card I attached a piece of the same Designer Series Paper to the lower edge of Whisper White card and added the same Washi Tape over the top edge.
I find the colours in this card are really striking and it has a happy feel despite the Basic Black. I will be back tomorrow with another card made using my practice pieces.
Bye for now,
Kris

Use this Hostess Code to place your order and receive a gift from me.
Product Used:


Watercolour Pencils
The addition of a new colouring option in the Occasions Catalogue on page 24 has me very excited. This will allow each and every one of us to take another look at those stamps in all our catalogues which cry out to be coloured in. I have always steered clear of colouring, but I kind of started to get the taste when we had the Blendibilities and I am really excited to be using the Watercolour Pencils. They can be used on all sorts of mediums and with all sorts of tools. You can just colour in if that’s what you like. You can colour and then use a Blender Pen to move the colour around and even up your pencils strokes. You can use them with an Aqua Painter and also with Watercolour Paper, but how about we look at this great video Stampin’ Up! have released and let Shannon West show us all about them.
Now you have seen the video I bet you are all as excited as I am by this fabulous new product and can’t wait to get your hands on them. I’ll be following up this video with some more watercolour pencil samples of my own over the next few days.
Don’t forget to use the Hostess Code for January – 23TQTAT6 – and you will also qualify to receive a gift from me.
Bye for now,
Kris
Freshly Made Sketch #269

The sketch this week at Freshly Made Sketches was open to lots of interpretation. I decided to break out some new product on my creation. I used copy paper to mask the left hand side of Whisper White card and then stamped the Watercolour Wash background onto the card using Soft Sky ink. I removed the copy paper mask and ran two rows of Floral Boutique Designer Washi Tape down the left hand side. I stamped the greeting from the So In Love stamp set onto the bottom right hand corner using Night of Navy ink. I attached the stamped panel to scored and folded Night of Navy card. I cut the string of dragonflies from Night of Navy card using the Detailed Dragonfly Thinlit Dies and attached them over the Watercolour Wash background.
Inside the card I simply ran the two strips of Floral Boutique Designer Washi Tape down the left hand side.
A very, very simple card and I like it a lot. In fact I like it so much it will be part of my class at Beachmere when they start again. However, I realised after I had finished that I added the Washi Tape in the wrong order to be exactly like the sketch. I should have had the wider Washi Tape close to the left hand edge. But never mind, I am quite happy with the card and I simply love the dragonflies. I will have to spend some more time with these products creating. What do you think?
Bye for now,
Kris
Use this Hostess Code this month when you place an order and get a gift from me.
Product Used:


Delicate Ombre

I love the Delicate Details stamp set which you can find in the Sale-A-Bration catalogue. This set features 5 beautifully delicate border stamps. I decided to use them all with a little ombre effect. I found a colour combination on Pinterest (where would we be without it). I embossed Whisper White card using the Falling Petals Embossing folder. The embossed card is attached to scored and folded Night of Navy card.  I stamped the different images in the Delicate Details stamp set from the top to the bottom of Whisper White card using Soft Sky, Marina Mist, Pacific Point and Night of Navy inks. I attached the stamped card to Night of Navy card and then the card front. I stamped the greeting from the So in Love stamp set onto Whisper White card using Marina Mist ink and cut it out using an oval Stitched Shape Framelits Die.
  I attached the greeting to a Night of Navy scalloped oval cut using the Layering Ovals Framelits Dies and then the card front using dimensionals. To decorate the inside, I stamped the image from the Delicate Details stamp set onto Whisper White card using Night of Navy ink. I had to stamp the image twice, side by side, which was easy as it is a photopolymer image. I cut the image out and attached it behind one long edge of Whisper White card which I embossed using the Falling Petals Embossing Folder. The whole piece is attached to the bottom of Whisper White card.
Well, I am pretty impressed with this stamp set. I think it has a lot of potential for adding that final finishing touch to a card. What about you? Does it appeal? Don’t forget to use the Hostess Code when placing your order so that you can get a gift from me.
Bye for now,
Kris
Product Used:


Dad’s present
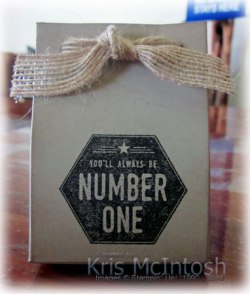
Because my Mum was celebrating her 80th birthday and my dad was only celebrating is 86th, Mum got most of the presents – although it is one they will share, so I thought I had better get Dad something just for himself. Since he still loves to play golf I thought I would give him a golf ball and created a little box for it to go in. I used the Gift Bag Punch Board to create a little box that would hold the golf ball. The stamp is from the Urban District stamp set and I used Early Espresso to stamp on the Crumb Cake box. I used the 5/8″ Burlap Ribbon to tie the box closed. Small gift but one that Dad will enjoy and it always looks better in a beautiful box. Don’t you agree.
Hope you are enjoying the new catalogues. Don’t forget you can use this month’s hostess code when ordering to ensure you get a small gift from me.
Bye for now,
Kris
Product used:


The Catalogue has landed
Today is the day and I am so excited. From today you can start ordering product from the Occasions Catalogue and at the same time earn Free product. You need to place an order for any Stampin’ Up! product that comes to $90.00 to earn one Free product – spend $180.00 and earn two Free products from the Sale-A-Bration catalogue and so on. If you do not have a demonstrator and live in Australia, particularly in the northern part of Brisbane, contact me to arrange for your catalogues to be sent to you.
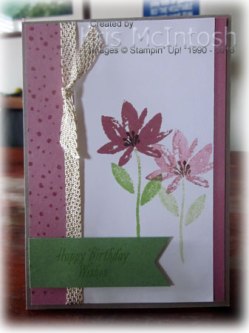
To launch the catalogue I decided to CASE the Sale-A-Bration catalogue and re-create one of the cards on Page 4. I started by stamping the large flower from the Avant Garden stamp set twice onto Whisper White card using Sweet Sugarplum ink without re-inking between stamps.  I stamped the stems twice using Wild Wasabi ink, again without re-inking between stamps. The leaves are added in the same manner. Lastly I added the flower centre using Early Espresso ink and you guessed it – without re-inking. I love the soft subdued look of the second image. I stamped the dotted background stamp down the left hand side of Sweet Sugarplum card using Sweet Sugarplum ink and then attached the stamped Whisper White panel. I wrapped the left hand side of the Whisper White card using the Gold Metallic Ribbon which is also one of the things you can earn free from the Sale-A-Bration catalogue and tied a knot.
  The Sweet Sugarplum card is attached to scored and folded Tip Top Taupe card. I stamped the “happy birthday wishes” which is also part of the Avant Garden stamp set onto Wild Wasabi card using Wild Wasabi ink. The right hand edge is punched using the Triple Banner Punch before attaching it to the card front.
To decorate the inside of the card, I stamped Sweet Sugarplum card with the dotted background image using Sweet Sugarplum ink. I attached the stamped card to Whisper White card and wrapped the join with the Gold Metallic Ribbon.
Well what do you think? Need to rush out and check out the catalogue and place your order, or is it already worked out. If you don’t already have a catalogue you can click on this link to download the PDF for the Occasions Catalogue the Sale-a-bration catalogue or click on the links on the right hand side. I have added a Hostess Code to the bottom of this post which you can use when you place your order. Everyone who places an order with me during the month of January will receive a gift. They will be posted out to you early in February.
So go on, grab a coffee and start working out your wish list.
Bye for now,
Kris
Product Used:


Happy Birthday Dad

My Mum and Dad share the same birthday 2nd January, which means I have to be super organised when it comes to their birthday cards. This year Dad’s card was easy to create using the Urban Underground Product Suite. I created a card that I hope looks a little like a tool belt and my inspiration comes from the catalogue itself. I used Crumb Cake card and scored it into 3 panels and sponged around all of the edges and the edges of the folds using Crumb Cake ink.  I also cut a narrow strip of the same card and scored it into 3 panels as well. The small panel has what look like the heads of screws stamped into each of the corners of the three panels using Early Espresso ink. The image itself is from the Nailed It stamp set which I received for free at Onstage Live in November this year. Once I had stamped the card, I sponged all around the edges and the edges of the folds using Crumb Cake ink. I attached this narrow piece of card to the top edge of the larger piece of scored card. I also stamped the greeting “worlds greatest” from the Urban District stamp set onto the left hand panel using Early Espresso ink.
 I stamped the letters from the Urban District stamp set onto Crumb Cake card using Early Espresso ink and cut them out using the largest square from the Stitched Shapes Framelits Dies. These pieces are also sponged around each edge using Crumb Cake ink. I attached one letter to each panel to spell out “DAD” but I only used adhesive on the sides and the bottom of the panel, not the top, so that I could use them as pockets.
  I stamped the tool images from the Nailed It stamp set onto Whisper White card using Memento Tuxedo Black ink, cut them out using the matching Build It Framelits Dies and then coloured them using the Early Expresso and Basic Gray Watercolour Pencils and a Blender Pen. Once I had coloured the images I added some Tombow Multipurpose Adhesive to the back of the images and slipped them into the pockets.
I love this card, it has lots of details that will suit my Dad perfectly – he has always loved to build and create with wood.
I guess by now you are all getting a little tired of seeing samples from product you can’t order yet. Well it’s only a couple of days till you can start placing orders for all these fabulous new products.
Bye for now,
Kris
Product Used:


Happy Birthday Mum
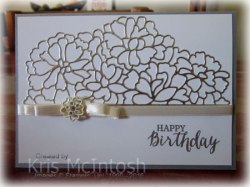
Thought I would pop in and share with you the card I made for my Mum’s birthday which is today. It’s a special one this year as she is turning 80. I was inspired by a beautiful card shared on pinterest by Sylwia Schreck. Sylwia created her card for the display boards at Onstage Dusseldorf. Of course I did change the greeting but am truly grateful that Sylwia shared her gorgeous card.
I embossed “happy birthday” from the Rose Wonder stamp set onto the lower right hand corner of Whisper White card using Versamark ink, which I sprinkled with Silver Embossing Powder and then heat set.  I cut Silver Foil Paper using the So Detailed Thinlits Dies and attached it to the stamped Whisper White card. I will let you in on a little secret that was shared recently by a demonstrator whose name I have forgotten (but thank you). She attached strips of Tear and Tape across the width of the back of the card piece that is going to be cut with a detailed framelit. Once the piece is cut you remove the backing and you are able to attach the piece without worrying about leaving a trail of liquid glue on your card. Anyway, once the framelit piece was attached I wrapped the Whisper White card with the Very Vanilla 1/4 ” Satin Ribbon to cover the bottom of the die cut piece. I attached two pieces of the same Vanilla Ribbon in a circle using Glue Dots and then attached them to each other and the ribbon to create a double bow effect.
 The gorgeous Falling in Love Embellishment is attached to the centre of the ribbon using Glue Dots to finish off the bow.
To decorate the inside I cut Silver Foil Paper using the border from the Flourish Thinlit Dies. I attached the border across the bottom of Whisper White card. I cut the numbers from Silver Foil Paper using the Timeless Type Alphabet Dies (retired). The numbers are attached to the centre of the Whisper White card.
One of the things I think is kind of interesting about this card is that it mixes Whisper White card with Very Vanilla ribbon and I think it works really well, don’t you?
Bye for now,
Kris
Product Used:


px; left: 607px;”>Save
Happy New Year
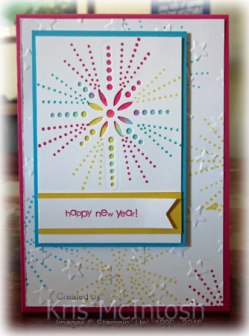
When I saw the Stampin’ Gal’s Gone Wild sketch challenge for this weekend. I decided to try and make a Happy New Year card to celebrate the beginning of 2017.
I had the idea to try and make the card look like fireworks. Not sure if it worked or not but here it is anyway.
I stamped Whisper White card using the stamp from the Star of Light stamp set that has 3 dotted lines. I stamped it multiple times to create a circle of colour using Melon Mambo, Tempting Turquoise and Daffodil Delight ink.  The stamped card was then embossed using the Lucky Stars Embossing Folder before being attached to scored and folded Melon Mambo card.
To create the focal panel on the card, I started by wetting a piece of Watercolour Paper with my Aqua Painter. Then using the Aqua Painter I picked up ink from my Melon Mambo, Tempting Turquoise and Daffodil Delight ink pads and rubbed the different inks to cover the Watercolour Paper. I cut Whisper White card using one of the Starlight Thinlit Dies.  I used the same stamp from the Star of Light stamp set to add Melon Mambo, Tempting Turquoise and Daffodil Delight between the circles in the die cut image. The coloured Watercolour Paper is attached to the back of the die cut Whisper White card, so that the colours show through the die cut image. The panel is attached to Tempting Turquoise card and then the card front using dimensionals. I stamped “happy new year” from the Teeny Tiny Sentiments stamp set onto Whisper White card using Melon Mambo ink and cut a “v” in one end. I attached the greeting to Daffodil Delight card and then the card front.
When I look at this card it seems to have a lot going on and is certainly very bright just like the fireworks on New Year’s Eve. So Happy New Year everyone. Let’s make it a great one.
Bye for now,
Kris
Product Used:


Mediterranean Madness – Take 2
 I shared with you the Crumb Cake Note cards I made using Mediterranean Madness yesterday. Well I did play with the images a little more and created the same set of cards using the Versamark ink and White Embossing Powder but this time I used the Watercolour Pencils to add just a little colour to each image. I think it gives the images a whole new dimension. I just coloured using the Watercolour Pencils and then used my Blender Pen to go over the colouring.
  This kind of washed the pencil off the embossing and made it stand out against the colour. Funny thing when you start to colour in you find that the images are really way more detailed than they look. There are a couple of cats in these images but I bet it takes you a while to find them and I don’t mean the one sitting on the chair.
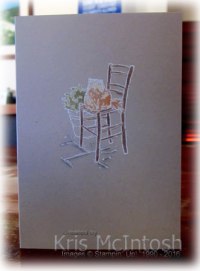
So what do you think? Which ones do you like the best, the plain White images or the ones with a little colour. I love both of them.
While we are chatting can I please say Thank You to each and every one of you who visit my blog.  A really big thank you to those of you who leave a comment. It is always nice to hear what someone else thinks of your work. Thanks also if you follow me on Pinterest, or just pin my work. I have been trying to post almost every day for the last month and while I have loved it very much I am not sure I can keep up that sort of commitment. I do promise to post regularly and keep you all up to date with what’s new and to share new product.
Happy New Year and stay safe tonight while you are celebrating.
Bye for now,
Kris
Product Used:


