Christmas Card Gifts

I said I would pop back and share with you the card sets that I made to go in my customers Christmas Gift Bags. Each of the cards is created using the Whisper White notecards, which come with matching envelopes.
I found the instructions and the layouts for each of these cards on Pinterest. So lets start with the little box which was shared here by Dawn Griffin. I loved the paper which she used and since I still had some It’s My Party Designer Series Paper (retired) in my stash I used the same paper to create each of my boxes. I created the first box using the same Melon Mambo Designer Series Paper and Melon Mambo and Whisper White card.  I went on to create boxes using Mint Macaron and Whisper White card, with Mint Macaron Designer Series Paper, Sahara Sand & Whisper White card with the Confetti Designer Series paper and the last one is Crushed Curry and Whisper White with the Basic Black/Balloon Designer Series Paper. I create four cards to go inside each of the box using all of the Designer Series Paper as the boxes.
The first card has the same banner as Dawns card but I used a different greeting. The end of the Designer Series paper is punched using the Triple Banner Punch.  I stamped the greeting from the Balloon Adventures stamp set (from the Occasions Catalogue to be released on the 4th January) onto Whisper White card using Melon Mambo ink and cut out the greeting using the oval Stitched Framelit Die. I attached it to Sahara Sand card cut using a scalloped die from the Layering Ovals Framelits Dies. The greeting is attached to the card front using dimensionals.
The second card is created using the layout found on this video on Pinterest, once again by Dawn Griffin. I used the same Mint Macaron Designer Series Paper but again I used a different greeting. The greeting from the Balloon Adventures stamp set is stamped onto Whisper White card using Mint Macaron ink and cut out using the square Stitched Framelit Die. The greeting is attached to a Mint Macaron scalloped square framelit from the Layering Squares Dies and then the card front using dimensionals.
The third card comes from a Video on Pinterest by Angie Juda . Once again I have used the same Designer Series paper but a different greeting. This greeting from the Perfectly Wrapped stamp set is stamped onto Whisper White using Sahara Sand ink and cut out using a circle Stitched Framelit Die. The greeting is attached to a Sahara Sand circle scalloped cut out using the Layering Circles Dies and then the card front using dimensionals.
The last card for the set was inspired by this Christmas Card I found on Pinterest by Jo Blackman. I used another of the papers from the same retired Designer Series Paper to cover the lower half of the card front. I stamped the greeting from the Perfectly Wrapped stamp set onto Whisper White card using Crushed Curry in and cut it out using a circle Stitched Framelit Die. I stamped the balloon from the Confetti Celebration stamp set next to the greeting using Sahara Sand ink. The greeting is attached to a Crushed Curry scalloped circle cut using the Layering Circles Dies and then the card front using dimensionals.
I love the way these cards turned out and so did the ladies. Thank you to each of these talented crafters for the ideas and inspiration for my card set. I think I will have to use more of my Designer Series Paper to create these notecard sets in the future. If you want to purchase any of the product used in my notecard set, then click on the link below to go to my online store.
Bye for now,
Kris
Product Used:


Happy Birthday Abigail

Today is my eldest granddaughter’s 12th birthday. My, oh my, how quickly she is growing up. She finished primary school this year and is off to high school next year! Anyway we were lucky enough to be away in the caravan with Abigail and her brother and sister for a couple of days at the beach – lots of surfing and fishing. So much fun, but we had to come home today so she could celebrate with her Mum and Dad.
I have been dying to use the Beautiful You stamp set which I got on pre-order from the Occasions Catalogue, so had to create a birthday card for Abigail using the set.
I attached Smoky Slate Designer Series Paper from the Neutrals Designer Series Paper Stack to Whisper White card.  I wrapped the join using Silver 5/8″ Satin Ribbon and tied a knot. I stamped the greeting from the Beautiful You stamp set onto the top right hand corner using Rich Razzleberry ink. The Whisper White card is then attached to scored and folded Rich Razzleberry card. I stamped the image from the Beautiful You stamp set onto Whisper White card using Memento Tuxedo Black ink and coloured it using the gorgeous new Watercolour Pencils, also from the Occasions Catalogue. I found on Whisper White card that I coloured the image lightly using the Rich Razzleberry and Old Olive Watercolour Pencils and used the Blender Pen to move the ink around slightly to create a more even look. I used the Layering Square Framelit Dies to cut out the image and attached it to a Rich Razzleberry Scalloped Square, cut using the same dies. The image panel is attached to the card front using dimensionals.
Inside the card I added a narrow strip of Rich Razzleberry card behind one long edge of a piece of the same Smoky Slate Designer Series Paper and attached it to Whisper White card.
Once I had finished this card, I decided to try colouring the image on Shimmer White card. This time I used the Rich Razzleberry and Basic Gray Watercolour Pencils and a Blender Pen to colour the image. I made the card in exactly the same manner.
 Now, of course, I had to try using Watercolour Paper. So I stamped the image onto the Watercolour Paper using Stazon Jet Black ink. I coloured the image with the Rich Razzleberry and Basic Gray Watercolour Pencils and this time used an Aqua Painter. Once again the card is finished in exactly the same manner.
Which image do you like the best? I was torn when choosing which card to give Abigail but finally decided on the first card I made using the Whisper White card. Although, I must admit I do love depth of colour on the Shimmer White card and the lovely soft image created with the Aqua Painter on Watercolour paper.
I think this stamp set is going to be a favourite of mine and I believe lot’s of you as well.
Remember you can purchase any of the items I have used by clicking on the links below (although you will have to wait until the 4th January to purchase the stamp set and Watercolour Pencils.)
Bye for now,
Kris
Product Used:


Christmas Celebration
Last weekend I held my Christmas Party to thank my very loyal customers and friends who support my classes at home and purchase from my store. It is always lovely to be able to spend time with these ladies and celebrate another successful year. I like to give them some gifts which I have made for them to show my appreciation.
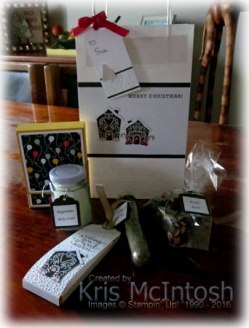
I buy blank bags and decorate them all the same. This year I stamped the greeting from the Greetings From Santa stamp set onto Whisper White card using Early Espresso ink. I embossed the stamped card using the Softly Falling Embossing Folder. I attached the embossed card to Early Espresso card and then the bag front. I created a little tag which has a little panel of Whisper White card embossed using the Softly Falling Embossing Folder, attached to Early Espresso card. I punched the top of the tag using the Scalloped Tag Topper Punch. The “to” stamped in Early Espresso comes from the Crazy About You stamp set. I stamped the christmas tree from the Candy Cane Christmas stamp set onto Whisper White card using Crumb Cake ink, cut them out and attached them to the tag. I tied the tags to the bag using Stitched Satin Ribbon, some Real Red, some Very Vanilla. The bags were filled with homemade goodies, Peppermint Body scrub, Italian Herb Mix, Rocky Road and a Chocolate slider. As well as these goodies, I made a set of four birthday notecards in a little cover. I will pop back soon with the instructions for the notecards.
We had a wonderful day and I believe everyone enjoyed themselves. I look forward to catching up with all of these lovely ladies again in the New Year.
Bye for now,
Kris
Product used:


Merry Christmas Mum
Are you like me? I make cards all the time for my class at Beachmere, three a week, one of which has been a Christmas card since the beginning of August. However, when it comes to my family, I always make them something I haven’t made before. Especially for my Mum and Dad, because Mum comes to the classes at Beachmere and she has the same cards as me!
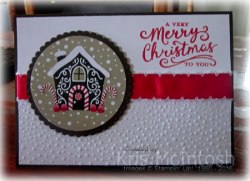
So this is the card I made for my Mum and Dad. I embossed the bottom half of Whisper White card using the Softly Falling Embossing Folder. I stamped the greeting from the Reason for the Season stamp set onto the top right hand corner of the embossed card using Real Red ink. I wrapped the embossed card with the Real Red 3/4″ Stitched Edge Ribbon and attached it to scored and folded Early Espresso card. I cut a circle from the Candy Cane Lane Designer Series Paper using the Layering Circles Framelits Dies and attached it to an Early Espresso scalloped circle cut using the same dies. I hand cut the little house from the Candy Cane Lane Designer Series Paper and attached it to the centre of the circle. The image panel is attached to the card front using dimensionals.
To decorate the inside I added a narrow strip of Early Espresso card behind one long edge of Candy Cane Lane Designer Series paper and attached it across the bottom of Whisper White card. I cut another of those cute houses from the designer series paper and attached it to the left hand side of the designer series paper.
I love this card, simple but it looks so cute. What do you think?
Bye for now,
Kris
Product Used:


Happy Anniversary
My daughter Sarah and son-in-law Sean recently celebrated 16 years of marriage. Love and congratulations to you both.
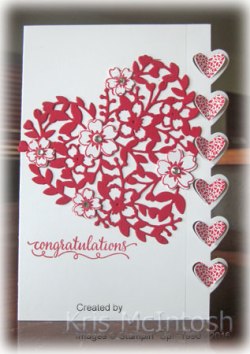
Of course I had to make a card and admit I was running a little bit late with my creation so I cased one from the boards at Onstage this year created by Juana Ambida. This card uses some product that is available currently and some which will become available on the 4th January. I absolutely love the way Juana was able to co-ordinate these products.
I cut A4 Thick Whisper White down the right hand side using the heart border from the Love Notes Framelits Dies. After the card was cut I stamped the centre of the hearts using one of the images from the Sealed With Love stamp set using Real Red ink.  The little stamp fits the die perfectly. I added a little dimension by bending the hearts upwards. I cut the large heart from Real Red card using the Bloomin’ Heart Thinlit Dies and attached it to the card front. I stamped three small hearts and two large hearts from the Bloomin’ Love stamp set onto Whisper White card using Real Red ink and cut them out using the matching Bloomin’ heart Thinlit Dies. I attached the flowers to the Real Red die cut heart and added a Basic Rhinestone to the centre of each of the flower. Lastly I stamped congratulations from the So in Love stamp set using Real Red ink. Inside the card I added a narrow strip of designer series paper from the Sending Love Designer Series Paper Stack. The papers helps to accentuate the heart border.
I love this card, don’t you? I love that it uses a blend of current product with some of the exciting new products in the 2017 Occasions Catalogue. It’s also kind of exciting that as a Demonstrator I get to see and use these products before the catalogue goes live for customers. Maybe you have been thinking about becoming a demonstrator then this is an excellent reason to join. If you need more information just contact me and we can have a chat about what you need and how Stampin’ Up! can meet this need.
Bye for now,
Kris
Product Used:
Unfortunately I cannot link to the new product just yet.


Gift Card Holder

This is another project which we made at our All Day event at the Beachmere Retirement Resort. This type of Gift Card Holder have been around since Stampin’ Up! added the Envelope Punch Board to our catalogue. Today I will share with you my version and if you love it you can download the FREE PDF tutorial here or by visiting my Free Tutorial Page.
I have once more used the gorgeous Candy Cane Lane Designer Series Paper and the Cookie Cutter Christmas stamp set.  I absolutely love these products and obviously everyone else does too because the Designer Series Paper is in the Low Inventory stage and will only be available while stocks last. The Christmas Banner comes from the Time of Year stamp set (Hostess). The Merry comes from the Holly Jolly Greetings stamp set.
What I particularly love about this Gift Card Holder is that when you open it the gift card slides up in the little pocket that is created on the inside. I also love that you don’t need adhesive on the bottom flap, it is held closed by the Real Red 3/8″ Stitched Ribbon. So you can’t put too much adhesive and have your gift card getting stuck!
I know most of you will be organised and have your Christmas projects already done, however, if you are like me you and leave everything until the last minute, I hope you find this tutorial useful.
Bye for now,
Kris
Product Used:


Christmas Framed Art

Every year I hold an all day event with the ladies from my Beachmere class. We get together at 9am and craft until all the projects are completed. This year I tried something a little different and die cut all the pieces for the projects before the class, so the ladies could spend more time creating and less time lining up at the Big Shot. All of the ladies are experienced stampers and have used a Big Shot more than once! It made the day a lot more enjoyable for everyone.
The first and probably the most complicated project this year was our Framed Art piece. I love creating these decorator pieces to use anytime, but especially at Christmastime. The background card is Soft Sky which is sponged around the card to a depth of about 2″ using Soft Sky ink. The edges were sponged again using Night of Navy ink but this time to a depth of about 1/2″. The swirly star image from the Star of Light stamp set is stamped across the Soft Sky card using Night of Navy ink. There are two layers of Very Vanilla card across the bottom of the frame which have been embossed using the Seaside Embossing Folder. The top edge of each piece is cut to create a snow-drift look. The large solid star at the top of the frame is cut from Night of Navy card with the detailed star over the top cut from Dazzling Details Glimmer Paper – both stars cut using the Starlight Thinlits Dies. There are a couple of small stars cut from the same Dazzling Details Glimmer Paper using dies from the same set. The trees from the Santa’s Sleigh stamp set are stamped on Wild Wasabi card using Wild Wasabi ink and cut using the matching Santa’s Sleigh Thinlits Dies. The sleigh is cut from Basic Black card with the detailed layer cut once more from Dazzling Details Glimmer Paper.
  These pieces are also cut using the dies in the Santa’s Sleigh Thinlits Dies. The reindeer from the Santa’s Sleigh stamp set are stamped onto Crumb Cake card using Soft Suede ink and cut out using the same matching die (Santa’s Sleigh Thinlits Dies). The bows for the reindeer are cut from Real Red card. The presents in the sleigh are hand cut after stamping onto Very Vanilla card using Night of Navy, Wild Wasabi and Real Red ink. Some of the decorative bows on the presents are stamped before die cutting and a couple are just die cut from Real Red and Night of Navy ink (Santa’s Sleigh Thinlits Dies). There is a sweet little teddy image in the Santa’s Sleigh stamp set and matching die so of course I needed to add one to the sleigh. The teddy is also stamped in Soft Suede ink on Crumb Cake card. The hardest part of creating one of these projects is placement. I attached the narrowest piece of Very Vanilla card to the bottom edge of the Soft Suede card and then played with the other images, placing some between the layers of Very Vanilla and some behind the back edge of the deepest piece. I liked the way this seemed to reinforce the snow drift effect. The pieces in both these stamp sets and matching thinlit dies lend themselves perfectly to this type of crafting. As a special bonus you can download the tutorial which we used in class to create this framed art piece. You can also find the tutorial on my Free Tutorials page.
I’d love to know what you think, so leave a comment please and if you create your own art piece, I’d love to see a photo.
Bye for now
Kris
Product Used:


Chocolate Treats
I held my last class at the Beachmere Retirement Resort for this year yesterday. I like to give each of the ladies who attends a small chocolate treat to celebrate our year together.
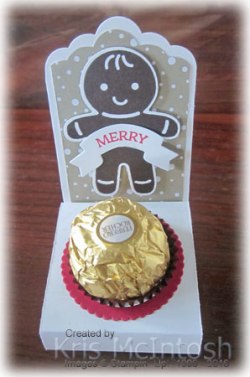
This year I followed some instructions shared by Lynda Emerson. They are so cute and hold a Ferroro Roche chocolate perfectly.
I used Whisper White card and punched the long end using the Scallop Topper Tag Punch. I added a layer of Candy Cane Lane Designer Series Paper to the back also punched with the Scallop Topper Tag Punch. I punched a piece of Real Red card using the 1-3/8″ Circle Punch and then cut around the hole using one of the Layered Circle Framelits Dies to create the little frame for the place where the chocolate sits. I stamped the Gingerbreadman image from the Cookie Cutter Christmas stamp set onto Whisper White card using Early Espresso ink and punched him out using the Cookie Cutter Builder Punch. I attached the Gingerbreadman to the designer series paper using dimensionals. I cut the little banner using the framelit from Home Sweet Home Framelits Dies and stamped Merry from the Sweet Home stamp set using Real Red ink. I attached the banner over the Gingerbreadman.
Everyone thought they were so sweet. So thanks to Lynda for a wonderful idea.
Bye for now,
Kris
Product Used:


Boxed Gift Tags
 As promised here are the gift tags I created as part of the Secret Santa Gift for the Christmas Party I attended recently.
To create the tags I cut A4 Thick Whisper White card at 6″ x 3″ and scored along the 6″ length at 3″ to create a 3″ x 3″ card. I added a piece of the Candy Cane Lane Designer Series paper to the card front. I cut Whisper White card and Early Espresso Card using the Layering Circles Framelits Dies so that they would sit on the Designer Series Paper.  I used the Gingerbreadman, Reindeer and Teddy Bear images from the Cookie Cutter Christmas stamp set to add to the front of the tags. Each image is punched using the Cookie Cutter Builder Punch.
I stamped inside the tags using the “to/from” image in the Candy Cane Christmas stamp set and Early Espresso ink.
I also created a gift box using the Envelope Punch Board to hold the gift cards. I used the Santa Clause image on the front and coloured him using Real Red, Basic Gray, Smokey Slate and Pink Pirouette Stampin’ Write Markers.
I am really happy with this little box and hope that whoever received it was happy too. What do you think?
Bye for now,
Kris
Product Used:

Boxed Card Set
My husband and I attended a Christmas Party recently where we needed to give a gift and I thought why not put together some handmade cards. I have always loved Designer Series Paper but have found it hard to cut into. You know how it is you need one piece of beautiful paper for a card and you cut a strip the width you need and then you are left with pieces that you can’t use. I did some searches on Pinterest and found a 6″ x 6″ one sheet wonder which creates three cards by Sylvia Durocher. I thought this was a wonderful idea, three pieces of designer series paper which would create three cards with no wastage. I used this to create three Christmas cards using the Cookie Cutter Christmas stamp set.
 They each use the Candy Cane Lane Designer Series Paper and the Cable Knit Embossing Folder with the addition of the Real Red 3/4″ Stitched Edge Ribbon. I used the Reindeer, Gingerbreadman and Teddy Bear images from the Cookie Cutter Christmas stamp set. You can download a free tutorial here to create your own set of card. I have also added this to my Free Tutorial Page.
I created a little box using the Envelope Punch Board to hold the three cards and decorated it in the same manner but using the Santa image as the feature. Santa is coloured in using Real Red, Basic Gray, Smokey Slate and Pink Pirouette Stampin’ Write Markers. I added a little Dazzling Diamonds Glitter to the image using a Two Way Glue Pen (retired) and a little bit of the Mini Pom Pom trim on his hat. I created the box using the backing sheet you get in the Designer Series Paper packages. I love to recycle!
 I didn’t write a tutorial for the gift box, but they are relatively simple to work out. I find the size envelope to match the size of my card on the guide on the Envelope Punch Board. I decide how deep I want my box to be and add that depth to the width and length of the cardstock size suggested on the Board. I punch the first time at the point suggested on the Board and then add the depth to that number and punch again. For example if the first punch is at 3″ and I want a depth of 1″, I punch and score at 3″ and then again at 4″ and continue to rotate, punch and score as if I was making an envelope.
I’ll pop back soon and share the gift tags and the decorated chocolate holder I also included in the gift.
Bye for now,
Kris
Product Used:


