My Rock Star
My grandson Ethan performed in his local inter-school talent quest last week. The talent quest is run by the Chaplains at the local primary and high schools to help keep them funded. I will have a Nanny brag and say that he is a very talented singer and guitar player. He performed very well, as did everyone else. It is really amazing how self assured young people are today. I am sure that I could never have stood up and performed in front of strangers or even friends for that matter, especially at age 10.
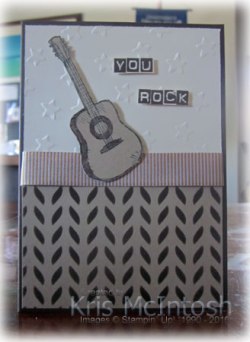
Anyway I had to make him a card to let him know how proud his Pop and I are. I used one of the Seasonal Decorative Masks to sponge Early Expresso ink onto Crumb Cake card. I attached this to Very Vanilla card which I embossed using the Lucky Stars Embossing Folder. I wrapped the top of the Crumb Cake card with Delightful Dijon 5/8″ Mini Striped ribbon and attached the whole panel to scored and folded Early Expresso card.  I stamped the guitar image from the Country Livin’ Stamp set onto Crumb Cake card using Stazon Jet Black ink and used a Blender Pen and Early Espresso ink to add some detail to the image. I cut the image out and attached it to the card front using dimensionals. I stamped the greeting using the Labeler Alphabet onto scrap Very Vanilla card using Early Espresso ink. I cut out the words and attached them to the card front using dimensionals.
Inside the card I attached a strip of the Crumb Cake card which had been sponged using the same Seasonal Decorative Mask and Early Espresso ink to the bottom of Very Vanilla card. I wrapped the top of the Crumb Cake card with Delightful Dijon 5/8″ Mini Striped Ribbon and attached the whole panel to the inside of the card.
I love this card and I know that Ethan did too. What do you think? Something you might like to try? I hope I have inspired you to try masking on your next card.
Bye for now,
Kris
Product Used:


Designer Series Paper Sale
I’m sure all of you will be just as excited as I am to be able to take advantage of this fantastic sale by Stampin’ Up!. Until the 31st October you can purchase three packs of Designer Series Paper from the list below and get one package FREE. Yes FREE.
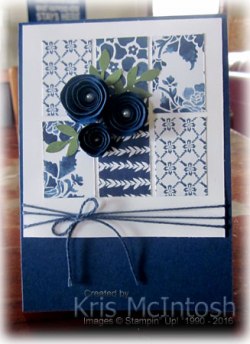
One of the papers included in the sale is the beautiful Floral Boutique Designer Series Paper and I thought I would share with you a card I made recently. This card came about as I was prepping for a class and I had lots of little ends from strips of the designer series paper laying on my desk. Instead of binning them as I would usually do (I know I am a little naughty), I decided to use them to make a card. I attached six pieces of the designer series paper to Whisper White card in a grid pattern. Wrapped the bottom of the card with the Night of Navy Solid Baker’s Twine and attached it to scored and folded Night of Navy card. I created three flowers for the front by punching Night of Navy card with the 1-3/4″ Circle, the 1-3/8″ Circle and the 1″ Circle Punches.
  I cut the circles into spirals and rolled them up to create the flowers. I added three sets of leaves punched from Old Olive card using the Owl Builder Punch. Once the flowers were attached to the card front, I pushed a Basic Pearl into the centre, just to finish them off.
I didn’t have enough scrap designer series paper left to decorate the inside, so I stamped the floral border from the Floral Phrases stamp set onto Whisper White card using Night of Navy ink.
So what do you think? Sometimes something gorgeous can be created from the scraps left laying around on your work table.
To get a good look at the papers included in this sale – just click on the links below. Some of the papers are in the Annual Catalogue and some are in the recently released Holiday Catalogue.


Hope you enjoyed this card and that you will find inspiration for your designer series papers.
Bye for now,
Kris
Product used:


Bordering on Birthday

I have been a little slow getting onto the computer this week as I feel like I am still on holidays. I was able to spend a fantastic week with my parents, children and grandchildren on a cruise up the Australian coast from Brisbane to Port Douglas. But now it’s time to get back to normal and start creating once more.
A friend celebrated her birthday while I was away and I thought I would share the card I made for her with you.  Can you believe this is the first time I have actually inked this Mixed Borders stamp set and created something that I love with it! I embossed Whisper White card with the Seaside Embossing Folder and attached it to scored and folded Watermelon Wonder card.
I stamped the leaves onto a strip of Whisper White card using Cucumber Crush ink and then stamped the flowers around the leaves using Watermelon Wonder ink. The stamped panel is attached to Watermelon Wonder card and then the card front. I stamped the greeting from the same stamp set onto Whisper White card using Cucumber Crush ink and cut the greeting using one of the Layering Circle Framelits Dies.  The greeting is attached to a circle cut from Watermelon Wonder card using another of the dies from the same set and attached to the card front using dimensionals.
Each of the borders in the Mixed Borders stamp set is designed to fit around the greetings. So if you stamp across the width of your card, like I have done on the front of the card you get a blank spot, which is where you put the greeting. My dilemma was how to use the border to decorate the inside of my card without leaving a blank spot – sooo, I decided to use the long sections only and placed them down the left hand side of the Whisper White panel. I think it looks effective and doesn’t leave me with a blank spot to fill. What do you think?
This card turned out so pretty, I believe I might have to play with this set a lot more.
Bye for now,
Kris
Product Used:


Congratulations

A lovely friend of mine achieved a wonderful Stampin’ Up! milestone recently and I wanted to congratulate her. Well done Joyce! This is the card I made for her.
I cut a rectangle of Night of Navy card diagonally and embossed the card using the Petal Burst Embossing Folder. I attached a narrow strip of Daffodil Delight card behind the diagonal edge of each piece and then attached them to Whisper White card. I stamped the greeting from the retired Sassy Salutation stamp set using Night of Navy ink.
 The panel is attached to scored and folded Crumb Cake card. I stamped the flower from the You’ve Got This stamp set onto Shimmer White card using Stazon Jet Black ink. I coloured the flower using an Aqua Painter and Daffodil Delight and Old Olive ink. I cut the flower out and attached it to the card front using dimensionals.
To decorate the inside of the card I embossed Night of Navy card with the Petal Burst Embossing folder, attached a narrow strip of Daffodil Delight card behind one long edge before attaching it to Whisper White card.
I really love this flower, don’t you?
Bye for now,
Kris
Product Used:


Birthday Wishes

My friend Gwen celebrated her birthday recently and I was inspired by many of the cards I have seen on Pinterest to create her card. I started by cutting Night of Navy card using both of the dies in the Detailed Floral Thinlits Dies. I cut the card the same size as the card front so that I could get a nice edge around the dies. I wrapped the card with Burlap Ribbon and attached it to scored and folded Thick A4 Whisper White card.
I cut the flowers from Very Vanilla card using the Botanical Builders Framelits Dies and sponged them with Daffodil Delight ink. The flower centres are cut from Daffodil Delight card and the leaves from Pear Pizzazz using the Botanical Builders Framelits Dies. I stamped the greeting from the Build a Birthday set onto Whisper White card using Night of Navy ink and once more sponged the edges using Daffodil Delight ink.  The flowers, leaves and greeting are attached to the card front using a combination of Dimensionals and Glue Dots. I added Basic Pearls to the centres of the flowers, although the extra large pearl is now retired.
Inside the card I wrapped Whisper White card with the Burlap Ribbon. I cut two more flowers from Very Vanilla card and once more sponged them using Daffodil Delight ink. The leaves are cut from Pear Pizzazz card.
This is a very bulky card but since it was hand delivered that is ok. I don’t think it would survive the mail!
Bye for now,
Kris
Product Used:


Wedding Wishes

I needed to make a wedding card for a special friend who was married last Saturday – Congratulations Gwen and Jan. I couldn’t go past this one I found on Pinterest by BJ Peters.
I cut Gold Foil card using the small die from the Detailed Floral Thinlits Dies and attached it to a layer of Whisper White card and one more layer of Gold Foil. I stamped the greeting from the Floral Phrases Stamp set onto Thick A4 Whisper White card using Versamark ink, sprinkled it with Gold Embossing Powder and heat set. The Gold Foil panel is attached to the card front using dimensionals.
Inside the card I stamped the border image and also the large floral image from the Floral Phrases Stamp set using Versamark ink. Once more they were sprinkled with Gold Embossing powder and heat set.
Since the card was for such a special occasion I felt it needed a special envelope. I used Whisper White card and the Envelope Punch Board to create a card which is the perfect size. I added 3/4″ circles punched from Gold Foil to the back of the envelope with retired gold brads and used some retired gold cord to create a closure. For the front of the envelope I added a layer of Gold Foil and then a layer of Whisper White which has been cut using the large Detailed Floral Thinlits Die.
I love how easy it is to create such beautiful and co-ordinating pieces using the wonderful products from Stampin’ Up! Don’t you?
Bye for now,
Kris
Product Used:


12 x 12″ Project Life

Tonight is my Memory Keeping Class and I thought I would share with you the page that everyone will be able to make. Of course they can if they wish use the pieces any way they want to. I found a double page scrapbook sketch on Pinterest which suited the photos that I had and would accommodate some of the cards from the beautiful Hello Lovely Project Life Card Collection.
I cut one of the 6″ x 4″ cards into four pieces 2″ x 3″ each. I attached one piece to the top of my Basic Black page and one at the bottom to create my banner.  No-one can see that the piece doesn’t go all the way and still gives the proper effect. You do need to take your time to line up the pieces but that’s easy with out grid paper. The photos and Project Life cards are layered onto Crumb Cake card and added to the page. My title is cut from Whisper White card using the retired Timeless Type Alphabet.
Usually when I make a layout like this I use a pocket page for the second layout, however, this time I only had a couple of extra photos from our weekend away with Ava and so I used the sketch to create the complimentary 12 x 12″ page.  The second half of the layout also uses Basic Black and Crumb Cake card. I added a couple of strips of the Washi Tape which comes in the Hello Lovely Project Life Accessory Pack across the top. This time my title is cut from Basic Black card using the Large Letters Framelits Dies. I used one more of the 2″ x 3″ pieces to create the banner behind my photo. For a bit of fun I used some of the images from the Day at the Beach stamp set (only available in Australia and New Zealand – item No. 142261) to complete the page. The images were stamped onto Whisper White card using Stazon Jet Black ink and coloured using Stampin’ Write Markers in colours to match the Hello Lovely Card Collection (Crumb Cake, Old Olive, Peekaboo Peak, Soft Sky and Tangerine Tango).
I love how these pages have turned out and now all I have to do is add my journaling tonight.
Kris
Product Used:


Thinking of You

This card was inspired by one I saw on Pinterest but I changed up the design a little. I stamped the background image from You’ve Got This onto Whisper White card using Rich Razzleberry ink and attached it to scored and folded Rich Razzleberry card. I stamped Thinking of You from the Wetlands stamp set onto scrap Whisper White card using Rich Razzleberry ink and punched it out using the 1-3/4″ Circle Punch. I sponged the edges and attached it to a 2″ Circle of Rich Razzleberry before attaching it to the card front.  I stamped a scrap of Whisper White using the background image once more and Rich Razzleberry ink and punched it out using the 1-1/4″ Circle Punch. I attached the 1-1/4″ circle to a 1-3/8″ circle of Rich Razzleberry card and then the card front using dimensionals. I cut Whisper White card using the second largest circle from the Layering Circle Framelits Dies,
  sponged the edges using Rich Razzleberry ink and attached it to a circle of Rich Razzleberry card cut using the largest circle from the Layering Circle Framelits Dies. The circle is attached to the card front using dimensionals. I stamped the flower from the You’ve Got This stamp set onto Rich Razzleberry card using Memento Tuxedo Black ink and cut out the flower head only. The flower is attached to the centre of the large Whisper White circle. I love how the circles are layered on top of each other, don’t you?
To decorate the inside of the card I simply stamped the flower once more onto Whisper White card using Rich Razzleberry ink. I used the You’ve Got This stamp set quite a lot when it was first released but it has been sitting idle on the shelf for a while now, I’m glad I got it out and used it once more. Maybe I’ve inspired you to use this stamp set once more too.
Bye for now,
Kris
Product Used:


Happy Father’s Day

Hope all of the Father’s out there are enjoying their special day with loved ones and of course, being thoroughly spoilt. I spent some time with my Dad this weekend which was lovely. He came to stay on Friday night and attended my grandchildren’s school for their Bush Dance and on Saturday morning we watched Abigail win her Under 12’s netball final. Unfortunately, he wouldn’t stay another night so I gave him his Father’s Day present before he left.
You all know by now that I loooove Pinterest – it saves me so much time! (As long as you don’t count the hours spent drooling over everyone’s fabulous creations and ideas!) I was inspired to make my Dad’s card by this one shared by Annette Elliott. In fact it was so perfect, I hardly changed a thing.
I embossed Whisper White card using the Cable Knit Dynamic Embossing Folder. Wow – this is one amazing embossing folder. It is 6″ square and it is so thick but gives such a perfect finish. You have to use it slightly differently as well – you set your Big Shot to emboss but you don’t add the bottom plate. I didn’t have the DSP that Annette used, so I wrapped the embossed card with two pieces of the 5/8″ Burlap Ribbon and then overlapped them with the Delightful Dijon 5/8″ Mini Striped Ribbon. The embossed Whisper White card is attached to scored and folded Soft Suede card. I stamped the car image from Guy Greetings onto Whisper White card using Memento Tuxedo Black ink and coloured it using Soft Suede, Smoky Slate and Basic Black Stampin’ Write Markers. The image is cut using one of the Layering Circle Framelit Dies and sponged the edges lightly with Soft Suede ink before attaching it to the card front using dimensionals. I stamped the greeting using Memento Tuxedo Black ink onto scrap Whisper White card and cut the ends using the Triple Banner Punch. The banner has also been lightly sponged around the edges and is attached with dimensionals so that it lies flat over the lower part of the stamped circle.
Inside the card I attached a strip of Soft Suede card behind one long edge of Whisper White which was embossed once more using the Cable Knit Dynamic Embossing Folder. The embossed card is attached to Whisper White card.
I love this card, so simple really but so striking, don’t you think? Anyway, hopefully Dad liked it when he opened his present this morning.
Bye for now,
Kris
Product Used:


Sneak Peak

I guess one of the great pleasures of being a Stampin’ Up! Demonstrator is that I get to see a new catalogue and order new product before everyone else. I have had my pre-order for a while but haven’t been able to create much with it because I was so busy getting ready for my fundraiser. Today is the day that you can now order from the Holiday Catalogue. Yay! If you haven’t seen the catalogue it is beautiful.  The stamp sets are amazing and with all the co-ordinating products you will be able to make gorgeous cards and 3d items so easily. This particular card using the Cookie Cutter Christmas stamp set and matching punch which you can purchase as a bundle and save (everyone loves a bargain). The punch also matches the Cookie Cutter Halloween stamp set, so you get quite a lot of options – maybe too many!
To create my card, I attached a piece of the This Christmas Specialty Designer Series Paper to the bottom of Very Vanilla card and tied a length of the new Real Red 3/8″ Silky Taffeta Ribbon around the top and attached it to scored and folded Garden Green card.  I cut the merry framelit from the Christmas Greetings Framelit Dies three times and attached them one on top of the other to create some dimension to the word (I love this technique). After I attached the word to the card front I stamped Christmas from the Holly Jolly Greetings stamp set using Real Red ink. I stamped the santa from the Cookie Cutter Christmas stamp set onto Very Vanilla card using Stazon Jet Black in and coloured him using Real Red, Basic Gray, Smoky Slate and Blush Blossom (retired but you could easily use Pink Pirouette or Blushing Bride) Stampin’ Write Markers. I punched the image using the matching Cookie Cutter Builder punch, so much easier than fussy cutting and attached him to the left hand side of the card front.
Inside the card I stamped a greeting which also comes from the Cookie Cutter Christmas stamp set. Well, what do you think? Can you see yourself, creating lots of fantastic things with this stamp set and matching punch, I bet you can.
Bye for now,
Kris
Product Used:


