Stitched Christmas Cards

I am so excited to be using the beautiful new Stitched Shapes Framelit Dies which Stampin’ Up! have released early from the 2017 Annual Catalogue. These framelits come as a set of circles, ovals and squares with four dies in each shape and the sizes co-ordinate perfectly with the Layering Circles, Layering Ovals and Layering Squares Framelit Dies which are in the current Annual Catalogue.
I found a card on Pinterest which I cased to showcase these dies. Unfortunately there is no watermark on the photo so I do not know who created these gorgeous cards and cannot give them proper credit.
 I added the Candy Cane Lane Designer Washi Tape across Whisper White card and stamped the greeting from the Reason for the Season stamp set using Real Red ink onto the bottom right hand corner. I attached the Whisper White card to Real Red card and then to scored and folded Crumb Cake card. I stamped the small images from the Candy Cane Christmas stamp set onto Whisper White card using Crumb Cake ink and cut them out using the second smallest square Stitched Shapes Framelit Die.
  I attached the stamped card to Real Red card and then Crumb Cake card both of these pieces of card were cut using the Layering Squares Dies. I attached the stamped panel to the card front using dimensionals. I created three cards using the tree image, the candy cane image and the star image from the Candy Cane Christmas stamp set. To decorate the inside of the card I added two strips of the Candy Cane Lane Designer Washi Tape across the bottom of Whisper White card. I wanted to show that you can step up a simple card without too much extra embellishment so I created a second card using the tree image and added some of the Gold Metallic Thread behind the image panel before attaching it to the card front.
The stitched frame around the image really adds something extra to the card with no extra effort. Such a fantastic set to have in your stash for creating gorgeous cards.
Have you bought yours yet? Well, if you haven’t you need to right now because they have been so popular that Stampin’ Up! is about to put it on backorder and the item number will be turned off on the 22nd November until Stampin’ Up! can get new supplies in. Just click on the link below and place your order immediately.
Remember that the discounted stamp sets are only available until the end of the month so check it out and make sure that you get your favourite set at a great price.
Bye for now,
Kris
Product Used:


Purple Hues

I spent some time recently using the delightful Seasonal Decorative Masks in the Holiday Catalogue. I used each of the masks and played with several colours. This card is the result of my “play”. I sponged Wisteria Wonder card with Elegant Eggplant ink and attached it to Whisper White card which I embossed using the Petal Burst Embossing Folder. I wrapped the join with the Whisper White 5/8″ Organza Ribbon and tied a knot. The panel is attached to scored and folded Elegant Eggplant card.  I stamped the leaf image from the Wild About Flowers stamp set onto Whisper White card using Wild Wasabi ink. I stamped the flower petal image from the same stamp set using Elegant Eggplant ink. I cut the image out using the Lots of Labels Framelits Dies and attached it to the card front using dimensionals.
To decorate the inside of the card I added a piece of the card created by using the mask. I attached it to Whisper White card and once more wrapped the join using the Whisper White 5/8″ Organza Ribbon, before attaching the panel to the inside of the card.
I love this card and hope that the lovely lady I sent it to enjoyed receiving it for her recent birthday.
Bye for now,
Kris
Product Used:


Happy Birthday Jason
My son in law celebrated his birthday recently and I thought I would share his card with you. I cased a card by JoyceWhitman which I found on a demonstrator only facebook page. I love Joyce’s card but did add a little sponging to mine for a slightly different effect.
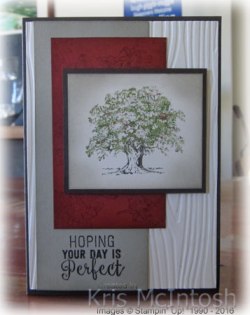
I embossed Very Vanilla card using the Woodgrain Embossing Folder and attached it to scored and folded Early Expresso card. I sponged around the edges of Sahara Sand card using Sahara Sand ink. Stamped the greeting which is from a stamp set which was given to all attendees at the Brisbane Onstage Live Demonstrator event using Early Expresso ink.  You will see more of this stamp set in the coming weeks, leading up to the release of the Occasions Catalogue in January. This panel is attached to the left hand side of the card front. I stamped the large leaf image from the Lovely as a Tree stamp set onto Cajun Craze card using Cajun Craze ink. I also sponged the edges of the card with the same ink before attaching to the card front. I inked the single tree stamp from the Lovely as a Tree stamp set using Early Expresso, Old Olive, Garden Green and Cajun Craze Stampin’ Write Markers.
 The Garden Green and Cajun Craze Stampin’ Write Markers were tapped over the tree after is was fully inked using the Old Olive Stampin’ Write Marker. I love the shaded effect this gives the foliage. I sponged the edges of the card using Sahara Sand ink and attached the stamped panel to Early Expresso card before attaching to the card front using dimensionals. To decorate the inside of the card I sponged around the edges of the Very Vanilla card using Sahara Sand ink and added a narrow panel of Cajun Craze card which was stamped and sponged the same as the Cajun Craze panel on the front of the card.
I was very happy with the final result and super happy to use a brand new stamp set. Thanks Jessica for the inspiration.
I’d love to hear what you think and so would Jessica.
Bye for now,
Kris
Product Used:


Onstage Live – Brisbane
 What a wonderful few days I have had with two members of my amazing team. Hello Jenny and Joyce.
Onstage Live is now a world wide Stampin’ Up! event, so, along with Australian and New Zealand demonstrators we were joined by demonstrators from all parts of the globe. Stampin’ Up! demonstrators are the best! As well as this one amazing three day event, lots of Onstage Live one day events were held in many locations all around the world. Maybe you have thought about becoming a demonstrator but just don’t know what it might bring to your life. Perhaps we should get together and have a chat about it.  Being a Stampin’ Up! demonstrator means something different for each of us. It might mean that you would like to receive a permanent discount on your orders, you might like to get together with a group of friends once a month and spend time crafting together. You might like to become one of the top 100 demonstrators in the world. Whatever you want from your demonstratorship, Stampin’ Up! will be there along the way to give you inspiration and ideas to run your business the way you want. Amazing isn’t it!
One of the things that Stampin’ Up! really love to do is to pamper and spoil us for our achievements. Maybe you don’t know, but I have been a demonstrator since May 2007 and this year I achieved a $100,000.00 in sales – I’m a bit shocked and I’m a little bit scared my husband is actually going to ask me how much of that was personal sales. Anyway I got to walk across the stage along with the other demonstrators who were present and had achieved this milestone. I am so grateful to my customers (now my friends) for supporting me for the past 9-1/2 years to reach this fantastic milestone.
I can’t share any of the exact details with you but we did received a copy of the upcoming Occasions and Sale-a-bration catalogues. Received some of the new stamp sets as free gifts. Got to play and create make and takes with some awesome product AND as a special award we were given the opportunity to take part in a Product Premier Pre-order, so I will have some new product to share with you over the next few weeks until the launch date of the 4th January. These are all more great reasons to become a Stampin’ Up! demonstrator.
Along with all the fun and believe me there was lots of fun and oh so many laughs, especially for our last session, we were issued with a challenge which I have decided to accept, to give a catalogue to five new customers each month. So if you know someone who hasn’t seen a Stampin’ Up! catalogue or hasn’t seen one for a long time, but you just know that they would love one and they live in Brisbane, please let me know so that I can get one out to them.
Not much more to say except I loved catching up with my upline Stephanie Pike and some of the other members of Steph’s Stampers.
Bye for now,
Kris
Happy New Year!
Maybe I am a little early with this one, but I did promise to come back with some more inspiration for the Every Occasion stamp set. I have been stalking Pinterest for card layouts to suit this stamp set and decided to use one to create a Happy New Year card.
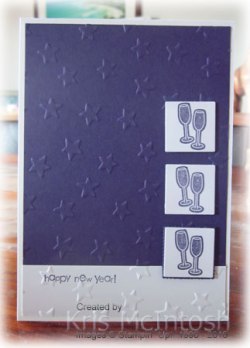
I started by stamping “happy new year” from the Teeny Tiny Sentiments stamp set onto Whisper White card using Elegant Eggplant ink.  I attached the Whisper White card to Elegant Eggplant card and embossed the whole piece using the Lucky Stars Embossing Folder. This panel is attached to scored and folded A4 Thick Whisper White card.
I stamped the wine glass image onto Whisper White card three times using Elegant Eggplant ink and this time used the smallest square framelit in the Layering Squares Framelits Dies to cut out the images. I also cut Elegant Eggplant with the smallest of the scalloped squares from the same Layering Squares Framelits Dies. I attached one of the wine glass images to the Elegant Eggplant scalloped square and attached it to the card front with part of the image panel sitting on the Whisper White and the rest on the Elegant Eggplant. I attached the other two wine glass images above the first one (in a line down the right hand side of the card front).
To decorate the inside of the card I stamped the starry image from the Star of Light stamp set using Elegant Eggplant ink. I also embossed a narrow strip of Elegant Eggplant card using the Lucky Stars Embossing Folder and attached it across the bottom of the inside of the card.
So what do you think? Do you like this one? Are you getting the idea that this is a fantastic stamp set.
Bye for now,
Kris
Product Used:


An Early Present
What are you all doing for the Melbourne Cup today? My husband and I are off to join my parents for a great day of entertainment and lunch before the big race this afternoon.

I can’t believe that on top of all the magic of the Melbourne Cup, Stampin’ Up! has done something wonderful for us too! Instead of having to wait until June next year, Stampin’ Up! have released a set of Stitched Shape Framelits (Item No. 145372) which when used on your projects, not only cuts the shape you want but gives the shape a gorgeous stitched edge. The set will include circles, ovals and squares.

So from today – 1st November, you can purchase this gorgeous set and be an expert with them by the time the catalogue is released in June 2017.
As if that isn’t enough, Stampin’ Up! will be discounting nine co-ordinating products with a 25% discount from 1st November to 30th November! Woohoo! I love a discount and there is at least one stamp set on this list I have been procrastinating about buying, so now seems like the perfect time to purchase. Yay.
You can click on the images below to get all the details on the discounted products.


I cannot wait to see what fabulous projects everyone creates with this gorgeous addition to our crafting needs.
Below is a video prepared by Stampin’ Up! to give us a better look at these Stitched Shape Framelits.
Happy stamping and good luck for the race, hope you have a wonderful day and maybe get lucky and pick a winner.
Bye for now,
Kris
Every Occasion Birthday

When I was at Onstage Local in April this year, everyone seemed to showcase the Every Occasion stamp set and I thought it would be a great stamp set to have and use. Well, this is the first card that I have actually made with this set! I was inspired by this one I found on Pinterest by Maureen Merritt. I love this card and hopefully so will the ladies at Beachmere when we make this sometime over the next month. The images in this stamp set are all very cute and as the name implies there is an image to suit any occasion you can think of.
Anyway, onto my card. I stamped “happy birthday” from the Guy Greetings stamp set onto the bottom edge of Whisper White card using Melon Mambo ink. I wrapped the top of the card with Melon Mambo/Basic Black Baker’s Twine (retired from the last Occasions Catalogue) and attached the Whisper White card to scored and folded Melon Mambo.  I stamped the cupcake image from the Every Occasion stamp set six times onto Whisper White card using Melon Mambo ink. I used the smallest scallop square die from the Layered Squares Framelits Dies to cut out the cupcake images. The images are attached to the card front using dimensionals.
To decorate the inside panel I stamped the present image from the Every Occasion stamp set three times across the bottom of Whisper White card using Melon Mambo ink.
I am certainly going to have to play with this stamp set some more. I’ll pop back soon with some more inspiration for you.
Bye for now,
Kris
Product Used:


Happy Birthday Jae

My granddaughter Jae is celebrating her 8th birthday on Saturday. We won’t be seeing her on Saturday so we had a small celebration after school today. When you see all the grandchildren growing up so quickly it makes you realise how precious the time is we get to spend with them. Hope she has a fantastic day on Saturday.
I created her birthday card after seeing a Double Z Fold card by Amanda Bates. She used the Pop of Pink Designer Series Paper to create her card which I don’t have so I improvised and used some of the retired It’s My Party Designer Series Paper Stack which I had in my stash. I also decided that I would leave out the double Z fold and just create a flap on the front.
My base card is A4 Thick Whisper White cut to 14.8cm x 21cm scored along the 21cm length at 14.8cm, making the card almost 6″ square. I added a piece of the Melon Mambo “starry” Designer Series Paper from the It’s My Party Designer Series paper Stack to the inside of the card. I stamped “let’s Celebrate” from the Confetti Celebration stamp set on a 10.5cm square of Whisper White card and centred it on the Melon Mambo DSP. I cut another piece of the same Designer Series Paper 5.5cm x 13.8cm and used the reverse side. The DSP is layered onto Melon Mambo and then onto the flap on the left hand side.  I attached a layer of 10.5cm square Whisper White card to the left hand flap so that it covered the Whisper White layer on the inside of the card. I stamped the image from the Marquee Messages stamp set onto Whisper White card 9.5cm x 9.5cm using Memento Tuxedo Black ink. I stamped “it’s your” on the inside of the frame using the same ink. I stamped the large arrow onto Melon Mambo card using Memento Tuxedo Black ink, cut it out and attached it over the stamped image. I stamped the banner and “birthday” onto Bermuda Bay card using Memento Tuxedo Black ink, cut it out and attached it over the stamped image.
  I coloured the ladder banner down the left hand side of the image using a Melon Mambo Stampin’ Write Marker. The “it’s yours” is coloured using a Bermuda Bay Stampin’ Write Marker. I attached the stamped panel to Bermuda Bay card 10cm x 10cm and then to the card front. I stamped “yay” from the Confetti Celebrations stamp set onto scrap Whisper White card using Memento Tuxedo Black ink, cut it out and attached it to the left hand side of the card front. Amanda had coloured in the circles on her card using a Signo Gel Pen but I decided to add a small Basic Pearl to each of the circles – love the way that makes the card look extra special.
  I also cut the small stars on the banner section from Whisper White card and coloured them using the Clear Wink of Stella to add a little more sparkle. Thank you so much Amanda for the inspiration.
As this card is almost 6″ square I needed to create an envelope, so I used the Envelope Punch Board to create the perfect size from a 12″ x 12″ piece of Whisper White card. To close the envelope I cut two 1″ circles from Melon Mambo card and pierced a hole through the centre of each one and also through the envelope. I attached the circles with a gold brad (retired) and used some retired Melon Mambo/Basic Black Baker’s Twine to close the envelope. I used the Large Letters Framelits Dies to create her name for the front of the envelope from Melon Mambo card. I love it, so simple to create but the perfect finishing touch for the card.
I love this type of card, don’t you? I’d love to hear what you think.
Bye for now,
Kris
Product Used:


Sweet Baby Card
 I thought I would share with you one of the cards we made at my Beachmere class last week. We haven’t made a baby card in a while and so I created this one. I started by attaching a piece of So Saffron card to Whisper White card and then embossing the whole piece using the Happy Heart Embossing Folder. This folder will not completely emboss a card front, so you need to push your card to the bottom of the folder, emboss, then move the card upwards inside the folder, lining up the embossed card with the folder and then you can emboss the bottom section of the card. I attached a piece of So Saffron Designer Series paper from the Subtles Designer Series Paper Stack to the left hand side. I love monochromatic cards!
  I cut an oval from Whisper White card using one of the Layering Ovals Framelits Dies , attached it to a So Saffron Scalloped Oval and then the card front using dimensionals. I stamped the baby onsie from the Something For Baby stamp set onto Whisper White card using So Saffron ink and cut it out using the matching Baby First Framelit Die. The baby onsie is attached to the Whisper White oval. I cut a Whisper White heart using the Cookie Cutter Builder Punch and attached it to the onsie. Inside the card I stamped “peek-a-boo to someone new” from the Suite Sayings stampset onto Whisper White card using So Saffron ink. I also attached a narrow strip of So Saffron card which is embossed using the Happy Hearts Embossing Folder.
Such a simple card but so sweet, don’t you think?
Bye for now,
Kris
Product Used:


October Memory Making
My Memory Keeping class for October will be held on the 28th at 6.30pm. If you are interested in attending, then let me know so that I can reserve a place for you.
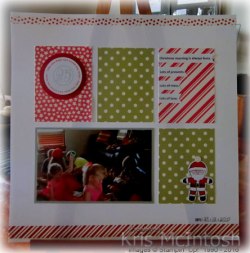
This month’s page using Whisper White for the base with a strip of Candy Lane Washi tape across the top and the bottom. I used two 3″ x 4″ cards from the Seasonal Snapshot Card Collection (retired) and one 6″ x 4″ card from the same collection. I cut the 6″ x 4″ card in half to create two 3″ x 4″ cards. I printed my photo and cut it to 6″ x 3-3/4″ before attaching it to Smokey Slate card 6″ x 4″. I stamped the santa image from the Cookie Cutter Christmas stampset onto scrap Whisper White card using Stazon Jet Black ink and coloured him in using Real Red, Basic Black and Smokey Slate Stampin’ Write Markers. I punched the image using the Cookie Cutter Builder Punch to cut out the image and added a small circle of Dazzling Details Glimmer Paper to the top of his hat.  I stamped the “trim the trees” circle from the Merriest Wishes stamp set onto Whisper White card using Real Red ink. The “25” image from the same stamp set is stamped using Smokey Slate ink. I punched the image using the 2″ Circle Punch and attached it to a Real Red 2-1/2″ Circle (retired) using dimensionals. My journaling was created on my computer, printed onto Whisper White card and then cut into strips. I punched one end of each strip using the Triple Banner Punch before attaching it to the Real Red striped 3″ x 4″ card. The date image comes from the Date It Project Life stamp set (retired)
I think this is a fun page and will give the ladies who attend a head start on their Christmas scrapbooking.
You may have noticed that I am using some retired product. I don’t do this in any other class but I love to give everyone the opportunity to create the same project. To enable me to do this I use My Digital Studio to print out the project life cards and add in some current product to show how versatile our products are. I really think everyone should try out the amazing Project Life Product that is sold by Stampin’ Up!.
I’d love to hear what you think.
Bye for now,
Kris
Product Used:


