Boxed Gift Tags
 As promised here are the gift tags I created as part of the Secret Santa Gift for the Christmas Party I attended recently.
To create the tags I cut A4 Thick Whisper White card at 6″ x 3″ and scored along the 6″ length at 3″ to create a 3″ x 3″ card. I added a piece of the Candy Cane Lane Designer Series paper to the card front. I cut Whisper White card and Early Espresso Card using the Layering Circles Framelits Dies so that they would sit on the Designer Series Paper.  I used the Gingerbreadman, Reindeer and Teddy Bear images from the Cookie Cutter Christmas stamp set to add to the front of the tags. Each image is punched using the Cookie Cutter Builder Punch.
I stamped inside the tags using the “to/from” image in the Candy Cane Christmas stamp set and Early Espresso ink.
I also created a gift box using the Envelope Punch Board to hold the gift cards. I used the Santa Clause image on the front and coloured him using Real Red, Basic Gray, Smokey Slate and Pink Pirouette Stampin’ Write Markers.
I am really happy with this little box and hope that whoever received it was happy too. What do you think?
Bye for now,
Kris
Product Used:


Boxed Card Set
My husband and I attended a Christmas Party recently where we needed to give a gift and I thought why not put together some handmade cards. I have always loved Designer Series Paper but have found it hard to cut into. You know how it is you need one piece of beautiful paper for a card and you cut a strip the width you need and then you are left with pieces that you can’t use. I did some searches on Pinterest and found a 6″ x 6″ one sheet wonder which creates three cards by Sylvia Durocher. I thought this was a wonderful idea, three pieces of designer series paper which would create three cards with no wastage. I used this to create three Christmas cards using the Cookie Cutter Christmas stamp set.
 They each use the Candy Cane Lane Designer Series Paper and the Cable Knit Embossing Folder with the addition of the Real Red 3/4″ Stitched Edge Ribbon. I used the Reindeer, Gingerbreadman and Teddy Bear images from the Cookie Cutter Christmas stamp set. You can download a free tutorial here to create your own set of card. I have also added this to my Free Tutorial Page.
I created a little box using the Envelope Punch Board to hold the three cards and decorated it in the same manner but using the Santa image as the feature. Santa is coloured in using Real Red, Basic Gray, Smokey Slate and Pink Pirouette Stampin’ Write Markers. I added a little Dazzling Diamonds Glitter to the image using a Two Way Glue Pen (retired) and a little bit of the Mini Pom Pom trim on his hat. I created the box using the backing sheet you get in the Designer Series Paper packages. I love to recycle!
 I didn’t write a tutorial for the gift box, but they are relatively simple to work out. I find the size envelope to match the size of my card on the guide on the Envelope Punch Board. I decide how deep I want my box to be and add that depth to the width and length of the cardstock size suggested on the Board. I punch the first time at the point suggested on the Board and then add the depth to that number and punch again. For example if the first punch is at 3″ and I want a depth of 1″, I punch and score at 3″ and then again at 4″ and continue to rotate, punch and score as if I was making an envelope.
I’ll pop back soon and share the gift tags and the decorated chocolate holder I also included in the gift.
Bye for now,
Kris
Product Used:


Hello December album
 I said I would pop back in and show you how my Hello December album is progressing. As you know I followed the video instructions I shared with you earlier, and which you can watch below, to place all of my Hello December Project Life cards in my album and cut down some of the cards as recommended and added plain cardstock to fill some more of the pockets. You do need to have the Hello December Project Life Cards and Accessories to decorate your album following the video, hopefully you took advantage of Extravaganza to get yours at a discounted price. So all I had to do was sit down with my album and my photos for the first couple of days and add the pictures. I used MDS and my home photo printer to print my photos to 2″ x 2″ which made it very simple.
  Now, let me share with you the cover of my album, I added some of the gorgeous Real Red 3/4″ Stitched Edge Ribbon over the green binding on the Album and tied a knot. I added a row of the Mini Pom Pom Trim down the edge of the album binding using Tombow Multipurpose Glue. Then my decorating went slightly wrong. I used the star mask from the Hearts and Stars Decorative Mask and my Gold Wink of Stella – big mistake for me, the Wink of Stella ran under the mask and I got horrible blobs of colour on my album cover (total user error). So I added some Emerald Envy card to the Album cover and added Crumb Cake card on top which had been inked with Crumb Cake using the star mask. Yay Success!
  I also cut the numbers from Real Red card using the Large Numbers Framelits Dies.
The first and second pages inside the album are just like the ones in the video. I didn’t change a thing and it was simple to add the Hello December Project Life cards to Real Red card and pop them in the sleeves. The first page with photos is actually from the 30th November but we had to decorate our tree one day early as Abigail had a birthday party on the 1st December and the grandchildren like to decorate the tree altogether. I used the Project Life Date It stamp set to create the November banner. My tree has a rather haphazard collection of decorations, some hand made, some gifted from the family and some that I have had since my girls were little.  It won’t win any prizes but the grandchildren love to have a free reign and put everything on. At least now they spread them round the tree and don’t just put them straight onto the front. After the decoration we took a couple of goofy photos and then they all had a swim to cool down. The second page of photos shows some of the decorations up close. An old Santa that lights up and was a gift from my grandmother to my girls when they were small. It is supposed to change colours but manages only a slight dimming now. However, I love that my grandchildren love to put this up and see it working. The Advent Calender was constructed by my dad and decorated by me a couple of years ago. The grandchildren love to fill the boxes and they love even more to empty them. The 1st of December also brought some great news as Ethan was chosen to become School Vice Captain next year. I am so delighted for him. His selection follows on from Abi having the same position this year. My journalling is handwritten and even holds a mistake or two but I know that in the years to come it will serve as a great reminder of the fun we had when the grandchildren were all small.
I did add a couple of extra bits of journalling and because I had a few cards left over, I cut some of them down to create the journalling spots. My Memory Keeping can be a bit haphazard over the year, but December is one month that I love giving the full treatment. It’s such a busy, happy time of year.
Here is the video for you to view once more, if you haven’t already started on your December Album.
Bye for now,
Kris
Product Used:


Hello Baby
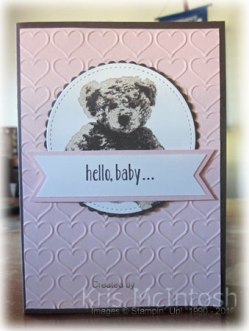
My upline Stephanie issued a challenge to her team members to find an online challenge and make a card. Soooo…. I found a great sketch on the Freshly Made Sketches blog and created a baby card. My hairdresser recently had a baby girl. I started by embossing Pink Pirouette card using the Happy Heart Embossing Folder and attached it to scored and folded Chocolate Chip card. I love this colour combo and have neglected my Chocolate Chip card for way too long. I stamped the first image from the Baby Bear stamp set onto Whisper White card using Crumb Cake ink. I stamped the next teddy image over the top using Chocolate Chip ink which I stamped off first.  I stamped the third image over the top again using Chocolate Chip ink. I cut the teddy image out using the largest circle in the Stitched Framelit Dies and attached it to Chocolate Chip card using a matching scalloped Layering Circle Framelits Die (these dies are discounted during the End of Year closeout sale). The teddy is attached to the card front using dimensionals.
  I stamped the greeting from the Baby Bear stamp set onto Whisper White card using Chocolate Chip ink punched the ends using the Triple Banner Punch and attached it to Pink Pirouette card also with the ends punched using the same punch. The banner is attached over the teddy bear image with dimensionals under the ends only.
Inside the card I attached a narrow strip of Chocolate Chip card behind one long edge of Pink Pirouette card which is embossed using the Happy Hearts Embossing Folder before attaching to Whisper White card.
So thank you to Stephanie for issuing the challenge and thank you to Freshly Made Sketches for providing the sketch. My hairdresser loved the card.
Bye for now,
Kris
Product Used:


Hello Summer
The first day of December and the first day to start using your Hello December Project Life cards. I will take some photos today and share them with you tomorrow.
I wanted to let you know that besides being the first day of summer it is also the beginning of the Close Out Sale at Stampin’ Up. There are heaps of exciting products in the sale, some reduced, some retiring and surprisingly I saw a few things that are already retired but available for purchase. Check it out by clicking on the image below.

It’s also the first day that demonstrators can pre-order from the 2017 Occasions Catalogue and earn Sale-A-Bration items. So exciting! So while I am happy shopping, I hope you are too.
Bye for now,
Kris
Wish Big
 Here is another card I created recently. I was inspired by a card I saw somewhere on the internet, it can’t be Pinterest because I can’t use it at the moment, it’s playing up and all I get is empty boxes, hopefully it will be fixed soon! Anyway whoever it was thank you so much.
I punched one short edge of Night of Navy card using the Confetti Stars Punch. I wrapped the card with Smokey Slate 1/8″ Stitched Ribbon and attached it to Brushed Silver card (sorry this one is retired) before attaching to scored and folded A4 Thick Whisper White card. I cut the word “wish” from more of the Brushed Silver card using the Cupcake Cutouts Framelits Dies (these framelits are discounted on the Extravaganza Sale which ends today) and attached it to the card front. I also cut the letters for the word “big” from the same card using the Little Letters Thinlit Dies (also retired) and attached them to the card front.
To decorate the inside of the card I simply stamped “happy birthday” from the Confetti Celebrations stamp set using Night of Navy ink.
I think this card packs a lot of punch and you could of course use the beautiful Silver Foil card in the current catalogue instead of retired product. The letters could be cut using any of the current letter dies or you could stamp and Silver Emboss.
What do you think? I’d love to hear. I love this card so much it will be one of the cards we make at the Beachmere Retirement Resort next week.
Bye for now,
Kris
Product Used:


Cupcake Birthday

My card today uses the Confetti Embossing Folder which is one of the products available at a 30% discount during the Extravaganza sale which ends tomorrow. Don’t forget tomorrow you will be able to take advantage of the huge savings in the Flash Sale with products only available tomorrow. Check out the flyer if you haven’t already.
I used the Extravaganza sale to add this folder to my crafting stash. My very talented friend Vicky shared a card using the Sprinkles of Life stamp set which inspired me to get mine out again and create something with it. I embossed Whisper White card using the Confetti Embossing Folder which creates a beautiful frame on the embossed card. I stamped the “ice-cream” base from the Sprinkles of Life stamp set onto the embossed card using Crumb Cake ink. I also stamped “on your” from the Time of Year (hostess) stamp set onto the embossed card using Marina Mist ink. I attached the embossed card to Marina Mist card and then to scored and folded Crumb Cake card. I stamped “birthday” from the Time of Year stamp set onto Whisper White card using Marina Mist ink and cut it out using the matching Bunch of Banner’s Framelits Die.
  The Bunch of Banners Framelit Dies are also available during the Extravaganza sale at 20% off – Yay! I attached the banner to the card front using dimensonals. I stamped the “ice cream” from the Sprinkles of Life stamp set onto Whisper White card using Marina Mist ink and punched it out using the Tree Builder punch. The ice cream is attached to the card front using dimensionals.
To decorate the inside of the card I attached a narrow strip of Marina Mist card behind one long edge of Whisper White card which I embossed using the Confetti Embossing Folder and attached the panel to Whisper White card.
I hope my card has inspired you to get creating and also maybe take advantage of the Extravaganza sale which ends tomorrow. I would hate for you to miss out on something you really want.
Bye for now,
Kris
Product Used:


Hello December
Did you see that the Project Life Cards and Accessories for Hello December this year is on the Extravaganza list and is being sold at 30% off. This is a great way to get your album ready to go so that when December starts with all the wonderful things that happen, especially here in the South Pacific because it is also the end of the school year, with graduations and concerts as well as Christmas parties, etc, you will be ready to go. This year Stampin’ Up! released a video with Donna Griffin presenting, on how to set up your album so that you are ready on the 1st December to document the festive season.
I took advantage of this video to get my album ready so all I have to do is add the photos and some journalling. I’ll update you once I have started adding photos to my album. I don’t know about you but I love Project Life, I have done more memory keeping with this system than with any other. For me it makes it easy to mix full page scrapbooking in a traditional form (although I like to use the project life cards to help with the decoration) and pocket pages to document the special moments in my life.
So watch the video and be inspired and then hop online to take advantage of this great saving so you can be ready to document your December. While you are there, check out all the other fantastic product discounted during the Extravaganza.
Bye for now,
Kris
Product Used:
It’s Started

Today is the beginning of the Extravaganza of discounted product and today starts with a Flash Sale of additional products which are only available today. I’ve made my list, double checked it and sent it off. What about you? All ready to save some money! One of the products available to purchase during this Extravaganza is the Christmas Stocking Thinlits dies at a whopping 30% off.
By chance this week I received an email from Amy and Debbie at Crafty Person with a download for a card using these thinlit dies. I changed my card a little but I was grateful for the inspiration.
I embossed Whisper White card using the Cable Knit Embossing Folder and wrapped it across the centre with the Gold 1/8″ Ribbon. I attached the embossed card to Cherry Cobbler card and then to scored and folded Tip Top Taupe card. I cut Whisper White card with one of the larger ovals from the Stitched Shapes Framelit Dies and stamped the greeting from the Hang Your Stocking stamp set using Cherry Cobbler ink. I attached the stamped oval to a scalloped Garden Green Oval cut using one of the Layering Ovals Framelits Dies. I stamped the stocking from the Hang Your Stocking stamp set onto Whisper White card using Garden Green ink and cut it out using the matching Christmas Stocking Thinlits Dies.  The toe and heel piece as well as the single flower were stamped onto Whisper White card using Cherry Cobbler ink and cut using the matching Christmas Stocking Thinlits Dies. I attached the stocking to the Whisper White oval. I cut the stocking hanger from Cherry Cobbler card and attached it to the top of the stocking. I actually think this was the one thing that “finished” the card. To decorate the inside I attached a narrow strip of Cherry Cobbler card behind one long edge of Whisper White card which is embossed using the Cable Knit Embossing Folder. I stamped the ivy leaf and berry images from the Hang Your Stocking stamp set onto Whisper White card using Garden Green and Cherry Cobbler ink and cut them out with the matching Christmas Stocking Thinlits dies before attaching them to the embossed card.
I love this card, what about you? Maybe I have inspired you to add the Christmas Stocking Thinlits Dies to your stamping supplies. In case you missed the list yesterday, you can check out the PDF here.
Please remember that if you want to purchase the Stitched Shapes Framelit Dies, you need to place your order today as the item number is being turned off tomorrow until more stock arrives. Just proves how popular and fantastic these dies are.
Bye for now,
Kris
Product Used:


Online Extravaganza
Stampin’ Up! is having a week of sales beginning on Monday 21st November including two Flash Sales.

You will be able to purchase products with up to 40% savings on some really fantastic products. Take advantage of the first flash sale on Monday 21st November to mark the beginning of the Extravaganza.

Take advantage of the second Flash Sale on Monday 28th November to make the end of the Extravaganza.

Between the two flash sales you will be able to purchase more fantastic products with 10% to 40% discounts. You can download the PDF so that you can browse the sales and have your shopping list ready to go when the sale starts.
Bye for now,
Kris


