Welcome Baby

My nephew and his wife recently celebrated the arrival of a new baby daughter, congratulations to the happy couple. This is the card I made for them. I used a card sketch I found on pinterest from the very talented Robin Messenheimer. Robin is so helpful she even provides dimensions and even though they are in inches not centimeters, I used her dimensions for the layers.
I embossed Whisper White card using the Happy Hearts Embossing folder and attached it to scored and folded Chocolate Chip card.  I stamped the greeting from the Perfect Pairs stamp set onto a small Whisper White square using Chocolate Chip ink. The other images are from the Something for Baby stamp set and were stamped onto Whisper White card using Pink Pirouette ink and cut out using the matching Baby’s First Framelits Dies.
  Each image is then attached to a square of Whisper White card and then Chocolate Chip card before attaching to another Whisper White/Chocolate Chip panel. This panel is attached to the card front using dimensionals. I added a small basic pearl to the duck image to represent it’s eye.
Inside I inked up the pram from the Something For Baby stamp set using my Chocolate Chip and Pink Pirouette Stampin’ Write Markers. Something for Baby is such a versatile stamp set and I love that it has matching framelits.
You will be happy to know that all of the products used in this card will be carrying over into the next catalogue, except the Perfect Pairs stamp set. However, in the new catalogue the Something For Baby and Baby’s First Framelits Dies will not be a bundle. So if you want to save 15% on the purchase cost of buying the stamp set and the matching framelits, do not delay. The offer only lasts until the 31st May or until stocks run out.
I’d love to know what you think, so leave me a comment. It makes my day when someone takes the time to tell me what they think.
Kris
Product Used:


.
Serene Sympathy
In case you missed it at the end of my last long, rambling post, the retired list is out and selling fast. All products on the retired list are while stocks last, so if you want something from the catalogue now is the time to act before the product disappears.
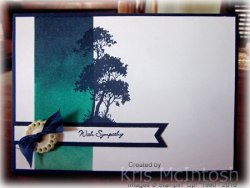
Anyway one of the stamp sets which is retiring and makes me a little sad is Serene Silhouettes.  For this card, I used post-it notes to create a narrow panel on the left hand side of Whisper White card and used a sponge to add ink to create the focal piece. I started by using Pool Party at the bottom and then added Bermuda Bay and lastly Night of Navy at the top. I love the way you get a beautiful graduated panel and it really is simple to do. I then stamped the image from the Serene Silhouettes stamp set using Night of navy ink. I stamped the greeting from the Teeny Tiny sentiments stamp set onto Whisper White card using Night of Navy ink and punched one end using the Triple Banner Punch.
 I added the greeting to a layer of Night of Navy card, also punched using the Triple Banner Punch and added it to the card front. I tied a length of Night of Navy 1/2″ Seam Binding (retiring) through the Very Vintage Button (retiring) and attached it to the greeting banner using Glue Dots. I love the balance of colour and white in this card, don’t you?
Inside I kept the card very simple by stamping the same image from the Serene Silhouettes stamp set onto the lower left hand corner using Night of Navy ink.
If you want this stamp set in your collection then act without delay and place your order today.
Bye for now,
Kris
EDITED TO ADD: Unfortunately this stamp set is already sold out.
Product Used:


Onstage Live

This is kind of a long post, so maybe you need to grab a coffee before we start.
Last Saturday I attended Onstage Live at the Gold Coast and we were able to view the new product lines that will become available in the 2016/2017 Catalogue. Oh My Goodness, it truly is a beautiful catalogue and there is some fabulous new products coming our way. This is a perk of being a Stampin’ Up! Demonstrator and one of the things I love about these types of events, not only do we get the catalogue but we also get to play with some new product and even bring some home!
Over the last few days I have been trying to digest all the wonderful information as well as ideas for using our new product and it made me think about what a wonderful company Stampin’ Up! is to work with. They truly work very hard to give us the tools and information to make out businesses whatever we want. If you just need the discount on your orders, then that’s fine with Stampin’ Up! but they still want you to have all the tools and information available to use however best suits you.
I have been a Stampin’ Up! Demonstrator for 9 years in May and have truly loved every minute. The company has grown globally and has tried very hard to make sure that the markets outside the United States are treated equally. If you didn’t attend a Live Onstage event somewhere in the world, the information we received at the events was released to all demonstrates, wherever they live, at the same time. So this morning at 5am Australian Eastern Standard Time, the catalogue went up on the Demonstrator website. I’m sure there will be lots of demonstrators who are late for work because they can’t tear themselves away from their computers!
Anyway the point I am trying to make is that if you have a love of paper-crafting and would like to create a small business for yourself, or you just want to get a discount on your product, then this is the company for you. The company will give 200% everything you need to operate the way you want. So my business operates very differently from every other demonstrator but that’s ok, because it is my business. If you would like any further information, please contact me so that we can have a chat and talk about the benefits for your situation.
So let’s look at my business, I run a class at the retirement Village every week and the ladies make 3 cards. I run a class at 9am and another class at 11am. We have lots of fun and I have a certain amount of flexibility in that if my husband and I want to go away in our caravan, then I just let the ladies know and take off for a couple of weeks. I also run a card class once a month on a Thursday and a Saturday at my home where we create 5 cards and some sort of “extra” project, usually a box or gift packaging of some kind which carries on the theme of the class. These classes usually focus on a particular stamp set or suite of products. They are also fun and give me the flexibility to work around any other commitments that I may have. I also fit in a Friday night Memory Keeping Class, also at my home, where I provide everything to create one project, usually a 12 x 12 scrap page using Project Life products and then everyone works on their own projects and gets to use my stamps and accessories. These nights are really great fun and usually my daughter and granddaughters (and sometimes my grandson) come along and work on their albums too. Finding the time to craft together and create together is truly something I love and treasure greatly.
Ok…. so now let’s look at what I would like to add to my business schedule. Well…… I would like to run a class which is very much a quick and easy card class. It would be suitable for beginners and seasoned stampers alike. We would be making 3 cards which can be created in an hour or less and the time frame could be flexible. I am thinking that I would run it something like a Saturday afternoon from 1-4pm and you can come anytime between 1 and 3pm and still have time to create your cards and go. I am hoping this fits with peoples busy schedules and offers some flexibility to get in some creating time without eating too much into precious family time.
I suppose this is a rambling kind of post but I would love some feedback from you, my readers, especially those who live close enough to join me and do some fun creating, whether it is my 5 card class or the quick and easy cards or even the Memory Keeping Class, I just want some feedback. Are these the type of classes that you want or is there something else that you would like to be able to attend?
 Now before I go I also want to let you all know that the Retiring List is now available for you to check out and see what won’t be making a re-appearance in the 2016/2017 Catalogue. Now is the time to make sure that you have purchased everything that you need before it disappears forever. You can check out the list here in my store. So please take the time to have a look and remember that everything on this list is only available While Stocks Last. So don’t delay making your purchases, because once they are gone, they’re gone.
So apologies for such a long post but please don’t forget to let me know what kind of classes you are interested in and even how often you would like to attend. AND Don’t forget to order the products you want from the retiring list.
Bye for now,
Kris
Male Thinking of You

I needed to make a card for a male friend of ours who has just undergone surgery. I find it hard to make cards for males generally and especially because they are unwell.
I started by embossing Whisper White card with the Softly Falling Embossing Folder and attached it to Crumb Cake card. I attached a square of Crumb Cake paper from the Neutrals Designer Series Paper Stack to Early Expresso card and then the card front. I inked the single tree image from the Lovely As a Tree Stamp set using Early Expresso, Old Olive and Garden Green Stampin’ Write Markers and then stamped onto Whisper White card.
  To get the shading on the foliage of the tree, I covered the whole of the foliage with the Old Olive Stampin’ Write Marker and then tapped over with the Garden Green Stampin’ Write Marker, which adds some depth and dimension to the image. The image is also attached to Early Expresso card and then the card front using dimensionals.
I decorated the inside by stamping the tree image once more onto the bottom left hand corner of Whisper White card.
This is an extremely simple card but I think it works for this occasion. How about you, what do you think?
Bye for now,
Kris
Product Used:


Flowers and Sympathy
This is the kind of card that no-one ever wants to make, however, there are times when it is necessary. A friend of ours recently passed away and this is the card that I made for his wife and family.
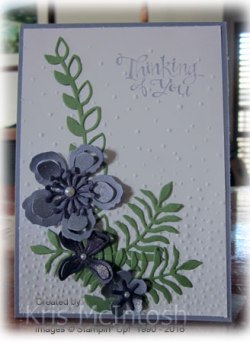
I stamped “Thinking of You” from the Sassy Salutations stamp set onto the top right hand corner of Whisper White card using Wisteria Wonder ink and then embossed the card using the Softly Falling Embossing Folder. The embossed card is attached to scored and folded Wisteria Wonder card. I cut the leaf border from the Botanical Builder Framelits Dies from Wild Wasabi card and trimmed it down so that it resembled a stem of leaves and attached it to the card front.. I also cut three of the “ferny” leaves from Wild Wasabi card using the framelit from the Botanical Builder Framelits Dies and attached them over the bottom the “stem of leaves”. Using the Botanical Builder Framelits Dies I cut a large double flower and a small single flower from Wisteria Wonder card.  I also cut the smaller double flower from Elegant Eggplant card. I painted the centre of each of the double flowers using the Clear Wink of Stella as well as the whole of the small flower. I used my bone folder to curl the petals of each flower and then attached them to the card front using Glue Dots. The flower centres are cut from Elegant Eggplant card and attached to the large and small flowers also using Glue Dots. I added Basic Pearls to the centre of each of the flowers as a finishing touch.
 To decorate the inside of the card I embossed Whisper White card using the Softly Falling Embossing Folder and then cut the top edge using the leaf border from the Botanicals Builder Framelits Dies and trimmed off the “overhanging leaves”. I cut Wild Wasabi card using the same border and attached it behind the embossed card. The panel is attached to Whisper White card. I inlaid the green petals once the panel was attached to the inside of the card.
I absolutely adore the Botanical Gardens collection and love using them. I do hope they carry over to next year’s catalogue! I am pleased with the way this card turned out. I’d love to hear what you think.
Bye for now,
Kris
Product Used:


Happy Birthday Ava

My youngest granddaughter Ava is celebrating her 6th birthday today so I thought I would share her card with you. I was inspired by this gorgeous card on Pinterest by Jo Blackman. I used two different papers from the It’s My Party Designer Series Paper Stack to attach to Whisper White A4 Thick Cardstock. I cut a length of Whisper White card and punched one end with the Scallop Tag Topper Punch. I created a banner from Basic Black card and Whisper White Card using the Triple Banner Punch.  The greeting is from the Butterfly Basics stamp set and is stamped in Memento Tuxedo Black ink. I punched 6 cupcakes from Basic Black card using the Party Punch Pack. I punched four cupcakes from Melon Mambo card and two from Mint Macaron card using the same punch. I trimmed the Melon Mambo and Mint Macaron cupcakes and attached the “icing” to each of the Basic Black cupcakes.
  I painted the “icing” with the Clear Wink of Stella and added a small Basic Pearl to the top of each cupcake. I tied a length of the Melon Mambo/Basic Black Bakers Twine from the Bakers Twine Combo Pack through the top of the tag and created a bow. Inside the card I cut the “Hip Hip Hooray” from the Party Pop-Up Thinlits Dies from Melon Mambo card. I attached it to the inside of the card and added a strip of designer series paper from the It’s My Party Designer Series Paper Stack.
I am really happy with this card, it’s bright and cheery and has lots of things going on – perfect for a six year old.
Bye for now,
Kris
Product Used:


Botanicals Joy Fold

I haven’t made a Joy Fold card in a long time but decided to create this card for my March Class (held in February – it’s a long story). Anyway I followed the basic directions that you can get from Splitcoast Stampers. For the card base I used the Whisper White A4 Thick Cardstock and added a layer of Botanical Gardens Designer Series Paper to the inside of the folded card and on the front of the small fold. I scored and folded Cajun Craze card and attached it to the section of the folded A4 Thick cardstock with the flowery designer series paper so that the fold was on the right hand side. I added a piece of Whisper White to the inside of the folded Cajun Craze card to give me somewhere to write my message. I also added Whisper White to the front of the card.  I stamped “thinking of you” from the Sassy Salutations stamp set onto Whisper White card using Cajun Craze ink and punched it out using the Extra Large Oval Punch. I atttached the greeting to a Cajun Craze Decorative Label. I added dimensionals to the back of the Label so that I could slide the front of the folded Cajun Craze card underneath to hold the card closed. To decorate the front I stamped the leaf detail from the Botanical Gardens Stamp set onto Mossy Meadow card using Mossy Meadow ink and used the matching Botanical Builder Framelit Die to cut out two leaves. I also cut two of the “ferny” leaves from Mint Macaron card. The flowers are cut from Cajun Craze, Mint Macaron and Crushed Curry card.
  The flower centres are cut from Whisper White card and each flower has a Basic Rhinestone in its centre. Lastly I added a Botanical Gardens Jewel Embellishment.
I think I am in love with this Botanical Garden Suite of products. Somehow using the co-ordinated products helps to make the card feel more cohesive and just plain “look better”, don’t you think. If you haven’t bought this set, I urge you to have another look. It may not be continued over to the next Annual Catalogue and so will be gone when the Occasions Catalogue retires at the end of May.
Bye for now,
Kris
Product Used:


Diamond Box

I found this cute box on Pinterest and followed the link back to Stampin’ Up! Apparently a very talented European demonstrator Jessica Winter shared the box and Stampin’ Up! shared the directions for creating it. You need the Gift Bag Punch Board and a little patience but the box is so worth the trouble. I did cheat a little and cut my card the width of our A4 sheets which are 21cm, so my seam is very tiny, however, the box holds together well and a little play in the box, sometimes makes it easier to get the lid on and off.
Anyway I used this box to create our 3d project for my recent card class. The bottom of the box is created using Basic Black card and the lid is created from Whisper White card. Please refer to the link to get the sizes and cutting instructions. The lid is wrapped with one of the Botanical Gardens Designer Washi Tapes, I liked the yellow one but I am sure any of the Washi Tapes would look equally good. The small solid leaf is stamped onto Whisper White card using Mint Macaron ink and then the detail is stamped in Mossy Meadow ink, before cutting them out using the matching Botanical Builder Framelit Die. The larger flower is stamped in Watermelon Wonder ink, which has been stamped onto scrap paper first.  The small flower is also stamped in Watermelon Wonder ink. Both flowers are cut out using the matching Botanical Builder Framelit Die. I added a little dimension to the flower petals using my bone folder and painted the flowers with the Clear Wink of Stella (OMG I love this stuff). The flower centre is cut from Tip Top Taupe card. The flowers and centre are attached together using Glue Dots and then attached over the leaves, also using a Glue Dot. I stamped the “just for you” from the Teeny Tiny Sentiments stamp set onto Whisper White card using Tip Top Taupe ink and punched it out using the Word Window Punch. The greeting is attached to Tip Top Taupe card punched using the Washi Label Punch. I trimmed the sentiment panel down a little before attaching it beneath the flower, also using a Glue Dot. Lastly I added a large Basic Rhinestone to the centre of the flower.
The ladies were in love with this little box. It is so cute and just the perfect size for a jewellery gift or a chocolate or two. So thank you to Jessica for creating such a cute and, despite having all those angles, really quite a simple box.
Bye for now,
Kris
Product Used:


Special Anniversary

My youngest daughter celebrated her 10th Wedding Anniversary last week, an event which seems to have come around rather quickly! My card was inspired by this card gorgeous card by Mary Brown. I embossed Basic Black card with the Elegant Dots Embossing folder and wrapped a length of Whisper White 5/8″ Organza Ribbon around the embossed card before attaching to a Basic Black card base. I cut the heart from Pink Pirouette card using the Bloomin’ Hearts Thinlets Die. I stamped the numbers onto Whisper White card using Pink Pirouette ink and cut them out using the matching Large Numbers Framelits Dies.  I cut the banner from Pink Pirouette card and stamped “anniversary” from the Number of Years stamp set using Memento Tuxedo Black ink. Lastly I cut Whisper White card using the flag framelit from the Large Numbers Framelits Dies and stamped “th” from the Number of Years stamp set using Memento Tuxedo Black ink.
 To decorate the inside of the card I embossed Whisper White card using the Elegant Dots Embossing Folder, added a strip of Basic Black card behind one long edge and attached it the bottom of Whisper White card. I stamped the heart image from the Bloomin’ Love Photopolymer stamp set using Pink Pirouette ink. I love this card and how the Pink and Black work so well together.
Thank you once again to Mary Brown for providing such a beautiful card for me to Case.
Bye for now,
Kris
Product Used:


Happy Birthday Elyssa
 Today my granddaughter Elyssa celebrates her 8th birthday. I can’t celebrate with her today so we had a shopping day last week and lunch out which was rather lovely. She got to shop for her birthday gifts – clothes of course – which she rather enjoyed and so did I.
I made her a centre step card for her birthday and used the Whisper White A4 Thick card for the base. I added a strip of designer paper from the It’s My Party Designer Series Paper Stack and a different paper on each of the side steps.  I embossed Whisper White card using the Softly Falling Embossing Folder and attached it to Melon Mambo card before attaching to the card base. I stamped the “look who’s turning” from the Number of Years stamp set onto Whisper White card using Mint Macaron ink. I free cut the greeting, attached it to Mint Macaron card and free cut once again before attaching it to the card front. I cut the number from Crushed Curry card using the Large Number Framelits Dies.
  I stamped the banner from the Number of Years stamp set onto Whisper White card using Sahara Sand ink and stamped the greeting from the Boys Will be Boys stamp set onto the banner before cutting it out with the matching Large Number Framelits Die. This is a rather simple card but she loved it because it “stands” all by itself.
I also made an envelope for the card using the It’s My Party Designer Series Paper Stack and the Envelope Punch Board.  I wanted the envelope to stay shut to I pierced a hole on the envelope flap and also on the envelope just below the opening. I punched two 3/4″ circles from Melon Mambo card, inserted a Mini Silver Brad through the circle and into the holes I punched. I tied a length of Whisper White Baker’s Twine behind the Melon Mambo circle on the envelope and wrapped it in a figure “8” around both circles.
Lastly I decorated a gift bag to match the card. I added a strip of It’s My Party Designer Series Paper to Sahara Sand card. I punched one long edge of Melon Mambo card using the Hearts Border Punch and attached it behind the Sahara Sand before attaching to the front of the bag.
So Happy Birthday Elyssa I hope you have a wonderful day.
Bye for now,
Kris
Product Used:


