Thank You Take 2

This is the second design that I used to make my Thank You cards and I was inspired by this card I found on pinterest by Lyn Starzl.
I cut strips from three different designs from the Botanical Garden Designer Series Paper and then cut them into squares (1-1/4″ square).  I attached them to the Whisper White card, trying to make sure they were evently spaced(!). I added a strip of the Botanical Gardens Designer Washi Tape across the card below the designer series paper and then stamped the greeting from the Sassy Salutations stamp set using Mossy Meadow ink. I cut the large flower from Whisper White card and added a Cajun Craze centre. The leaf is cut from Mossy Meadow card. I added a small flower in either Cajun Craze or Crushed Curry to the right hand side of the Botanical Gardens Designer Washi Tape. Each flower has a Basic Rhinestone in its centre. The Whisper White card is attached to either Cajun Craze or Crushed Curry card
 The inside is decorated like the other Thank You card I shared with you. A strip of Botanical Gardens Designer Series Paper with a narrow strip of Cajun Craze or Crushed Curry card behind one long edge. The designer series paper is attached to Whisper White card and the whole panel is attached to the inside of the card.
I love this card, the colours are bright and happy and the layout is perfect. So another big thank you to Lyn for the inspiration.
Bye for now,
Kris
Product Used:


Thank You Take 1

I recently had occasion to make some thank you cards and decided to use the Botanical Garden suite of products. I selected the leafy piece of designer series paper from the Botanical Gardens Designer Series Paper and cut it using the leaf edge in the Botanical Builder Framelits Dies. I attached it to Whisper White card and stamped the greeting from the Sassy Salutations stampset onto the bottom right hand corner using Mossy Meadow ink. I cut the flowers from Whisper White card, Crushed Curry card and Cajun Craze card. The centres of the flowers are cut using Cajun Craze and Crushed Curry.  I cut the leaves from Mellow Moss card and attached all the pieces across the edge of the designer series paper. Lastly I added Basic Rhinestones to the centres of the flowers.
To decorate the inside, I used a strip of another design from the Botanicals Designer Series Paper, added either a narrow piece of Cajun Craze card or Crushed Curry card behind one long edge and attached the panel to the inside of the card.
 Because I had to make a number of these I used Cajun Craze card and Crushed Curry card for card bases. One of the best things about this suite of products is that you can buy the Botanical Blooms Photopolymer Stamp set, the Botanical Builder Framelits Dies and the Botanical Gardens Designer Series Paper as a bundle and save a heap. I just bet you all love a bargain as much as I do.
I love how these cards turned out and hope that the recipients love them too.
Bye for now,
Kris
Product Used:
Happy Birthday Pop Up
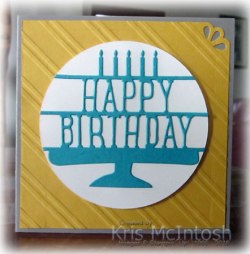
This is the first card I have made using the Party Pop-Up Thinlits Dies even though I have had them on hand for some time. I started by punching the top right hand corner of the Crushed Curry card using the Curvy corner Trio Punch. Once I had punched the card, I embossed it using the Stylish Stripes Embossing Folder. I attached the embossed card to scored and folded Tip Top Taupe card. I cut the Happy Birthday Thinlet from Bermuda Bay card and attached it to a circle of Very Vanilla card and then the card front using dimensionals. I cut the Hip Hip Hooray Thinlet pop up from the centre of scored Very Vanilla card.  This thinlet has an arrow on the top and the bottom which you need to line up with your score line when you are cutting, then you simply fold the centre of the Hip Hip Hooray so that it is a mountain fold. I attached the pop up to the centre of the card using Tombow Glue which gave me I had a little time to settle it into the right place and to make sure I had it lined up properly with the score line in the card base. I attached a strip of Designer Series paper from the Cherry on Top Designer Series Paper Stack to each side of the Very Vanilla card.
While I don’t exactly love this card, I do love these Party Pop-Up Thinlet dies and will have to have a little more of a play to see what I can make.
Bye for now,
Kris
Product Used:


It’s a Girl

While I was making the baby boy card the other day, I decided to make a baby girl card as well. This one was inspired by this card I found on Pinterest by Kim at Joyful Creations with Kim.
I started by embossing the bottom two-thirds of Whisper White card using the Elegant Dots Embossing Folder. I stamped the little duck from the Something For Baby stamp set onto Whisper White card three times using Pink Pirouette ink and cut them out using the matching Baby’s First Framelit Dies. I attached the ducks to Whisper White card and then to Pink Pirouette card.  I cut the decorative edge on the Pink Pirouette card by using the scalloped square from the Squares Thinlets Dies. The duck panel is attached over the top edge of the embossing.
  I stamped “Congratulations” from the Teeny Tiny Sentiments stamp set using Pink Pirouette ink. I added small Basic Pearls to the ducks to represent the eye and added a bow tied from 1/8″ Silver Ribbon.
To decorate the inside, I embossed Whisper White card using the Elegant Dots Embossing Folder and attached a narrow strip of Pink Pirouette card behind one long edge. After the embossed panel was attached to the Whisper White card I stamped the little duck once more using Pink Pirouette ink.
I am so happy with this card, so sweet and simple. This is another layout which I think could be used over and over again. I’d love to hear what you think.
Bye for now,
Kris
Product Used:


It’s a Boy
 Once again I have been missing in action for which I am truly sorry. However, I have been creating lots of cards for my classes, I just haven’t had time to sit at the computer and blog about them. Anyway I was asked by my Mum to create a baby boy card and I was inspired to case this card I made way back in September 2013. Of course I had to change up the stamp set and a couple of the embossing folders!
 I started by embossing Whisper White card using the Elegant Dots, Chevron and Decorative Dots Embossing Folders. I attached the embossed card to Soft Sky card, then Whisper White card and lastly scored and folded Soft Sky card.
  I stamped the duck from the Something For Baby stamp set onto Whisper White card and added the greeting from the Teeny Tiny Sentiments stamp set using Soft Sky ink. I punched the image using the 2″ Circle Punch, attached it to a 2-3/8″ Scalloped Circle before attaching it to the card front. I added a small Basic Pearl to the duck to represent it’s eye. To decorate the inside I stamped a row of ducks onto a narrow strip of Whisper White card using Soft Sky ink. I added a narrow strip of Soft Sky card before attaching to the Whisper White card.
All in all a very simple card, but one that is still very beautiful. Don’t you think so?
Bye for now,
Kris
Product Used:


Happy Bloomin’ Birthday

I was creating cards for my class next week using the Bloomin’ Love stamp set and co-ordinating products and although the products immediately shout out “love”, I thought that the small heart could be used to create this birthday card.
I attached a piece of the It’s My Party Designer Series Paper to the left hand side of Whisper White card and then attached it to a Mint Macaron card base. I punched Crushed Curry card and Sahara Sand card using the Sweetheart Punch. I embossed the Crushed Curry heart using the Decorative Dots Embossing Folder and the Sahara Sand heart using the Woodgrain Embossing Folder.  I stamped the small heart image from the Bloomin’ Love stamp set onto Whisper White card using Mint Macaron ink and punched it out using the Sweetheart Punch. I attached Gold Metallic Thread to the back of each of the hearts. I attached the hearts to Whisper White card, using dimensionals under the stamped heart. I gathered the ends of the Gold Metallic Thread and attached the ends to the back of the card.
  The panel is once again attached to Mint Macaron card and then the card front using dimensionals. I stamped the greeting from the Petite Pairs stamp set onto Whisper White card using Sahara Sand ink and punched it out using the Large Oval Punch. The greeting is attached to a Crushed Curry Scalloped Oval and then the card front using dimensionals along the lower edge only. Inside the card I attached a narrow piece of Crushed Curry card to one long edge of the same Designer Series Paper and attached it to Whisper White card.
Its a pretty simple card really but I love the colours and the “fun” of it. What about you? What do you think? This card will be part of my class next week. You can check out my Classes and Workshops page to see what’s coming up and which classes you might like to attend.
Bye for now,
Kris
Product Used:


Botanical Birthday
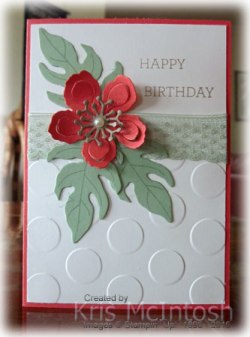
My eldest daughter celebrated her birthday last Friday and today is the first chance I have had to share her card with you. I created this card with her in mind, however, it will be part of my upcoming classes as well.
I embossed the lower two-thirds of Whisper White card using the Polka Dot Embossing Folder and wrapped the card just above the embossing using the Mint Macaron 1″ Dotted Lace Trim. I stamped the greeting from the Crazy About You stamp set onto the top right hand corner of the embossed card using Tip Top Taupe ink. The embossed card is attached to scored and folded Watermelon Wonder card. I stamped the leaf image from the Botanical Blooms Photopolymer stamp set three times onto Mint Macaron card using Mint Macaron ink and cut them out using the matching Botanical Builder Framelit Die. I attached the leaves so that the stems overlapped on the ribbon on the card front. I cut the flower from Watermelon Wonder card using the Botanical Builder Framelit. I curled the petals a little with my bone folder and painted the inner section of the flower using the Clear Wink of Stella.
  (Oh My Goodness, if you love sparkle you need to try this, it is so beautiful!). I cut the flower centre from Tip Top Taupe card using another of the Botanical Builder Framelits and added it to the centre of the flower before attaching it over the stems of the leaves. I added a large Basic Pearl to the centre of the flower, just to finish it off.
Inside the card I attached a length of Mint Macaron card behind Whisper White card which is embossed using the Polka Dots Embossing Folder. The panel is attached to bottom of Whisper White card.
I must say this stamp set and matching framelits are absolutely to die for, if you want to see for yourself, check out my Classes and Workshops Page to see the dates for my classes so you can have a little play with these amazing products.
Bye for now,
Kris
Product Used:


It’s Free
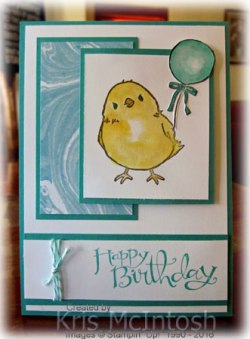
Well this stamp set was FREE with a qualifying order. Its such a cute little birdie. The stamp set is called Honeycomb Happiness and co-ordinates perfectly with the Honeycomb Embellishments which can be found in your Occasions Catalogue. Have you recieved your copy of each of these catalogues(Occassions and Sale-A-Bration)? If you do not have a demonstrator and you live in Australia then contact me and I will get copies to you.
I also used another FREE product from the Sale-A-Bration catalogue the very gorgeous Perfectly Artistic Designer Series Paper (although this one is only available for a limited time until the 15 th February when it will be replaced with another offering) for this card.  I attached a piece of the Perfectly Artistic Designer Series Paper to Bermuda Bay card and then to Whisper White card. I stamped the greeting from the Sassy Salutations stamp set on a strip of Whisper White card using Bermuda Bay ink and wrapped the left hand side using Bermuda Bay Baker’s Twine before attaching it to Bermuda Bay card. I stamped the birdie from the Honeycomb Happiness stamp set using Stazon Jet Black ink onto Whisper White card. I used an Aqua Painter and Daffodil Delight ink to colour the birdie. The feet are coloured using a Daffodil Delight Stampin’ Write Marker and the beak using a Crushed Curry Stampin’ Write Marker.
  I attached the stamped panel once again to Bermuda Bay card and then the card front using dimensionals. The balloon was stamped onto Whisper White card using Stazon Jet Black ink and coloured using an Aqua Painter and Bermuda Bay ink. I coloured the ribbon using a Bermuda Bay Stampin’ Write Marker. I cut out the balloon image and attached it to the image panel, trimming the end of the balloon string as necessary.
Inside the card I added a strip of Bermuda Bay card behind one long edge of a narrow strip of the Designer Series Paper and attached it to Whisper White card.
A simple card but sooooo cute, don’t you think?
Bye for now,
Kris
Product Used:


Sale-A-Bration Birthday

The last card I shared with you was for my Mum for her birthday, today I am going to share the card I made for my Dad. I used a sketch from my Pinterest Board to create my card using the Sky Is The Limit stamp set from the Sale-A-Bration catalogue. Now this stamp set is only available from today until the 15th February and will be replaced with something new after that date, so once you get your hands on the Sale-A-Bration catalogue don’t delay placing a qualifying order so that you can get this fabulous stamp set FREE!.
I added a piece of Cherry on Top Designer Series Paper to scored and folded Soft Suede card. I added a layer of Whisper White and stamped the birthday greeting from the Sky Is The Limit stamp set using Bermuda Bay ink.  I embossed Soft Suede card using the Decorative Dots Embossing Folder and attached it over the Designer Series Paper/Whisper White card. I attached Whisper White card to Bermuda Bay card and attached it to the card front on an angle. I stamped the plane image from the Sky Is The Limit stamp set onto scrap Whisper White card using Soft Suede ink and cut it out. I attached the plane to the card front and stamped the heart/cloud image using Soft Suede ink.
To decorate the inside I added more of the same Designer Series Paper and Bermuda Bay card to Whisper White card.
I love how this card turned out. What about you? Wouldn’t you love this stamp set to be part of your collection?
So now the exciting part! The new Occassions Catalogue and the Sale-A-Bration catalogue both went live today. You can start planning your gorgeous new projects after you’ve spent time viewing your catalogue. If you don’t have a Stampin’ Up! demonstrator and you live in Australia, contact me and I will organise for you to receive the new Occasions Catalogue as well as the Sale-A-Bration catalogue. In the meantime you can view the catalogues online here. Remember to calculate your order so that you qualify for a FREE product from the Sale-A-Bration catalogue. Remember some of these products like the Sky Is The Limit stamp set are only available for a limited time, however, they will be replaced with new limited time products. How exciting! So make a cuppa and sit down with your catalogue and enjoy.
Bye for now,
Kris
Product Used:


Happy Birthday

Today my Mum and Dad celebrate their birthdays. Yes I know the same day but not the same year! This year I cased the Occassions Catalogue which will be released on the 5th January to create a small gift bag to hold my Mum’s present. I had a small plain Kraft Gift Bag and added the designer series paper from the Botanical Gardens Designer Series paper.  Now, something really cool about this Designer Paper is that the Botanical Blooms stamp set (which you an purchase in a bundle) is that the stamps can be used to pretty up the paper. So I stamped the centres to the flowers using Hello Honey and Mint Macaron ink. How cool is that!
  I added a strip of Botanical Gardens Designer Washi Tape over the top edge of the Designer Series Paper. I created the tag by punching the top with the Scallop Tag Topper Punch and stamping the greeting from the Suite Sayings stampset (Occassions Catalogue) using Cajun Craze ink. The flower is cut from Hello Honey card using the matching Botanical Builder Framelits Dies (also part of the bundle).
  The centre of the flower is cut from Cajun Craze card. I stamped the leaves onto Old Olive card using Old Olive ink and used the matching framelit to cut them out. The leaves and flower are attached to the tag using Glue Dots. A large Basic Rhinestone finishes off the centre of the flower. I used a length of Linen Thread to tie the tag to the handle of the bag.
  I love it when you CASE something and it turns out just the way you imagined.
So I cased the layout once again to create a card to go with the gift bag. This time I used a greeting from the Petite Pairs stampset to add to the bottom of the tag. I used Crumb Cake card to layer on the Designer Series Paper (which once again I have stamped) and the Washi Tape. The tag is attached using Glue Dots. Inside the card I added a piece of the Designer Series Paper and some more Washi Tape.
So happy with the way the gift bag and card turned out. Glad to say Mum loved them too.
Bye for now,
Kris
Product Used:


