Casing the Occasions Catalogue

The excitement of Christmas with all its preparations is over and now I can finally look at some of the goodies I pre-ordered from the Occasions Catalogue which begins on the 5th January, so not long now. One of the first things that caught my eye was the Botanical Blooms Stamp set and matching Botanical Builder Framelits Dies. These two items can be purchased in a bundle with the equally gorgeous Botanical Gardens Designer Series Paper, a fantastic saving which gives you a selection of great co-ordinating products. You can find these items on page 26 of your catalogue. If you do not have a demonstrator of your own and live in Australia, then send me an email and I will get one to you.
I loved the samples in the catalogue and decided to case an extremely cute 4″ square card. The base card is cut from the fantastic Whisper White A4 Thick cardstock. This is one product I shouldn’t have waited so long to buy, gorgeous quality and a perfect thickness to create Whisper White cards. I cut Old Olive card using the leaf border from the Botanical Builder Framelits Dies and attached it to the right hand side of the card front. Isn’t it gorgeous! I inked the greeting from the Suite Sayings (also in the new catty page 41) using Mint Macaron, Old Olive and Mossy Meadow Stampin’ Write Markers and stamped it directly onto the card front.  The starry image is also from the Botanical Blooms Stamp set and is stamped in Hello Honey ink. The large flower with it’s separate “inner” and “outer” petals is cut from Mint Macaron card using one of the Framelits in the Botanical Builder Framelits Dies – I used my bone folder to add some dimension before attaching to the card front using a Glue Dot. The small flowers are cut from Hello Honey card using another Framelit from the same set of Dies and attached to the card front also using Glue Dots. I added Basic Rhinestones to the centres of the flowers – large one for the large flower and smallest ones for the Hello Honey flowers. Lastly I added one of the new Botanical Gardens Jewels just behind the top edge of the large flower. Isn’t it a gorgeous little card. My greeting is different to the one in the catalogue but I love it just the same. To decorate the inside I once again cut Old Olive card using the leaf border. Simple but oh so effective.
I believe that these products will be one of my favourites. What do you think? Bet you love them just as much as I do.
Bye for now,
Kris
Product Used:


Looking through the window
 I don’t know about you but I love the Hearth and Home Framelits, and was so excited that they won’t be retiring but carrying over to the Occasions Catalogue in January. They make it so easy to create many, many different looks. This card started out as a 3 x 4″ card for a Project Life Scrapbook page, however, I loved it so much I re-created it for this card. I stamped the tree from the Lovely as a Tree stampset onto Whisper White card using Old Olive ink. I then used the framelit from the Perfect Pines Framelit Dies to cut the “baubles” from the image.
  The panel is layered onto Real Red card and a star punched from Red Glimmer paper using the star punch from the Bitty Punch Pack is added to the top. The window frame is cut from Smoky Slate card and the image panel attached to the back. I embossed the Whisper White card using the Brick Wall Embossing Folder, attached the window panel and layered it onto Real Red card.
  I embossed the next layer using the Softly Falling Embossing Folder, added the window panel and layered it onto the front of scored and folded Real Red card. The greeting from the Petite Pairs stamp set is stamped in Real Red ink and punched using the Large Oval Punch, layered onto a Real Red Scallop Oval and attached to the card from using dimensionals so that it would sit over the corner of the window frame panel. Inside I stamped the tree image once again using Old Olive ink. Used the framelits to cut the baubles in the tree and attached it to the inside of the card.
I love how easy it is to combine these products to create so many different looks, don’t you.
Bye for now,
Kris
Product Used:


Christmas Cards for my Grandchildren
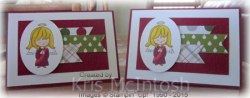
I started making a special Christmas card for each of my six grandchildren several years ago. It has now become somewhat of a tradition and they look forward to seeing what I create each year. This year I used some card sketches I had saved on my Pinterest Board to create 6 cards, 2 each of 3 designs. I love the Christmas Critters stamp set and purchased it specifically so that I could make cards for my grandchildren.

 I used three strips of the Merry Moments Designer Series Paper and attached them to Whisper White card 5″ x 5″ square before attaching to Cherry Cobbler card. I stamped the “elf” image onto Whisper White card using Memento Tuxedo Black ink and used my retired Blendibilites to colour the image (Cherry Cobbler, Old Olive, Smoky Slate, Daffodil Delight and Skin Tones (nude)). I punched Gold Glimmer Paper using the Owl Builder Punch and attached them over the bells on the stamped image.
  I used a Circle Framelit Die to cut out the image and attached it to the card front using dimensionals. I stamped the greeting onto Whisper White card using Mellow Moss ink and punched both ends using the Triple Banner Punch before attaching to a slightly longer piece of Mellow Moss card which also has both ends punched to match the Whisper White banner. The greeting is attached to the card front using a dimensional under each end. Inside I added a strip of Mellow Moss to one long edge of a piece of the Merry Moments Designer Series Paper and attached it to Whisper White card. The panel is attached to the inside of the card.
 For the next two cards I embossed Cherry Cobbler card using the Elegant Dots Embossing Folder and attached it to the centre of Whisper White card. I cut three banners from the Merry Moments Designer Series Paper Stack and attached them to the centre of the Cherry Cobbler card.
  I stamped the angel image onto Whisper White card using Memento Tuxedo Black ink and cut the image out using an Oval Framelit Die. Once more the image is coloured using Blendibilities, except for the wings where I coloured using a 2-Way Glue Pen and added Dazzling Diamonds. For the inside I stamped the greeting from the Sassy Salutations stamp set using Cherry Cobbler ink onto Whisper White card and added a piece of Designer Series Paper to one long edge of Cherry Cobbler card which is embossed using the Elegant Dots Embossing Folder.

 The last card has a piece of Merry Moments Designer Series Paper attached to Whisper White card with a narrow strip of Silver Glimmer Paper attached over the Designer Series Paper. I stamped the greeting using Cherry Cobbler ink onto the lower right hand corner of the Whisper White card. The panel is attached to scored and folded Cherry Cobbler card.
  Once more the image is stamped onto Whisper White card using Memento Tuxedo Black ink, coloured using Blendibilities and cut out using one of the Circle Framelits Dies. The image is attached to the card front using dimensionals. A narrow strip of Silver Glimmer paper is attached to one long edge of Merry Moments Designer Series Paper and then to Whisper White card. The panel is attached to the inside of the card.
I love how each of these cards turned out and my grandchildren loved them as well.
Bye for now,
Kris
Product Used:


Christmas Luminaries

While searching on Pinterest I found a cute little Luminary by Debra Smart here. Debra shared some quick instructions to show how she made them but didn’t have a specific tutorial for their creation. I decided to add a platform to the inside that would hold my battery operated tea light and I decorated using the Snowflake Elements and the Home for the Holiday Enamel Dots. I created my own instructions and the ladies at the Beachmere Retirement Resort made these on our all day class.  I embossed Vellum Cardstock using the Snow Falling Embossing Folder and attached them to the back of the Basic Black Window Frames made using the Hearth and Home Thinlits Dies and added the little piece for the frame to sit on to hold the tea light. However, when looking inside the frame I didn’t like the look of the raw Vellum edges showing and of course they weren’t all perfectly even either! Soo… I decided that I would add another frame to the inside of the Luminary so that you couldn’t see any raw edges.
  I did have to trim down the sides of the Window frames a little so that it would fold properly and I could still connect the four sides together. I also added a little tape to the tea light holder so that it would stay permanently connected to the window frames. I love how this turned out. A little glitter with the Gold Sequins also gave it a special look. Each side has some decoration, so that no matter where you are sitting you have something to look at. If you would like to make one of these, then please download the Free Tutorial. You will not find instructions for adding the inside layer (as this was an afterthought), but I am sure that you can work it out.
Bye for now,
Kris
Product used:


A special birthday wish
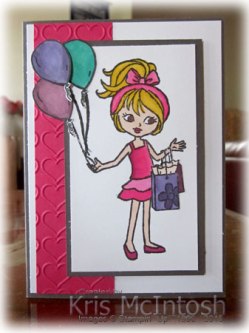
Today I am sharing the card I made for my eldest granddaughter’s 11th birthday. I love the Hey Girl stampset it has so many elements that allow you to create so many different looks for your cards. I stamped my image in Memento Tuxedo Black ink and then coloured it using my retired Blendibilities (I just couldn’t return them, I never had an issue with any of mine and I love how easy it is to get a great coloured look). The balloons and shopping bags are fussy cut to make placement a little easier.  I used Basic Gray card to layer the focal image and also for the base card. I embossed Melon Mambo card using the Happy Hearts Embossing Folder to add a little texture. Inside is simple with the greeting from the Sassy Salutations stampset stamped in Melon Mambo and a little more embossing.
 Sorry about the retired product but couldn’t resist sharing. For those of you like me who couldn’t bear the thought of parting with their blendibilities I used these colours – Melon Mambo, Skin Tone (nude), Rich Razzleberry, Coastal Cabana, Wisteria Wonder and Daffodil Delight.
Bye for now,
Kris
Product Used:


Year End Sale

I love sale time, there is always something reduced in price that I just “have to have”, well Stampin’ Up! is having an End of Year Sale. Woohoo and to make it even more exciting Australian and New Zealand customers have an additional discount on selected items from the Annual Catalogue of up to 50% ffor this week only (10th to 17th December). Download the PDF or visit my store to see what’s included in this sale and remember anything from the annual catalogue will be discounted for this week only.
Happy shopping.
Kris
Celebration Time

I was extremely lucky to get together with the lovely ladies who attend my classes at home and support my business in many, many, ways as well as my downline. We shared a lovely lunch (thanks so much to my husband who willingly dons his chefs hat and cooks the barbeque) lots of laughs and generally had a great catch up.
I also want to thank my three little helpers, my two granddaughters (thanks Abi and Elyssa) who love to hand out my Christmas gifts and also help to serve and share around the snacks and my grandson (thanks Ethan) who is also a dab hand at barbequeing (not sure if that is a word). I try to give each of my ladies a little gift to show my appreciation for their support and friendship over the last 12 months. This year I used My Digital Studio (how sad I am that this has retired) to create the decoration for the front of the gift bags and also for the tags to label each of the handmade gifts. Since I have at least one lady with dietary considerations, I add the ingredients to the back of the tag so they can be sure that they are safe for their use/consumption.
Each bag contained a small chocolate bar, because everyone needs chocolate. The Chocolate Bar Holder is available as a free tutorial. This is the perfect way to present those cute little chocolate bars that Aldi sells. This year I stamped one of the trees from the Festival of Trees stamp set using Garden Green ink. I love how if you keep stamping you create the look of the forest, don’t you? The greeting comes from the Holly Jolly Greetings stamp set (this stamp set isn’t retiring in January, woohoo) and is stamped in Real Red ink. They are closed with a length of 1/8″ Striped Ribbon in either Garden Green or Real Red. So cute aren’t they? I also covered a small notebook using the same stamping decoration as the Chocolate Bar Holder and added the greetingfrom the Reason for the Season stamp set (these stamps aren’t retiring in January either) in Real Red ink . The image panel was sponged around the edges using Garden Green ink before it was attached to the front of the notebook. I added a small selection of homemade gifts, including a couple of Bath Bombs, some Rocky Road and a Peppermint Body Scrub which is just devine if you use if on your hands every time you wash – it makes them so soft and silky!
I was also spoiled with a swag of lovely gifts from these ladies, lost of chocolate and wine, which I know will be enjoyed over Christmas for which I thank them very much.
I am so looking forward to catching up with these ladies again in the New Year.
Bye for now,
Kris
Product Used:


Stamping All Day
 Once a year I hold an all day event at the Beachmere Retirement Village. We begin our day at 9am and finish when all projects are completed. We bring morning tea and lunch to share and all in all have a wonderful, although a little tiring day.
This year we made five projects – a Framed Art Piece, a Gift Box, a Tea Light Holder, a Triangle card, and a Bendi Fold card.
Since I haven’t shared a tutorial with you in a while I thought that some of you may be interested in making this framed art. We created four panels, two each of two different sizes to fit on a full A4 sheet of Thick Whisper White card. When I create these pieces, I try to use product from the current Holiday Catalogue. The Christmas Tree panel was inspired by one that I found on Pinterest – isn’t it just adorable. My frame is recessed so that I could add some dimension to the panels if required. Would you like to create this project, well you can, simply click on the link below to download your instructions and then start creating.
I would love to see your finished samples.
Kris
Product Used:


20% OFF! and Retiring List!
EDITED: I believe this sale applies to the Australian and New Zealand markets only!
 From today for just 5 days Stampin’ Up! has discounted selected stamp sets by 20%. That’s a huge saving!. Download the PDF to see which of your must have stamp sets are discounted. You won’t be able to delay, order the ones you want immediately or miss out on this fabulous deal. You can place your order directly at my online store.
 Just to add to the excitement Stampin’ Up! has released the retiring list for the Holiday Catalogue. While this catalogue doesn’t end until the 4th January, products also have the disclaimer “while stocks last”, so if you want something from this catalogue, you need to purchase it as soon as possible to ensure you don’t miss out. So download the PDF and shop to your hearts content and then visit my online store to place your order.
Have a fabulous time checking out the specials and be sure to visit my online store to place your order and don’t forget the discount only lasts 5 days.
Bye for now,
Kris
Another Birthday
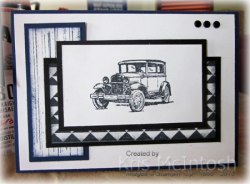
My family seems to love having birthdays in groups and this past month is no different. Last week was my son-in-laws birthday as well as my niece! Thought I would share with you the card that I made for Jason.
I actually had a card sitting on my bookshelf which used this particular layout and I thought that I would use it again for Jason’s card. I began by attaching Whisper White card to scored and folded Night of Navy card. I stamped the striped image from the Gorgeous Grunge stamp set onto Whisper White card using Night of Navy ink. I sponged around the edges using the same ink, attached it to Night of Navy card and then to Whisper White card. I stamped the triangle image from the Dotty Angles stamp set onto Whisper White card using Memento Tuxedo Black ink, sponged the edges with the same ink and attached it to Basic Black card. The panel is attached to the Whisper White card over the Night of Navy panel. I stamped the car from the Guy Greetings stamp set onto Whisper White card using the Memento Tuxedo Black ink and attached it to Basic Black card. The image panel is attached to the card front using dimensionals. Lastly I added three Basic Black Candy Dots from the Neutrals Candy Dots collection to the upper right hand corner. Simple.
 It’s not hard to buy for either of my sons-in-law a bottle of their favourite bourbon or rum always goes down a treat and this year was no exception. I used the two largest Banners Framelits Dies to cut Whisper White and Basic Black card. I stamped “to and from” using the image in the Merry Everything stamp set and a Basic Black Stampin’ Write Marker. I also stamped the car again using the Memento Tuxedo Black ink. The tags are scored and a 1-1/4″ Scallop Circle is punched through the end. This gives you a way to hang the tag from the bottle, no extra wrapping. He did get a little something extra and once again I used the brown paper that Stampin’ Up! supplies in my orders to wrap it.
All in all it went down a treat.
Bye for now,
Kris
Product Used:


