20% OFF! and Retiring List!
EDITED: I believe this sale applies to the Australian and New Zealand markets only!
 From today for just 5 days Stampin’ Up! has discounted selected stamp sets by 20%. That’s a huge saving!. Download the PDF to see which of your must have stamp sets are discounted. You won’t be able to delay, order the ones you want immediately or miss out on this fabulous deal. You can place your order directly at my online store.
 Just to add to the excitement Stampin’ Up! has released the retiring list for the Holiday Catalogue. While this catalogue doesn’t end until the 4th January, products also have the disclaimer “while stocks last”, so if you want something from this catalogue, you need to purchase it as soon as possible to ensure you don’t miss out. So download the PDF and shop to your hearts content and then visit my online store to place your order.
Have a fabulous time checking out the specials and be sure to visit my online store to place your order and don’t forget the discount only lasts 5 days.
Bye for now,
Kris
Another Birthday
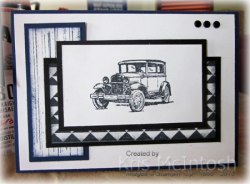
My family seems to love having birthdays in groups and this past month is no different. Last week was my son-in-laws birthday as well as my niece! Thought I would share with you the card that I made for Jason.
I actually had a card sitting on my bookshelf which used this particular layout and I thought that I would use it again for Jason’s card. I began by attaching Whisper White card to scored and folded Night of Navy card. I stamped the striped image from the Gorgeous Grunge stamp set onto Whisper White card using Night of Navy ink. I sponged around the edges using the same ink, attached it to Night of Navy card and then to Whisper White card. I stamped the triangle image from the Dotty Angles stamp set onto Whisper White card using Memento Tuxedo Black ink, sponged the edges with the same ink and attached it to Basic Black card. The panel is attached to the Whisper White card over the Night of Navy panel. I stamped the car from the Guy Greetings stamp set onto Whisper White card using the Memento Tuxedo Black ink and attached it to Basic Black card. The image panel is attached to the card front using dimensionals. Lastly I added three Basic Black Candy Dots from the Neutrals Candy Dots collection to the upper right hand corner. Simple.
 It’s not hard to buy for either of my sons-in-law a bottle of their favourite bourbon or rum always goes down a treat and this year was no exception. I used the two largest Banners Framelits Dies to cut Whisper White and Basic Black card. I stamped “to and from” using the image in the Merry Everything stamp set and a Basic Black Stampin’ Write Marker. I also stamped the car again using the Memento Tuxedo Black ink. The tags are scored and a 1-1/4″ Scallop Circle is punched through the end. This gives you a way to hang the tag from the bottle, no extra wrapping. He did get a little something extra and once again I used the brown paper that Stampin’ Up! supplies in my orders to wrap it.
All in all it went down a treat.
Bye for now,
Kris
Product Used:


November Class
 Thought you might be interested to see what projects we will be making in the November Class. This is my last class for the year and it will be lots of fun. We are going to make a Framed Art piece as well as 3 extra special cards. You can use the framed art to update the one we made last year. I am so excited for you to be making the Bendi Fold and Triangle cards. There is something extra special and magical about making cards that are able to stand on their own and are not “flat”.
If you live in or near Narangba (Brisbane, Qld) and would like to attend this class, then check out my Classes and Workshops page where you can find the dates and all the other details you need.
Bye for now,
Kris
Turning 7

My granddaughter Jae celebrated her 7th birthday on Thursday. How quickly she is growing up! Like all little girls her age she loves the movie Frozen, so I used Pinterest to get some inspiration to make her a frozen card. I embossed the Whisper White card using the Softly Falling Embossing Folder and attached it to scored and folded Soft Sky card. I cut Soft Sky card using my Dress Up Framelits (retired but with 4 granddaughters I couldn’t let this one go) I trimmed the bodice, covered it in Versamark and sprinkled with Heat & Stick powder and Dazzling Details combined and then heat set it.  I cut one more full dress and two more skirts and layered them together. I added lots of Basic Rhinestones – a girls gotta have bling! The greeting from the Petite Pairs stamp is stamped in Soft Sky on Whisper White card, punched using the Large Oval Punch and attached to a Soft Sky Scalloped Oval. Inside I just added the second part of the birthday greeting and a piece of Soft Sky card embossed using the Softly Falling Embossing Folder.
  Of course you have to have matching decoration on the gift bag, so once again I embossed Whisper White card using the Softly Falling Embossing Folder and attached it to Soft Sky card. I stamped the greeting from the Happy Birthday Everyone Hostess Stamp Set onto Whisper White card using Soft Sky ink and cut it out using the largest Oval Collection Framelits Die. The greeting is attached to the Soft Sky Scalloped Oval Framelit from the Oval Collection Framelits Dies.
  I punched three flowers from Soft Sky card using the Petite Petals Punch, added a little dimension and a couple of sets of leaves punched from Soft Sky card using the Bird Builder Punch. Lastly I added a large Basic Pearl to the centre of the flowers. Her present included a small set of books which would not fit inside the gift bag so I used the brown paper that Stampin’ Up! supplies in my orders to wrap them.
I’m pleased to say that Jae loved her presents, card and gift bag. Success!
Bye for now,
Kris
Product Used:


A Pretty Box
 The bonus project for last month’s card class was this cute little Pillow Box. Who knew they could be gorgeous and practical too! The box pieces were cut from Kraft Card which is sold in 12″ x 12″ packs of 12 and is a little thicker than our normal card and therefore perfect for boxes. Once you have cut out the box pieces you need to make sure that you have folded all the score lines very well, especially the curved ends which hold the box closed. We used Fast Fuse to hold our boxes together which made it a very quick and easy.
  The front is decorated with half a Tea Lace Paper Doily and Natural 5/8″ Chevron Ribbon which covers the cut edge of the Paper Doily. The ribbon is joined on the front of the box, again with Fast Fuse. The flower is created by stamping the image from the Reason for the Season stamp set onto Garden Green card once and Cherry Cobbler Card twice using Basic Black Archival ink. We cut out the whole Garden Green image, one full flower from a Cherry Cobbler image and a smaller section from the middle of the flower for the last Cherry Cobbler image. The full Cherry Cobbler flower is attached flat to the Garden Green image and the smaller flower is attached to the centre of the full flower using dimensionals. Lastly I added three tiny Basic Pearls to the centre of the flower. The flower is attached to the front of the box using Fast Fuse.
I love this box and I am quite impressed at how large it actually is. This will be gorgeous under my tree this year.
I’d love to hear what you think of my pillow box and if you have made any yourself.
Bye for now,
Kris
Product Used:


SFF10915

Unfortunately I had to make a sympathy card this week and found some inspiration in the sketch challenge at Sketch Frenzy Friday.
I attached Whisper White card to scored and folded Sahara Sand card. I inked the image from the Thoughts and Prayers stamp set using Wisteria Wonder and Wild Wasabi Stampin’ Write Markers, stamped onto Whisper White card and cut the image using one of the Circles Collection Framelits Dies. I cut a Circle of Sahara Sand card and attached the image panel to it, before attaching the piece to the card front.  I embossed a strip of Wisteria Wonder card using the Brick Wall Embossing Folder and attached it to the left hand side of the card front. I inked “Thinking of You” using the Wisteria Wonder Stampin’ Write Marker, stamped onto Whisper White card and punched the image using the Large Oval Punch.
  I attached the greeting to a Sahara Sand Scalloped Oval before attaching to the card front.
To decorate the inside panel I stamped the tree image from the Thoughts and Prayers stamp set onto Whisper White card using Wild Wasabi ink. I embossed a strip of Wisteria Wonder card, again using the Brick Wall Embossing Folder and attached it to the bottom of the stamped card.
These cards are never fun to make but I think this has turned out very nicely. What about you, what do you think?
Bye for now,
Kris
Product Used:


Extra! Extra! Read all about it!
From the 9th October to the 9th November Stampin’ Up! is offering an extra 3% in Stampin’ Rewards to any qualifying order over $400.00. This is fantastic! Sooo…… now is a fabulous time to stock up on all your favourite Stampin’ Up! products, or even better host your own workshop. Imagine the possibilities! Check out the flyer to see how much free product you can earn.  If you need more information or you would like to host your own workshop, please contact me to find out all the details. I would hate for you to miss out on this great opportunity to stock up on your Stampin’ Up! supplies.
Bye for now,
Kris
Bohemian Flowers

Can I let you in on a little secret? I was given the Bohemian Designer Series Paper at the Stampin’ Up! Convention way back in March and I have to admit that it did not impress me very much. I love the colours but the patterns were just too “busy” for me. So it has sat in my cupboard gathering dust until I decided that I needed to get it out and have a play. So here is a card I created using this paper for one of my classes at the Beachmere Retirement Resort. I cut four different papers from the Designer Series Paper and attached them to Delightful Dijon card and then to scored and folded Bermuda Bay card.  I stamped part of the Vivid Vases stamp onto Very Vanilla card using Stazon Jet Black ink. I also stamped the image onto Bermuda Bay card and cut out the vases.
  I attached the Bermuda Bay vases over the stamped vases and then coloured the flowers and leaves using Delightful Dijon, Blackberry Bliss and Mossy Meadow Stampin’ Write Markers. I added a small Basic Pearl to the centre of the Blackberry Bliss Flower. I punched the image using the 2-1/2″ Circle Punch and attached it to a circle of Blackberry Bliss card cut using one of the Circles Collection Framelits Dies. The image panel is attached to the card front using dimensionals. Inside the card I added a narrow piece of Blackberry Bliss behind a strip of the Bohemian Designer Series Paper and attached it to Very Vanilla card.
I may have to review my first opinion of this Designer Series Paper and get it out to use more. Let me know what you think? I actually think this card works well.
Bye for now,
Kris
Product Used:


Joy Fold Card
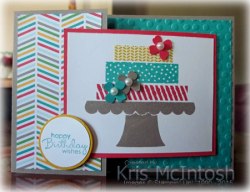
I haven’t made a Joy Fold card in quite a while, and I should have shared it before now, because this is one I created for my August Class. I used Tip Top Taupe card for the base and added a layer of Bermuda Bay card which I embossed using the Decorative Dots Embossing Folder. I added a strip of designer series paper from the Cherry on Top Designer Series Paper Stack to the left hand flap. I folded Watermelon Wonder card in half and attached it to the centre of the embossed Bermuda Bay card.  I stamped the images from the Build a Birthday stamp set using Tip Top Taupe, Watermelon Wonder and Bermuda Bay ink onto Whisper White card. The top layer of the cake is a piece of the yellow Cherry on Top Designer Washi Tape. I used the flower from the Itty Bitty Accents Punch Pack to punch Watermelon Wonder, Tip Top Taupe and Bermuda Bay card. I attached the flowers using Glue Dots and then added a Basic Pearl to the centre of each flower.
  To hold my card closed, I stamped the greeting from the Petite Pairs stamp set onto Whisper White card using Bermuda Bay ink and punched it out using the 1-1/4″ Circle Punch. I attached the greeting to a 1-3/8″ circle of Crushed Curry card and used dimensionals to position it so that I could close the card. I left the Whisper White panel on the inside of the Watermelon Wonder card blank, to add a message.
These are such fun cards to make. If you don’t know where to start to make one of these you will find a great tutorial on the Splitcoast Stampers website.
Why don’t you make one and share the result with me. I’d love to see your creations.
Bye for now,
Kris
Product Used:


A Christmas Challenge
 The sketch challenge this week at Sketch Frenzy Friday caught my eye and I decided to have a play with my Sleigh Ride Edgelits to complete this card. I attached a piece of Soft Sky card, which had one end punched using the Triple Banner Punch, to Whisper White card and embossed the card using the Softly Falling Embossing Folder. The embossed card is attached to scored and folded Soft Sky card. I cut an oval from Soft Sky card and two ovals from Whisper White card using one of the Oval Framelits Dies.
 I cut one oval using the tree edgelit from the Sleigh Ride Edgelits and the other one using the house edgelit. I attached the oval with the trees to the Soft Sky oval. I cut the houses from the Whisper White oval and cut another set of houses using Basic Gray card. I attached the Basic Gray houses behind the oval which I had cut and then attached it to the Soft Sky Oval. (Oh, that sounds so complicated but in reality it was pretty easy.)
  The oval is attached to the card front using dimensionals. I cut the sleigh and horse edgelit from Basic Gray card, cut away the excess card and attached the sleigh and horse to the card front.
Inside the card I embossed the lower portion of Whisper White card using the Softly Falling Embossing Folder. I cut the sleigh and horse once more from Basic Gray card and attached it over the embossed card. Lastly I stamped the greeting merry everything” from the Jingle All The Way stampset onto the Basic Bray card using the Archival Basic Gray ink. Want to know the best thing, well you can purchase the Sleigh Ride Edglits and the Jingle All The Way stamp set as a bundle! Yay – I love to save money don’t you?
I love this! It is so soft and delicate and the edgelits make it look very professional, even if I do say so myself! Have you tried these edgelits yet? I really recommend that you do, and once you have you will love them as much as I do.
Bye for now,
Kris
Product Used:


