A Happy Christmas Scene
 If you don’t buy anything else from the Holiday Catalogue, I thoroughly recommend you look at the Festive Fireplace and Happy Scenes Bundles. These sets work together very well and allow you to create many different types of cards quickly and easily and you have to love a stamp set that has a matching framelit. I know everyone at my classes gives a little groan when they have to fussy cut, so these sets are perfect.
Anyhow, onto the card! I embossed Whisper White card using the Boughs and Berries Embossing Folder. I attached Crumb Cake card to the bottom which is embossed using the Stylish Stripes Embossing Folder, only I made the stripes run vertically on the card (I think I am missing the retired Stripes Embossing Folder). I cut out the Window Box from Crumb Cake card, cut it in half and attached it to the top of the embossed card. The embossed panel is attached to scored and folded Garden Green card. I stamped the trees from the Happy Scenes stamp set onto Whisper White card using Garden Green ink and then added a little Pool Party ink using a sponge. I used a 2-Way Glue Pen to add Dazzling Diamonds to the “snow” section of the card. I cut out the window from Crumb Cake card and attached the stamped card to the back. This is attached to the card front using dimensionals.  I stamped “seasons greetings” from the same stamp set onto Whisper White card using Garden Green ink and punched it out using the Word Window Punch. I attached the greeting to Garden Green card punched using the new Washi Label Punch before attaching to the card front, also using dimensionals.
Inside the card I stamped the trees once more onto the lower right hand corner of Whisper White card using Garden Green ink. I cut Silver Glimmer Paper using one of the Sleigh Ride Edgelits and attached it over the bottom of the card. I hope I created the look of a hill of snow in front of the trees!
I love this card and if you love it too, why not come along to my October Class where we will be creating this card along with another four Christmas Cards. Check out my Classes and Workshops page to get the details.
Bye for now,
Kris
Product Used:


Just Add Ink 279
 I was browsing Sketch Challenges this week and the one at Just Add Ink took my eye. So I used their sketch to create this Christmas Card using the Christmas Cuties stamp set. I embossed Real Red card using the Softly Falling Embossing Folder and attached it to scored and folded Smoky Slate card. I rounded two corners on a piece of Designer Series Paper from the Merry Moments Designer Series Paper Stack using the Project Life Corner Rounder Punch. I rounded two corners on a piece of Old Olive card using the same punch and attached it over the bottom of the Designer Series paper.
  I stamped the image onto Whisper White card using Basic Black Archival ink. I coloured the image using a Blender Pen and the following inks – Old Olive, Real Red, Pink Pirouette, Hello Honey and Basic Gray. I cut the image using a die from the Circles Collection Framelits Die but I had to fussy cut one of his feet first so that I didn’t have to use a die that was too big. I attached the image to the card front using dimensionals.
  I stamped the greeting from the Happy Seasons stamp set onto Whisper White card using Real Red ink. I punched the image using the Washi Label Punch before attaching it over the Old Olive card. The finishing touch was to punch small circles from Gold Glimmer Paper using the Cupcake Builder Punch to place over the stamped baubles on the collar and the hat of the cute little elf. Inside the card I added a narrow strip of Real Red card behind one long edge of the same Designer Series Paper and just to add a little something extra I stamped the two bauble images from the Among The Branches stamp set, one using Real Red and the other using Old Olive ink.
Cute isn’t it? Despite the fact that “colouring- in” is not my favourite thing to do I am having fun with this stamp set. If you haven’t got this set, maybe you should take another look.
Bye for now,
Kris
Product Used:


Father’s Day
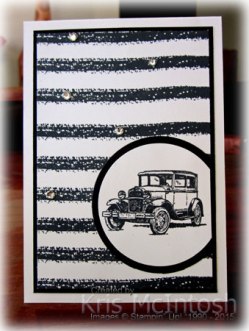
I know it was Father’s Day a while ago but I hadn’t got around to sharing with you the card I made for my Dad. I CASED this card which I found on Pinterest and unfortunately I cannot read the watermark to give credit to the creator. I used the skinny line image from the Gorgeous Grunge stamp set and Archival Black ink to create the striped background on Whisper White card. I stamped the car from the Guy Greetings stamp set onto Whisper White card using the same ink and punched it out using the 2-1/2″ Circle Punch. I made sure to leave a straight edge on one side.  I attached the image to a circle of Basic Black card cut using one of the Circles Collection Framelits Dies, which I trimmed to match the straight edge. This was attached to the stamped/striped panel and then to Basic Black card. The whole piece is attached to scored and folded Whisper White card. I added some large Basic Rhinestones to add a little bling.
  Inside the card I stamped “World’s Greatest Dad” onto Whisper White card using Archival Black ink and images from the Guy Greetings stamp set. The panel is attached to Basic Black card.
I also created matching packaging to house my Dad’s gifts. I used the Baker’s Box die to cut Basic Black card and stamped Whisper White card using the same line image from the Gorgeous Grunge stamp set and Archival Black ink to decorate the side panels.  I cut a tag from Basic Black card using the Lots of Labels Framelit Dies. I stamped Whisper White card with the “just for you” from the Teeny Tiny Sentiments stamp set using Archival Black ink. The Baker’s Box is wrapped with Whisper White satin ribbon with the tag attached and tied in a knot. The box holds two golf balls. My Dad loves his golf! I created a matching tag to hang from a bottle of port and added”happy father’s day” which is from the Guy Greetings stamp set. My Dad also loves his port!
Lucky for me Dad was happy with his gifts and I thought they looked really cute. What about you, what do you think?
Bye for now,
Kris
Product Used:


Golden Wedding
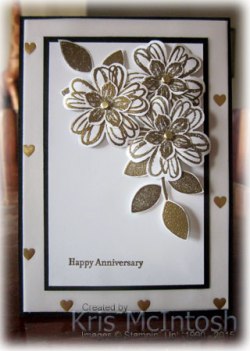
This is another card I created after a request from one of the ladies at my Beachmere Class. She needed a card for a special friend celebrating her Golden Wedding Anniversary. I attached some of the very gorgeous Fancy Foil Designer Vellum to Whisper White card and then to scored and folded Basic Black card. I stamped the greeting from the Teeny Tiny Sentiments stamp set onto the lower left hand corner of another piece of Whisper White card using Versamark, sprinkled it with Gold Embossing Powder and heat set it.  The stamped card is again attached to Basic Black card and then the card front. I stamped the flowers from the Flower Shop and Petite Flowers stamp set onto Whisper White card using Versamark, embossed them in Gold and punched them out using the Pansy Punch and the Petite Petals Punch. The leaves are from the Crazy About You stamp set which are again embossed in Gold but this time they were cut out by hand.
  I gave the flowers some dimension before attaching the small flower to the centre of the large flower using a Gold Brad (retired). The leaves are attached to the back of two of the flowers using Glue Dots and all the flowers are attached using dimensionals. Inside the card I stamped the leaves and once again embossed them in Gold. The flowers are stamped, embossed and punched as before and attached over the leaves. This time I didn’t add a brad to the centre of the flowers.
I love how gorgeous this card is and of course I love embossing, however, some of the ladies at class were not so enthusiastic! What do you think? Is is gorgeous enough for such a special occasion?
Bye for now,
Kris
Product Used:


Memory Keeping with Friends
 Last Friday night I held my monthly Memory Keeping Class. This class is fun because basically you get to work on your own projects and just use my stamps, inks, and accessories. I usually create a page which uses some of the Stampin’ Up! Project Life products on a 12 x 12″ scrap page which anyone who attends can create or just keep the pieces for another project. Last Friday I worked on some pocket pages about a holiday my husband and I had with two of our grandchildren last April.
  We took a mini road trip from Moree to Cunnamulla, up to Charleville and then across through Roma and Miles back to Brisbane. What a great time we had sharing this experience with our Grandchildren. Ron & I have been to Cunnamulla and Charleville many times but it seemed different seeing it through the children’s eyes. We got to see lots of native animals up close including a night encounter with a very large Kangaroo who was only a few feet in front of us! Anyway I kept my pages simple focusing on the photos and hand writing about our experiences. I used the Love Story Project Life cards to fill my pages and to journal on. Keep an eye on my Classes & Workshops page if you would like to attend next month’s class.
Bye for now,
Kris
Product Used:


Non-Traditional Christmas
I really like the sketch at Freshly Made Sketches this week and thought that I would play along. I wasn’t going to buy the Christmas Cuties stamp set but thought that it would be a good one for my grandchildren to use to make cards for their friends. Anyway, you can’t have new product without trying it out and this sketch gave me the inspiration.
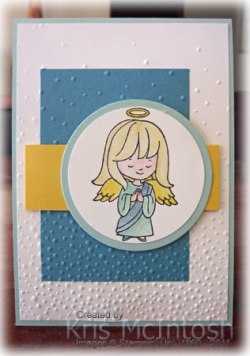
I started by attaching Marina Mist card to Whisper White card which was then embossed using the Softly Falling Embossing Folder (I really love this folder!). The embossed card is attached to scored and folded Pool Party card. My next layer is daffodil delight which I attached using dimensionals.  The cute little angel from the Christmas Cuties stamp set is stamped onto Whisper White card using the new Basic Black Archival ink and then coloured using a Blender Pen and the following inks – Pool Party, Marina Mist, So Saffron, Daffodil Delight and Pink Pirouette. I punched the image using the 2-1/2″ Circle Punch before attaching to Pool Party card cut using a Circles Collection Framelits Die. The image is attached to the card front using dimensionals so that it would sit flat onto the Daffodil Delight card.
 I decorated the inside by attaching a narrow strip of Daffodil Delight card behind one long edge of Marina Mist card before embossing using the Softly Falling Embossing Folder. The embossed card is attached to Whisper White card stamped with Merry Christmas from the Sassy Salutations stamp set using Marina Mist ink.
Isn’t it cute? I might have to play with this stamp set a little more before letting my Grandchildren have their turn.
Now what is really exciting is that the 2015 Holiday Catalogue launches today! Yay! That’s right, you can now place your order for your “must haves” for the holiday season. Don’t have a catalogue – you can view it by clicking on the picture on the right hand side of this page. Don’t have a demonstrator, then contact me to get a copy of this wonderful catalogue.
Bye for now,
Kris
Product Used:


Calypso Wedding
 I had a request from one of the ladies at my Beachmere Class to create a Wedding card as her granddaughter is getting married soon. She showed me the invitation so that I could match the colour and I think Calypso Coral is perfect. I embossed Calypso Coral card using the Happy Hearts Embossing Folder and attached it to Whisper White card. I stamped the greeting from the Teeny Tiny Sentiments stamp set using Calypso Coral ink onto the right hand side of the Whisper White card. I wrapped the top of the Calypso Coral card using the Silver 5/8″ Satin Ribbon and tied a knot.
  The panel is attached to scored and folded Smoky Slate – I love how this card takes on a real silver look and is a perfect match for the ribbon. I stamped the hearts from the Hello Life stamp set onto Whisper White card using Calypso Coral ink and cut them out before attaching to the card front. I punched out a small heart from Calypso Coral card using the punch from the Itty Bitty Accents Punch Pack and attached it over the other two.
Inside I kept the card pretty simple -I attached a piece of Smoky Slate card behind one long edge of a narrow piece of Calypso Coral card embossed with the Happy Hearts Embossing Folder.
Fortunately the lady who asked for the card loved it and all in all it was a great success this week in class. I’d love to hear what you think.
Bye for now,
Kris
Product Used:


Peaceful Chistmas Card
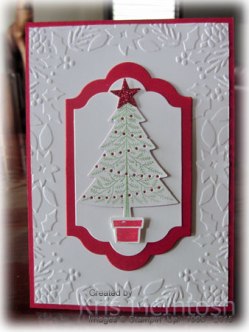
Here is another card I made using my pre-order. This time I used the Peaceful Pines stamp set and the Boughs & Berries Embossing Folder. I attached the embossed Whisper White card to scored and folded Real Red card. I used the Lots of Labels framelits to cut the Whisper White card and the Real Red card. These pieces are attached together and then to the card front using dimensionals. I stamped the tree onto scrap Whisper White card using Garden Green ink and cut it out using the matching Perfect Pines Framelit Die. I used another die from the same set to cut the holes in the stamped tree.  The stamped tree is attached to a Real Red tree cut with the matching Perfect Pines Framelit. I love how you get the colour coming through the stamped tree to create the look of a wreath around the tree. So clever! I stamped the tree pot using Real Red ink, cut it out using the matching framelit which is also in this set before attaching it with a dimensional over the tree trunk. (Actually I cut the dimensional in half so that the pot would sit properly over the tree trunk.) I punched a star from Red Glimmer Paper using the punch in the Itty Bitty Accents Punch Pack and attached it to the top of the tree.
I decorated the inside of the card with a piece of Real Red card which I embossed using the Boughs and Berries Embossing Folder. It is quite easy to line this up so that it decorates the Real Red card perfectly. I attached the embossed card to Whisper White card and wrapped the card with Garden Green 1/8″ Striped Ribbon. Before I attached the panel to the inside of the card I stamped the greeting with comes from the Peaceful Pines stamp set using Real Red ink.
Such a great set to work with and isn’t it fabulous how we are getting these stamp sets with co-ordinating framelits. You have to love that, no more fussy cutting. Yay!
I bet you can’t wait to place your order for this catalogue. Remember it begins on September 1st, not long now! Unfortunately, I cannot link directly to the new product until after September 1st, so you will have to look up the numbers from your catalogue when you place your order.
Bye for now,
Kris
Product Used:

August Bonus Project
 Each month when I hold my class – I tease the ladies who are coming by telling them that as well as completing the five cards I have shown them, they will make a “surprise” project which I try to make some sort of 3d project. For my August Class we made a box using the Baker’s Box Thinlits Die.
Our Baker’s Boxes were cut from Whisper White card and since I wanted the ladies to be able to make it from an A4 sheet of Whisper White card, we cut the first box piece with the “handle” piece in the centre of the card and then flipped the card around and cut the second box piece – you need two pieces to create the box. Most of the videos I saw recommended using 12 x 12″ card stock that is cut down to 6″ squares and cutting both pieces at the same time. Anyway, once our two pieces were cut we layered them together to cut out out handle. You get a choice of 3 handle styles with this die – we used the double hole handle style. The boxes went together very easily using Fast Fuse. We also added Fast Fuse to the base of our box to make it extra strong.
Since we focused on the Build A Birthday stamp set for this class we used this stamp set to decorate the box. I stamped the “banner” image onto Whisper White card using Bermuda Bay ink and punched it out using the 2″ Circle Punch. I attached it to a 2-3/8″ Scalloped Circle cut from Tip Top Taupe card before attaching it to the front of the box. I stamped the largest of the “cake layer” images onto Whisper White card using Crushed Curry ink and cut it out. “Birthday wishes” is stamped onto the Crushed Curry image using Memento Tuxedo Black ink and I cut a small “v” in each end. The “banner” was curled between our fingers and attached to the front of the box using dimensionals in the centre and a glue dot on each end. The rest of the panels were decorated with Bermuda Bay card which was embossed using the Lucky Stars Embossing Folder and attached to Tip Top Taupe card. We tied a length of the beautiful Tip Top Taupe 1″ Dotted Lace Trim through the holes created in the handle. Obviously we didn’t tie a knot because we need to fill our box before we give it away.
Want to see how it works, watch this video by Stampin’ Up!.
This is such a cute box and will hold quite a lot of chocolate or jewellery or even a mini cup cake! I’d love to hear what you think.
Bye for now,
Kris
Product Used:


A sneak peak

I’m sorry I haven’t been sharing with you as much of late but I seem to have been very busy – so busy that my pre-order sat on the floor in my craft room for a week before I got to open anything and have a look! So today I will share with you the first card I made using some of the great products in my pre-order – a simple Christmas card I made using the Reason for the Season stamp set. Now although I am showing new product, the catalogue does not go live until 1st September, so get your note pad out and start making a list. If you are anything like me it will be long!
I embossed Real Red card using the Softly Falling Embossing Folder. I attached the embossed card to Whisper White card and wrapped it with the very beautiful (and new) Real Red 1/8″ Striped Ribbon. This ribbon comes in a pack of two ribbons with a Garden Green Striped Ribbon as well. I stamped the greeting which is from another new set called A Little Something using Old Olive ink. The Whisper White card is attached to scored and folded Sahara Sand card. The image is stamped in three steps. First the outline of the flower which I stamped in our new archival Basic Gray ink.  The flowers were stamped using Real Red ink and the leaves using Old Olive ink. I attached the image panel to Old Olive card and then to the card front using dimensionals. I also added a large Basic Rhinestone to the centre of the flower.
Inside I added a piece of Real Red card embossed using the Softly Falling Embossing Folder which has a narrow strip of Old Olive card behind one long edge.
I love my first try using this stamp set and can’t wait to play with it a little more. One more fantastic thing is that the Reason for the Season stamp set is sold as a bundle with the Festive Flower Builder Punch which co-ordinates with some of the other leaves in the stamp set. Woo Hoo. Hooray for Bundles – you can save 15% by purchasing your supplies this way. If you don’t have a demonstrator please contact me so that I can arrange for you to get one.
Bye for now,
Kris
Product Used:


