A Christmas Card
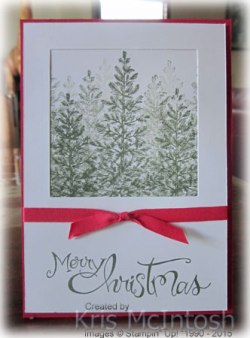
Already! It’s coming sooner than you think! We are going to be making one Christmas card each week from now till the end of the year. I was inspired by one of the samples in the new Holiday Catalogue to create this card (Catalogue starts on the 1st September so contact me or your demonstrator to get your copy). I hadn’t received my pre-order so I used what I had. I cut a square in Whisper White card using one of the Squares Collection Framlits Dies and stamped the greeting from the Sassy Salutations stampset onto the bottom of the Whisper White card using Mossy Meadow ink. I wrapped the card with Real Red 1/4″ Cotton Ribbon and tied a knot.  I stamped a square of Whisper White card with the single tree from the Lovely As A Tree stamp set using Mossy Meadow ink (I made sure that the card was slightly larger than the cut out window). I stamped the image multiple times without re-inking. I wanted to create a feeling of depth, so just kept adding images until it had the look of a “forest”. I attached the trees behind the square cut in the card front. The card front panel is attached to scored and folded Real Red card using dimensionals. I stamped the same tree onto the lower left hand corner of Whisper White card three times without re-inking and attached to the inside of the card.
I love this card and can imagine it in many different colours, can’t you?
Bye for now
Kris
Product Used:


Try Stamping On Tuesday Challenge 230
 Oh my goodness I can’t believe how long it is since I completed a card sketch challenge, I always seem to be busy creating cards for my weekly class and never have time for the challenges each week. So this week I decided to create the cards for my class using the challenges to get my “mojo” going. The challenge at Try Stamping on Tuesday this week is to use a photo and sketch or just the photo or just the sketch. I used the sketch.
I attached Whisper White card to scored and folded Pink Pirouette card. Next I rounded the corners on a piece of Mossy Meadow card using the Project Life Corner Rounder Punch and embossed it using the Brick Wall Embossing Folder.  The embossed piece is attached to the Whisper White card. I stamped the branch image from the Thoughts & Prayers stamp set onto Whisper White card using Mossy Meadow ink. I rounded the corners of the stamped card, attached it to Pink Pirouette card, also with the corners rounded and then the card front using dimensionals. I punched the flowers from Pink Pirouette card using the Tree Builder Punch, gave them a little dimension and attached them over the stamped flowers using a little Tombow Glue to hold them in place. I also added the three flowers to the top right hand corner of the Whisper White card. Each flower has a tiny Basic Pearl in the centre as well.
  I stamped the greeting from the Petite Pairs stamp set onto Whisper White card using Mossy Meadow ink and punched it out using the 1-1/4″ Circle Punch. The greeting is also attached to the card front using dimensionals.
Inside I added a panel of Mossy Meadow card which is embossed with the Brick Wall Embossing Folder, a narrow strip of Pink Pirouette card and three more flowers.
I’ve always loved the Thoughts & Prayers stamp set, which I have had a long time, but I tend to use my newer stamp sets and leave the older ones neglected on the shelf. Another reason I don’t use this one so much is because it is a Wood Mount set and I have to get out my Stamp-a-ma-jig to position it correctly. I guess I am getting spoilt by all the photopolymer stamp sets I now own. What about you? Are you like me, do you neglect your wood mount stamps in favour of the newer cling mount or photopolymer stamp sets?
Bye for now,
Kris
Product Used:


Anchors Away

Here is a card we made last week at my Beachmere Retirement Resort class. These classes are really so much fun. Some of the ladies have been coming for around 3 years now, making 3 cards a week and generally having a lovely time, catching up with each other. They make me feel like “one of the girls” and I love our weekly get together. I believe that making new friends and spending time with people who are doing something creative and fun at the same time has been the greatest benefit of being a Stampin’ Up! Demonstrator.
I started by stamping “happy birthday” from the Guy Greetings stamp set onto Whisper White card using Night of Navy ink. The stamped card is layered onto Night of Navy card and then scored and folded Crumb Cake card.  I embossed another piece of Night of Navy card using the Boho Chic Embossing Folder and attached it to the stamped Whisper White card. I used a Banner Framelit Die to cut the end of a strip of Crumb Cake card and then embossed it using the Stylish Stripes Embossing Folder, however, I made sure that the embossed stripes ran down the length of the card. I stamped the banner image from the Amazing Birthday stamp set onto Whisper White card using Crumb Cake ink and cut it out using the matching Banner Framelit Die. Both Banners are attached to the card front and then a circle of Whisper White (cut using a Circle Framelit Die) is attached over the banners using dimensionals. I stamped the anchor image from the Guy Greetings stamp set onto Whisper White card using Night of Navy ink and cut it out before attaching it to the Whisper White circle.
Inside the card I added a strip of Night of Navy card embossed using the Boho Chic Embossing Folder which has a narrow strip of Crumb Cake card attached.
Simple but a great guy card, don’t you think?
Now let me tell you a little secret. I completely forgot to take the Guy Greetings stamp set with me to class. Soooo, I borrowed a greeting stamp set from my Mum (who also lives at the Retirement Resort) which the ladies used to stamp happy birthday and instead of the anchor some of the ladies stamped the cake image from the Amazing Birthday set using Night of Navy ink and attached it to a layer of Night of Navy card and then the Whisper White circle. A few ladies just left the circle blank and I will take over the stamp for them to complete next week (I write myself a note so that I don’t forget). The moral of the story being that there is always something you can do when you don’t have the same supplies as you need. The ladies are very forgiving and just laugh and smile and get on with their creating.
Bye for now,
Kris
Product Used:


A Dino-birthday
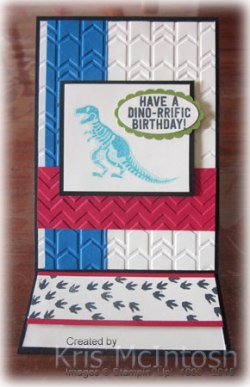
I just knew I had to have the No Bones About It stamp set when I first saw this year’s annual catalogue. It is so cute and I have at least 3 grandchildren who are a bit dinosaur mad. I created this card as an easel card for last week’s class at the Beachmere Retirement Resort.
I started by attaching Pacific Point card to the left hand side of Very Vanilla card before embossing using the Arrow Embossing Folder. I added a layer of Real Red card which I embossed using the Chevron Embossing Folder. I stamped the dinosaur onto Very Vanilla card using Tempting Turquoise ink which I stamped onto scrap paper first. The “bones” were stamped using the same ink, without stamping off first. I attached the stamped card to Basic Black card and then the card front using dimensionals. I stamped the greeting which is from the same stamp set onto Very Vanilla card using Memento Tuxedo Black ink and punched it out using the Large Oval Punch. The greeting is attached to an Old Olive Scalloped Oval and then the image panel.
I stamped a narrow piece of Very Vanilla card using the “footprint” stamp and Memento Tuxedo Black ink. I attached the stamped panel to Real Red card and then Very Vanilla card using dimensionals.
Isn’t it cute? I bet you know someone who would love this card, don’t you? Just click on the links below to take you to my store to purchase everything you need to re-create it. Easy isn’t it.
While I’m talking about my store, do you know that there is a section in the store called Project Ideas. In this section you will find heaps of projects and when you click on them you are given a list of product required to recreate your favourite projects. The projects themselves are ones that are showcased in this year’s annual catalogue. I love this feature! Since we don’t have a Stampin’ Supplies list anymore, this allows you to find your project and purchase any additional supplies you might need to recreate the one’s you love. Check it out and let me know what you think.
Bye for now,
Kris
Product Used:


A Drive in the Country
 I have had an idea in my head for a while now to use the car from Guy Greetings and the group of trees from the Lovely as a Tree stamp set. When I finally sat down to make the card, I couldn’t find either of these stamp sets. They have completely vanished! So I had to re-order them to make this card.
I cut an oval in Tangello Twist card and then embossed using the Brick Wall Embossing Folder. I attached the embossed card to scored and folded Soft Suede card.  I stamped the car from the Guy Greetings stamp set onto Whisper White card using Memento Tuxedo Black ink and then covered it with a mask. I stamped the trees from the Lovely as a Tree stamp set over the top using Mossy Meadow ink. Before I removed the mask I stamped the long thin image from the Work of Art stamp set below the car to look like a road using Basic Gray ink. I removed the mask and using a Blender Pen and Lost Lagoon ink, coloured the car.
  I cut the image panel using a smaller oval than I had used on the front of the card and attached the panel to the card front using dimensionals.
Inside the card I stamped the car onto the lower left hand corner of Whisper White card using Memento Tuxedo Black ink, masked it and once again using Mossy Meadow ink stamped the single tree from the Lovely as a Tree stamp set. I stamped the long thin image using Basic Gray ink and removed the mask. Once again I coloured the car using a Blender Pen and Lost Lagoon ink.
I love with this card, it really does remind me of driving in the country. What do you think? As for my missing stamp sets, I live in hope that they will turn up one day.
Bye for now,
Kris
Product Used:


Memory Keeping & Project Life
 I hold a class once a month on Friday night for Memory Keeping. I create a page and give the ladies who attend all the supplies needed to recreate the page. They can make the page as I have done, change it around completely or use the pieces elsewhere in their memory keeping. The idea of the class is that everyone can bring their own projects to work on and I get to make time to create some pages myself. I also give the ladies who attend a pocket page to use however they wish. We have a great time with lots of laughs, shared memories and generally just have fun (of course we get lots done too). I like to have something so that we can share a light supper as well. Anyway, this is the page I created for this month’s class which is being held on Friday night the 24th. I still have a couple of spots left if you are interested in attending. More details can be found on my Classes and Workshops page.
For the page this month I decided to use the new Project Life Paper Clips Thinlits Dies. I cut three 4″ squares from Basic Black card using the die in this great set. I embossed one using the Chevron Embossing Folder and one using the Decorative Dots Embossing Folder. I added 3-3/4″ square of Whisper White card with rounded corners to the last one. I used some retired Designer Series Paper from the Stacked With Love Designer Series Paper Stack to create the last square. I wanted to keep the background simple because I think the photo of the beautiful sunset at Karumba needs to be the focus of the page. I added a layer of Crushed Curry card behind the photo and used the same card stock to cut the little paper clips. I just love these little paper clips, such a simple way to add some decoration without fussing too much. I used the 0.01 Project Life Journaling Pen to hand write my memories of this photo. The title is cut from Basic Black card using the Little Letters Thinlits Dies. Of course, everyone will be able to create their own title and choose their own designer series paper and accent card stock. I love this simple layout, a great way to use your Project Life products and incorporate 12 x 12″ pages into your Project Life Memory Keeping.
I’d love to hear what you think. Do you use Pocket Pages combined with 12 x 12″ pages in your Memory Keeping?
Bye for now,
Kris
Product Used:


For a Special Friend
 I needed to create a card for a friend who is going through a difficult time and couldn’t go past the You’ve Got This stampset. I cut a flag shape from Tip Top Taupe card and embossed it using the new Elegant Dots Embossing Folder. I attached the embossed card to the left hand side of Whisper White card before attaching the panel to scored and folded Watercolour Wonder card. I stamped the flower onto Whisper White card using Stazon Jet Black ink and colored it using a Blender Pen and Watercolour Wonder, Cucumber Crush and Delightful Dijon ink. The image panel is attached to Watercolour Wonder card and then the card front.
  I stamped the greeting which is from the same stampset using Tip Top Taupe ink. The end of the Whisper White card is punched using the Banner Triple Punch before attaching to Cucumber Crush card, which is also punched using the Banner Triple Punch and then the card front. (How did I do that? Well first I stamped the greeting on a strip of card that was 2.5cm wide. Once the greeting was stamped, I punched one end using the Banner Triple Punch and then I cut an equal amount from each side of the greeting and trimmed the banner to the correct size.
 The Cucumber Crush card is 2.5cm wide also and once I punched the end, I attached the stamped banner to the trimmed the Cucumber Crush card. No measuring, no guessing, perfect!)
To decorate the inside of the card, I stamped the flower using Stazon Jet Black ink and coloured it, once again using a Blender Pen and Watercolour Wonder, Cucumber Crush and Delightful Dijon ink. Once it was colored I cut out the image and attached it to the lower left hand corner of Whisper White card.
I am so pleased with how this card turned out and I know my friend will appreciate it because she knows colouring is not one of my favorite things. However, I must say this gorgeous image makes it almost fun. I’d love to know what you think.
Bye for now,
Kris
Product Used:


Class Schedule

I have just updated my Classes and Workshops page with the dates of my upcoming classes (held in Narangba, North Brisbane). I haven’t prepared all the samples for each class yet but I do have the cards made for my August Classes. The August classes will be held on Thursday 13th August at 9.30am and Saturday 15th August at 2pm. We are going to make 5 cards using the Build A Birthday stamp set including a Christmas Card just to show how versatile this stamp set is. I thought I would share one of the projects here with you today.
I added Sahara Sand Designer Series Paper from the Neutrals Paper Stack to the left hand side of Whisper White card, before attaching to scored and folded Night of Navy card. I embossed Night of Navy card using the Boho Chic Embossing Folder and attached it over the Designer Series Paper. I stamped the images from the Build A Birthday stamp set using Night of Navy, Marina Mist and Sahara Sand ink and cut them out. The “for you” comes from the “just for you” in the Teeny Tiny Sentiments stamp set and I used a Night of Navy Stampin’ Write Marker to ink up only the part of the sentiment I needed. I used the smallest of the Lots of Labels Framelits Dies to cut it out. I punched a hole in one end using the 1/16th” Hand Held Punch and attached it to the Linen Thread which ties up the “birthday gift”. The greeting is stamped in Night of Navy ink. The image panel is attached to Marina Mist card and then the card front using dimensionals.
Inside I embossed Marina Mist card using the Boho Chic Embossing Folder and added a narrow strip of Night of Navy card before attaching it to the Whisper White card.
So if you would like to attend my class and make this card as well as the other four cards, then don’t forget to contact me to reserve your place as space is limited.
Bye for now,
Kris
Product Used:


Beautiful Butterflies
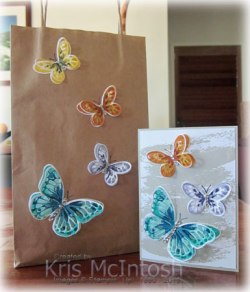
Today I am going to share with you a card and matching gift bag I made for a friend who celebrated her birthday while I was away. I came home from my holidays to a big box of goodies from the new catalogue. So I was happy to use a new stamp set called Watercolour Butterflies to create my gift. This is a two-step or three-step stamp set, so you can create some really gorgeous images.
I started by stamping the Watercolour Wash Background stamp onto Whisper White card using Sahara Sand ink. I attached the stamped Whisper White card to scored and folded Sahara Sand card.  I stamped the large solid stamp using Pool Party ink onto Whisper White card. The outline of the wings is stamped using Bermuda Bay ink and the centre of the butterfly is stamped using Island Indigo ink. I created two flowers so that one could be cut using the outline framelit from the Bold Butterfly Framelits and one was cut using the detail butterfly from the Butterflies Thinlits. Once I cut the images, I stamped the butterfly body using Island Indigo ink. I attached the solid image to the lower left hand side of the card front and then stamped the antennae using Island Indigo ink.
  The detail image is attached using Glue Dots on top of the solid image, so that the wings can have some lift.
I created a smaller butterfly by stamping the solid butterfly onto Whisper White card using Wisteria Wonder ink which is stamped onto scrap paper first. The outline of the wings is stamped using Wisteria Wonder ink without stamping onto scrap paper and the centre of the flags owner is stamped using Elegant Eggplant ink. A second small butterfly is created by stamping the solid image using Delightful Dijon ink, the outline of the wings is stamped using Hello Honey ink and the centre of the butterfly is stamped using Cajun Craze ink. Again a solid and detail butterfly image was created using the Bold Butterfly Framelits and the Butterflies Thinlits. The Wisteria Wonder butterflies body was stamped using Elegant Eggplant ink and the Delighful Dijon butterfly body is stamped using Cajun Craze ink. After the solid butterflies were attached to the card front I stamped the antennae use Elegant Eggplant and Cajun Craze ink. The detail butterflies were attached over the solid butterflies using glue dots in the centre so that the wings can be lifted. I added Basic Rhinestones to the centre of each butterfly.
To decorate the inside of the card I stamped the dotted image across the lower left hand corner of Whisper White card using Sahara Sand ink. I created two more small butterflies using Daffodil delight, Delightful Dijon and Memento Tuxedo Black ink. The butterfly body and antennae are stamped using Memento Tuxedo Black ink. The greeting from the Sassy Salutations stamp set was stamped using Memento Tuxedo Black ink.
To decorate the gift bag I created one large and three small butterflies using the same color combinations as I used for the card. The butterflies are attached in the same manner as they were for the card.
I love how both the card and the bag turned out. What about you? Do you love them too?
Bye for now,
Kris
Product Used:


Belated Birthday
 Ron and I have been just returned from a touring holiday up to Karumba, across to the coast and back home. We travelled over 5,000klms and visited many towns. One highlight was watching the sun set over the Gulf of Carpentaria, those of you who live on the east coast of Australia as I do will know that we only get to see the sun rise, so it was a real treat to see the magnificent sunset over the Gulf.
Anyway while we were away I missed a milestone birthday for a lovely lady friend of ours. So it was one of the first things I created once I returned home.  I actually CASED this card I found on Pinterest by Jen at Ladybug Designs. I embossed Whisper White card using the new Fluttering Embossing Folder. I don’t know if you have noticed but this Embossing Folder and the Brick Wall Embossing Folder are 15.2cm square (6″) which makes it so easy to emboss card stock in any direction, either portrait or landscape. Fantastic! Once I embossed the Whisper White card I attached it to scored and folded Wisteria Wonder card. I stamped the greeting from the Petite Pairs stamp set onto the bottom left hand corner of a smaller piece of Whisper White card using Elegant Eggplant ink, attached it to Wisteria Wonder card and then the card front using dimensionals.
  To create the butterfly I used the gorgeous new stamp set Watercolour Wings. How wonderful is this set!! You can create butterflies in two sizes, which just happen to match the Butterflies Thinlits Dies – and not only that there is another new co-ordinating Framelit set called Bold Butterfly Framelits. What does this mean, well now you can cut the solid butterfly and then cut the matching butterfly with the intricate detail cuts. What did I do, well I stamped the outline of the large butterfly wing onto Wisteria Wonder card using Wisteria Wonder ink and then I stamped the centre details of the butterfly using Elegant Eggplant ink. I cut out one solid butterfly and one detail butterfly. The solid butterfly is attached to the small greeting panel and then I stamped the antennae using Elegant Eggplant ink. I attached the detail butterfly over the top using glue dots in the centre only, so the wings could have some lift. I added Basic Rhinestones down the centre of the butterfly instead of stamping the body. Gorgeous isn’t it.
 To decorate the inside I stamped the large solid butterfly using Wisteria Wonder ink which I had stamped off onto scrap paper first onto the lower left hand corner of Whisper White card. I stamped the outline of the wings over the top using Wisteria Wonder ink and then the centre detail using Elegant Eggplant. I also stamped the body and the antennae using Elegant Eggplant ink.
I love this card, and I hope it will make my friend forgive me for being late with her birthday wishes.
What do you think? Don’t you just love this set? Want one of your own, well click on the link below to take you to my store so that you can purchase it.
Bye for now,
Kris
Product Used:


