A Fond Farewell
 Here is another card I made featuring retiring product. Once again I have embossed Whisper White card with the Perfect Polka Dots Embossing Folder. Once embossed I wrapped it with Calypso Coral 3/4″ Chevron Ribbon before attaching it to scored and folded Crisp Cantaloup card. I stamped the image from the Apothecary Art stamp set onto Whisper White card using Stazon Jet Black ink.
  I coloured the flowers using a Crisp Cantaloup Stampin’ Write Marker and the leaves using a Pistachio Pudding Stampin’ Write Marker. The image is cut out using the matching Label Framelit Die (retiring). I stamped the greeting which comes from the same stamp set onto a narrow strip of Whisper White card using Stazon Jet Black ink. I attached the greeting to the coloured image and trimmed the ends to match the framelit shape.
  The image panel is then attached to the card front using dimensionals.
Once more I have kept the inside very simple adding a strip of Crisp Cantaloup card to the back of Whisper White card embossed using the Perfect Polka Dot Embossing Folder before attaching it to a Whisper White panel.
I had forgotten how much I enjoyed this stamp set and will be sorry to see this one go. Not sure if this is still available, so don’t forget to check the Retiring List and order quickly to avoid being disappointed.
Bye for now,
Kris
Product Used:


Gift from my Roomie
 I shared my accommodation at Convention with three lovely ladies, one of whom made each of us a beautiful gift. It was Jenny’s first time at Convention and I am glad that we were able to spend this time together. We had such fun and I am sure that I have never laughed so much!
Jenny put a lot of effort into decorating a notebook for us to record our thoughts and inspiration and I must admit I put mine to good use. She also gave us another shopping list type notebook which I will also be putting to good use as I am terrible at remembering what I need when I get to the shops. My husband says its “Oldtimers Disease” and although I hate to admit it, he may be right. She used the very gorgeous Sale-A-Bration stamp set Lotus Blossom – it’s so sad when a beautiful stamp set like this comes and then disappears just as quickly.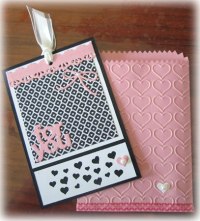
Jenny also shared one of her swaps which uses the Mini Treat Bag Thinlits Die. I love how she embossed using the Happy Heart Embossing Folder, something that Jenny says was a little tricky but well worth the effort. I think this style of card and envelope would make a truly special way to deliver a gift card to someone special. I love all the effort she put into the special small touches like the White heart and pearl on the front of the bag and also on the card for the inside.
I do have some photos of the other swap cards I received and I will try and get organised to share them this coming week.
Bye for now,
Kris
Product Used:


Happy Mother’s Day
 To each and every mother out there, hope you all have a fantastic day with your family. I spent this morning very quietly and then joined my Mum and Dad for a celebration lunch. My girls are spending the morning with their families and being thoroughly spoiled. Tonight I am joining my girls for a trip to the movies. I am so lucky to be able to spend special time with my lovely family.
I made my Mum a card using the Stippled Blossom stamp set. I have to say losing this set makes me truly sad. I love how easy it is to get a WOW card using this two step stamping set. I must not be the only person who loves this set, because I believe it is already sold out. Anyway, enough of that, I am consoling myself by wearing the print off my new catalogue!
I started by embossing Whisper White card with the Spring Flowers Embossing Folder (unfortunately this one is not carrying over to the new catalogue), and attaching it to scored and folded Strawberry Slush card.  I added the sentiment from the Crazy About You stamp set using Strawberry Slush ink to the right hand side of a strip of Whisper White card and then attaching it to Baked Brown Sugar card. This strip is attached across the lower portion of the embossed card. I stamped the large solid flower image from the Stippled Blossom stamp set onto Whisper White card using Strawberry Slush card which I stamped off onto scrap paper first.
  I stamped the large outline flower over the top using Strawberry Slush ink (without stamping off). I stamped the leaves using Pistachio Pudding ink. I stamped off the solid leaf once onto scrap paper first. Once the images were stamped I cut them out and attached them the to the left hand side of the card front.
Inside the card I stamped the flower and leaves as before, cut them out and attached them to the lower left hand side of Whisper White card.
I love how this card turned out and so did my Mum.
Once again Happy Mother’s Day to all.
Bye for now,
Kris
Product Used:


Happy Birthday Noah
 My grandson Noah turns 8 on Sunday and because it is Mother’s Day we celebrated his birthday with a family gathering yesterday. Noah loves Lego and will spend every spare cent of his pocket money on more Lego whenever he can.
I created my card with a Lego theme in mind. I cut strips of Real Red, Tempting Turquoise, Pumpkin Pie, Old Olive and Daffodil Delight 1″ wide by either 1″, 2″ or 3″ to suit my layout. To make the “Lego blocks” fit I had to make my card a custom size which doesn’t matter at all when you are hand delivering. I punched all the circles using the 1/2 Circle Punch. It truly is a labour of love to add all those circles to the card to create the Lego look.  I didn’t sponge the circles but I did use Glue Dots which tends to give a little more “lift” so they do stand out a little bit. The lego panel is added to a layer of Basic Black Card and then a layer of Pacific Point. I tried to use really bold colours on the card. I inked the image from the Perfect Pennant stamp set using my Real Red, Daffodil Delight Old Olive and Pacific Point Stampin’ Write Markers and stamped onto Whisper White card. I added a layer of Basic Black before attaching to the card front using Stampin’ Dimensionals.
 Inside the card I stamped the block image from the Boys Will Be Boys stamp set and coloured it using the Pumpkin Pie, Daffodil Delight and Tempting Turquoise Stampin’ Write Markers.
I recycled a kraft gift back to house his present. I stamped the block image and the parachute image from the Boys Will Be Boys stamp set all over the front and back of the bag using Chocolate Chip ink. I cut the letters to spell Happy Birthday (retired die) from Daffodil Delight, Pumpkin Pie, Tempting Turquoise and Real Red card.  Then I added the letters to the bag front. I think it looks very cute and suitable for a young boy. Noah loved his card and told me that it was very cool the way I had done the Lego blocks. High praise indeed. Noah’s Mum and Dad are taking him ice skating today and I believe that he gets to choose what’s for dinner. Happy Birthday Noah, have a wonderful day.
I hope you have enjoyed seeing this card and the matching gift bag. I would really love to hear what you think. I know you visit my blog, so if you have the time, please leave me a comment.
Bye for now,
Kris
Product Used:


Bye Bye Chalk Talk
 Here is yet another stamp set which is retiring with the end of the current catalogue – which by the way is the 2nd June, not the 30th June as indicated on the catalogue. The reason for this is that new catalogues are going to be released simultaneously in all markets across the world, which is fantastic news!
Anyway, onto my card. I embossed Whisper White card using the Decorative Dots Embossing Folder and attached it to scored and folded Baked Brown Sugar card. I added strip of Lullaby Designer Series Paper to the left hand side of the embossed Whisper White card.  I stamped the image from the Chalk Talk stamp set onto Whisper White card using Baked Brown Sugar ink and cut it out using the matching Chalk Talk Framelit. I attached the tag to the card front using dimensionals. I stamped the tag image once more onto Whisper White card using Hello Honey ink and cut out the “something” banner. I attached the cut out banner over the stamped banner using dimensionals.
  I tied a bow in Hello Honey 1/2″ Stitched Satin Ribbon and attached it to the top of my tag using a Glue Dot.
Inside a little strip of Baked Brown Sugar behind the same Lullaby Designer Series Paper decorates the Whisper White insert.
Another simple card which I liked so much, it was included in my Class at Beachmere this week.
I hope you have noticed that I am trying to use up all my retiring cardstock and designer series paper – I am so good at hoarding!
Let me know what you think of this project and don’t forget do not delay if you want anything from the Retired List.
Bye for now,
Kris
Product Used:


Convention
So far Convention has been fantastic. It’s day 2 and so much has happened.
 Yesterday we got our Convention bag, caught up with old friends for dinner AND we received a copy of the 2015-2016 Annual Catalogue. OH my goodness it is amazing. Stampin’ Up! has outdone themselves. I can’ show you what’s inside but I can show you the cover. It’s beautiful and sets the tone for the whole book.
Today we have been treated to more fabulous information Stampin’ Up! style. We have seen some fabulous demonstrations of new and “old” product. We had our first all attendee prize patrol. We got the Heart Border Punch and Linen Thread – fabulous.
I’ve completed two make and takes, which are extremely beautiful. I will share more photos when I get home on Sunday.
Last night was Party Night and also the biggest storm with gale force winds – therefore we made the decision to stay safe and stay home. A big disappointment but better safe than sorry. My roomies and I were all pretty pre-occupied anyway because our families were all in the worst hit part of Brisbane, where unfortunately 3 people lost their lives. Our thoughts and prayers are with their families.
On a lighter note it is a glorious morning and we are all excited to see what’s in store for our last day of Convention.
Bye for now
Kris
Artisan Presents
 I have had my Artisan Embellishments Kit for a while now and thought it was the perfect way to create a small gift for each of my friends attending Convention with me. You always need something to write in when you are at convention and I thought that the Large Kraft Journals in the Occasions Catalogue would be perfect. I decided to sponge Blushing Bride ink onto Whisper White card using the beautiful laser cut stencil in the Kit as a template. Isn’t that rose background beautiful.
  I added half a doily to the bottom of the sponged card and then some of the beautiful Blushing Bride rosettes included in the kit. Now I had a dilemma, how would they be able to distinguish their own journals. So I added a piece of the Blackberry Bliss Velvet Trim to the back of each journal using a Candy Dot Brad Base and a Blackberry Bliss Candy Dot. I punched 2″ circles from Window Sheet and cut each person’s initial from Blushing Bride card (retired Die). I sandwiched the initial between the circles using Crystal Effects and let them dry. I punched a hole using my Crop-A-Dile and tied them to the Blackberry Bliss Velvet Trim using Gold Baker’s Twine. They now have a marker to keep their place in the journal and a way of identifying their own journal.
 I also made a tag for our Convention Bags. When we register for Convention we will all be given a bag, exactly the same bag! So you can image how difficult it can be identifying your bag from the hundreds of other bags. I decided to keep on with the Artisan Embellishment Kit but this time I sponged Rose Red ink over the Laser Cut stencil. The card was then cut using a Circle Framelit Die.
  I added a slightly larger circle of Rose Red card and then a Scalloped Circle of Basic Black card. I cut out each initial from Basic Black card and added a layer of Crystal Effects to the initials. Once the initials were dry I attached them to the left hand side of the tag. I had some retired Rosette Trim left over in my cupboard (I told you I was a hoarder) and added them around the right hand side of the tag. Hopefully we won’t lose our Convention Bags now.
Keep tuned in case I find out anything fantastic that I am allowed to share.
Bye for now,
Kris
Product Used:


My Convention Swap
I’m heading off to the Stampin’ Up! Convention on the Gold Coast today (yay) with my good friends Gwen, Jenny and Shirley. This Convention will be the last of its kind held in Australia and I am sure it will be amazing. From now on Conventions will be held every April and November and anyone from anywhere can attend. Not sure if I will ever attend an overseas Convention but you never know.
 Anyway its a kind of tradition that Demonstrators make cards or 3d items to swap with other Demonstrators. The idea being that we will have lots of different cards to show our customers. I wanted to wait till the retired list came out to start making my swaps, but life has been pretty hectic and in the end I only got 15 swaps made. I like to keep the product current for the new catalogue if I can, so I was really pleased to see the Kinda Eclectic wasn’t on the Retiring List.
I started by masking the lower portion of my Very Vanilla card before I stamped the “starburst” image from the Kinda Eclectic stamp set using Daffodil Delight ink. I also stamped the leaf image from the same set twice without re-inking using Old Olive in before removing the mask. I stamped the greeting, also from the same stamp set onto the lower right hand corner using Old Olive ink. I stamped the “dotted” border image (same set) onto a strip of Very Vanilla card using Smoky Slate ink. I attached the border image to Smoky Slate card and then the card front, making sure to line up the top edge of the Smoky Slate card with the bottom edge of the stamped images. I attached the Very Vanilla panel to Smoky Slate card and then scored and folded Melon Mambo card. I stamped a leaf image onto scrap Very Vanilla card using Old Olive ink and cut it out. I attached it to the card front using dimensionals. I stamped the flower from Flower Shop using Melon Mambo ink and punched it out using the Pansy Punch. I stamped the small flower from the Petite Petals stamp set onto scrap Very Vanilla card using Melon Mambo and punched it out using the Petite Petals punch. I attached the small flower to the centre of the large flower using a dimensional. The large flower is also attached to the card front using dimensionals. Lastly I added a Basic Rhinestone to the centre of the flower.
I didn’t decorate the inside of the card as often swaps are only a card front. It will be a simple matter for whoever receives the swap to add some leaves and flowers to the inside of the card.
I can’t wait to see all the amazing swaps made by my fellow Demonstrators (and some guests) and I look forward to sharing them with you.
I will try and keep you updated with any news that we are allowed to share and of course, I can’t wait to see the new catalogue!
Bye for now,
Kris
Product Used:


Vivid Vases
 Here is a card I designed for our class this week at Beachmere. I haven’t had the Vivid Vases stamp out in ages and thought that I should play with some new techniques now that the Blendibilities are gone.
I embossed Whisper White card using the Perfect Polka Dots Embossing Folder (boy am I going to miss this folder) and attached it to scored and folded Baked Brown Sugar card (retiring). I attached a piece of Best Year Ever Designer Series Paper (Sale-A-Bration) to Baked Brown Sugar card and then the card front. I stamped the Vivid Vases onto Whisper White card using Stazon Jet Black ink and coloured the flowers and leaves using Calypso Coral, Coastal Cabana, Crushed Curry and Pistachio Pudding Stampin’ Write Markers. I stamped the Vivid Vases once more onto Crushed Curry card and cut out each of the vases.
  I attached the cut out vases over the top of the stamped vases and attached the image panel to Baked Brown Sugar card. The image panel is attached to the card front using dimensionals.
Inside I added a strip of Baked Brown Sugar behind one long edge of the same Designer Series Paper and attached it to Whisper White card.
A very simple card, combining some current, some retired and some soon to be retired product.
I hope you enjoyed seeing this project.
Bye for now,
Kris
Product Used:


Goodbye Embellished Events
This is one stamp set that I have used many times to create lots of different cards and a set that I am going to miss – can’t wait to see what we get to replace it. This card showcases retiring Cardstock and ink as well (Strawberry Slush and Pistachio Pudding).
 I looked up my Pinterest Card Sketches board and found a sketch that I thought would work with this set. I used an Oval Framelit Die (not retiring but my icon builder is not co-operating) to cut Strawberry Slush card and then embossed it using the Beautifully Baroque Embossing Folder. The embossed card is attached to Whisper White card and then scored and folded Strawberry Slush card. I used my Strawberry Slush and Pistachio Pudding Stampin’ Write Markers to ink up the image from the Embellished Events stamp set and cut it out using a small Oval Framelit Die. I attached it to a larger oval cut from Pistachio Pudding card and then the card front using dimensionals.
  I added a small Basic Pearl to the centre of each flower. I stamped the greeting from the Embellished Events stamp set onto Whisper White card using Strawberry Slush ink and cut it out using a Bitty Framelit Die. I attached the banner to a piece of Strawberry Slush card, cut the ends to match the Banner and attached it to the card front with a dimensional under the right hand edge and Snail under the left hand side.
 Inside I embossed Whisper White using the Beautifully Baroque Embossing Folder, added a strip of Strawberry Slush card before attaching it to Whisper White card.
This gorgeous Embossing Folder is also on the Retiring List, so be sure to check and see if it is still available, because everything is only while stocks last.
I’d love your thoughts on these retiring products, it’s always so hard to say goodbye.
Bye for now,
Kris
Product Used:


