Sketch Frenzy Friday 121214
 The sketch for the current Sketch Frenzy Friday challenge reminds me very much of some cards I made a couple of years ago and so I thought I would remake the card using up to date Stampin’ Up! products.
I cut four pieces of Under the Tree Specialty Designer Series Paper and trimmed each piece into four smaller pieces. I swapped the pieces around so that I could get four card fronts from the cut DSP. I attached the pieces of DSP to Whisper White card and then to scored and folded Cherry Cobbler card. I stamped “Merry Christmas” from the Teeny Tiny Sentiments stamp set onto Whisper White card four times using Cherry Cobbler ink.  I cut the greetings using the larger banner from the Bitty Banner Framelits Dies. I attached the greeting to the card front over the large panel on the right hand side.
  I cut Gold Glimmer Paper using the second smallest star from the Stars Collection Framelits Dies and attached it to each card front so that it sits over the end of the greeting banner.
  I stamped the smallest star from the Bright and Beautiful stamp set onto Whisper White card using Cherry Cobbler ink and cut them out using the smallest die in the Stars Collection Framelits Dies. The stamped stars are attached to the centre of the Gold Glimmer Paper stars using Dimensionals. I added a medium Basic Rhinestone to the centre of each star.
 I cut four narrow strips of each of the Designer Series Papers I used on the card fronts, attached a narrow strip of Gold Glimmer Paper behind the top edge and then attached the DSP to Whisper White card. I stamped the greeting from the Bright and Beautiful stamp set using Cherry Cobbler ink and then attached the panel to the inside of the card.
I bet you can guess which card had a smudge of ink!
Thanks to the Sketch Frenzy Friday team for a great sketch.
Bye for now,
Kris
Product Used:
For some reason Teeny Tiny Sentiments doesn’t have an image in the store but this link will take you there.


What’s in the Bag?
 I know you all loved seeing the gift bags I presented to my customers and downline but I thought you might like to see what was in them. I love including gifts which I have made myself and this year was no exception.
I found a recipe for Peppermint Body Scrup on my favourite site – Pinterest. The scrub is actually easy to make and smells devine. I purchased some small jars (this year I found them at Kmart) and filled them with the scrub. I used My Digital Studio to create labels for the bottles, printed them onto some pretty paper and punched them using the 1-3/4″ Circle Punch.  I used some Sizzix Adhesive Sheets that I had on hand to add adhesive to the back of the labels to attach them to the front of the jars. I think they look pretty, don’t you?
Next I found some cute Mason Mugs at Kmart.  I made some Hot Chocolate mix and placed one serve in the Cellophane Bags 4″ x 6″ (which by the way are food safe) and sealed them with some retired Washi Tape. The little bags fitted inside the Mugs perfectly. I created a tag in My Digital Studio which gave directions on how to use the mix. The tag is printed onto Whisper White card and then punched with the Scallop Tag Topper Punch. I used some retired Gold Twine to attach the tags to the handle. Yes, I agree, pretty cute.
I also made some Rocky Road which I placed into the Cellophane Bags 6″ x 8″. I created another tag using My Digital Studio, just so they would know what they were getting. This tag is punched using the Decorate Label Punch. I punched a hole in one end using the Crop-A-Dile and attached the tag to the bag using Linen Thread.
I bought some of the really yummy chocolates from Aldi that come in a pack of 5 and created the Chocolate Bar Holders, the tutorial for which you can find on my Free Tutorials Page. I created the holders using Whisper White card and decorated the front of the holder and the front of the pocket in the same manner. I stamped the dotty background stamp from the Gorgerous Grunge stamp set and Pear Pizzazz ink. I added three strips of the All is Calm Designer Washi Tape and stamped the greeting from the Good Greetings stamp set on the front only (no longer available) using Lost Lagoon ink.  I stamped the tree from the Festival of Trees stamp set onto Whisper White card and cut it out using the Tree Punch. I added the tree on the front of the holder using dimensionals. Lastly I threaded a length of Lost Lagoon 1/2″ Stitched Satin Ribbon to keep the holder closed.
I love how all of the gifts turned out and from the ladies reactions they did too.
To qualify for one of these gifts all you need to do is attend my classes throughout next year and you will receive an invitation to the Christmas Party.
I would really love to hear what you think.
Bye for now,
Kris
Product Used:


Happy Birthday Abi
 Today is my granddaughter Abi’s 10th birthday. She is very excited because she is getting her own flute to replace the one she hired from the school last year. This is the card and tag I made to go with her gifts.
I cut an oval from Whisper White card and embossed it using the Decorative Dots Embossing Folder before attaching it to scored and folded Smoky Slate card. I also cut a frame to go around the oval from Melon Mambo card. I stamped the image from the In This Together stamp set onto Whisper White card using Memento Tuxedo Black ink. I coloured the image using Melon Mambo, Daffodil Delight, Smoky Slate and Skin Tone Blendibilities.  I cut the image out using a smaller oval and attached it using dimensionals inside the oval frame in the embossed Whisper White card. Now as Abigail is only turning 10, I thought it best to cover up with martini glass in the image. I stamped the leaf image from the Hello There stamp set onto Whisper White card using Old Olive ink. I also stamped the small flower using Melon Mambo ink and cut out both images. I attached them over the martini glass and although they are probably a little too large, I think they look ok.
 I stamped “happy birthday” from the Teeny Tiny Sentiments stamp set onto Whisper White card using Melon Mambo ink and cut it out using the smallest die in the Bitty Banner Framelits. I cut another banner from Melon Mambo card using the banner die in the Circle Card Thinlets. I attached the two banners together and then to the card front using a dimensional in the centre and Glue Dots on the ends.
Inside I kept the card pretty plain to leave room to write my message. I embossed a 2.5cm wide strip of Whisper White card using the Decorative Dots Embossing Folder and attached it Melon Mambo card.
The gift is wrapped in the brown paper that Stampin’ Up! so thoughtfully supplies with my orders. The tag is stamped and coloured in the same way as the image on the card. I used the Scallop Tag Topper Punch to punch the top of the tag. I used some Gold curling ribbon to tie around the parcel and attach the tag.
Bye for now,
Kris
Product Used:


Celebration
 Yesterday I had my annual Christmas gathering with my customers and downline. I am truly blessed to have such a wonderful group of friends. We had a lovely time chatting together over lunch.
I always like to give them something small to take home and thought you might like to see. I purchased some bags from Spotlight and decorated them using My Digital Studio. I used the Wishing You stamp brush set – digital download which I recoloured with Real Red, Early Expresso and Garden Green. I love these colours together! I printed the panels onto Whisper White card and added a layer of Garden Green Card.  I cut a 3cm wide piece of Real Red card using the Finishing Touches Edgelits. I put the fancy open cut edge onto the bottom of the printed panel and used the scallop edge at the top of the panel. Two edges with one cut – love it! I created a tag using the stamps in My Digital Studio, which I again printed onto Whisper White card. I trimmed the card to 4.5cm wide and punched the top using the Scallop Tag Topper Punch. I punched the top of Real Red card 5cm wide using the same Scallop Tag Topper Punch.
  The tags are adhered together and tied to the bag using some retired Whisper White ribbon. I filled the bag with some goodies which I will share with you a little later. I seem to be very time poor at the moment.
My downline received the same gift bag filled with goodies but they also received the a bottle of wine. I created some tags for these by stamping Whisper White card with the large dotted image from the Gorgeous Grunge stamp set using Pear Pizzazz ink.  I added three pieces of the All is Calm Designer Washi Tape. I stamped the greeting from the Good Greetings stamp set (not currently available) using Lost Lagoon ink. I stamped the tree from the Festival of Trees stamp set using Lost Lagoon ink and punched it using the matching Tree Punch. I attached the trees to the bottom of the tag using dimensionals. The tag sits over the bottle through a 1-3/4″ Circle I punched in the top.
Here they are all are sitting under the tree waiting for the party to begin.
My friends are very generous and I want to say a big thank you for all the gorgeous gifts I received yesterday and which I didn’t open until after everyone had gone. I was very spoiled. Thank you again.
Bye for now,
Kris
Product Used:


Last Class for 2014
 Yesterday I held my last class at the Retirement Village for this year. As always it was a fun day. The ladies who attend my classes are just fantastic. I hope they read this post and know how grateful I am for their continued support. Anyway as it’s Christmas I couldn’t leave without giving each of them a little gift. I recently became a very happy owner of a Thermomix and used it to make Rocky Road Truffles for the ladies. I wrapped them in alfoil so that they wouldn’t melt all over the presentation bags. I used the medium cellophane bags in the catalogue – did you know that they are now food-safe? I used a little retired Washi Tape to hold them closed and created a small tag for each one.
I cut Very Vanilla card using the Chalk Talk Framelit and then stamped “Merry Christmas” from the Merry Everything stampset using Real Red ink. I stamped the row of trees from the Cheerful Tags stamp set across the bottom of the tag using Garden Green ink.
I love how these tags can be hung from the gift without the need to tie them on.
I’m glad to say that the gifts were a big hit.
I also have to say a huge thank you to these wonderful ladies for my gift from them. I was touched and surprised by the fantastic voucher to a local shop which has always caught my eye and now I have the perfect reason to visit. Thanks again ladies – I look forward to joining you again in the New Year.
Bye for now,
Kris
Product Used:


Quick Tags
Sounds like a broken record but I really have been busy and haven’t had time to share with you all as much as I would like. This week I have my last class at the Retirement Village for the year and also my annual get together/Christmas Party with my customers and downline, so I have had lots of organising, cooking and also creating to get done. Another exciting thing is happening today – we are picking up our new caravan. Yay! Can’t wait to have the time to take it away.
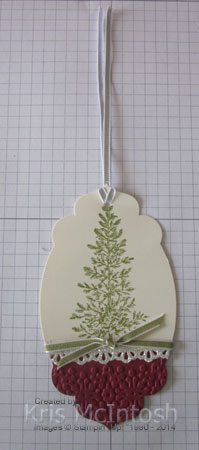 Ok so today I am going to share with you a couple of tags we made at the Retirement Village last week. The first tag was inspired by one on Pinterest, I changed up the product to replace the retired items. Unfortunately, now I can’t find the link to share the original with you. I started by cutting Very Vanilla card using the large Apothecary Accents Framelit. I stamped the tree from the Lovely as a Tree stamp set using Old Olive ink. I cut a piece of Cherry Cobbler card using the same Apothecary Accents Framelit, to create a small layer for the base of the die. I embossed this piece with a Delicate Designs Embossing Folder and attached it to the stamped tag. I cut a strip of Silver Glimmer Paper in half using the fancy Finishing Touches Edgelit. I attached the decorative edge on top of the Cherry Cobbler card. I wrapped the tag with Old Olive 1/8″ Taffeta Ribbon and tied a knot. I stamped “to/from” (from the Cheerful Tags stamp set) onto the back of the tag using Old Olive ink. I used the Crop-A-Dile to punch a hole in the top of the tag and added a length of Silver 1/8″ Ribbon.
For the second tag I cut a strip of Crumb Cake card 5cm wide and punched one short end using the Scallop Tag Topper Punch. I used the other half of the Silver Glimmer Paper I cut with the decorative edge, attached it behind a piece of Under the Tree Designer Series Paper before attaching it to the bottom of the tag. I stamped the tree image from Festival of Trees onto Very Vanilla card using Garden Green ink and punched it with the matching Tree Punch. I stamped “merry & bright” from the Good Greetings stamp set (unfortunately this set is no longer available – hopefully you got it while it was available) onto Very Vanilla card using Early Expresso ink. I cut the greeting using the Bitty Banner Framelit and gave it a little curl with my fingers. I attached it to the bottom of the tag using dimensionals in the middle and Glue Dots on the ends. I stamped “to/from” (Cheerful Tags stamp set) onto the back of the tag using Early Expresso ink. Lastly I tied a length of Cherry Cobbler 1/2″ Seam Binding through the top of the tag.
I love these tags and will, of course, be making good use of them when I finally get around to wrapping my gifts.
Bye for now,
Kris
Product Used:


End of Year Closeout Sale
Everywhere you look there are end of year sales and this year Stampin’ Up! has some fantastic deals.
 The products in the sale are on offer only on a while stocks last basis. So check out the awesome product at reduced prices and make your purchase ASAP so that you don’t miss out.
Bye for now,
Kris
Peace & Joy
Here is a card I designed for next week’s class at Beachmere. I haven’t used my Gold Sequin Trim enough and thought it was about time to give it another chance to shine.
 I punched one long edge of Whisper White card (14.3cm x 10cm) using the Confetti Stars Punch. I embossed another piece of Old Olive card (13.8cm x 7cm) using the Lucky Stars Embossing Folder and attached it above the punched stars. I wrapped the lower edge of the embossed Old Olive card with the Gold Sequin Trim. You need to remove some sequins from the ends so that you have enough cord to attach to the back of the card. This whole piece is attached to scored and folded Old Olive card (21cm x 14.8cm, scored along the 21cm length at 10.5cm).
 I stamped the “tree like” image from the Merry Merry Stars stamp set onto Whisper White card using Old Olive ink and used the Tree Punch to cut them out. I attached them to the card front with the one on the right being attached with dimensionals. I stamped “peace & joy” from the Good Greetings set onto Whisper White card and cut it out using the Bitty Banner Framelit (unfortunately this was a limited offer stamp set and is no longer available). The banner is attached to the card front with one end behind the edge of the tree. I punched three stars from Gold Foil Sheet using the Star Punch from the Itty Bitty Accents Punch Pack.
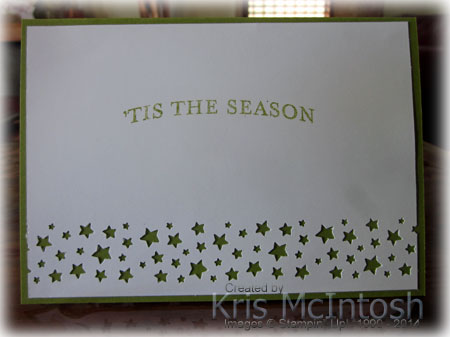 Inside I punched the Whisper White card (14.3cm x 10cm)using the Confetti Stars Punch and added the greeting from the Merry Merry Stars stamp set using Old Olive ink.
I’d love to hear what you think of my latest creation.
Bye for now,
Kris
Product Used:


Happy Anniversary
My daughter Sarah and her husband Sean celebrated 14 years of marriage earlier this week. It seems like only yesterday I watched them exchange their vows and yet they have achieved so much and made my husband and I very proud.
Anyway, I thought I would share the card that I made them to celebrate this milestone. I was inspired by this gorgeous ensemble by Nicki Spencer which I found on Pinterest. I encourage you to check out Nicki’s blog, she is truly a gifted papercrafter.
 I embossed Whisper White card using the Fancy Fan Embossing Folder and attached it to scored and folded Whisper White card. I stamped the “happy anniversary” from the Teeny Tiny Sentiments stamp set onto Whisper White card using Elegant Eggplant ink. I cut a “v” and attached it to Elegant Eggplant card, trimmed to match, and then to the card front.
 I cut a heart from Elegant Eggplant card using one of the Hearts Collection Framelit Dies and attached Gold Baker’s Twine behind it to create some interest. The heart is attached to the left hand side of the card front using Dimensionals. I cut a smaller heart, using the same dies, from the Gold Glimmer Paper and attached it slightly over the Elegant Eggplant Heart.
 To decorate the inside of the card I used the Edgelit Finishing Touches to cut one long edge of Elegant Eggplant card before attaching it behind the top edge of Whisper White card which has been embossed with the Fancy Fan Embossing Folder. I attached another heart cut from Gold Glimmer Paper over the embossed card.
I love this card and so did Sarah and Sean – thank you Nicki for the inspiration. Why don’t you leave a comment and let me know what you think.
Bye for now,
Kris
Product Used:


Cash Back Offer

There are many reasons for becoming a Stampin’ Up! Demonstrator, the 20% discount, the friendship, knowing about great deals and fantastic product before anyone else, and probably a million more. However, starting today for one week only, you can join Stampin’ Up! and get a 25% discount on the joining kit fee of $169.00, that makes the kit cost around $127.00. For that you can purchase $235.00 worth of merchandise and receive all the business supplies you need to get started in your business. As well as this you can earn 5% cash back on your sales during the month of December.
I told you Stampin’ Up! is a fantastic company to work for!
I have a small group of downline but we are all very good friends and love getting together whenever we can. We help each other out whenever possible and love to share our ideas. We would love to have you become part of the team and part of our little “family”. So, if you are interested in this offer, then contact me immediately to take advantage. You order must be placed by the end of business on the 2nd December.
Hope this inspires those of you who may have been sitting on the fence, to take the plunge and join this fantastic company.
Bye for now,
Kris


