Butterfly Basics

This card uses a new stamp set from the Occasions Catalogue. I love that there are a number of images, so that you can create a collage if you wish. The large butterfly in this set also matches one of the Butterfly Thinlets Dies which you can purchase as a bundle with the Butterfly Basics stamp set. The small one matches the Bitty Butterfly Punch.
I stamped the greeting from the Butterfly Basics stamp set onto the top right hand corner of Whisper White card using Memento Tuxedo Black ink and then embossed the Whisper White card using the Perfect Polka Dots Embossing Folder. I stamped the border image from the Butterfly Basics stamp set onto Whisper White card using Melon Mambo ink, cut it out and attached it to the lower right hand side of the embossed card. I stamped the floral stem image onto Whisper White card using Memento Tuxedo Black ink. I coloured the image using Melon Mambo, Old Olive and Daffodil Delight Blendibilities. Once the image was coloured I cut it out using one of the Oval Framelit Dies. I attached the image panel to a slightly larger Melon Mambo oval and then the card front using dimensionals.
 Inside the card I stamped the border across Whisper White card using Melon Mambo ink. The border doesn’t quite make it across the length of the card, so I just stamped it twice, being photopolymer it lines up pretty easily. I stamped the leaf image on the left hand side using Old Olive ink. I stamped the butterfly onto scrap Whisper White card using Daffodil Delight ink and cut it out using the matching Butterfly Thinlets Die.
This is a really pretty stamp set and I am sure you will me using it quite a lot over the coming months.
Bye for now,
Kris
Product Used:


Another Magazine Case
Today I am sharing with you some old and some new product in a card which I cased from the magazine Stampin’ Up! publishes for demonstrators. I made this card to showcase some product that is new to the market. In fact it was released yesterday! Sorry I didn’t make it on here to show you then. So check out the link on my blog to the new Occasions Catalogue and also the gorgeous Sale-A-Bration catalogue. If you don’t have a demonstrator, then feel free to contact me for a copy of these publications.
 Anyway onto my card! I stamped the large dotted image from the Gorgeous Grunge stamp set onto Whisper White card using Coastal Cabana ink. I stamped the balloons from the Sketched Birthday stamp set onto the Whisper White card using two new ink pads from the Occasions Catalogue. These are Rose Coral and Yellow Citris ColorBox Chalk ink. I also stamped the balloons onto Blushing Bride card using the Rose Coral ColorBox Chalk ink and onto So Saffron card using the Yelllow Citris ColorBox Chalk ink, cut them out and attached the cut images over the stamped images using dimensionals. I then used a Banner Framelit Die to cut the new Chalkboard Paper – yes Chalkboard paper. How exciting!
  The greeting comes from a Sale-A-Bration stamp set called Big Day (FREE with a qualifying order) and is stamped onto the Chalkboard Paper banner using Aquamarine ColorBox Chalk ink. I stamped my image using the Stamp-a-ma-Jig to position it and without removing the “T” piece stamped it again to give it a little more depth of colour.
Once the banner was attached to the card front I wrapped it with Basic Black 1/8″ Tafetta Ribbon and tied a bow. The image panel is attached to scored and folded Coastal Cabana card. I also added four Basic Rhinestones to the card front just for fun.
To decorate the inside of the card, I stamped the balloon images once again using Rose Coral and Yellow Citris ColorBox inks. I masked the balloons and then stamped the dotted image from the Gorgeous Grunge stamp set over the top using Coastal Cabana ink.
Thanks, once again, to Stampin’ Up! for all the inspiration and don’t forget to check out the new catalogue for all the fantastic new product. As always the catalogues are loaded with inspiration.
Bye for now,
Kris
Product Used:


More New Product

I am getting really excited about the release of the new Occasions Catalogue on the 5th January. I decided to use one of my new stamp sets and create a card from the magazine which Stampin’ Up! produces for demonstrators.
The stamp set I have used is a photopolymer stamp set called Celebrate Today. You can purchase this stamp set on it’s own or you can purchase it as a bundle with matching Balloon Framelits Dies.
 I stamped two balloons using Coastal Cabana ink onto Whisper White card. I also stamped a balloon using Hello Honey ink, but I stamped onto scrap paper first to get a lighter image. I stamped the stars which are a separate image over the top using Crushed Curry ink as well. The stamped Whisper White card is attached to scored and folded Coastal Cabana card. The last balloon was stamped onto scrap paper first and then onto Whisper White card using Wild Wasabi ink. I stamped the dot image over the top also using Wild Wasabi ink. I cut the balloon out using the matching balloon framelit from the Balloon Framelit Dies. This balloon is attached to the Whisper White card using dimensionals. I stamped the “tails” for the balloons using Soft Sky ink.
  Lastly I stamped the “happy” using Coastal Cabana ink and the “birthday” using Basic Gray ink.
To decorate the inside of the card, I stamped the little banner three times using Coastal Cabana ink across the top of Whisper White card. It is so easy to line up the photopolymer stamps to get a continuous image.
I love this card. It has such a happy feeling perfect for a birthday. All of the images used on this card are included in the Celebrate Today stamp set. I bet you can’t wait to get your hands on it now.
Bye for now,
Kris
Product Used:


Happy Birthday Mum and Dad
My parents both celebrated their birthdays yesterday. They were born on the same day but several years apart. Co-incidence or meant to be – who knows – but I do know that it makes shopping for their birthdays a little hard being so close to Christmas!
I gave my dad the card I made for the Technostamper Challenge – you can get all the details in this post.
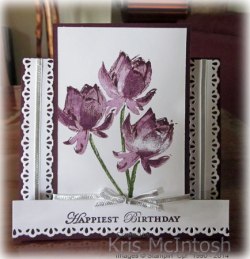
However, I haven’t shared my Mum’s card with you yet. I created a step card base in Blackberry Bliss recently and never got around to using it.  When I saw the Lotus Blossom stamp from the Sale-A-Bration catalogue I knew that it would be perfect for this card. I stamped the flowers using Blackberry Bliss ink, stamping off once for the second image and twice for the third image. I love the depth created with this stamp set, don’t you? I did have to mask two of the flowers so that they would all fit together and so that I could stamp the stems. The stems are stamped with Garden Green ink, which is once again stamped off for the second image.
I attached the image panel to the centre of the card front. I cut narrow strips of Whisper White card and cut both long edges using the Finishing Touches Edgelit. I wrapped these pieces with Silver 1/8″ Ribbon and attached the card to the narrow side panels.  I cut one long edge of another strip of Whisper White card using the Finishing Touches Edgelit which I stamped “Happiest Birthday” from the Apothecary Art stamp set using Blackberry Bliss ink. This piece is attached to the bottom panel of the card front. I wrapped the centre panel with Silver 1/8″ Ribbon and tied a bow.
Inside the card I simply stamped another of the Lotus Blossom flowers, leaving lots of room for my message.
I don’t know about you but I can hardly wait for the Occasions Catalogue AND the Sale-A-Bration Catalogue to go live on Monday.
Bye for now,
Kris
Product Used:


Another Male Card
In my last post I shared with you a card I made using a sketch and a left over card kit. Well I had another of the same card kits and this time I used the sketch challenge at Freshly Made Sketches.
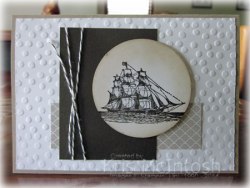
I embossed the Whisper White card using the Decorative Dots Embossing Folder and attached it to scored and folded Crumb Cake card. I cut down the Designer Series Paper from the Neutrals Backgrounds Designer Series Paper Stack and attached it to the card front. I also cut down the length of the Early Expresso card, wrapped it with the Early Expresso Baker’s Twine and attached it to the card front. I stamped the ship from The Open Sea stamp set onto Whisper White card using Early Expresso ink. I punched the image using the 2-1/2″ Circle Punch and sponged around the image using Crumb Cake ink. The image panel is attached to the card front using dimensionals.
 Inside I followed the same layout as my card from yesterday – Designer Series Paper/Early Expresso card onto the bottom edge of Whisper White card. The greeting from Sassy Salutations is stamped using Early Expresso ink.
I am so happy to have used up my kits and to have created such different looking cards using the same basic pieces and colours. I’m feeling rather clever at the moment.
Bye for now,
Kris
Product Used:


A Male card
I was surfing a couple of challenge sites that I like to visit and found this great sketch on the Technostamper blog. I had a couple of kits left over from one of my classes sitting on my work table and thought that the contents would work great with the sketch. Unfortunately I am a little late for the challenge but here is the card anyway.
 I embossed Whisper White card using the Woodgrain Embossing Folder. I attached a narrow piece of Early Expresso card to the back of a piece of Crumb Cake DSP from the Neutrals Backgrounds Designers Series Paper Stack before attaching it to the bottom of the embossed Whisper White card.
  I punched another narrow piece of Early Expresso card using the Scallop Edge Border Punch and attached it behind the top edge of the Whisper White card. I had a piece of Early Expresso Baker’s Twine in the kit and decided to tie it around the Early Expresso card before attaching to scored and folded Crumb Cake card. I stamped the ship from the The Open Sea stamp set onto Crumb Cake card using Early Expresso ink and punched it out using the 2-1/2″ Circle Punch.
  The image panel is attached to the card front using dimensionals.
Inside I attached the same DSP/Early Expresso piece to the bottom of Whisper White card. I stamped the “Happy Birthday” from the Sassy Salutations stamp set using Early Expresso ink.
What do you think? I think it’s gorgeous!
This was fun to make, and I love that I used up a kit that I already had on hand.
Bye for now,
Kris
Product Used:


Casing the Catalogue
Today I am going to share with you a set of cards I made using the gorgeous stamp set Lotus Blossom from the Sale-A-Bration catalogue.
 I cased this set of cards from the catalogue just to showcase how gorgeous this stamp looks in many different colours. There is a three step stamping process to create the blossom and you start with the darkest image (which is the smallest image) first and work towards the lightest (which is actually the largest image). I stamped my flowers using the following colour combinations – Crushed Curry and Daffodil Delight, Tempting Turquoise and Soft Sky, Calypso Coral and Crisp Cantaloup and Elegant Eggplant and Perfect Plum. The stems are stamped using Old Olive and Pear Pizzaz. You stamp the first stamp with the darkest colour, the second stamp with the lightest colour. You use the lightest colour for the third stamp but stamp onto scrap paper first.
 I stamped the flowers onto Whisper White card and then added the greeting from the Wetlands stamp set using, Crushed Curry, Tempting Turquoise, Calypso Coral and Elegant Eggplant. The images are attached to card in the same colours. The Gold stripe Fancy Foil Designer Vellum is attached to scored and folded Whisper White card. Before attaching the image panel to the card front, I wrapped two of them with the Gold Baker’s Twine and tied a knot. The other two image panels are wrapped with the Gold Sequin Trim.
 Inside the cards I stamped the flower using the same colours as the card front. I attached a narrow piece of Gold stripe Fancy Foil Designer Vellum to Whisper White card and then a co-ordinating piece of card which has one long edge punched using the Scallop Edge Border Punch.
 Don’t they look gorgeous? I bet you can’t wait to get your hands on this beautiful stamp set! Well beginning 5th January, this stamp set will be FREE with a qualifying order. If you don’t have a demonstrator, then contact me to find out the details.
Bye for now,
Kris
Product Used:


Merry Christmas to All
 Well it’s finally arrived – Christmas Day. I am looking forward to spending the day with my parents, daughters, sons-in-law, grandchildren, sister and my niece and her husband. Its a little cloudy but looks like it might clear and be a beautiful day. We are going to be near the water so we want a little sun but also a cool breeze so that it doesn’t get too hot.
I want to take the opportunity to wish each and every one of you a Merry Christmas and a wonderful New Year full of all the things that bring you happiness. Have a wonderful day, celebrating with your family and friends.
I look forward to spending time with you all over the coming 12 months.
Bye for now,
Kris
Sketch Frenzy Friday 121914
 When I saw this sketch, I knew it would be perfect to make a Christmas card. In fact, this card is going to a friend and hopefully will arrive before Christmas. (I did post it a couple of days ago.)
To begin I embossed Whisper White card using the Decorative Dots Embossing Folder and attached it to scored and folded Garden Green card.  I punched three circles from Under The Tree Specialty Designer Series Paper using the 1-3/4″ Circle Punch and another one using the 2″ Circle Punch. I attached the DSP Circles across the embossed Whisper White card. I stamped the “merry christmas” from the Endless Wishes stamp set onto Whisper White card using Early Expresso ink and cut a “v” in one end.
  I attached the banner across the DSP circles.
On the inside I stamped the greeting from the Bright and Beautiful stamp set onto Whisper White card using Garden Green ink.
Very simple and very quick to do but I think it is rather gorgeous – you can’t go wrong with this beautiful Designer Series Paper. I do love hearing what you think.
Bye for now,
Kris
Product Used:


Progress December Daily
 I shared with you a while ago the first page in my December Daily Album and while I have been taking lots of photos, I haven’t had much time to complete my pages, until this last week.
I decided to shout myself an Epson Picturemate Printer so that I could print the photos I wanted, exactly as I wanted. This printer lets me print 4″ x 6″ photos or I can photo collage onto the 4″ x 6″ canvas up to 8 photos. Amazing and the quality is just fantastic.
Anyway, using the printer at home means that I can look at the layout, select my photo and print it either portrait or landscape to suit my page. This makes it much easier for me to complete the pages, especially when you need to add the pictures on “back to back” pages.
The first layout shows my grandchildren decorating my Christmas Tree and putting up the various banners and decorative pieces which we have made between us over the years. My tree is beautiful and always decorated heavily on the side most accessible and will never win a contest for being the most perfect tree, but each decoration has a memory attached and that is what I treasure most.
My two youngest granddaughters were spending the day with me while I was working on the photos and they were really interested to see what I have done and what I had written. This is the most important part of memory keeping being able to share the story and the memory of wonderful times together.
The second page shows my Mum with a couple of other ladies at my Beachmere Class on the left. The right side of the page shows my grandson Noah collecting a weekly award at his school assembly.
I will show you more of my album over the next week or so. Although, I must say that my album will not be a documentation of each day necessarily, but I will document all the outings, school events and family occasions that come up during the month.
Hope you are all getting organised to celebrate Christmas.
Bye for now,
Kris
Product Used:


