Sunny Challenge 89/13
This week’s challenge has been brought to us by Vicky and all we have to do is create something to do with babies. We can all use a welcome baby card or a gift for a new little someone, so how about joining us this week.
I created two cards using the Easy Events stamp set (actually this is the only stamp set I own with any images remotely baby like). I used the same layout for both cards too. For each card I embossed three pieces of Whisper White card, each one using a different embossing folder – Chevron, Stripes and Stylish Stripes. The embossed card is attached to either scored and folded Pistachio Pudding or Wisteria Wonder card. I stamped the duck image in Smoky Slate and also in Wisteria Wonder on Whisper White card and punched both images using the 1-3/4″ Circle Punch. I attached the Smoky Slate image to Smoky Slate card cut using one of the Circle Framelits. I ran snail around the edges of the back of the Smoky Slate Circle and attached the gorgeous Pistachio Pudding 3/8″ Rufle Stretch Trim. This ribbon is stretchy so it is perfect for this type of use. This piece is attached to the Pistachio Pudding card front using dimensionals. 
The Wisteria Wonder image is attached to a circle of Pistachio Pudding card, again cut using one of the Circle Framelits and then to a Wisteria Wonder 2-3/8″ Scallop Circle. The image panel is attached to the Wisteria Wonder card front using dimensionals.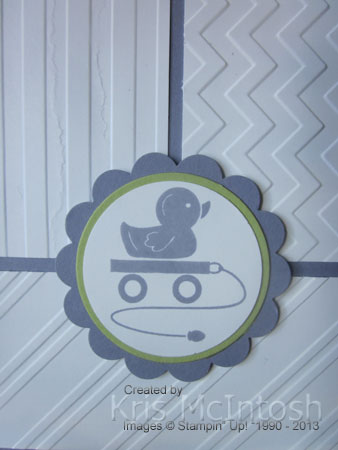
To decorate the inside of the cards I stamped the duck image either in Smoky Slate or Wisteria Wonder onto the bottom left hand corner of Whisper White card. I also stamped “hello baby” from the Sweet Essentials stamp set onto the centre of the card using the matching ink.

These cards are simple but oh so sweet for a new baby. I absolutely adore how gorgeous the stretch ribbon looks attached behind the image, and it is so easy to do.
Now if you want more inspiration just pop on over to Sunny Challenges and Creations and see what the design team has created. Once you have made your card, 3d item or scrap page, pop back and add it to Mr. Linky. I need some inspiration for baby cards, etc., so I cannot wait to see what you create.
Bye for now,
Kris
A Lego Birthday
We made this card at my Beachmere Class this week. It was inspired by a card I saw on Pinterest by Melissa Davies. I loved the way she had stacked the blocks on the front of her card.
 The Whisper White card was stamped with the greeting from Sassy Salutations using Real Red ink. Once stamped it was embossed using the Square Lattice Embossing Folder and attached to scored and folded Basic Black card. I added a 1-1/4″ strip of Basic Black card to the left hand side of the card front. The blocks are created by using the 1″ Square Punch and the circle from the Itty Bitty Shapes Punch Pack. All the pieces were sponged with the corresponding inks – Real Red, Daffodil Delight, Pacific Point and Pumpkin Pie.
  The circles are attached using 1/4 of a dimensional and then stacked onto the Basic Black card. The Tempting Turquoise block is 2″ x 1″ and has eight circles instead of four. After assembling it is attached to the card front using dimensionals.
Inside the card I added a Real Red 1″ square block and a Pacific Point 2″ x 1″ block. The circles are attached this time using Mini Glue Dots. I stamped the greeting from the Bring on the Cake stamp set using Tempting Turquoise ink.
I think this is a really fun card and I have two grandsons who would love it. Thanks so much Melissa for the inspiration.
If you would like to re-create this card all the supplies can be purchased from my online store.
Supplies:
Whisper White A4 card – Item No.106549
Basic Black A4 card – Item No. 121688
Real Red A4 card – Item No. 106578
Daffodil Delight card – Item No.121680
Pacific Point card – Item No. 116202
Pumpkin Pie card – Item No. 108601
Tempting Turquoise card – Item No. 108598
Real Red ink – Item No. 126949
Daffodil Delight ink – Item No. 126944
Pacific Point ink – Item No. 128951
Pumpkin Pie ink – Item No. 126945
Tempting Turquoise ink – Item No. 126952
Square Lattice Embossing Folder – Item No. 119976
Sassy Salutations stamp set – Item No. 126707 (clear), Item No. 132070 (wood)
Bring on the Cake stamp set – Item No. 121958 (clear), Item No. 126490 (wood)
1″ Square Punch – Item No. 124094
Itty Bitty Shapes Punch Pack – Item No. 118309
Bye for now,
Kris
Ornament Card
I created this card using the sketch challenge at Sudsol which is an online group for Stampin’ Up! demonstrators to which I belong. I took a little licence with the sketch but not too much.
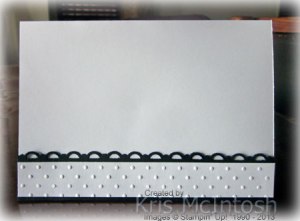
 I embossed Whisper White card using the Perfect Polka Dot Embossing Folder. I punched both long edges of Night of Navy card using the Scallop Trim Border Punch and attach to the embossed card. I wrapped the Silver 1/8″ Ribbon around the card in the centre of the embossed strip and then attached it to scored and folded Night of Navy card. (I can’t believe how absolutely stunning the Silver 1/8″ Ribbon from the Seasonal Catalogue really is. It’s sooo shiny, more like a metal than a ribbon and just gorgeous in real life. Can you tell this is the first time I have used it – but not the last I bet). I stamped the Ornament from the Ornament Keepsakes stamp set onto Whisper White card using Night of Navy ink and cut it out using the matching Holiday Ornament Framelit. The ornament is attached to the card front using dimensionals. I tied a piece of Silver 1/8″Ribbon in a bow and attached it to the ornament using a Glue Dot.
  I punched two tiny ornaments from Night of Navy card using the ornament punch in the Merry Minis Punch Pack. The tiny ornaments are attached to the card front using 1/2 a dimensional. I added a small Rhinestone Basic Jewel to the centre of each of the tiny ornaments and a large Rhinestone Basic Jewel to the centre of the large ornament.
To decorate the inside of the card I punched one edge in a narrow strip of Night of Navy card using the Scallop Trim Border Punch, wrapped it with Silver 1/8″ Ribbon and then attached it to the top of a piece of Whisper White card. Stamped and cut another large ornament and attached it under the ribbon. I stamped the greeting from the Delightful Dozen stamp set using Night of Navy ink.
I like this card so much, it is going to be part of my next Christmas Stamp-A-Stack Class. I am sure that it will be a big hit.
 You can purchase all of the supplies to make this card from my online store.
Supplies:
Whisper White A4 card – Item No. 106459
Night of Navy A4 card – Item No. 106577
Night of Navy ink – Item No. 126970
Keepsake Ornaments stamp set – Item No. 128051 (clear), Item No. 128048 (wood)
Delightful Dozen stamp set – Item No. 122652 (clear), Item No. 128547 (wood)
Holiday Ornaments Framelits Dies – Item No. 127816
Scallop Trim Border Punch – Item No. 118402
Merry Minis Punch Pack – Item No. 126882
Silver 1/8″ Ribbon – Item No. 132137
Rhinestone Basic Jewels – Item No. 119246
Stampin’ Dimensionals – Item No. 104430
Glue Dots – Item No. 103683
Snail – Item No. 104332, refill – Item No. 104331
Bye for now,
Kris
Rev Up The Fun meets Washi Tape
 Here is another card I created for the Sunny Challenges and Creations challenge to use Washi Tape. This challenge still has a week to run, so I hope you can join the fun.
I used the same layout as my previous card but this time I used the This and That Washi Tape. I attached the Washi Tape to Very Vanilla card and stamped the greeting from the Rev Up The Fun stamp set onto the bottom right hand corner using Basic Gray ink. I stamped the car onto scrap Very Vanilla card using Basic Gray ink and once again using Wild Wasabi ink. I cut out both car images but omitted the tyres on the Wild Wasabi image.  I attached the Wild Wasabi image over the Basic Gray image and then to the card front using dimensionals. I stamped the “smoke” using Basic Gray ink. On the inside I added the Crumb Cake Washi Tape to Wild Wasabi card and attached it to Very Vanilla card over a strip of the striped Washi Tape. I stamped the greeting using Basic Gray ink. You will notice that although this is the same layout as my other card, it has a completely different feel just by using a different Washi Tape and stamp set.
 I really am loving Washi Tape. Hope you are having fun with it too.
You can purchase the supplies to recreate this card from my online store.
Supplies:
Crumb Cake A4 card – Item No.121685
Very Vanilla A4 card – Item No. 106550
This and That Washi Tape – Item No. 131269
Rev Up The Fun stamp set – Item No.130523 (clear), Item No. 130520 (wood)
Basic Gray ink – Item No. 126981
Wild Wasabi ink – Item No. 126959
Bye for now, Kris.
A Stylish Christmas Card
 Some of you are aware that I do a class each week at Beachmere Retirement Resort. I have a great bunch of ladies who attend these classes and we have a lot of fun. Last week we made the Telescoping card I shared with you here. When I cut the piece for the Season of Style Designer Series Paper I cut it the wrong size! I had all these pieces of paper cut, sooo… what to do. Well, of course, I had to make another Christmas card.
This time I cut my Whisper White card in half lengthwise, trimmed 5cm from the bottom of the front of the card and punched the shortened end with the Scallop Edge Border Punch. I wrapped the spotted piece of designer paper from the Season of Style Designer Series Paper Stack with Cherry Cobbler 1″ Stitched Edge Grosgrain Ribbon. I tied a knot in a piece of Crumb Cake 3/8″ Tafetta Ribbon and wrapped it over the top of the Cherry Cobbler ribbon. This piece was then attached to the shortened card front. I punched one long edge in a narrow piece of Cherry Cobbler card using the Scallop Edge Border Punch and attached it behind a piece of striped designer series paper (which is actually the reverse side of the spotted designer series paper) and attached it to the lower edge of the inside of the card. I stamped the beautiful word image from the O Holy Night stamp set onto Whisper White card using Old Olive ink. The greeting panel is attached to Cherry Cobbler card and then Crumb Cake card before attaching it to the card front. I made sure that the image panel was centred on the card front and that the bottom of the panel lined up with the bottom edge of the inside of the card. To finish off the inside I stamped the “starry” image from the O Holy Night stamp set using Cherry Cobbler ink.
I love this card. I love that it is so pretty and also I love that it has a different kind of fold. What do you think? I am sure the ladies at Beachmere will love this card too.
You can purchase all the supplies you need to re-create this card from my online store.
 Supplies:
Whisper White A4 card – Item No. 106549
Cherry Cobbler A4 card – Item No.121681
Crumb Cake A4 card – Item No. 121685
Season of Style Designer Series Paper Stack – Item No. 132181
O Holy Night stampset – Item No. 131835(clear), Item No. 131832(wood)
Cherry Cobbler 1″ Stitched Grosgrain Ribbon – Item No. 132135
Crumb Cake 3/8″ Tafetta Ribbon – Item No. 122966
Scallop Edge Border Punch – Item No. 119882
Bye for now, Kris.
Chevron Birthday
I have started to play with the gorgeous Build a Banner Simply Created Kit to make a Christmas Banner for an upcoming class. While I had the chevron mask out I thought I would use it on a card.
 I found some spray adhesive at Spotlight (Australia) which says if you only spray it on the back of the stencil, it will be repositionable and it really works. So I attached the chevron stencil to Whisper White card and used a sponge and Coastal Cabana ink to decorate the lower half of the card. I stamped “happy birthday” from the Sassy Salutations stamp set onto the top right hand corner of the Whisper White card using Smoky Slate ink. Then to mask the top edge of the sponging I wrapped it with Smoky Slate 3/4″ Chevron Ribbon. This Whisper White card is attached to scored and folded Coastal Cabana card.
  I cut Smoky Slate card with the Little Leaves Sizzlet and attached them to the card front. I stamped the flower from the Flower Shop stamp set onto Whisper White card using Strawberry Slush ink, punched it using the Pansy Punch and attached it to the card front over the leaves.
I attached the chevron mask to a narrow piece of Whisper White card and sponged on Coastal Cabana ink. I punched one long edge of Smoky Slate card using the Scallop Trim Border Punch and attached it behind the top edge of the sponged Whisper White card. I attached this to another piece of Whisper White card and then to the inside of the Coastal Cabana card.  I stamped another flower using Strawberry Slush ink, punched it out and attached it over the lower left hand corner.
I think, in hindsight, I should have left edge of the Smokey Slate card plain. I think it would make a better contrast to the chevron pattern.
I am loving these masks – all sorts of ideas come to mind to use them.
You can purchase all the supplies needed to recreate this card from my online store.
Supplies
Coastal Cabana A4 card stock – Item No. 130024
Whisper White A4 card stock – Item No. 106549
Smoky Slate A4 card stock – Item No. 131291
Coastal Cabana ink – Item No. 131175
Strawberry Slush ink – Item No. 131178
Build a Banner Simply Created Kit – Item No. 133507
Flower Shop stamp set – Item No. 130942(Clear), Item No. 130939(Wood)
Sassy Salutations Stamp set – Item No. 126707(Clear), Item No. 132070(Wood)
Little Leaves Sizzlit – Item No. 114511
Smoky Slate 3/4″ Chevron Ribbon – Item No. 131152
Bye for now, Kris.
Sunny Challenge 88
I have set the Sunny Challenge this week and all you need to do is use some Washi Tape. Should be easy because there are four different styles, This and That, Gingham Garden, Witches Brew and Season of Style. Hope you have time to join us.
 I created a very simple card by adding strips of Gingham Garden Designer Washi Tape to Whisper White card. I attached the Whisper White panel to scored and folded Night of Navy card. The greeting is from the Really Good Greetings stamp set and is stamped onto Whisper White card using Melon Mambo ink. I used the Decorative Label Punch to cut the image. I punched Night of Navy card using the same punch, cut it in half and attached it behind the greeting panel so that it showed at the top and the bottom The greeting is attached to the card front using dimensionals.
To decorate the inside of the card I added a couple of pieces of Gingham Garden Designer Washi Tape to Whisper White card.
Very simple but I really love the look of the Washi Tape, it is kind of “see through” which adds a different kind of dimension.
 For some more inspiration take a visit to Sunny Challenges and Creations and see what the other Design Team members have created. Once you have made your card, 3d item or scrap page pop back and add it to Mr. Linky. I am truly excited to see how you have used your Washi Tape for this challenge..
Bye for now, Kris.
Telescoping Card
I made this Christmas Card after seeing one on Pinterest by Julie Davison. It gave me the perfect opportunity to try out my Circles Collection Framelit Dies.
I used the Scallop Circle from the Circles Collection Framelits Dies to cut Cherry Cobbler Card and then the largest circle to cut a piece of Whisper White card. I stamped the Whisper White card with the tree from the Lovely as a Tree stamp set using Old Olive ink. The greeting from the More Merry Messages stamp set is stamped using Cherry Cobbler ink. The stamped piece is attached to the Cherry Cobbler scallop circle. I cut Old Olive card with the Circle Framelit Die the same size as the Whisper White card and the Polka Dot Paper from the Season of Style Designer Series Paper Stack using the Circle Framelit Die one size smaller. I attached the Designer Series Paper to the Old Olive circle.  I lined up the Old Olive circle with the stamped Circle and pierced a hole in the top and inserted a Silver Mini Brad. If my Polka Dot circle had an image I would have made sure that the image was upside down when I lined them up.
  Next I cut Cherry Cobbler card with the same size Circles Collection Framelit Die as the Polka Dot Designer Series Paper and Whisper White card using the Circles Collection Framelit Die one size smaller. Once again I attached the Whisper White card to the Cherry Cobbler card. I stamped the 2nd largest snowflake from the Festive Flurry stamp set onto Whisper White card using Cherry Cobbler ink and cut it out using the matching Festive Flurry Framelit Die. I attached the snowflake to the centre of the Whisper White card and lined it up with the Polka Dot Designer Series Paper. I pierced a hole through the top of the snowflake and the Designer Series Paper and inserted a Silver Mini Brad. You need to make sure that the bottom piece is out of the way when you do this and that the image panel is upside down (didn’t matter in the case of the snowflake).
 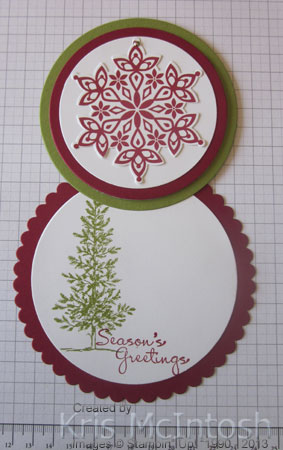 I added small Rhinestone Basic Jewels to the remaining points on the snowflake and small Pearl Basic Jewels to the centres of the small flowers and also one large Rhinestone Basic Jewels to the snowflake centre.
 This was such a fun card to make and looks so cute, don’t you think? There is a great tutorial for Telescoping Cards at Splitcoast Stampers.
You can purchase the supplies to make this card at my online store anytime.
Supply List
Cherry Cobbler A4 cardstock – 121681
Old Olive A4 cardstock – Item No. 106576
Whisper White A4 cardstock – Item No. 106549
Season of Style DSP Paper Stack – Item No.132181
Festive Flurry stampset – Item No. 131781 (Clear) – Item No. 131778 (Wood)
Festive Flurry Framelit Dies – Item No. 132193
Festive Flurry Bundle – Item No. 133285 (Clear) – Item No. 133284 (Wood)
Circles Collection Framelit Dies – Item No. 130911
Cherry Cobbler ink – 126966
Pearl Basic Jewels – Item No. 119247
Rhinestone Basic Jewels – Item No. 119246
Silver Mini Brads – Item No. 122941
Bye for now, Kris.
Sunburst Card Case
Sunburst or Starburst cards are everywhere on the internet and they look so pretty. I did try one of these a while back and couldn’t get it to work and gave up in frustration. However, recently I watched a video by Dawn Olchefske which was so easy to follow that I had another try. My card is a CASE of the one that Dawn makes in her video, although I did use a different greeting. I can thoroughly recommend that you watch and give one of these cards a try.

Isn’t the Modern Medley Designer Series Paper just gorgeous. This card uses just two of the double sided papers in the series. I think this card could be used for any number of occasions – wedding, anniversary, special birthday or just to congratulate someone on a fantastic achievement. The lovely Whisper White 5/8″ Organza Ribbon is just perfect with this Designer Series Paper.
We made this card in the class at Beachmere Retirement Resort this week and to make sure that it was a little generic, I kept the inside decoration of the card simple. The ladies loved it.
I do have a little tip for you – make sure that the design you want to use is facing up when you do your diagonal cut otherwise your pieces will be cut in the wrong direction. (Ask me how I know this??).
You can purchase all the supplies necessary to recreate this card at my online store.
Supply List –
Modern Medley Designer Series Paper – Item No. 126926
Whisper White A4 Cardstock – Item No. 106549
Basic Black A4 Cardstock – Item No. 121688
Whisper White 5/8″ Organza Ribbon – Item No. 114319
Scallop Trim Border Punch – Item No. 118402
Perfect Polka Dots Embossing Folder – 117335
Bye for now, Kris.
Thinking of You
 I found a picture of a card in a folder I was going through the other day. Before Pinterest I used to print lots of samples to give me inspiration. Anyway I liked the look of the sample but added a few new things to give it a fresh look.
I embossed Very Vanilla card using the Stylish Stripes Embossing Folder and attached it to scored and folded Smoky Slate card. I inked the image from the Thoughts and Prayers stamp set using Pear Pizzazz and Smoky Slate Stampin’ Write Markers and stamped onto Very Vanilla card.  I inked the “Thinking of you” portion of one of the greeting stamps from the same stamp set using the Smoky Slate Stampin’ Write Marker and stamped below the flower image. I attached this card to Smoky Slate card and then to the card front using dimensionals. I added a small Basic Pearl to the centre of each of the flowers.
On the inside I again stamped the flower image as before and inked the second part of the greeting stamp using the Smoky Slate Stampin’ Write Marker and added it below the flower image.
 I love this colour combination so soft and subtle but not too sad or dreary. I absolutely adore Smoky Slate and cannot believe how many times I reach for this colour, whether it be cardstock or ink. I love it.
Bye for now, Kris.


