Christmas Tag
We are now halfway through the Sunny Challenges and Creations challenge to use Framelits. To give your a little more inspiration I decided to create a tag using the Labels Collection Framelits and also the Festive Flurries Framelits.
 I cut the largest Labels Collection Framelit from Cherry Cobbler card and the next size down from Whisper White card. I stamped the smallest image from the Festive Flurries stampset onto the Whisper White card using Smoky Slate ink. I stamped the “to from” image from the Tag It stamp set using Cherry Cobbler ink onto the Whisper White card. I attached the Whisper White Framelit to the Cherry Cobbler framelit and then use the small oval from the Chalk Talk Framelits to create a place to tie my Cherry Cobbler 1/2″ Seam Binding. To create the snowflake, I cut one of the largest Snow Flurries Framelits from Cherry Cobbler card. I stamped the largest framelit onto Whisper White card using Cherry Cobbler ink and cut it out. I cut a hole in the centre and scored and folded it, then used a little Hot Glue to hold it together. I attached this to the Cherry Cobbler framelit, cut the smallest Snow Flurries Framelit from Smoky Slate card and attached it on top. Lastly I added one of the Frosted Finishes Embellishments to the centre. I think the dimension and the colours work really well together.
This video from Stampin’ Up! will help you to understand a little better how I created the embellishments.
You can find all of the products to create this project for yourself at my online store.
Bye for now, Kris.
A Baby Gift
The hardest part of giving a gift is finding the right way to present it. This year Stampin’ Up! has been wonderfully kind and given us lots of options for gift giving. I decided to decorate one of the cute Tag a Bag Gift Boxes to package a gift for a friends new baby. There are 8 boxes in the set which you can assemble without glue and they come with acetate sleeves, also already assembled.
 I created a little cover from some Pretty in Pink card (retired but just the right pink for this gift) which I stamped using the fine splash from the Gorgeous Grunge stamp set and Pretty in Pink ink. I scored the card so that it would sit over the top of the box and rounded the corners. The acetate sleeve slides right over the top. Then I used the new Gift Bow Bigz L Die which can be found in the Seasonal Catalogue. The bow is created using some retired Pretty in Pink Designer Series Paper to match the card stock. I wrapped the box with Whisper White 5/8″ Organza Ribbon and attached the Bow. This slides off so that the box can be opened.
 This video will show you just how quickly and easily you can create beautiful bows.
Amazing isn’t it. Of course, now that you have seen how easy it is to create such gorgeous bows you will want one for yourself. You can purchase this die at my online store for the fabulous price of $55.95.
So now you have seen my gift packaging, check out both the Annual Catalogue and also the new Seasonal Catalogue for a fabulous array of gift packaging ideas.
Bye for now, Kris.
Sunny Challenge 87/13
As today is Father’s Day (Happy Father’s Day to you all), I decided to use the current Sunny Challenge set by Gwen to create a card and packaging for my Dad. For the challenge all we have to do is use Framelits.
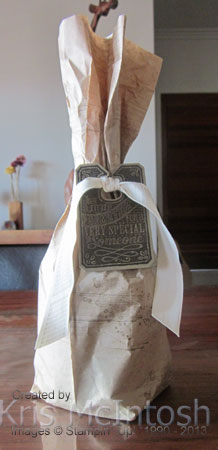 I love all that paper that Stampin’ Up! uses to pack our orders and keep it to use on my projects. I tore off two of the perforated sections and stamped all over using the images from the Gorgeous Grunge stamp set and Crumb Cake, Soft Suede and Early Expresso ink. Then I created a bag to hold my Dad’s gift. I inked the image from the Chalk Talk stamp set first using Versamark ink and then Early Expresso ink and stamped onto Soft Suede card before embossing with Clear Embossing Powder. I cut the image using the matching Chalk Talk Framelit. I stamped the 7/8″ Cotton Ribbon with another image from the Gorgeous Grunge stamp set and Early Expresso ink. I tied the cotton around the gift bag and attached the stamped tag.
My matching card is inspired by one from the Stampin’ Up! Demonstrator Magazine – Impressions. I wanted my card to match the gift bag, so I took another piece of packing paper and scrunched it up. I wanted to give it a grungy look, so I attached it to a piece of card using an Anywhere Glue Stick, making sure to leave some of the creases in. I attached this piece to scored and folded Soft Suede Card.  I cut a “V” shape in the bottom of a piece of Soft Suede Designer Series Paper from the Neutrals Colour Collection Designer Series Paper Stacks, attached a strip of Champagne Glimmer Paper behind the left hand side and then to the card front. I created a tag as before and attached it to the right hand side of the card front. I stamped another piece of 7/8″ Cotton Ribbon and tied a knot before attaching it to the card front using Glue Dots.
I wanted the same look inside the card, so again I attached a piece of packing paper to card, this time, making sure to keep it nice and smooth so I could write on it. I stamped the tag image as before, embossed it and cut it using the matching Chalk Talk Framelit. I stamped “Happy Father’s Day” from the Delightful Dozen stamp set onto Very Vanilla card. I used my Early Expresso Stampin’ Write Marker to colour in the word “Father’s”, punched the greeting using the Extra Large Oval Punch and sponged the edges using Early Expresso ink. The greeting is attached over the tag using Glue Dots.
 Using the packing paper for both the packaging and the card really creates a unified look don’t you think?
Want some more inspiration? Then pop on over to Sunny Challenges and Creations and see what the rest of the Design Team has created. Once you have your card, scrap page or 3d item created be sure to add it to Mr. Linky. We love seeing your creations.
Bye for now, Kris.
Designer Sketched Birthday
 I had time to play with some of the Designer Series Paper I bought when Stampin’ Up! had the buy 3 and get one free deal. Gotta love getting something free! This card uses the beautiful Birthday Basics Designer Series Paper.
I started by cutting Whisper White card in half lengthwise, scoring in half and then trimming about 5cm (2″) from the front. I punched the shortened end with the Scallop Border Punch. I added the Birthday Basics DSP with the candles to the front and a strip of the balloon DSP to the right hand side of the inside of the card.  I stamped the birthday cake image from the Sketched Birthday stamp set onto Whisper White card using Stazon Jet Black ink and coloured it using Bermuda Bay, Raspberry Ripple, Summer Starfruit and Basic Gray Stampin’ Write Markers. I punched the image using the 2-1/2″ Circle Punch. I discovered that one of the Circles in the Circles Collection Framelits is just a little larger than 2-1/2″ and used it to cut Basic Gray card to mat the image. I attached this image to the front of the card so that it extended beyond the punched edge.
  I stamped the “happy birthday cupcake” image from the Sketched Birthday stamp set onto Whisper White card using Stazon Jet Black ink and coloured it using Stampin’ Write Markers in the same colours as the first image. Again this is punched using the 2-1/2″ Circle Punch and attached to a Basic Gray mat before attaching to the inside of the card.
I love how bright and cheerful this card is. If you would like to recreate this card you can purchase all of the supplies used in this card at my online store.
Bye for now, Kris.
Tag It Christmas
I participated in a challenge for an online group I belong to and created a card using the Tag It stamp set.
You may not know that Stampin’ Up! has had a long association with Ronald McDonald Houses in the United States. This year this programme has been extended into all Stampin’ Up! markets. So this particular set is designated as a fundraiser for Ronald McDonald Houses. For every stamp set sold $3.00 will be donated to Ronald McDonald Houses in the market where the stamp set was sold. So not only is this a gorgeous stamp set but you will be helping a very worthwhile cause if you purchase it.

I embossed Whisper White card using the Beautifully Baroque Embossing Folder and attached it to scored and folded Cherry Cobbler card. I attached a strip of Season of Style Designer Series Paper to Cherry Cobbler card and then to the card front. I stamped the Santa image from the Tag It stamp set onto Whisper White card using Cherry Cobbler ink and cut it using the matching Chalk Talk Framelit.

I attached the greeting to the card front using dimensionals and added small Basic Rhinestone to the top of the tag.

To decorate the inside of the card I inked the Santa image using a Cherry Cobbler Stampin’ Write Marker and left enough room below it to add a strip of the Season of Style Designer Series Paper and Cherry Cobbler Card. I stamped the greeting from the More Merry Messages stamp set onto the top right hand corner using Cherry Cobbler ink.

I really love that Season of Style Designer Series Paper and the great thing is if you buy the Season of Style Designer Series Paper stack you get 48 sheets, 24 sheets of one double sided design and 24 sheets of another double sided design. One of the designs is the one I used on this card. Each sheet is 11.4cm x 16.5cm (4.5″ x 6.5″), which is fantastic for card making.
Well, what you think? Is it too simple? I’d love to hear what you think. If you would like to purchase this fun stamp set or any of the supplies used then you can do so at my online store.
Bye for now, Kris.
Another Shaped Card
 This is another card I made for the current Sunny Challenge. This time I used the Window Collection Framelits to create my card shape. I cut the largest framelit on the fold from Whisper White card. I cut another framelit the same size from Whisper White and used the Paper Piercing Tool and the template from the Festive Paper Piercing Pack to add a row of “holes” around the card. I stamped the flower from the Best of Flowers stamp set onto Whisper White card using Stazon Jet Black ink and cut it using an Oval Framelit. I coloured the flower using Pool Party ink and Pistachio Pudding ink and a Blender Pen. I attached the image to a larger oval cut from Pool Party card and then to the card front.
  I stamped the greeting from the Itty Bitty Banners stamp set onto Whisper White card using Pool party ink and cut it using the matching Bitty Banners Framelit before attaching it to the card front.
I stamped the flower image on the inside of the card again using Stazon Jet Black ink and coloured it using the Pool Party and Pistachio Pudding inks and a Blender Pen.
I think this one is a little more subdued than the first shaped card I created. Which one do you like the best?
Bye for now, Kris.
A Beautiful Duo
Yesterday I shared with you my Christmas Card using the Expressions Thinlets Dies from the upcoming Seasonal Catalogue. Well, today I thought I would share with you another fantastic product from this catalogue – Envelope Liners Framelits Dies. This is a set of three dies and can be found on Page 37 of the Seasonal Catalogue. Each of these dies fits the standard Stampin’ Up! Envelope sizes (Page 162 of your Annual Catalogue) – C6 Envelopes, Square Envelopes and the envelope which comes in the Note Cards and Envelopes set.

I used the largest envelope die to fit a standard C6 envelope to cut the matching Perfect Polka Dots Designer Series Paper to create a gorgeous matched set. I think I have found a way to break my habit of saving my designer series paper. If you don’t have a Stampin’ Up! Demonstrator then please contact me to get your hands on this beautiful catalogue which is full of wonderful product and ideas for the upcoming holiday seasons.
I’d love to hear what you think.
Bye for now, Kris.
A Thinlets Christmas
 One of the new products in the Seasonal Catalogue to be released on the 1st September, is the Expressions Thinlets Dies on page 36. This set of dies cuts three words from your cardstock – Merry, Love and Thankful. The font is gorgeous and they look so sweet. A little tip for you is to layer waxed lunch wrap on top of the card you are cutting and then the die. Once cut you can also poke through the little holes on the back of the die to help release the words.
Anyway here is a card I made using the Expressions Thinlets Dies.  I embossed Whisper White card using the Stylish Strips Embossing Folder (also in the new Seasonal Catalogue page 22) and attached it to scored and folded Real Red card. I attached a strip of the Real Red Designer Series Paper from the Perfect Polka Dots Designer Series to Silver Glimmer Paper and then to the card front. I cut the word “Merry” from Real Red card and attached it to Whisper White card and then added a Real Red mat. Another tip for you – try using the Multipurpose Adhesive Sheets to attach the thinlets. You just press the word onto the sheet, lift up and it is ready to attach and the sheet can be used until all the adhesive is gone. I inked Christmas from the Sweet Essentials stamp set using a Real Red Stampin’ Write Marker, stamped onto scrap Whisper White card and punched it using the Decorative Label Punch.
  I added a Real Red Decorative Label behind the greeting and then attached the greeting to the right hand side of the “Merry” panel. This whole piece is attached to the card front using dimensionals.
Inside the card I added another strip of the Real Red DSP/Silver Glimmer Paper to the lower edge of Whisper White card. I used a Real Red Stampin’ Write Marker to ink the words “and a happy new year” from the Christmas stamp in the Delightful Dozen stamp set and stamped it onto the Whisper White card.
I am quite delighted with the way this has turned out. What do you think?
Bye for now, Kris.
Make a Statement Digital Tour – Brisbane
Last Saturday I attended the Make a Statement Digital Tour – Brisbane with four of my customers and a fellow demonstrator. What a fabulous day. We were given step by step help to create a photobook using the Downtown Grunge Photobook which comes as part of your download when you purchase My Digital Studio. It was fun to be given ideas about how to add embellishments, change the opacity and even how to unlock the background elements which come as part of the page. The presenters were all fabulous and there were some great ideas to photograph to later inspiration. Here is one of the first pages we created. Of course, I did come home and play a little to move things to where I wanted them to be.
 Don’t you just love that Washi Tap and the background images. It’s so grungy but can fit just about any type of photos you want. I saw pages being made with baby photos, pet photos, bush camping photos, wedding photos.
If you haven’t checked out this programme you are really missing out. It is fun and easy to use and a great way of recording a special event in your life. You could print the pages individually and then add some additional embellishments to make a gorgeous hybrid page, or just leave it the way it is.
You get an amazing amount of content when you purchase this programme for the ridiculously low price of $27.72 (regular) or $25.95 (preferred). To get the preferred price, just visit my online store (or your own demonstrators online store) and create an account. Not only do you get a discount by shopping through your demonstrator but it is easy to see what downloads you have already purchased. The best part is that your can join a free online site to get ideas, ask questions or find out exactly what you get when you purchase this programme. The site also has an amazing array of short videos to help get you started. If you wish you can simply download the 30 day free trial to try before you buy.
I am looking forward to getting together with my customers and fellow demonstrators who have this programme to share ideas and creativity.
Bye for now, Kris.
Sunny Challenge 86/13
This week our challenge has been bought to us by Vicky and she wants us to make a shaped card. That’s it no sketch, no colour combo just make any kind of shaped card.
 My shaped card is made using the Label Collection Framelits. I cut the largest framelit from Whisper White card on the fold to make the card base and then cut another single large framelit from Whisper White for the card front. I cut the next size smaller framelit also from Whisper White card and embossed it using the Fancy Fan Embossing Folder. I attached these pieces together and then set out decorating the card front. I have only recently purchased the Stippled Blossoms stamp set so I thought I would play with it. I stamped the solid flower in Crisp Cantaloup and over stamped with the detail flower using Calypso Coral.
I created three large flowers and two small flowers and cut them all out. I stamped the leaves using Old Olive ink. I stamped off once for the solid leaf so that it would give a little more dimension. The leaves are also cut out. I stamped the greeting from the Bring on the Cake stamp set using Calypso Coral ink and punched it using the Scallop Oval Punch. I attached the greeting to a Extra Large Oval punched from Old Olive card and then attached the flowers and leaves to the card front around the greeting.
I created another small flower and two sets of the small leaves, cut them out and attached them on the inside of the card.
I think I may have overdone it with the flowers but thought I would share anyway. What do you think, is it too much?
Oh well, for some more inspiration visit Sunny Challenges and Creations and see what the design team has in store for you. Once you have created your card, pop back and add it to Mr. Linky. I will be interested to see what kind of shapes you create.
Bye for now, Kris.


