More Trimming The Tree

Today’s card uses the Trimming the Tree stamp set and the co-ordinating Tree Trimming Dies which are available to purchase during the month of September while supplies last. You can purchase a bundle if you don’t already have the stamp set or you can order the dies if you already have the stamp set. For today’s card I cut a card base from Smoky Slate card and attached a piece of Design A Daydream 12″ x 12″ Designer Series paper to the front panel. I used the Stitched Rectangle Dies to cut a piece from the card front. I also used the same die and a slightly larger die to cut Old Olive card to create a frame which I attached around the opening. I cut Basic White card to go inside my card and scored it in half and then scored one half in half again (hope that makes sense!). I stamped the banner image from the Trimming the Tree stamp set across the top of the inside panel using Old Olive ink.

I stamped one of the baubles from the Trimming The Tree stamp set three times beneath the banner image using Real Red ink. I also stamped the greeting from the Trimming The Tree stamp set using the same ink. I attached a piece of the same pattern Design A Daydream Designer Series Paper to the middle panel of the Basic White card. The whole piece is attached to the inside of the Smoky Slate card base, with the folds on the right hand side. I cut Basic White card using the same sized Stitched Rectangle Die as I used to cut the piece from the card front. I used the larger die which I used to create the frame for the card front to cut Old Olive card. I attached the Basic White rectangle to the Old Olive rectangle and using glue only on the folded section of Basic White card, attached the panel so that the Basic White rectangle sits inside the frame on the card front.

I cut the tree base from Early Espresso card using the Tree Trimming Die and attached it to the bottom of the Basic White rectangle. I stamped the more solid tree image from the Trimming the Tree stamp set onto Basic White card using Old Olive ink which I stamped onto scrap paper first. I stamped the more detailed tree image over the top using Old Olive ink. The image is cut out using the co-ordinating Tree Trimming Die. The tree is attached to the Basic White rectangle using dimensionals so that it sits slightly over the top of the tree base. I attached some Adhesive Sheet to the back of Real Red card and used the Tree Trimming Die to cut three baubles for the tree. I attached some Adhesive Sheet to the back of Gold Foil card and used the Tree Trimming Dies to cut three bows and one star. The bows are attached to the top of the baubles and the star to the top of the tree.
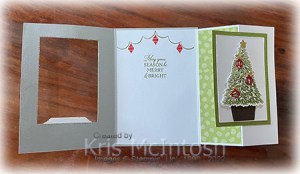
To finish off the card, I stamped “peace & joy” from the Trimming The Tree stamp set onto Basic White card using Real Red ink. The greeting is cut out using one of the label dies from the Tree Trimming Dies and attached to the card front.
I love how this card turned out and although the Designer Series Paper is not technically a Christmas paper, I think it works well for Christmas, don’t you? If you would like to make one of these cards you might like to visit Brenda Quintana here to get a better idea of how the mechanism works.
Bye for now,
Kris
Product Used:


