A Lovely Day
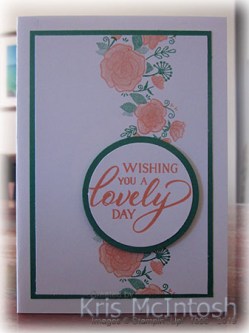
Today’s card is another that I have CASEd. I found this card by Amy Koenders on Pinterest and thought it was lovely and once more perfect for my classes. I stamped the floral image from the Forever Lovely stamp set onto the right hand side of Whisper White card using Grapefruit Grove ink. I stamped the leaf image around the flowers using Call Me Clover ink. I attached the stamped panel to Call Me Clover card and then scored and folded Thick Whisper White. I stamped the greeting from the Forever Lovely stamp set onto Whisper White card using Grapefruit Grove ink and punched it out using the 2″ Circle Punch.  I attached the greeting to a 2-1/2″ circle of Call Me Clover card and then the card front using dimensionals.
To decorate the inside of the card, I stamped the large single flower from the Forever Lovely stamp set using Grapefruit Grove ink.  I covered the stamped flower with a post-it-note mask and stamped the single leaf around the flower using Call Me Clover ink.
Thanks Amy for the inspiration, I love the way my card turned out. I have used more layers and bolder colours than Amy but isn’t that they way of things when we CASE something. We always seem to add our own twist to the card. Do you use the ideas you find on the internet to help you with your creating? I’d love to hear.
Bye for now,
Kris
Product Used:


Beautiful Kindness

I bought the Enjoy Life stamp set on my pre-order for the release of this year’s Annual Catalogue. I made a few samples for my Catalogue Launch and then put the stamp set away and promptly forgot about it. Today’s card was inspired by one I saw on Pinterest, although it doesn’t actually look anything like the card I saw! I stamped the starry background stamp from the Bokeh Dots stamp set using Balmy Blue ink onto Whisper White card. I stamped the silhouette image from the Enjoy Life stamp set using Memento Tuxedo Black ink. I also stamped the greeting which is from the same stamp set using Memento Tuxedo Black ink.  I attached the stamped panel to Balmy Blue card and then scored and folded Thick Whisper White card.
To decorate the inside of the card, I stamped the leafy/flower image from the Enjoy Life stamp set onto the lower left hand corner using Balmy Blue ink. I also stamped the greeting from the Enjoy Life stamp set using Memento Tuxedo Black ink.
A pretty simple card, but I love how the background works so well with the silhouette. I think I will make a few more cards just like this one.
Bye for now,
Kris
Product Used:


My Grandparents

Today’s page shows a photo of my Grandparents at their eldest daughter’s second wedding. It’s a lovely photo of them both and possibly the last one taken of my Grandfather who passed away very soon after this event.  I used Whisper White 12″ x 12″ card as the base and attached strips of the Come Sail Away Designer Series Paper. The photo is attached to Night of Navy card as is the journaling. I created the journaling on my computer, but I need to add a few dates, so it is only attached with repositional glue.
  I embellished the layout using hearts cut from Night of Navy card using the Be Mine Stitched Dies. I cherish this photo and love the way this page presents it.
What do you think? I really would love to know.
Bye for now,
Kris
Product Used:


Three Stages of Christmas
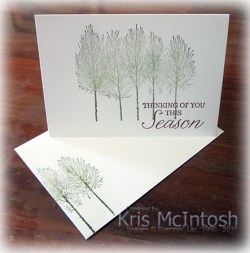
As a demonstrator I was able to have a browse through the soon to be released Holiday Catalogue, a demonstrator perk that I love. Anyway it got me thinking about Christmas and made me itch to create a Christmas Card. So I started very simply by stamping the multiple tree image from the Winter Woods stamp set onto a Whisper White Note Card using Mossy Meadow ink.  I stamped the greeting from the same stamp set onto the lower right hand corner using Merry Merlot ink. Simple but effective. I also stamped a little of the tree image onto the envelope.
 Then I thought, lets get a little more creative, so I stamped the multiple tree image from the Winter Woods stamp set onto the right hand side of Whisper White card using Mossy Meadow ink. I stamped the greeting onto the lower right hand corner of the card using Merry Merlot ink.
  I stamped the single tree image from the Winter Woods stamp set onto scrap Whisper White card using Mossy Meadow ink. The image is cut out using the co-ordinating In The Woods dies. I attached the single tree over the left hand edge of the stamped tree image. The panel is attached to scored and folded Merry Merlot card. I decorated the inside of this card by stamping the multiple tree image partially onto the lower left hand edge of Whisper White card.
 So now my creative juices are running hot, so I had to create another card just a little bit more stepped up. This time I stamped the multiple tree image from the Winter Woods stamp set onto Whisper White card as before and the greeting onto the lower right hand corner as before. I stamped the single tree image from the Winter Woods stamp set twice onto scrap Whisper White card using Mossy Meadow ink.
  I cut one full tree out using the co-ordinating In The Woods Dies and the second tree is cut using the die which actually cuts small panels that can be lifted to give the tree more dimension. I attached the full tree to the card front with the second tree over the top using tombow multipurpose glue and Mini Dimensionals under the “flaps”.
  The Whisper White card is attached to Merry Merlot card and then scored and folded Mossy Meadow card. To decorate the inside of this card, I stamped the single tree partially onto the lower left hand corner of Whisper White card. I also stamped a greeting from the Merry Christmas to All stamp set using Mossy Meadow ink.
Don’t they look lovely. I must admit, I love the multiple tree image, it looks Christmassy without feeling like it should be covered in snow. Suitable for an Aussie Christmas I believe, what about you?
Bye for now,
Kris
Product Used:


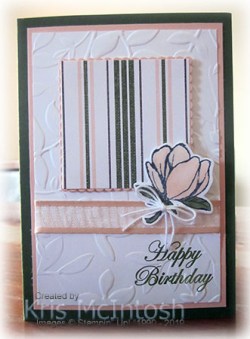
Central Panel Easel Card
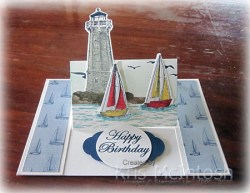
Today I am sharing a Central Panel Easel Card which has a card base cut from Thick Whisper White card. To create this card, you need to cut and score your card base as usual. Line up the edge of the card with the 1-1/4″ mark on our paper trimmer and cut from the score line to the edge. Line up the opposite edge of the card with the 1-1/4″ mark and cut from the score line to the edge. You need to make sure that both cuts are on the same side of the fold. The 1-1/4″ panels are glued to the back of the card and decorated with Come Sail Away Designer Series Paper. The central flap is scored roughly in half.  I stamped the sea image from the High Tide stamp set across the bottom of the central panel using Balmy Blue ink. I stamped the long skinny image from the Waterfront stamp set across the top of the water using Soft Suede ink. I made sure to line up the edge of the stamp the the left hand edge of the central panel. I sponged the rest of the central panel with Pool Party ink and stamped the bird image from the High Tide stamp set over the sponged area using Night of Navy ink. I stamped the lighthouse from the Sailing Home stamp set onto scrap Whisper White card using Memento Tuxedo Black ink. I added some colour using the Soft Suede and Sahara Sand Stampin’ Write Markers. I cut out the image using the co-ordinating Smooth Sailing Die and attached the lighthouse over the stamped Soft Suede image, making sure that the glue did not extend above the score line.
 I stamped the small sailing boat image from the Sailing Home stamp set onto scrap Whisper White card using Memento Tuxedo Black ink and added some colour using the Balmy Blue, Daffodil Delight and Poppy Parade Stampin’ Write Markers. The boats were cut out using the co-ordinating Smooth Sailing Die. One boat is attached to the right hand side of the stamped sea image, making sure that the glue does not go above the score line. The second boat is attached to the card using dimensionals.
I stamped “happy birthday” from the Magnolia Blooms stamp set onto scrap Whisper White card using Night of Navy ink and cut it out using one of the Layering Circles Dies. I attached the greeting to Night of Navy card punched using the Pretty Label Punch. The greeting is attached to the inside of the card using dimensionals.
I am very happy with the way this card turned out. Have you tried to make one of these, they are really quite simple once you know how but oh so gorgeous AND they fold flat to go in a standard envelope!
Bye for now,
Kris
Product Used:


Balmy Birthday
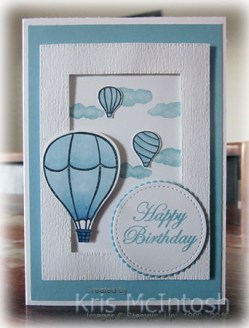
I found a lovely card on Pinterest by Cornelia Janssen which was the inspiration for this card. I attached Balmy Blue card to scored and folded Thick Whisper White card. I cut a frame from Whisper White card using the Rectangle Stitched Frames which I embossed using the Subtle 3D Embossing Folder. I stamped the clouds from the Above the Clouds stamp set onto Whisper White card using Balmy Blue ink. I attached the stamped panel to the back of the frame using dimensionals before attaching the whole piece to the card front. I stamped the large balloon onto scrap Whisper White card using Memento Tuxedo Black ink and punched it out using the Hot Air Balloon Punch. I stamped the basket image from the Above the Clouds stamp set onto scrap Whisper White card and punched it out using the Hot Air Balloon Punch. I coloured the image using Balmy Blue and Light Night of Navy Stampin’ Blends. I stamped the small balloons from the same stamp set onto scrap Whisper White card, coloured them using the Balmy Blue Stampin’ Blends and then cut them out.
  I attached the two small balloons over the stamped clouds and the large balloon to the left hand side of the card front, partially over the frame using dimensionals. I stamped “happy birthday” from the Magnolia Blooms stamp set onto Whisper White card using Balmy Blue ink and cut it out using one of the circles from the Stitched Shapes Dies. I attached the greeting to a Balmy Blue scalloped circle cut using the Layering Circles Dies and then the card front, partially over the frame using dimensionals.
To decorate the inside of the card, I stamped the cloud image from the Above The Clouds stamp set using Balmy Blue ink. I stamped the greeting from the Itty Bitty Birthdays stamp set over the clouds using Memento Tuxedo Black ink.
Thank you so much Cornelia for the inspiration. I love this card.
Bye for now,
Kris
Product Used:


Pretty Floral

The more I look at the Perennial Essence Product Suite, the more I fall in love. The Perennial Essence Designer Series Paper is absolute stunning and as you have seen in previous projects doesn’t need much additional product to create a beautiful card. I also love the flowers in the Floral Essence stamp set. So much detail and no extra steps to achieve it. Anyway, I decided to have a little play with these products and this is what I created. I embossed Whisper White card using the Pinewood Plank 3D Embossing Folder and attached a piece of the Perennial Essence Designer Series Paper across the bottom of the embossed card.  I wrapped the top of the Designer Series Paper with the absolutely gorgeous Petal Pink 5/8″ Organdy Striped Ribbon. The whole panel is attached to scored and folded Blackberry Bliss card. I stamped the large and small flower onto scrap Whisper White card using Blackberry Bliss ink. I added the flower centres using Crushed Curry ink and then fussy cut each flower. I stamped the three leaf image onto scrap Whisper White card using Mossy Meadow ink. The leaves are punched using the leaf punch which carried over into this catalogue.
  So even though it doesn’t mention it in the stamp set description this punch fits the leaves. After punching out the leaves, I attached them to the flowers and then the card front. The small flower is attached using dimensionals. I didn’t add a greeting to the card front, I just wanted each of the elements to be the focus.
To decorate the inside of the card, I stamped the greeting “you are like a diamond, Resilient, Strong, and Beautiful” from the Strong and Beautiful stamp set using Blackberry Bliss ink.
I don’t believe that you could create a card using these products that doesn’t look amazing. Have you tried this product suite, if not, why not?
Bye for now,
Kris
Product Used:


Family Memory Page

Today’s page showcases a photo of my Dad (back row right) with his Mum and Dad, sister and brother. His sister only just made it into the photo and everyone except Dad look very unhappy, but I wanted to use this photo in my Family Memory Keeping Album. The layout was inspired by a page I saw on Pinterest. I added some Shimmery White Embossing Paste to a Clear Block and added a drop of Crumb Cake Classic Stampin’ Ink Refill. I used one of the Party Decorative Masks to add some interest across the Very Vanilla 12″ x 12″ page. I embossed a large piece of Smoky Slate card using the Bricks and Mortar 3D Embossing Folder and added it over the embossed area. I attached my photo to Sahara Sand card and then the page. I stamped the image from the Tasteful Textures stamp set onto Very Vanilla card using Crumb Cake ink. I cut out the image using one of the ovals from the Stitched Shapes Dies. I attached the image to a Crumb Cake scalloped oval cut using the Layering Ovals Dies. I stamped a greeting from the retired Part of My Story stamp set onto Very Vanilla card using Memento Tuxedo ink and fussy cut out the word “family”. I cut Very Vanilla card using the Classic Label Punch which I punched twice to get a smaller label. I attached “family” to the Classic Label and then the centre of the stamped panel.
I will add my journaling after consultation with my Dad about the why’s and where’s etc of the photo.
I really love the way this page turned out and I am so glad that I have another memory shared for my family.
Bye for now,
Kris
Product Used:
I don’t know why I can’t bring up an image for the Layering Ovals Dies but the item no. is 141706.


AWLSU034
I belong to a Facebook page called Aussies Who Love Stampin’ Up!. This page is open to everyone who loves Stampin’ Up! not just demonstrators. They have a sketch challenge at the moment and I decided to use the sketch to create a birthday card for a friend who recently celebrated her birthday. I stamped the greeting from the Magnolia Blooms stamp set onto the lower right hand corner of a piece of Whisper White card using Mossy Meadow ink before embossing using the Layering Leaves 3D embossing folder. I wrapped the embossed card with the Petal Pink 5/8″ Organdy Striped Ribbon before attaching to Petal Pink card. The whole panel is attached to scored and folded Mossy Meadow card. I cut a piece of Magnolia Lane Designer Series Paper using the Squares Layering Dies and attached it to a Petal Pink scalloped square cut using the same dies. The Designer Series Paper square is attached to the card front using dimensionals.
 I stamped the small flower from the Good Morning Magnolia stamp set onto scrap Whisper White card. I coloured the flower using Petal Pink and Mossy Meadow Stampin’ Blends. I cut out the flower using the co-ordinating Magnolia Memory Dies and attached the flower to the card front using dimensionals so it sits partially over the Designer Series Paper. I tied a bow in a double length of Whisper White Baker’s Twine and attached it to the flower using a rolled up Mini Glue Dot.
To decorate the inside of the card, I stamped the greeting from the Perennial Birthday stamp set onto Whisper White card using Mossy Meadow ink. I punched a narrow strip of Mossy Meadow card using the Decorative Ribbon Border Punch and attached it behind one long edge of the same pattern of Magnolia Lane Designer Series Paper. The panel is attached to the bottom of the stamped Whisper White card.
I love the end result using this sketch, don’t you. Thanks AWLSU for the inspiration.
Bye for now,
Kris
Product Used:


Simple Diorama

Today’s card was inspired by the multilayer diaorama card I shared with you all earlier. I wanted to create something similar that was also a little easier to achieve. For this card you only need two pieces of card. I used Whisper White as the card base and stamped the sea image from the High Tide stamp set across the centre using Bermuda Bay ink. I cut an oval from the other piece of Whisper White card using the Layering Ovals Dies. The card pieces are cut to standard card size and scored at 1/2″ and 1″ on either end. I stamped the small sailing ship from the Come Sailing stamp set three times onto Whisper White card using Night of Navy ink and cut them out using the co-ordinating Sail Away die. I stamped the lighthouse from the Come Sailing stamp set onto Whisper White card using Night of Navy ink and cut it out using the co-ordinating die.
  I attached the lighthouse to the left hand side of the oval cut out and one of the sailing ships to the right hand side of the oval cut out. Laying this piece over the stamped piece for placement, I attached another of the sailing ships to the stamped background. I did want to add a little more dimension to this card, so I attached the last sailing ship to a strip of Window Sheet and holding the pieces together for placement, trimmed the Window Sheet so that the ship would sit between the other two sailing ships. The Window Sheet is attached between the right hand sides of the card.
I didn’t add a greeting and I probably should have stamped some birds onto the background piece but I like the simplicity of this card and the fact that it would be easy to create. I’d love to hear what you think.
Bye for now,
Kris
Product Used:
I can’t seem to get the Layering Ovals Dies to show up as an icon but you can see it in my store.


